
Related Manuals for Rini RiEye Mk2S Series


Summary of Contents for Rini RiEye Mk2S Series
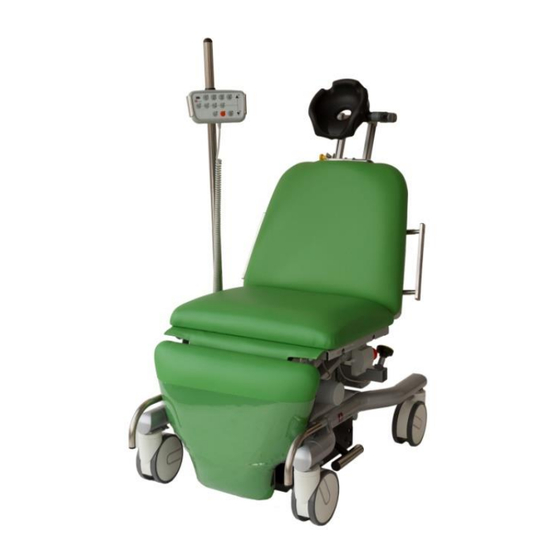
- Page 1 Service manual Operationsbord RiEye Mk II 100-00101-0n Operating table RiEye Mk2S - Model R5 100-00105-05 - Model R6 100-00105-06 - Model R7 100-00105-07 2011-0118 8-594 771 70...
-
Page 2: Table Of Contents
Operating table RiEye Mk2S Table of content Introduction ..................3 Warning and lables ................3 Product identification label .............. 4 Safety ....................5 Preventive service and maintenance ..........5 Checklist for annual service ............6 Periodic maintenance and check ........... 7 Spare parts and repairs.............. -
Page 3: Introduction
This Service Manual covers the RiEye Mk2S operating table of: Mechanical release from serial number 0001-01 Software release from v1.0 In you have any questions or suggestions, please contact Rini direct at e-mail: support@rini.se or your local Rini distributor. 2. Warning and lables The operating table should only be used as it is intended to as described in the user guide. -
Page 4: Product Identification Label
Operating table RiEye Mk2S 3. Product identification label The label is located on the product and shows the product part number and its unique serial number. For questions about this product, always specify these numbers to facilitate identification. Main unit Foot control (optional accessory) -
Page 5: Safety
• Check of cushions quality and damages to avoid bacteria traps • Check of electrical equipment, battery status and battery charger In the case of service being carried out by a Rini distributor or by technical staff at the end user it is important that a service record with... -
Page 6: Checklist For Annual Service
Operating table RiEye Mk2S 5.1 Checklist for annual service a. Inspect the brake function, adjust if necessary b. Inspect the guide barrier, adjust if necessary c. Lock the wheels, use the hand control and run the table between its end positions, listen so it’s no unusual sounds, in the actuators, column or bearings. -
Page 7: Periodic Maintenance And Check
The following list is a set of typical spare parts for the RiEye Mk2S operating table. In the last column it is noted if this spare part is included in one or Rini’s spare part kits. SPK1 – User with single RiEye Mk2S and with limited technical skill SPK2 –... - Page 8 SPK1/2 010-00333-00 Tightening tool SPK1/2 headrest 000-05269-00 Headrest standard SPK1/2 Standard Contact Rini for spares for special models XL Cushions (100mm wider), other colours etc 010-00674-00 Snap lock for seat 010-00673-00 Snap lock for chassis 000-05285-00 Cushion back RiEye blue...
- Page 9 Armrest pillow black 000-03461-01 Armrest pillow grey The above list is not complete. Please contact Rini or your local Rini distributor for more detailed information regarding spare parts for your product. The product should only be repaired by Rini or by Rini authorized service center/engineer.
-
Page 10: General Overview
Operating table RiEye Mk2S 6. General overview Location of main components of RiEye Mk2S (R7) a. Control unit item 010-01058-00 is located under the seat. Lift cushion and unscrew 4 snap locks M10. Remove plastic cover and cables. b. Leg rest powered by one actuator item 010-00976-00 c. -
Page 11: Electrical Architecture
Operating table RiEye Mk2S 7. Electrical architecture... -
Page 12: Trouble Shooting And Solutions
Operating table RiEye Mk2S 8. Trouble shooting and solutions This section is divided in practical guides to deal with possible service actions needed. 8.1 Software update – by control unit replacement See chapter Control unit – replacement below. 8.2 Control unit – replacement The control unit holds the complete software program from version 1.1 upwards. - Page 13 Operating table RiEye Mk2S d. Mark the connectors so they can be put back in the same order and then unplug them. e. Put back the contacts in the same order. Check that all cables are wired correctly and not squashed. f.
-
Page 14: System Synchronisation
Operating table RiEye Mk2S 8.3 System synchronisation “System synchronisation” is used to reset the positions of all actuators so the system starts from a defined initial state and dynamic motion of operation. The system synchronisation involves all columns and actuators. The below system synchronisation is always made in the factory before delivery. - Page 15 If not please don’t continue to work after this instruction, call Rini technical support. To set the actuator brake lever position, start position for this setting instruction is the wheel in direction control after the synchronization process above is made.
-
Page 16: Set And Change Factory Stored Positions
Operating table RiEye Mk2S e. When the brake lever position is found (3-4 mm stop from the wheel frame), check that all four wheels are locked. Then press simultaneously the Brake button and the S-button, keep them pressed, a pep sound shall be heard. Keep both buttons pressed until the pep is changed to a constant pep, approximately after 5 seconds. -
Page 17: Set Anaesthesia Position, "Level 0", Button
Operating table RiEye Mk2S is changed to a constant pep, approximately after 5 seconds. Now the old position is cleared. b. To set a new leg rest limitation. Push any bottom to activate the system, lamps should light up. Then push simultaneously the S button and the leg rest button (below button 2) and keep them pressed, a pep sound shall be heard. - Page 18 Operating table RiEye Mk2S Put the table on flat floor and in a location with sufficient space around that the table can be put in all its position (sitting, flat etc). Be careful and take preferably take pictures so the strapping of cables is identical after replacement.
-
Page 19: Adjusting The Headrest
Operating table RiEye Mk2S a. Tip the Mk2S on carefully on the side and remove the 4 screews from the broken column b. Remove the broken column and insert the new one and tight the 4 screws again, tip the Mk2S back on the wheels again. c. -
Page 20: Replacing A Wheel
Operating table RiEye Mk2S Use the tightening tool again, now to tighten the lock mechanism. This is done with two nuts one with right and one with left thread. This should be done so the friction starts almost when the handles bar is fully open Put back a new tightening plate (they are of one time use and usually break when removed) to lock the new position and verify that the... - Page 21 Operating table RiEye Mk2S a. Secure the table and put a support underneath the centre pieces of the chassis so the wheel that needs to be exchanged is in the air with approximately 100mm margin. Set the brake level in the middle neutral position.
- Page 22 Operating table RiEye Mk2S d. Take the new wheel and verify that it is in the middle neutral position. It should not be locked or in directional mode! Use some appropriate tool for this. Then put on the wheel adaptor piece and carefully stick in the brake shaft.
-
Page 23: Replacing Backrest
Operating table RiEye Mk2S Re-assemble and make sure the wheel adaptor is fully retracted. Tighten the screws but not fully as the final tuning must be done with the table standing on a 100% flat floor. g. When the table is standing on a 100% flat floor move the wheel adaptor angel so that both wheel paths are firmly on the floor. - Page 24 Operating table RiEye Mk2S b. Remove lock washers holding the 2pcs hinge bolts, use two screw drivers and press the lock washer out from the hinge bolt axis. c. Remove the backrest actuator lock and bolt. One person holds the backrest and a second person carefully take out the hinge bolds by a screwdriver.
-
Page 25: Cleaning And Disfection
Operating table RiEye Mk2S d. Hold the new back rest in position and assemble the 2pcs hinge bolds and lock put back the lock washers by a screwdriver. e. But back the backrest actuator bolt and lock. f. Slide back the headrest foundation into the back rest, check so its locks ok. -
Page 26: Cleaning And Disfection
Operating table RiEye Mk2S Detail Disinfectants Information Cushions and other Virkon 1 % concentration parts of leatherette (and most other Moderate alcohol dry and crack disinfectants without the seat and back material and alcohol) should not be used Hand control and Noedischer Dekonta 1-3 % concentration other electronics... -
Page 27: Disinfection
Operating table RiEye Mk2S Details Detergent Information Use damp cloth (if the charger is mounted vertically, wet brush can be used.) Battery charger Water Note! Do not flush with water under pressure 9.2 Disinfection Clean the table with disinfectant or germicidal agents according to the manufacturer’s instructions and follow the hospital's or clinic's protocol for cleaning of body fluids off the table's surface. -
Page 28: Electromagnetic Emission And Immunity
Operating table RiEye Mk2S Backrest angle vertical to -20 Legrest angle /-45 /-35 (model R5, R6, R7) Trendelenburg position (relative horizontal position of head) Material Stand and frame Powder coated metal Cushions Med tech material available in different colours Accessory rail Stainless steel Memory positions 4 user selectable... - Page 29 Operating table RiEye Mk2S RF emissions Class B RiEye Mk2S is suitable for use CISPR 11 in all establishments including domestic establishments and Harmonic emissions those directly connected to the IEC 61000-3-2 public low-voltage power supply network that supplies buildings used for domestic Voltage fluctuations/flicker purposes.
- Page 30 Operating table RiEye Mk2S Guidance and manufacturer’s declaration – electromagnetic immunity continuing… Immunity test IEC 60601 test Compliance Electromagnetic environment level level - guidance Portable and mobile RF communications equipment should be used no closer to any part including cables than the separation distance calculated from the equation applicable to the frequency of the transmitter.
-
Page 31: Disposal And Recycling
11. Disposal and recycling The product is mainly made from environmentally recyclable materials as steel, stainless steel, aluminum and plastics. Rini recommends that the material be sorted and recycled in connection with the destruction of the product. Electronic parts and cables shall be handled as electronic waste in accordance with local requirements. - Page 32 Rini Ergoteknik AB Fågelsångsvägen 3B SE-186 42 Vallentuna Sweden Phone +46 8 594 77170 Email info@rini.se www.rini.se...
Need help?
Do you have a question about the RiEye Mk2S Series and is the answer not in the manual?
Questions and answers