
Subscribe to Our Youtube Channel
Related Manuals for Synthes USS II Polyaxial


Summary of Contents for Synthes USS II Polyaxial
- Page 1 USS II Polyaxial. The Versatile Polyaxial Solution for the Universal Spine Systems. Technique Guide...
-
Page 3: Table Of Contents
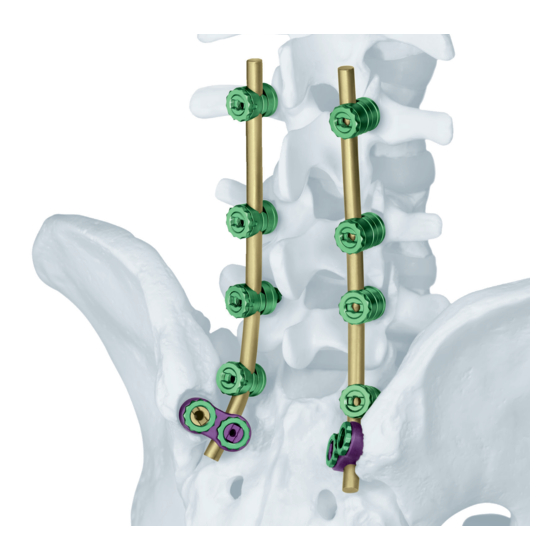
Implants Instruments Surgical Technique Dismantling Instructions Bibliography Image intensifier control Warning This description is not sufficient for immediate application of the instrumentation. Instruction by a surgeon experienced in handling this instrumentation is highly recommended. Synthes USS II Polyaxial Technique Guide... - Page 4 USS II Polyaxial. The Versatile Polyaxial Solution for the Universal Spine Systems. USS II Polyaxial combined with USS II Ilio-Sa- tive diseases as well as for correcting defor- cral enables a construction to be fabricated mities. The implants are compatible with all from the thoracolumbar spine to the pelvis.
-
Page 6: Ao/Asif Principles Of Internal Fixation
Preservation of blood supply Creation of an optimal environment for fusion. Early, pain-free mobilisation Minimization of damage to the spinal vasculature, dura and neural elements, which may contribute to pain reduction and improved function for the patient. Synthes USS II Polyaxial Technique Guide... -
Page 7: Indications And Contraindications
Indications and Contraindications Indications USS II Polyaxial is indicated for use in the thoracic and lumbar spine, as well as for ilio-sacral fixations (T1–S2). It is indicated for the posterior treatment of: – Degenerative diseases – Deformities in combination with USS II or USS Low Profile pedicle screws –... -
Page 8: Implants
Implants The USS II Polyaxial system consists of the following implants: – Pedicle screws – Cancellous bone screws – Polyaxial 3-D heads – Sleeves Pedicle screws with dual core, titanium alloy (TAN) Art. Nos. Lengths Colour 04.607.010 – 014* 4.2 mm 20 –... -
Page 9: Instruments
3.0 mm, with T-Handle 03.607.003 USS II Polyaxial Holding Sleeve for No. 03.607.001 03.607.002 Screwdriver Shaft for USS II Polyaxial cancel- lous bone screws with lengths ≥ 70 mm 03.607.006 USS II Polyaxial Handle for Screw Holder 03.607.005 03.607.000 USS II Polyaxial Reamer 03.607.005... - Page 10 03.607.004 USS II Polyaxial Positioning Pliers for 3-D Heads 03.607.007 Positioner for Screw Holder 03.607.005 03.607.008 Socket Wrench, bihexagonal, 11.0 mm, self-holding, with straight handle Synthes USS II Polyaxial Technique Guide...
- Page 11 03.607.009 USS II Polyaxial Rod Introduction Pliers for Rods 6.0 mm and 5.0 mm 03.607.012 USS II Polyaxial Remobilizing Instrument 03.607.013 Stop Sleeve for Remobilizing without Rod 03.607.014 Hollow Reamer 12.6 mm for USS II Polyaxial Additional instruments 388.143 Socket Wrench 5.0 mm, with T-Handle...
-
Page 12: Surgical Technique
. With the Pedicle Awl, open the cortex of the pedicles to a depth of 10 mm. Continue opening the pedicles using the Pedi- cle Probe 3.8 mm. Determine the lengths of the USS II Polyaxial screws. Note: If screws 7.0 mm are implanted as the first screws, use the Pedicle Probe 4.8 mm. - Page 13 Prepare seat for 3-D heads Required instruments USS II Polyaxial Reamer 03.607.000 Screwdriver, bihexagonal, 3.0 mm, with T-Handle 03.607.001 Apply the Reamer guided by the Screwdriver over the head of the screw. To ensure free movement of the polyaxial 3-D head, either ream away excessive bone or back-out the screw until the red mark is visible.
- Page 14 Required instruments USS II Polyaxial Screw Holder 03.607.005 USS II Polyaxial Positioning Pliers for 3-D Heads 03.607.004 Note: If more than one level has to be fused, it is recommended to check the required curvature of the rod before inserting the 3-D heads.
- Page 15 388.440 Optional instruments Bending Pliers with Rolls for USS Rods 6 mm, length 300 mm 388.960 USS II Polyaxial Handle 03.607.006 Positioner for Screw Holder 03.607.007 Determine the length and curvature of the rods. The ± 25° polyaxial flexibility of the screw heads compensates a lateral screw offset up to +/- 5.1 mm.
- Page 16 Optional: Align rod and screw head with Rod Introduction Pliers Required instruments Support for Rod Introduction Pliers 388.615 USS II Polyaxial Rod Introduction Pliers 03.607.009 USS Sleeve Pusher 388.502 Spreader Forceps for USS and Click’X, length 330 mm 388.410 If necessary, use the Rod Introduction Pliers to align the rod with a screw head.
- Page 17 03.607.008 USS II Polyaxial Handle 03.607.006 USS II Polyaxial Screw Holder 03.607.005 Use the self-holding Socket Wrench to pick up a sleeve and nut from the loading station. Slide them over the Screw Holder onto the screw head, and tighten the nut slightly. Although the rods are now secured in the side-opening of the screw, the 3-D heads still remain mobile.
- Page 18 USS II Polyaxial Screw holder 03.607.005 Note: Always apply the Screw Holder as a guide. In the following situations, the USS II Polyaxial heads can be remobilized with the Remobilizing Instrument: 1. Head with rod introduced Loosen the nut with the Socket Wrench as far as possible.
- Page 19 2. Head without rod Apply the Stop Sleeve over the polyaxial head. Then apply the Remobilizing Instrument as described before. Note: If the head has to be removed, remove nut and sleeve using the Socket Wrench. Remove the rods. Apply the Remobi- lizing Instrument as described above without inserting the Stop Sleeve.
- Page 20 Synthes USS II Polyaxial Technique Guide...
-
Page 21: Dismantling Instructions
Dismantling Instructions 03.607.005 USS II Polyaxial Screw Holder... - Page 22 03.607.003 USS II Polyaxial Holding Sleeve for 03.607.001 Synthes USS II Polyaxial Technique Guide...
- Page 23 03.607.002 Screwdriver Shaft for USS II Polyaxial cancellous bone screws with lengths ≥ 70 mm...
- Page 24 03.607.012 USS II Polyaxial Remobilizing Instrument Synthes USS II Polyaxial Technique Guide...
- Page 25 03.607.006 USS II Polyaxial Handle for Screw Holder 03.607.005...
-
Page 26: Bibliography
[1] Müller ME, Allgöwer M, Schneider R, Willenegger R (1991) AO Manual of Internal Fixation. 3rd ed. Berlin: Springer [2] Aebi M, Thalgott JS, Webb JK (1998) AO ASIF Principles in Spine Surgery. Berlin: Springer Synthes USS II Polyaxial Technique Guide... - Page 28 Ö036.000.216öAC*ä Synthes GmbH Eimattstrasse 3 CH-4436 Oberdorf All technique guides are available as PDF files at 0123 www.synthes.com www.synthes.com/lit...
Need help?
Do you have a question about the USS II Polyaxial and is the answer not in the manual?
Questions and answers