Advertisement
Advertisement
Table of Contents

Related Manuals for Innova Ephoca HPAC 2.0


Summary of Contents for Innova Ephoca HPAC 2.0
- Page 1 INSTALLATION MANUAL 2020...
- Page 2 ATTEN TION Please read this entire guide (both the installation and operation portions) thoroughly prior to installation. Pay careful attention to all safety warnings and notices. As a professional installer you have an obligation to know the product better than the customer. We cannot overemphasize the importance of proper installation.
-
Page 3: Installation
CO NTE NTS NOMENCLATURE CHECKLIST SAFETY WARNINGS GENERAL EXTERIOR GRILLES INCLUDED INSTALLATION PARTS UNIT COMPONENTS INSTALLATION RULES SIDE WALL MOUNTING OPTION OCCUPANCY SENSOR CONNECTION PREPARATION OF WALL CONDENSATION DRAIN OPTIONS IN-WALL CONDENSATE DRAIN DIRECT EXTERNAL DRAIN INSTALLATION NEBULIZER 3.0 CONDENSATE ATOMIZER INSTALL WALL MOUNT CONTROLLER HIGH WALL CONFIGURATION MOUNTING THE UNIT... - Page 4 NOMENC LAT UR E 1, 2 6, 7 Basic System Controller HPAC 2.0 On-board Wall mount System Type Corrosion Protection Heat Pump Only Standard Heat Pump + Electric Resistance Heat Corrosive Environment Heat Pump with Integrated FCU Condensate Removal Capacity Range 3,139²...
- Page 5 CHECKLI ST PRE INSTALLATION Determine type of exterior grille Determine location of unit Determine type of condensate drain (if used in heat mode) Check for proper electrical connection INSTALLATION Holes for vents drilled per XVentBox instructions Seal around XVentBox sleeve Condensate drain connected Wall bracket securely hung Compressor unlocked...
- Page 6 first. • Do not install outdoors. • Do not modify the safety or adjustment devices without written authorization from Innova. • Repairs or maintenance must be performed by qualified personnel in accordance with this manual. • Do not modify or tamper with the unit as this could create dangerous situations.
- Page 7 WARNING EXCESSIVE WEIGHT HAZARD Use two people when lifting and installing the unit. The unit is unbalanced on the right (compressor side) Failure to do can result in back or other injury. WARNING REFRIGERATION SYSTEM UNDER HIGH PRESSURE Do not puncture, heat, exposed to flame or incinerate. This can result in damage to the unit, damage to property, personal injury or death.
- Page 8 EX TERIOR G RI LLES Exterior vents by XVentBox are required for the installation and are supplied by Ephoca. The style and type will vary from site to site. These grilles will be shipped separately. All grilles can be color matched to any Benjamin Moore color. Retrofit For all retrofit installations use the 6ILS-8F xventbox.com/work/6ils/...
- Page 10 INCLUD ED I NSTALLAT I ON PA R TS The parts below are included in the packaging and are required for installation. If a part is missing, please contact Customer Service. Bracket for wall mounting Template for holes Wall mount touch controller* * For models with wall controller instead of onboard controller...
-
Page 11: Unit Components
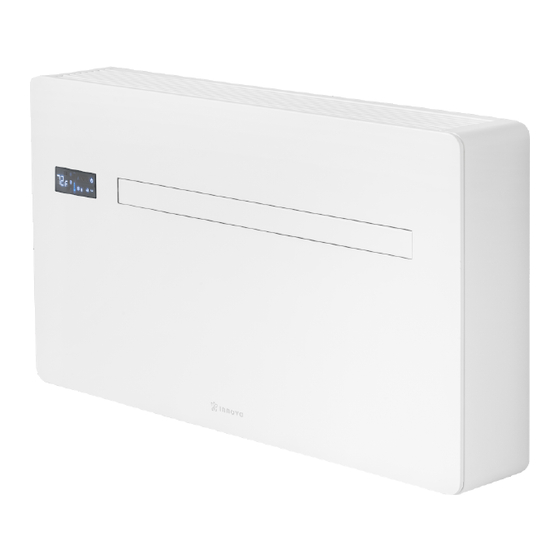
UNIT COMPO NEN TS Ventilation filter Adjustable air louver Condensate drain pipe Touch screen display Temperature sensor Front cover panel 10 Power supply terminal block Outdoor air suction Side panels Outdoor air outlet Anti-lifting bracket Internal air intake grille... -
Page 12: Installation Rules
The unit must be attached to a wall of material suitable of supporting the weight of the unit. • If using the Innova Nebulizer for condensate removal the unit must be mounted a minimum of 9.5” from the floor to accommodate the height of the nebulizer. - Page 13 2.5” 8.0” 2.5” Unit should be installed no closer than 8” from the ceiling and no closer than 2” from the floor. Leave a minimum of 2.5” on the side of the unit. 2.0” WARNING FALLING OBJECT HAZARD Failure to mount the unit securely can result in property damage, injury or death.
- Page 14 SID EWALL ADAPTE R (SW A ) Where it’s not feasible or practical to mount the HPAC 2.0 on an exterior wall, HPAC 2.0 can be mounted on a wall perpendicular to the exterior using the SWA. The SWA is recessed into the wall and includes additional fans that assist the supply and exhaust air through the bend.
- Page 15 OCCU PANC Y SEN S OR CONNECT IO N HPAC 2.0 can be connected to an occupancy sensor such as; open window contact, on/off remote, infrared presence sensors, enabling badge, etc. to activate and deactivate the unit. When the contact opens (very low voltage, connected to a free non-live contact) the unit is placed in standby mode and CP displays on the screen (note, CP stand for Contatto Presenza - Contact Present in Italian) Use only double insulated cable.
- Page 16 P R EP ARATIO N Once the location for the unit has been determined following all the requirements follow these steps: STEP 1 Attach the mounting template to the wall with tape STEP 2 Drill the holes for the XVentBox in accordance with the specifications of the grille style you are using.
- Page 17 N OTES...
- Page 18 This is the easiest type of drain where the condensate drips straight outside. NEBULIZER: Innova offers an optional nebulizer kit, which atomizes the condensate in heat mode as a fine mist through an additional exterior hole. Follow appropriate instructions on the following pages depending on your particular type of installation.
- Page 19 IN-WALL C ONDENSA TE DR AI N For optimum performance and aesthetics, when possible use an internal wall drain. STEP 1 Have licensed plumber install a PVC drain pipe with a minimum 3/4” inside diameter and a 45 Degree fitting at the top. The mouth of the 45 degree fitting should be lined up with the condensate hole on the template STEP 2 Test the drain by pouring water into it...
- Page 20 DIRECT EXTER NAL D RA IN Make sure to check applicable local laws if this is type of drainage is permissible. Check that the expelled water does will cause any damage or problems to people or objects. During winter, this water may create sheets of ice outside. Drainage is by gravity only.
- Page 21 STEP 1 Make sure hole is set a 3 degree downwards angle STEP 2 Place the rubber drain pipe inside the hole STEP 3 Wrap the portion of rubber drain pipe located inside the room with % inside diameter anti-condensation insulating material. STEP 4 Properly seal the pipe penetration using best practices based on the application and materials.
- Page 22 NEB ULIZER 3.0 AT OMI ZE R Innova off ers an optional nebulizer kit, which atomizes the condensate in heat mode as a fi ne mist through an additional exterior hole. For complete instructions see the manual packaged with the nebulizer.
- Page 23 WALL MOUN TED CO NT RO LLE R The wall mount controller is used to control all functions and programing of the unit. The cord is 19’ long. STEP 1 Determine location for wall mounted controller, making sure that cord is suffi cient. STEP 2 Run the wire from the unit to the location selected for the wall mounted controller.
- Page 24 HIG H WALL C ONF I G URA T ION HPAC 2.0 can be installed close to the floor or near the ceiling (high wall). The unit is factory configured for floor and high wall installation, where the air flow is directed upwards. This works well for heating and cooling in floor installations and cooling only in high wall installations (coanda effect).
- Page 25 STEP 5 Remove the screws from the right-side louver support bracket STEP 6 Rotate the right-side louver support bracket 180° STEP 7 Reinstall the right-side louver support bracket screws STEP 8 Reinstall the front cover panel STEP 9 Replace the grill STEP 10 Connect the power and turn unit on STEP 11...
-
Page 26: Mounting The Unit
MOU NT IN G TH E UNI T After checking that the bracket is securely anchored to the wall and that all necessary electrical connections and condensate drain preparations are completed, you can mount the unit on the wall. STEP 1 Lift the unit by the sides of the bottom base until it clips onto the two prongs of the bracket. - Page 27 REMOVIN G CO MPR ESSOR L OCK To prevent the compressor and the pipes from moving during transportation and installation, a bracket is used to lock the compressor. This bracket must be removed before starting up the compressor. Under the unit, on the right side, by the red label, there are two wing nuts that must be completely unscrewed, and removed to free the compressor.
- Page 28 LCDI P OWER C ORD CONNE CT I ON HPAC 2.0 is equipped with a power cord and LCDI (Leakage Current Detection Interrupter) power cord. If using a power socket near the unit, simply insert the plug. Before connecting the unit check that: •...
- Page 29 H ARDWI R ED CO NN ECT I ON HPAC 2.0 can be hardwired to the correctly sized circuit breaker. When doing so make sure to check local codes. Mount a junction box behind the unit as indicated on the template. A junction box provides a protected enclosure for electrical connections (required by some electrical codes) Follow national or local codes regarding flush, surface or recessed mounting of boxes.
-
Page 30: Programming Features
P R OG RAMMI NG FEAT U RES For systems with an onboard touch controller, use these instructions to set display brightness, temperature limiting and cool or heat only modes. For all set-up and programing refer to the user guide. For Wall mounted touchy controller continue to page 32. - Page 31 COOL OR HEAT ONLY MODE This mode restricts the system to Heating Only or the Cooling Only modes. To enable Cooling Only press and hold the A key for 12 seconds until HC appears on the Display. Press the A key again for 5 seconds, Co will display. Wait for three seconds without touching anything for the HPAC 2.0 to memorize the setting and return to normal operations.
- Page 32 P R OG RAMMI NG FEAT U RES For systems with a wall mounted controller use these instructions to set display brightness, temperature limiting and cool or heat only modes. For all set-up and programing refer to the user guide. DISPLAY BRIGHTNESS The Display Brightness sensor is factory-set to automatically adjust to the light of the room.
- Page 33 TEMPERATURE LIMITING (HOTEL MODE) This mode restricts the temperature setting to 71.5°F to 82.5°F in cooling mode and 61°F to 75°F in heating mode. It also disables dehumidification mode and automatic mode. TO ENABLE RESTRICTED MODE When the system is off, press and hold the Power Key for 10 seconds until appears.
- Page 34 COOL OR HEAT ONLY MODE This mode restricts the system to Heating Only or the Cooling Only modes. TO ENABLE COOLING ONLY When the system is off, press and hold the Power Key for 10 seconds until appears. Press the key until appears.
- Page 35 N OTES...
-
Page 36: Problems And Solutions
PRO B LE M S A N D SO LUTI O N S In the event of a malfunction, refer to the following table. If, after performing the suggested checks, the problem is not solved, call the Customer Support Call Center at for assistance. PROBLEM POSSIBLE CAUSES SOLUTION(S) - Page 37 PRO B LE M S A N D SO LUTI O N S In the event of a malfunction, refer to the following table. If, after performing the suggested checks, the problem is not solved, call the Customer Support Call Center at for assistance. PROBLEM POSSIBLE CAUSES SOLUTION(S)
-
Page 38: Error Codes
ERROR CODES ERROR CAUSE Faulty room Faulty internal Faulty outside Faulty Faulty internal temperature RT coil IPT sensor. temperature OT external coil fan motor. sensor. sensor. OPT sensor. WHAT’S Sensor monitoring Automatic Fan motor is WRONG the antifreeze defrosting is not working. - Page 39 OF (COOL) OF (HEAT) Faulty external Lack of commu- Open CP con- In cooling/ dehumidifi- In Heating: Maximum fan motor. nication with the tact. cation: Maximum level level float intervention display. float. motor. None of the Display can’t The HPAC 2.0 During cooling and During heating, con- modes can be...
- Page 40 East Coast (212) 244-1100 east@ephoca.com West Coast (310) 879-8400 west@ephoca.com ephoca.com Ephoca, Inc. is the US subsidiary of Innova SRL Via I Maggio, 8 - Storo (TN) 38089 - Italy Edition 2020/3...
Need help?
Do you have a question about the Ephoca HPAC 2.0 and is the answer not in the manual?
Questions and answers
Our unit is dripping water on and off from underneath where it touches the wall. See the picture. What is the remedy?
To remedy water dripping from the Innova Ephoca HPAC 2.0 unit, ensure the condensate drain system is properly installed. Use an internal wall drain with a PVC pipe (minimum 3/4” inside diameter) and a 45-degree fitting aligned with the condensate hole. Insert at least 4 inches of the rubber drain pipe snugly into the PVC pipe. Check the connection to ensure it is secure and will not come loose. Avoid squeezing the rubber hose during installation.
This answer is automatically generated