
Related Manuals for Matsutec HP-528A

Summary of Contents for Matsutec HP-528A
- Page 1 Class B AIS Transponder / AIS Display With GPS Navigator HP-528A / HP-528 User Manual...
- Page 2 Foreword Thank you for your choice of HP-528A /HP-528. We would appreciate feedback from you to go further where we are achieving. Please carefully read and follow the procedures of installation and operation for best use of your unit. Features •...
-
Page 3: Quick Start
Quick Start Power on/Power off Press the key to power on the unit. The unit beeps and starts up. Press and hold the key for three seconds to power off the unit. The time remaining is counted down until power off. Adjust LCD or key panel brilliance Press the key to show the brilliance window. -
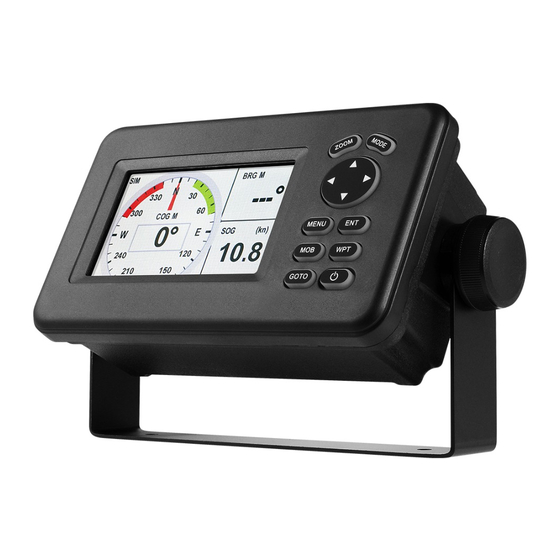
Page 4: Main Screens
Main screens Main screens are shown as below. Press MODE key to step through sequentially. Press MODE key more than 2 seconds to invert the sequence. AIS Radar AIS Lists Plotter Highway Steering Satellite SOG Meter COG Meter User Data Page 3 of 24... -
Page 5: Zoom Scale
AIS Radar The AIS Radar screen shows the location of other AIS-equipped vessels and shore stations relative to own ship within the current range scale. The position and course of own ship is also displayed in the center. The red color circle indicates the CPA value of AIS settings. 2.1.1 Zoom scale Scale is available from 0.125 to 24 nm. - Page 6 2.1.2 Direction Up Press MENU key to get a pop-up window. Select North up or Course Up. Press ENT key. “N-UP” or “AC-UP” is displayed on the up left side of the screen to indicate current selected direction up. 2.1.3 Selected Targets Use arrow key ▲,▼,◀...
- Page 7 2.1.4 Own boat information When there is no target selected, press ENT key to show your own boat detailed information. Use ▲ or ▼ key to show own static or own dynamic information. Press MENU key to exit. Own static data screen shows your static vessel information such as MMSI code, vessel name, GPS antenna position and type of Ship.
- Page 8 AIS Lists AIS lists are multi-list screens. It has 5 sub-screens: target list, danger list, watch list, alarm list and message list. Use ◀ or ▶ key to switch between the sub-screens. 2.2.1 Target List The target list shows all AIS targets being recognized by the unit. The target is sorted by the distance from own boat, so the closest target is located on the top of the list.
-
Page 9: Danger List
2.2.2 Danger List The danger list shows any dangerous target whose CPA & TCPA to own boat is less than thresh value. The dangerous target is sorted by CPA. The CPA and TCPA value will be updated every 3 seconds, thus the dangerous target is resorted. - Page 10 Operations of add, edit or delete can be done for the watch target. 2.2.3.1 Add Watch AIS Use ▲ or ▲ key to select the first line [New], then press ENT key to add a new watch target. You can add a new watch by edit or select from target list.
- Page 11 Lost alarm If the lost alarm is set on, lost alarm message will pop up when the watch target is declared as a lost one. Position alarm If the position alarm is set on, deviation alarm message will pop up when the watch target deviates away from the defined position far than the defined range.
- Page 12 2.2.4 Alarm List Show the alarms by sequence of start time. 2.2.5 Message List Show the messages by sequence of receive time. Page 11 of 24...
- Page 13 Plotter Show the ship, waypoints, routes, tracks, AIS targets in a plotter graph. 2.3.1 Plotter zoom Zoom scale is available among 0.02 ~ 320 nm. Press ZOOM key. Use ▲ or ▼ key to zoom in or zoom out. Press ENT key to exit. 2.3.2 Center own boat Normally when own boat is travel off the plotter screen, it will automatically return back to the center of the screen.
-
Page 14: Display Options
2.3.3 Display options Press MENU key twice to pop up an option window: 1. Show COG line or not. 2. Show the waypoint name of the GOTO, or of the route or of all the waypoints. 2.3.4 Add a new waypoint Use arrow key ▲,▼,◀... - Page 15 2.3.6 Move Waypoint 1. Select Move in the pop-up menu, and press ENT key to start. 2. Use arrow key ▲,▼,◀ ,▶ to move cursor to a new position. 3. Press ENT key, then the waypoint is moved to the new position. 2.3.7 Select AIS Target Use arrow key ▲,▼,◀...
-
Page 16: Screen Division
SOG meter There are 4 speed scales. 1. Press the MENU key. 2. Use ▲ or ▼ to choose the range. 3. Press the ENT key. User data Two customized user data screens are available. User data 1: default with 3 fields of POSN, SOG and COG. User data 2: default with 4 fields of RNG, BRG, XTE, and TTG. - Page 17 2. Press ENT key to pop up the data list. ODO: Odometer distance BRG: Bearing Trip: Trip distance XTE: Cross-track error Time: Time TTG: Time to go Date: Date ETA: Estimated time to arrival POSN: Position WPT: Waypoint to go Volts: Power voltage None: Blank SOG: Speed over ground...
- Page 18 Press MENU key to display the main menu. Press ▲ or ▼ key to select AIS item, and press ENT key. Notes: For HP-528, only CPA and TCPA are available for setting. 3.1.1 MMSI 1. Select MMSI item, Press ENT key. 2.
-
Page 19: Gps Antenna Position
3.1.2 Vessel Name The vessel’s name is of up to 20 characters. 3.1.3 Vessel Type Push ▲or ▼ key to select your vessel type from the list, then push ENT key to save it or press MENU key to cancel. 3.1.4 GPS antenna position A : Bow, 0 ~ 511 meters. -
Page 20: Waypoint Operation
Waypoints Enter into the waypoint list by sort of name or by sort of range to own boat. 3.2.1 Create new waypoint Move to the [NEW] line, press ENT key to create a new waypoint with default value: Name: WP**** Lat/Lon: current own boat position The name, position, icon, color and comment field of the waypoint could be edited. - Page 21 3.3.2 Manage waypoints in a route Waypoints can be added, changed, skipped or deleted in a route. Move to the waypoint line. Press ENT key to pop up a menu. For the last line, only Add operation could be selected. 3.3.3 Route operation Routes can be set as a destination, edited or deleted.
- Page 22 Self Test A system test and LCD test is ready for diagnostics. System information and RAM, ROM, GPS status is shown in system test screen. Press each key to check whether the key functions properly. During LCD test, each press of ENT key changes the grade of RGB color sequentially.
- Page 23 REM1 Output 4800 DTM, GGA, GLL, RMB, RMC, VTG, ZDA REM2 Output 4800 DTM, GGA, RMB, RMC, VTG, ZDA, BWC* AAM*, APB*, BOD*, BWC*, GLL, VTG, AP Output 4800 XTE, ZDA GPS Output GGA, GSA, GSV, VTG 4800 GPS Input GGA, GSA, GSV, VTG, RMC, GLL 4800 AIS Input...
- Page 24 3.8.4 Alarms These settings are for the alarms of XTE, SBAS, arrival, etc. All the alarms could be switched on or off. When an alarm is activated, the buzzer sounds and the alarm window will pop up for remind, together with an alarm icon flashes on the up right of the screen.
-
Page 25: Installation
Installation Power DC12V-24V ① Power + (White) ② Power - (Black) NMEA Data Port: ① RS-232 RX ② RS-232 TX ③ ④ RS-422 RX- ⑤ RS-422 RX+ ⑥ RS-422 TX- ⑦ RS-422 TX+ Page 24 of 24...
Need help?
Do you have a question about the HP-528A and is the answer not in the manual?
Questions and answers
WHAT IS THE CABLE NECESARY TO CONECT THE NMEA output to a 5 pin Garmin backbone?
The Matsutec HP-528A uses RS-422 for NMEA output, while the Garmin NMEA 2000 backbone uses a 5-pin connector. NMEA 2000 is not directly compatible with RS-422 (NMEA 0183). To connect them, you need an NMEA 0183 to NMEA 2000 converter.
To wire the Matsutec HP-528A to the converter:
- Use the RS-422 TX+ (Pin 7) and TX- (Pin 6) from the Matsutec.
- Connect these to the NMEA 0183 input on the converter.
- The converter will then output NMEA 2000 data to the Garmin backbone using a standard NMEA 2000 drop cable.
Ensure the converter supports bidirectional communication if you need data sent back to the Matsutec.
This answer is automatically generated
I want to it to a simrad nssevo3s radar display
To connect a Matsutec HP-528A to a Simrad NSS Evo3S radar display, follow these steps:
1. Check Compatibility: The HP-528A supports NMEA 0183 and NMEA 2000 data output. The Simrad NSS Evo3S has NMEA 2000 and NMEA 0183 input options.
2. Choose Connection Type:
- NMEA 0183 Connection:
- Identify the NMEA 0183 output wires on the HP-528A.
- Connect the HP-528A NMEA 0183 output (TX+) to the Simrad NSS Evo3S NMEA 0183 input (RX+).
- Connect the HP-528A NMEA 0183 ground to Simrad's NMEA ground.
- Set the baud rate to match (typically 4800 or 38400 bps).
- NMEA 2000 Connection (if available):
- Use an NMEA 2000 adapter cable if the HP-528A supports it.
- Connect the HP-528A to an NMEA 2000 backbone where the Simrad NSS Evo3S is also connected.
3. Configure the Devices:
- On the HP-528A, enable the necessary NMEA output sentences (e.g., VDM, VDO for AIS data).
- On the Simrad NSS Evo3S, configure the input to accept AIS data from the connected NMEA 0183 or NMEA 2000 source.
4. Test the Connection:
- Confirm that the Simrad NSS Evo3S detects AIS targets from the HP-528A.
- Check for any connection or configuration issues and adjust settings if needed.
This setup ensures that AIS data from the HP-528A is displayed on the Simrad NSS Evo3S radar display.
This answer is automatically generated