Table of Contents
Advertisement
Available languages
Available languages
Quick Links
Advertisement
Chapters
Table of Contents

Related Manuals for Salora 60BFH3800


Summary of Contents for Salora 60BFH3800
- Page 1 SALORA PROJECTOR MODEL: 60BFH3800 ENGLISH...
-
Page 2: Table Of Contents
CONTENT Warning ………………………………………………………………………………………………………………………………….. Safety Precautions ………………………………………………………………………………………………………………….. Caution …………………………………………………………………………………………………………………………………… 3 Installation …………………………………………………………………………………………………………………………….. Structural Diagram ………………………………………………………………………………………………………………….. Panel Keys Introduction ………………………………………………………………………………………………………….. Input Terminals ………………………………………………………………………………………………………………………. Turning ON/OFF ……………………………………………………………………………………………………………………… Image Adjustment ………………………………………………………………………………………………………………….. Remote Control Introduction …………………………………………………………………………………………………. Menu Settings …………………………………………………………………………………………………………………………. 13 Multimedia Menu …………………………………………………………………………………………………………………… Connection to a PC Instructions ………………………………………………………………………………………………. 17 Troubleshooting ………………………………………………………………………………………………………………………... -
Page 3: Warning
WARNING Warning Do not look directly into the light of the lens, this can cause damage to the eyes, especially for children. Warning: Do not place the projector on a wet surface, this can cause an electric shock. High Voltage, only to be Important Operation Instructions opened by professionals WARNING... -
Page 4: Safety Precautions
SAFETY PRECAUTIONS Please read this manual carefully before operating the projector and keep it for future reference Please follow the instructions mentioned in this manual when operating or if the projector needs maintenance. 1. Cleaning 7. Ground wire Unplug the power cable before The plug on the power cord is cleaning it. -
Page 5: Caution
CAUTION Installation • In order to extend the life-span of the projector, do not use it under damp, dusty and foggy conditions, unless the lens and ventilation openings are cleaned frequently. • For the best possible performance, please use the projector in a dark room, with the curtains drawn, protecting it from direct strong light. -
Page 6: Installation
INSTALLATION FULL SETTING Speaker Speaker Screen Subwoofer Speaker C DVD Player Projector Amplifier Seats Door Speaker Speaker Avoid direct sunlight to obtain the best quality image. Draw the curtains, when using the projector during day time. - Page 7 INSTALLATION Standard Setting (Front Projection) Please refer to the following table to adjust the picture size and distance (from the lens to the screen). Distance Dimensions Image 16:9 50” 1.63m 1.90m 70” 2.25m 2.65m 100” 3.10m 3.55m 120” 3.08m 4.40m (For the best quality image, we advise you to not use the projector over 80”.) Please allow a ±...
- Page 8 INSTALLATION Installation procedure Contact a professional installer to mount the projector to the ceiling. Follow the instructions below for the correct projector positions. projector Projector screen screen Front projection Rear projection Ceiling mount Ceiling mount projector screen screen projector Front projection Rear projection Table mount Table mount...
-
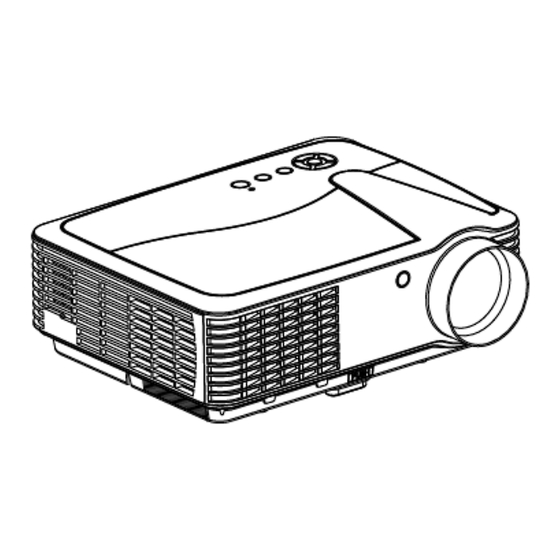
Page 9: Structural Diagram
INSTALLATION Vent cool air intake Level-stand adjustment IR receiver Focus Lens Keystone Power switch Input terminals Speaker Vent hot air exhaust 10. Level-stand adjustment 11. Projector mount holes 12. Rating plate 13. Vent cool air intake... -
Page 10: Panel Keys Introduction
Panel key instruction 1) Navigation Key By pressing this key, you can adjust the menu by using the Up/Down as well as the Left/Right navigation buttons. 2) Menu By pressing this key, you can enter the main menu. With the navigation buttons you can scroll through the various options. -
Page 11: Input Terminals
Input Terminals Interface Y/Pb/Pr Component Video input Video output L-Out, R-Out Audio output left and right L-In, R-In Audio output left and right VGA input HDMI 1/2 HDMI signal input USB 1/2 USB Flashdrive Caution: To avoid any damage, connect the input signal cable correctly prior to switching on the projector. -
Page 12: Turning On/Off
Turning the projector On/Off Turning the projector on: 1) Install the two new batteries into the remote control before using the projector. 2) For switching the projector on, you need to press the power switch at the back, the indicator light will turn red. 3) Press the power button on the top panel or the remote control, the indicator light will turn blue. -
Page 13: Image Adjustment
Image Adjustment When you are using the projector for the first time, the image may appear unclear or trapezoid, because the focus and keystone haven’t been adjusted yet. You can adjust the image by carrying out the following steps. Focus adjustment Turn the lens clockwise, after that turn it slowly counter clockwise. -
Page 14: Remote Control Introduction
Remote Control On/Off Mute Down Info Display Information Left Pic. Picture mode Right Audio Audio mode Previous Enlarge/reduce Zoom Next image size Repeat function Rep. (when using USB Rewind multimedia) AB cycle (when using Fast Forward USB multimedia) Audio tracks (when Aud.T using USB Play/Pause... -
Page 15: Menu Settings
Menu Settings 1. Menu Settings 1) When the projector is turned, press the men key on the panel. The following image will appear on the screen (picture 1). Picture 1 2) Press the a / d key, to enter the following sub-menus: picture>sound>time>option>channel. - Page 16 Menu Settings 2. Picture Menu Picture Menu Picture Mode Medium/Soft/User/Vivid Color Temperature Normal/Warm/User/Cool Aspect Ratio Auto/4:3/16:9 Noise Reduction Off/Weak/Middle/Strong/Default User Mode of Picture Contrast 0-100 Adjust the difference between darkness and brightness. Brightness 0-100 Adjust the brightness of the whole picture. Color 0-100 Adjust the color of the picture.
- Page 17 Menu Settings 4. Time Menu Time Menu Time Menu Time Menu Sleep Timer Sleep Timer Sleep Timer Off/10min/20min/30/min/ Off/10min/20min/30/min/ Off/10min/20min/30/min/ 60/min/90min/120min/ 60/min/90min/120min/ 60/min/90min/120min/ 180min/240min 180min/240min 180min/240min Auto Sleep Auto Sleep Auto Sleep Off/3Hours/4Hours/5Hours Off/3Hours/4Hours/5Hours Off/3Hours/4Hours/5Hours 5. Option Menu Menu Settings OSD Language English/German/Chinese etc.
-
Page 18: Multimedia Menu
Multimedia Menu Multimedia Menu Multimedia Menu MOVIE Watch a movie MUSIC Play an album PHOTO View photos in a gallery TEXT Read a book Caution: 1) The USB interface supports USB1.1 and USB2.0, including hard drives and fresh drives. 2) The maximum storage supported is 400GB. 3) The system format supported: FAT16, FAT32, NTFS. -
Page 19: Connection To A Pc Instructions
Connection to a PC Instructions 1. Connect with PC by HDMI: Connect the project and the device with an HDMI cable, then press “Source” on the remote control or the panel, choose “HDMI-1” as input source (picture 1). 2. Connect with PC by VGA: Connect the projector and the device with a VGA cable, then press source on the remote control or panel, choose “VGA”... -
Page 20: Troubleshooting
Troubleshooting Problem Possible Causes 1. indicator light Power cable is not connected correctly. doesn´t work when the power is The power switch is faulty. The power switch is turned off. 2. The projector doesn´t work The remote control has no batteries or the batteries are low. when using the ... -
Page 21: Specifications
Specifications LCD Panel Size 5.8”TFT Component Video (YPbPr), Video Input Signal VGA/HDMI/USB/AV Audio Stereo Output Signal Audio 3W x 2 speakers Native Resolution 1920 x 1080 Contrast Ratio 30000:1 Lens Focus 200mm 140W Lamp Life 50.000 hours Size 50-200 inch Image Brightness 3800 lumens... -
Page 22: Accessory List
Accessory List Projector Remote control Power cable AV signal cable VGA signal cable Manual Spare fuse Accessories which can be purchased separately: 1. Projection screen 2. Ceiling mount... - Page 23 SALORA BEAMER MODEL: 60BFH3800 NEDERLANDS...
- Page 24 INHOUD INHOUD Waarschuwing Veiligheidsvoorschriften Waarschuwing Installatie Volledige opstelling Standaard Instelling Opstelling methode Product overzicht Ingang Aansluitingen Afstandsbediening Bedieningspaneel toetsen Projector Aan/Uit zetten Aanpassen Beeldweergave/Keystone Menu Instellingen Instellen Menu Software Update Aansluiten op de PC Probleem Oplossen Specificaties Accessoires Lijst...
- Page 25 Veiligheid Voorschriften Waarschuwing Kijk niet direct in het licht van de lens, dit kan uw ogen beschadigen, in het bijzonder bij kinderen. Waarschuwing Plaats dit apparaat niet op een natte ondergrond, dit kan een elektrische schok veroorzaken. Belangrijke Bediening Instructies Hoog Voltage, alleen te openen door deskundigen WAARSCHUWING...
- Page 26 Veiligheid Voorschriften Lees deze veiligheidsvoorschriften voor gebruik van de projector zorgvuldig door en bewaar deze voor eventueel latere raadpleging. Volg de instructies voor het gebruik van de projector en eventueel bij reparaties. 1. Reinigen Gebruik een vochtige doek, zonder schoonmaakmiddel. Voordat u dit doet dient u de stekker uit het stopcontact te halen.
-
Page 27: Waarschuwing
Waarschuwing Installatie • Voor een langere levensduur van de projector, gebruik dit apparaat niet onder vochtige, stoffige en mistige omstandigheden. • Voor een optimale prestatie dient u de projector in een donker ruimte te gebruiken met de gordijnen gesloten, zodat u het zonlicht weert. Controleer of de ondergrond waarop de projector staat vlak en stabiel is zodat deze niet kan vallen en letsel kan veroorzaken. -
Page 28: Installatie
Installatie VOLLEDIGE OPSTELLING Speaker Speaker Scherm Subwoofer Speaker C DVD Speler Projector Versterker Zitplaatsen Deur Speaker Speaker Vermijd direct zonlicht om de beste beeld kwaliteit te verkrijgen. Sluit de gordijnen wanneer u de projector overdag gebruikt. -
Page 29: Standaard Instelling
Installatie Standaard Instellingen (Vooraan Projectie) Raadpleeg onderstaand schema om weergave afmeting en afstand (van lens tot scherm) aan te passen. Afstand Afmeting Beeldweergave 16:9 50” 1.63m 1.90m 70” 2.25m 2.65m 100” 3.10m 3.55m 120” 3.08m 4.40m ( Voor een optimaal beeld adviseren wij u niet boven de 80” te projecteren) Behoud een marge van -/+ 3% met betrekking tot de hierboven genoemde afmetingen van de beeldweergave. -
Page 30: Opstelling Methode
Installatie Opstelling methode Neem contact op met een specialist om de projector aan het plafond te bevestigen. Volg de instructies, hieronder aangeven, voor een juiste projectie opstelling. projector Projector scherm scherm Voor projectie Achter projectie Plafond Plafond projector scherm scherm projector Voor projectie Achter projectie... -
Page 31: Ingang Aansluitingen
Installatie Koele lucht ventilatie inlaat Verstelbare standaard IR ontvanger Lens focus Keystone Aan/Uit schakelaar Ingang aansluitingen Luidspreker Warme lucht ventilatie uitlaat 10. Verstelbare standaard 11. Gaten voor montage projector 12. Typeplaatje 13. Koele lucht ventilatie inlaat... -
Page 32: Afstandsbediening
Installatie 1) Navigatie knoppen Door op deze knoppen te drukken kunt u in het menu opties selecteren, u kunt de Omhoog/Omlaag knoppen en de Links/rechts knoppen gebruiken. 2) Menu Door op deze knop te drukken kunt u het hoofdmenu openen. Door middel van de navigatie knoppen kunt u uw keuze selecteren. -
Page 33: Projector Aan/Uit Zetten
Projector Aan/Uit zetten Naam Omschrijving Y/Pb/Pr Component video ingang Video ingang L-Out, R-Out Audio uitgang L-In, R-In Audio ingang VGA ingang Analoog TV/digitaal TV/GEEN TV HDMI 1 / 2 HDMI signaal ingang Aansluiting USB Flashdrive LET OP: Om schade te voorkomen, dient u de signaal ingang kabel op de juiste manier aan te sluiten voordat u de projector aan zet. - Page 34 Projector Aan/Uit zetten Projector Aanzetten: 1) Plaats de twee nieuwe batterijen in de afstandbsediening voordat u de projector gaat gebruiken. 2) Om de projector aan te zetten moet u de schakelaar aan de achterzijde indrukken, het indicatie lampje wordt nu rood. 3) Druk op de knop van het bedieningspaneel of van de afstandsbediening, het indicatie lampje wordt nu blauw.
-
Page 35: Aanpassen Beeldweergave/Keystone
Aanpassen Beeldweergave Bij het eerste gebruik kan de beeldweergave onscherp en vervormd zijn. Dit komt omdat de focus en keystone nog niet zijn aangepast. Hieronder volgen instructies om dit te corrigeren. Aanpassen focus Draai de lens met de klok mee, draai daarna de lens langzaam tegen de klok in. Controleer tegelijkertijd het resolutie punt. - Page 36 Afstandsbediening Aan/Uit Omhoog Geluid uit Omlaag Info Informatie weergave Links Pic. Afbeelding modus Rechts Audio Audio modus Vorige Vergroten/verkleinen Zoom Volgende beeldweergave Herhaal functie (bij Rep. gebruik van afspelen Snel terug USB multimedia) AB cyclus (bij gebruik van afspelen USB Snel vooruit multimedia) Audio nummers (bij...
-
Page 37: Menu Instellingen
Afstandsbediening 1. Menu Instellingen 1) Terwijl de projector in werking is, drukt u op de menu knop, de projector geeft nu een beeld weer zoals hiernaast afgebeeld (afbeelding 1). Afbeelding 1 2) Druk op de w/s knoppen, om de volgende menu’s te openen: Beeld/Geluid/Tijd/Opties/Applicaties/Kanaal 3) Nadat u het submenu heeft geopend, drukt u op de a/d... -
Page 38: Probleem Oplossen
Probleem Oplossen 2. Beeld Menu Beeld Menu Beeld Modus Standaard/Mild/Gebruiker/Dynamisch Kleurtemperatuur Normaal/Warm/gebruiker/Koel Beeldverhouding Auto/4:3/16:9 Ruisonderdrukking Uit/Laag/Midden/Hoog/Default Gebruiker modus Beeld Contrast 0 – 100 Aanpassen van verschil tussen donker en helder beeld. Helderheid 0 – 100 Aanpassen van helderheid van het totale beeld. Kleur 0 –... - Page 39 Probleem Oplossen 4. Tijd Menu Tijd Menu Uit/10 min/20 min/30 min/60 min/90 Sleep Timer min/120 min/180 min/240 min Auto Sleep Uit/3 Uur/4 Uur/5 Uur 5. Optie Menu Menu Instellingen Engels/Duits/ OSD Taal Chinees/Tota al 23 talen Terug naar Ja/Nee Fabrieksinstellingen...
- Page 40 Probleem Oplossen...
- Page 41 Probleem Oplossen 6. Multimedia Menu Multimedia Menu Foto’s bekijken in de FOTO galerij. MUZIEK Album afspelen. FILM Film kijken. TEKST Een boek lezen. LET OP: 1) De USB Interface ondersteunt USB1.1, USB2.0, inclusief hard drives en flash drives. 2) De maximum opslag capaciteit is 400GB. 3) De systeem formats die ondersteund worden:FAT16, FAT32, NTFS.
- Page 42 Probleem Oplossen 1. Verbind de PC door middel van HDMI: Sluit een HDMI kabel aan op de projector en de PC, druk vervolgens op “Source” van de afstandsbediening, selecteer “HDMI-1” als uw invoerbron (afbeelding 1). 2. Verbind de PC door middel van VGA: Sluit een VGA kabel aan op de projector en de PC, druk vervolgens op “Source”...
- Page 43 Probleem Oplossen Probleem oplossen Probleem Mogelijke oorzaak 1. De indicator De elektriciteitsdraad is niet goed aangesloten. werkt niet als de schakelaar is De schakelaar is kapot. omgezet. De schakelaar staat op OFF 2. De projector Er zitten geen batterijen in de afstandsbediening of ze zijn leeg gaat niet aan met ...
-
Page 44: Accessoires Lijst
Accessoire Lijst Maat LCD scherm 5.8” TFT Component Video (YPbPr), Video VGA/HDMI/USB/AV Ingang Signaal Audio Stereo Uitgang Signaal Audio 3W x 2 luidsprekers Oorspronkelijke resolutie 1920 x 1080 Contrastverhouding 3000:1 Lens Focus 200mm 140W Lamp Levensduur 50.000 uren Maat 50-200 inch Beeld Helderheid 3800 lumens... - Page 45 Accessoire Lijst Projector 1 stuk Afstandsbediening 1 stuk Elektriciteitskabel 1 stuk AV signaal kabel 1 stuk VGA signaal kabel 1 stuk Handleiding 1 stuk Reserve zekering 1 stuk Accessoires die apart kunnen worden gekocht: 1. Projectie Scherm 2. Reserve lamp...
Need help?
Do you have a question about the 60BFH3800 and is the answer not in the manual?
Questions and answers