Table of Contents
Advertisement
Quick Links
Advertisement
Table of Contents
Troubleshooting

Subscribe to Our Youtube Channel
Related Manuals for Liesegang ddv 2300


Summary of Contents for Liesegang ddv 2300
- Page 1 2300 USER’S Manual...
- Page 2 Notice The information in this user’s Manual’s subject to change without notice. THE MANUFACTURER OR RESELLER SHALL NOT BE LIABLE FOR ERRORS OR OMISSIONS CONTAINED IN THIS MANUAL AND SHALL NOTBE LIABLE FOR ANY CONSEQUENTIAL DAMAGES, WHICH MAY RESULT FROM THE PERFORMANCE OR USE OF THIS MANUAL. The information in this user’s Manual’s protected by copyright laws.
-
Page 3: Table Of Contents
TABLE OF CONTENTS PREFACE Protecting Your Projector - Avoid Abusive Handling and Adverse Environment Symbols GETTING TO KNOW THE BASICS Performance Features (1-2,3) Supplied Accessories (1-3) System at a Glance (1-4) Front View (1-4) Top View (1-5,6) Rear View (1-7,8) Right-Side View (1-8) Left-Side View (1-9) Bottom View (1-9) - Page 4 Image Problems (3-7,8,9) Lamp Problems (3-9) Other Problems (3-10) LED Indicator Error Messages (3-10) Appendix A REFERENCE Product Specification (A-2) Projection Distance V.S. Projection Size (A-3) Present Timing (A-4) Appendix B AGENCY REGULATORY NOTICES Federal Communications Commission Notice (B-2) Compliance Information For Canada (B-3) User Information for all Countries (B-3)
-
Page 5: Protecting Your Projector
Preface Using This Manual This User’s Manual contains general information about your projector, hardware installation and OSD setting information, troubleshooting, and technical specifications. Protecting Your Projector - Avoid Abusive Handling and Adverse Environment Follow the advice below will help ensure that you get the most out of your Investment. -
Page 6: Symbols
To reduce the bodily harm: Do not stare directly into the lens as possible eye injury could occur since this projector produce intense light from the projection lens. Be especially careful that children do not look into the beam directly. When cleaning the projector, observe these steps: Switch off the projector and disconnect the power plug from AC outlet. -
Page 7: Getting To Know The Basics
GETTING TO KNOW THE BASICS GETTING TO KNOW THE BASICS This section introduces the features and components of the DLP Projector. -
Page 8: Performance Features
USER’S MANUAL Performance Features High Resolution By using advanced video “Digital Light Processing” technology, it is fully compatible with true XGA and supports SXGA. This lets you display your clear compression images without line omission. Convenient Presentation Design With this feature, you won’t have to stand next to your computer or give hand signal to your partner when you require changing slides. -
Page 9: Supplied Accessories
GETTING TO KNOW THE BASICS Multilanguage OSD Menu Support The On Screen Display Menu in 7 languages provides users with informative data to aid users to re-set the parameters while operated in their own native language. Supplied Accessories Make sure that all of the following accessories are included in the package besides the projection unit. -
Page 10: System At A Glance
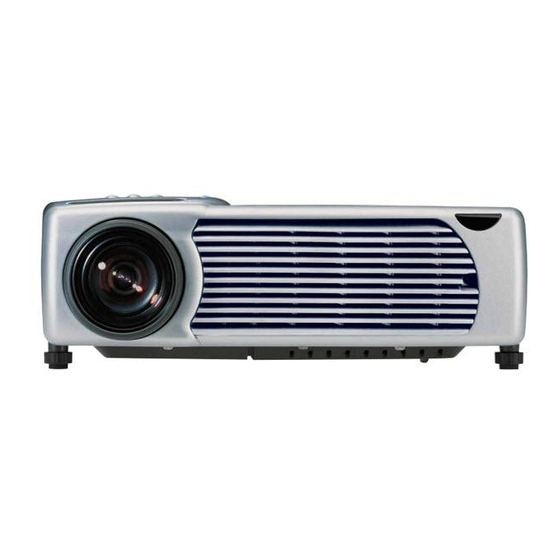
USER’S MANUAL System at a Glance Front View Illustration 1-1 Warning: Do not stare directly into the lens as possible eye injury Projection Lens could occur since This is where the beam of light projected. this projector produce intense Ventilation Grills light from the projection lens. -
Page 11: Top View
GETTING TO KNOW THE BASICS Top View Illustration 1-2 Warning: Do not place any objects on the top of projector. Focus Ring That may damage the Zoom Ring projector. Remote Control Sensors For convenience, this projector had built-in two IR receivers. - Page 12 USER’S MANUAL the projector. (See “LED Status Indicator” later in this section for details.) Lamp Ready LED 4-Directional Keypads 3 v 4 Menu Button It will activate the menu system on screen. Press Menu again to enter the sub-menus. The 4-directional keypads help you navigate among choices.
-
Page 13: Rear View
GETTING TO KNOW THE BASICS Rear View Illustration 1-3 RS-232 Port Audio-Out Socket The socket is for connecting external speakers or a public-address system. It is also able to control the volume via you IR remote control. Audio-In Socket This socket accepts sound from a computer or video source. -
Page 14: Right-Side View
USER’S MANUAL Screen Trigger Port This is where you connect your screen remote device if your screen supports the function. If this function has been enabled, the screen will scroll down automatically after activating your projector. (For details, please refer to page 14) Right-Side View Illustration 1-4 Ventilation Grill... -
Page 15: Left-Side View
GETTING TO KNOW THE BASICS Left-Side View Illustration 1-5 Adjuster Button The foot adjuster is where to adjust the height of projection image. Adjuster Foot The projector is equipped with 2 adjuster feet. Push the adjusters to adjust its tilt angle. Life the projector up and press the adjuster button to release the adjuster. -
Page 16: Control Panel And Remote Control
USER’S MANUAL Control Panel and Remote Control Control Panel Illustration 1-7 Keypad Definition Power To switch power on or off Source Source selection Auto Auto image Keystone Keystone adjustment selection Note: To enter or exit menu It takes 60sec for Menu lamp to cool OSD item up-toward selection... -
Page 17: Control Panel
GETTING TO KNOW THE BASICS Remote Control Remote Instruction The optimum range of operation for the remote control is less than or equal to 33 feet (10m). Install AAA battery x2 into the remote. Illustration 1-8 Warning: Laser Pointer To reduce the risk of injury to the eyes, do not look directly into... - Page 18 USER’S MANUAL Laser Key Take this red key is used as regular laser pointer function while giving presentations. Zoom In/Out Hotkey • Press “Zoom+”, the center of the picture will be magnified. Press “Zoom-”, the size of the image will be reduced. •...
-
Page 19: Remote Instruction Operating Range
GETTING TO KNOW THE BASICS Remote Instruction Operating Range The remote control can be used to control the projector within the range shown as following illustration. Note: The signal from the remote control can be reflected off a screen for easy operation. - Page 20 USER’S MANUAL Connecting Projector to Various Equipments It takes a few seconds to connect your projector to your PC or laptop, VCR and so on. Connecting Projector to Your Laptop or Desktop Note: Always turn off Mouse the image source (computer or video) and projector before...
- Page 21 GETTING TO KNOW THE BASICS Connecting Projector to Your DVD Player Audio-In S-Video Illustration 1-12 Connecting Projector to Your VHS Recorder/Player Audio-In Video Illustration 1-13...
-
Page 22: Starting The Presentation
USER’S MANUAL Connecting Projector to Your Speakers Audio-Out Illustration 1-14 Starting the Presentation Power on 1. Remove the lens cap. 2. Make sure Lamp Ready LED is in steady green light of normal status. Press Power on the remote control, or on top of the unit, to turn on Note: the unit. - Page 23 GETTING TO KNOW THE BASICS 2. Press the Power button on the top of the unit or remote control to turn off the power. A confirmation request will appear on the screen asking for reconfirmation on power off Note: request. Many laptops do 3.
-
Page 24: Ceiling Mount Projection Setting Procedure
USER’S MANUAL Ceiling Mount Projection Setting Procedure 1. It’s recommended that you use the optional ceiling-mount bracket for the installation. 2. Before mounting the projector, contact the nearest dealer or distributor to obtain a recommended ceiling mount kit. 3. Observe the mounting installation procedures described in the ceiling mount user’s guide. -
Page 25: On Screen Display Menu Description
Section 2 On Screen Display Menu Description SECTION 2 On Screen Display Menu Description In this section, you will learn how to adjust the projector by using the On Screen Display Menu and manipulate various hardware control settings. -
Page 26: Status Signals
USER’S MANUAL The On Screen Display (OSD) Menu is a configuration program built into your projector and allows you to easily configure and change the settings. It contains manufacture default settings for the projector’s standard operations. However, there are occasions when you need to be required to modify the default settings. - Page 27 Section 2 On Screen Display Menu Description No Input Signal “No Input Signal” will pop up on the screen when there is no active signal within 16 seconds. Signal Lost When input signal lost for 16 seconds, the display will be blanked. OSD Menu You may activate the OSD menu by pressing the “Menu”...
-
Page 28: Adjust Menu
USER’S MANUAL Adjust Menu Illustration 2-1: Adjust Menu shown if in PC Mode Illustration 2-2: Adjust Menu shown if in Video Mode Item Default Value Description Video Mode Mode Press ► (+) to enter this Keystone function Press ▲▼ to adjust the vertical keystone;... - Page 29 Section 2 On Screen Display Menu Description Item Default Value Description Video Mode Mode Default: Press ◄ ► to adjust the Volume factory volume. calibrated Adjustment range: from to center. weak–strong (0-100). Default: Press ◄ ► to adjust the Brightness factory brightness.
-
Page 30: Setup Menu
USER’S MANUAL Setup Menu Illustration 2-3: Setup Menu shown if in PC Mode Illustration 2-4: Setup Menu shown if in Video Mode Item Default Value Description Video Mode Mode Default: Press ◄ ► to adjust sampling Frequency Auto clock to eliminate flicker. Detected. - Page 31 Section 2 On Screen Display Menu Description Item Default Description Video Value Mode Mode Default: Press ▲▼ to adjust the video Tint 0º. tint/hue. Adjustment range: from red to green (-180º – +178.6º). Default: Press ◄ ► to select the video Scaling 4:3.
-
Page 32: Color Management Menu
USER’S MANUAL Color Management Menu Illustration 2-5: Color Management Menu Item Default Description Value Default: Press ◄ ► to select the different color Color Auto temperature. Temp. detected. Selections: from Cool, Normal, Warm and User. While “User” is selected, you may able to adjust R/G/B level. -
Page 33: Language Menu
Section 2 On Screen Display Menu Description Language Menu Illustration 2-6: Language Menu Item Default Value Description Default: Press to select the desired Chinese -Simplified English. language. Chinese-Traditional English French German Portuguese Spanish... -
Page 34: Utility Menu
USER’S MANUAL Utility Menu Illustration 2-7: Utility Menu Item Default Value Description Default: Press ◄ ► to select different picture in picture PIP Size Off. size. Selections: Off, Small, Medium, and Large. Default: Press ◄ ► to select different picture in picture Bottom position. -
Page 35: Status Menu
Section 2 On Screen Display Menu Description Status Menu Illustration 2-7: Status Menu Item Description To turn on or off the function for automatically searching Auto Source all the input port to find out the valid source. If “On”, it will auto search for input source. To turn on or off the function for automatically detecting Auto Image the input signal level. -
Page 36: Cleaning, Maintenance And Troubleshooting Cleaning
Section 3 CLEANING, MAINTENANCE AND TROUBLESHOOTING SECTION 3 CLEANING, MAINTENANCE AND TROUBLESHOOTING In this section, you will learn how to maintain your projector and keep it in good condition as well as solve common hardware problems. -
Page 37: Clean The Lens
USER’S MANUAL Cleaning In this part, you will find the correct ways to: Clean the lens. Clean exterior case Replace the projection lamp. Clean The Lens Follow these steps to clean the projection lens: Be sure the projector is power-off and cooled Note: down. -
Page 38: Maintenance
Section 3 CLEANING, MAINTENANCE AND TROUBLESHOOTING Maintenance Lamp Replacement The lamp contains a certain amount of mercury. Some governments required special disposal of lamps containing mercury. Dispose of lamps in accordance with the law and any applicable local regulations. The lamp module should be replaced with a certified replacement part. - Page 39 USER’S MANUAL Lamp Module Cover Fixing Screw Cover Latch Illustration 3-2 Illustration 3-1 Fixing Screws Lamp Module Lamp Module Bay Illustration 3-3 Illustration 3-4 Observe the arrow to PLEASE DO place the lamp TOUCH THE module GLASS. back to bay. Illustration 3-7 Illustration 3-6 Note:...
-
Page 40: Resetting The Lamp
Section 3 CLEANING, MAINTENANCE AND TROUBLESHOOTING Resetting the Lamp After replacing the lamp, you should reset the lamp hour counter to zero. Refer to the following: Press the Menu button to open the Main menu. Press the cursor button to move to the Status menu. -
Page 41: Troubleshooting
USER’S MANUAL Troubleshooting Your projector has been fully tested and complies with the system specifications before shipping. However, incorrect operations and/or mishandling during shipment may cause problems. This section provides a reference for identifying and correcting common hardware and software problems that you may encounter. - Page 42 Section 3 CLEANING, MAINTENANCE AND TROUBLESHOOTING Image Problems No image on the screen– Check the power connections to the projector. Verify the settings on your laptop or computer. Be sure that the blank function has disabled. Press “Blank” button on the remote control for further verification.
- Page 43 USER’S MANUAL on the control panel of the unit. The projected image is centered on the screen– Reposition the projector to improve its angle on the screen. Make sure that your projector is at a 90° angle to the screen. The projected image is upside-down–...
- Page 44 Section 3 CLEANING, MAINTENANCE AND TROUBLESHOOTING The color of image doesn’t match the computer or the video– Press Menu and go to Menu “Color Manager”. Adjust the color temperature and gamma to optimize the colors. Lamp Problems No Light– Be sure that the power cable is properly connected to a fully functional AC electric outlet.
- Page 45 USER’S MANUAL Other Problems No Sound– Make sure that the audio cable is connected well. Be sure that the audio cable is functional. Adjust the volume. Adjust the audio source. Press “Blank” button is on the remote control for further verification. Make sure that the lens cap is not mounted.
- Page 46 Appendix B AGENCY REGULATORY NOTICES APPENDIX B AGENCY REGULATORY NOTICES...
- Page 47 Appendix A REFERENCE APPENDIX A REFERECE...
- Page 48 USER’S MANUAL Product Specification Display Type 0.7" DLP Projection System Native XGA: 1024x768 Resolution Compressed SXGA: 1280x1024 Projection Distance 1.5 to 10 meters Projection Screen Size 35.4" to 283.5" Projection Method Front / Rear / Desktop / Ceiling Aspect Ratio 4:3 &...
- Page 49 Appendix A REFERENCE Projection Distance V.S. Projection Size Screen Width Screen Height Projection Max. Screen Size Min. Screen Size Distance Diagonal Width Height Diagonal Width Height 1.5m 1.1m 0.9m 0.7m 0.9m 0.7m 0.5m 4.92' 42.5" 33.8" 25.6" 35.4" 28.3" 21.2" 2.0m 1.4m 1.2m...
- Page 50 USER’S MANUAL Present Timing The projector can display several resolutions. The following table outlines the resolutions that can be displayed by the projector. Mode Name(s) Used Resolution H. Frequency V. Frequency (K Hz) (Hz) VESA Standard 640 x 350 37.86 -85.08 640 x480 -37.86...
- Page 51 USER’S MANUAL Federal Communications Commission Notice This equipment has been tested and found to comply with the limits for a Class B digital device, pursuant to Part 15 of the FCC Rules. These limits are designed to provide reasonable protection against harmful interference in a residential installation.
- Page 52 Appendix B AGENCY REGULATORY NOTICES Compliance Information For Canada Notice: This class B digital apparatus complies with Canadian ICES-003. CE Conformity The device complies with the requirements of the EEC directive 89/336/EEC as amended by 92/31/EEC and 93/68/EEC art.5 with regard to “Electromagnetic compatibility,”...
Need help?
Do you have a question about the ddv 2300 and is the answer not in the manual?
Questions and answers