Advertisement
ThunderboltM3
Quick Installation Guide
Installing ThunderboltM3
1. Insert the ThunderboltM3 card into the PCIe
3.0 x4 Thunderbolt supportive slot.
2. Connect one end of the TB header cable to
the J1 connector on the card.
3. Connect the other end of the TB header cable
to the JTBT1 connector on the motherboard.
4. Use the screw to secure the ThunderboltM3.
5. Refer to the User Manual of your
motherboard for information on enabling
Thunderbolt Technology in the BIOS.
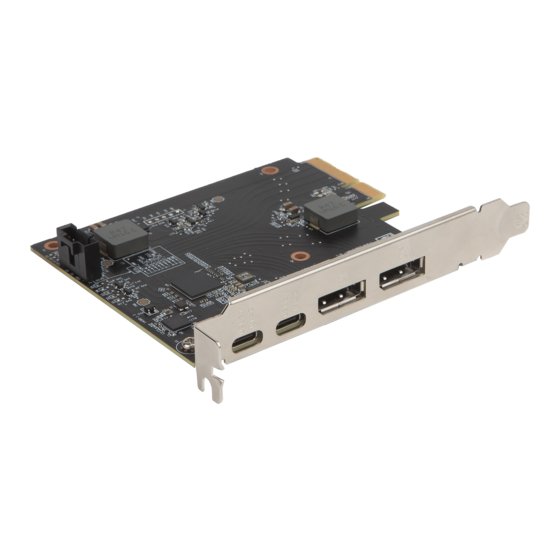
USB 3.1 Type-C/ Thunderbolt™ 3 ports:
Connect to Thunderbolt devices.
Displayport input ports:
Connect to Displayport output port on
the motherboard or graphics card.
NOTE: To connect a Thunderbolt Display,
you must connect the Displayport output
port on the motherboard or graphics card to
the Displayport input port on the
Thunderbolt M3 card.
4
ThunderboltM3
J1 connector
2
1
JTBT1 connector on
the motherboard
3
Advertisement
Table of Contents

Related Manuals for MSI ThunderboltM3


Summary of Contents for MSI ThunderboltM3
- Page 1 ThunderboltM3 Quick Installation Guide Installing ThunderboltM3 ThunderboltM3 1. Insert the ThunderboltM3 card into the PCIe 3.0 x4 Thunderbolt supportive slot. J1 connector 2. Connect one end of the TB header cable to the J1 connector on the card. 3. Connect the other end of the TB header cable to the JTBT1 connector on the motherboard.
- Page 2 Supports DisplayPort 1.2 with max, 4K x 2K @60/24 Hz ● Accessories 1 x TB header cable ● Form factor 3.35 inch x 4.11 inch (8.5 cm x 10.4 cm) Package Contents 1x ThunderboltM3 card, 1x TB header cable, 1x DisplayPort cable G52-43902X2...
Need help?
Do you have a question about the ThunderboltM3 and is the answer not in the manual?
Questions and answers