Kenwood KDC-BT640U Instruction Manual
Cd receiver
Hide thumbs
Also See for KDC-BT640U:
- Instruction manual (164 pages) ,
- Quick start manual (2 pages) ,
- Quick start manual (86 pages)

Related Manuals for Kenwood KDC-BT640U


Summary of Contents for Kenwood KDC-BT640U
- Page 1 KDC-BT640U CD-RECEIVER INSTRUCTION MANUAL © 2019 JVCKENWOOD Corporation B5A-3140-10 (MN)
-
Page 2: Table Of Contents
AUX......................12 • (Page XX) indicates references are available on the stated page. Using Other Applications ..............13 KENWOOD Remote application This symbol on the product means there are important TuneIn Radio/TuneIn Radio Pro operating and maintenance instructions in this manual. -
Page 3: Before Use
Before Use IMPORTANT • If a disc error occurs due to condensation on the laser lens, eject the disc and wait for the moisture to evaporate. • To ensure proper use, please read through this manual before using this • USB rating is indicated on the main unit. To view, detach the faceplate. product. -
Page 4: Basics
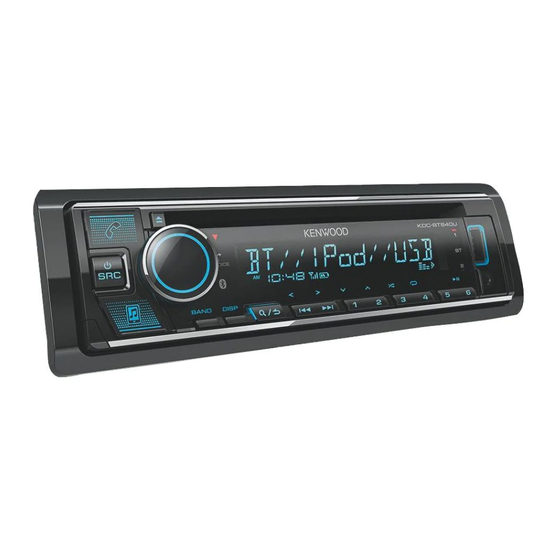
Basics Faceplate Remote control (RC-406) Volume knob Loading slot Remote sensor (Do not expose to bright sunlight.) Lights up when Bluetooth connection is established. (Page 14) Pull out the insulation sheet when using for the first time. Detach button Display window* * Only for illustration purpose. -
Page 5: Getting Started
Getting Started To adjust the clock Turn the volume knob to select [CLOCK ADJUST], then press the knob. Turn the volume knob to make the settings, then press the knob. Set the time in the order of “Hour” “Minute”. Turn the volume knob to select [CLOCK FORMAT], then press the knob. Turn the volume knob to select [12H] or [24H], then press the knob. - Page 6 [OFF]: [ZONE 1] illumination remains as [COLOR SELECT] color. For details on how to update the firmware, visit (Page 25) <www.kenwood.com/cs/ce/>. • [ZONE 2] illumination changes to light blue color when you enter [FACTORY RESET] [YES]: Resets the settings to default (except the stored station). ;...
-
Page 7: Radio
Radio Other settings Press the volume knob to enter [FUNCTION]. Turn the volume knob to select an item (see the following table), then press the knob. Repeat step 2 until the desired item is selected/activated or follow the instructions stated on the selected item. Press and hold to exit. -
Page 8: Cd/Usb/Ipod
CD/USB/iPod Radio Insert a disc [TI] [ON]: Allows the unit to temporarily switch to Traffic Information if available (“TI” indicator lights up). ; [OFF]: Cancels. Eject disc Label side [PTY SEARCH] 1 Turn the volume knob to select the available Program Type (see the following “Available Program Type for [PTY SEARCH]”), then press the knob. - Page 9 CD/USB/iPod Select music drive While in USB source, press 5 repeatedly. Stored songs in the following drive will be played back. • Selected internal or external memory of a smartphone (Mass Storage Class). • Selected drive of a multiple drive device. On the faceplate On the remote control You can also select the music drive from the [FUNCTION] menu.
- Page 10 CD/USB/iPod • To cancel, press or DIRECT. Turn the volume knob to select a file, then press the knob. • Not available if Random Play is selected. Selected file starts playing. • Not applicable for iPod USB source. [SKIP SEARCH] setting Press the volume knob to enter [FUNCTION].
-
Page 11: Spotify
Spotify You can listen to Spotify on iPhone/iPod touch (via Bluetooth or via USB On the faceplate On the remote control input terminal) or Android device (via Bluetooth). Press 6 IW. Press ENT IW. Play back/pause Preparation: Press S*3 / T. Press S*3 / T (+). -
Page 12: Aux
Spotify You can listen to music from a portable audio player via the auxiliary input Search for a song or station jack. Press Preparation: Turn the volume knob to select a list type, then press the knob. Select [ON] for [BUILT-IN AUX] in [SOURCE SELECT]. (Page 6) The list types displayed differ depending on the information sent from Spotify. -
Page 13: Using Other Applications
Repeat step 2 until the desired item is selected/activated. Press and hold to exit. You can control the KENWOOD car receiver from iPhone/iPod touch (via Bluetooth or via USB input terminal) or Android device (via Bluetooth) using To return to the previous setting item, press KENWOOD Remote application. -
Page 14: Bluetooth
Bluetooth features may not work with this Press B SRC to turn on the unit. unit. Search and select the name of your receiver (“KDC-BT640U”) on the • Be sure to turn on the Bluetooth function of the device to make the Bluetooth device. -
Page 15: Bluetooth - Mobile Phone
Bluetooth® The following operations may differ or be unavailable depending on the Auto Pairing connected phone. When you connect iPhone/iPod touch to the USB input terminal, pairing request (via Bluetooth) is automatically activated if [AUTO PAIRING] is set to On the faceplate On the remote control [ON]. - Page 16 Bluetooth® *1 This adjustment will not affect the volume of the other sources. Make a call *2 Press and hold VOL to continuously increase the volume to 15. *3 Operations may vary according to the connected Bluetooth device. You can make a call from the call history, phonebook, or dialing the number. Call by voice is also possible if your mobile phone has the feature.
- Page 17 Bluetooth® Make a call using voice recognition [PHONE BOOK] (Applicable only if the phone supports PBAP.) 1 Turn the volume knob quickly to enter alphabet search mode (if the Press and hold to activate the voice recognition of the connected phonebook contains many contacts).
-
Page 18: Press And Hold
To return to the previous setting item, press Press and hold “PLEASE PAIR YOUR PHONE PIN 0000” appears on the display. Default: [XX] Search and select the name of your receiver (“KDC-BT640U”) on the [BT MODE] Bluetooth device. [PHONE SELECT] Operate the Bluetooth device to confirm pairing. -
Page 19: Bluetooth - Audio
Bluetooth® Bluetooth — Audio On the faceplate Repeat play Press 4 repeatedly. [ALL REPEAT], [FILE REPEAT], [GROUP REPEAT]*, [REPEAT OFF] Random play Press and hold 3 to select [ALL RANDOM] or [GROUP RANDOM]*. • Press 3 to select [RANDOM OFF]. While in BT AUDIO source, you can connect to five Bluetooth audio devices and switch between these five devices. -
Page 20: Audio Settings
Audio Settings [MANUAL EQ] Adjusts your own sound settings for each source. • The settings are stored to [USER] in [PRESET EQ]. • The settings made may affect the current settings of [EASY EQ]. [62.5HZ] [LEVEL] [LEVEL –9] to [LEVEL +9] ([LEVEL +5]): Adjusts the level to memorize for each source. - Page 21 Audio Settings Crossover settings [FADER] (Not applicable if 3-way crossover is selected.) [R15] to [F15] ([0]): Adjusts the front and rear speaker output balance. Below are the available setting items for 2-way crossover and 3-way [BALANCE] [L15] to [R15] ([0]): Adjusts the left and right speaker output balance. crossover.
- Page 22 Audio Settings 2-way crossover setting items [SUBWOOFER [SW LPF FRQ] [30HZ]/[40HZ]/[50HZ]/[60HZ]/[70HZ]/[80HZ]/ LPF] [90HZ]/[100HZ]/[120HZ]/[150HZ]/[180HZ]/ [SPEAKER SIZE] [220HZ]/[250HZ]/[THROUGH] [FRONT] [SIZE] [8CM]/[10CM]/[12CM]/[13CM]/[16CM]/[17CM]/ [SW LPF SLOPE] [–6DB]/[–12DB]/[–18DB]/[–24DB] [18CM]/[4×6]/[5×7]/[6×8]/[6×9]/[7×10] [SW LPF PHASE] [REVERSE] (180°)/[NORMAL] (0°) [TWEETER] [SMALL]/[MIDDLE]/[LARGE]/[NONE] (not connected) [SW LPF GAIN] [–8] to [0] [REAR] [8CM]/[10CM]/[12CM]/[13CM]/[16CM]/[17CM]/[18CM]/[4×6]/ •...
- Page 23 Audio Settings [MID RANGE] [HPF FRQ] [30HZ]/[40HZ]/[50HZ]/[60HZ]/[70HZ]/[80HZ]/[90HZ]/ [DTA SETTINGS] [100HZ]/[120HZ]/[150HZ]/[180HZ]/[220HZ]/[250HZ]/ [POSITION] Selects your listening position (reference point). [THROUGH] [ALL]: Not compensating ; [FRONT RIGHT]: Front right seat ; [HPF SLOPE] [–6DB]/[–12DB] [FRONT LEFT]: Front left seat ; [FRONT ALL]: Front seats •...
-
Page 24: Display Settings
Display Settings Audio Settings When 3-way crossover is selected: Zone identification for color settings and brightness settings [TWEETER LEFT]/[TWEETER RIGHT]/[MID LEFT]/[MID RIGHT]/[WOOFER] – You can only select [WOOFER] if a setting other than [NONE] is selected for [WOOFER] of [SPEAKER SIZE]. (Page 22) •... - Page 25 Display Settings Default: [XX] [LEVEL METER] [ON]: Shows the level meter on the display window (as shown below). ; [OFF]: Cancels. [DISPLAY] [COLOR SELECT] Selects illumination colors for [ALL ZONE], [ZONE 1] and [ZONE 2] separately. 1 Select a zone. (See the illustration on page 24.) Level meter 2 Select a preset color for the selected zone.
-
Page 26: Installation/Connection
Installation/Connection Part list for installation This section is for the professional installer. For safety’s sake, leave wiring and mounting to professionals. Consult the (A) Faceplate (×1) (B) Trim plate (×1) car audio dealer. WARNING • The unit can only be used with a 12 V DC power supply, negative ground. •... - Page 27 Installation/Connection Installing the unit (in-dash mounting) Installing the unit (without mounting sleeve) Remove the mounting sleeve and trim plate from the unit. Align the holes in the unit (on both sides) with the vehicle mounting bracket and secure the unit with screws (supplied). Use only the specified screws.
- Page 28 If no connections are made, do not let the wire come out from the tab. White/Black For 3-way crossover: Mid range speaker (left) Gray Brown To front speaker (right)/ To connect the KENWOOD navigation system, refer your Gray/Black For 3-way crossover: Mid range speaker (right) (Mute control wire) navigation manual Green...
-
Page 29: References
More information damage to the unit. For: – Latest firmware updates and latest compatible item list – KENWOOD original application Output terminals 2-way crossover 3-way crossover – Any other latest information Visit <www.kenwood.com/cs/ce/>. - Page 30 • The song order displayed on the selection menu of this unit may differ from that of the iPod/ iPhone. • You cannot operate iPod if “KENWOOD” or “ ” is displayed on iPod. • Depending on the version of the operating system of the iPod/iPhone, some functions may not operate on this unit.
-
Page 31: Change The Display Information
Troubleshooting References Change the display information Symptom Remedy Sound cannot be heard. • Adjust the volume to the optimum level. Each time you press DISP, the display information changes. • Check the cords and connections. • If the information is unavailable or not recorded, “NO TEXT”, “NO INFO”, or other information (eg. - Page 32 Troubleshooting Symptom Remedy Symptom Remedy Disc cannot be ejected. Press and hold to forcibly eject the disc. Be careful not The iPod/iPhone does not • Check the connection between this unit and iPod/iPhone. to drop the disc when it is ejected. If this does not solve turn on or does not work.
- Page 33 Troubleshooting Symptom Remedy Symptom Remedy No Bluetooth device is • Search from the Bluetooth device again. “NOT SUPPORT” The connected phone does not support Voice Recognition detected. • Reset the unit. (Page 4) feature or phonebook transfer. Bluetooth pairing cannot •...
-
Page 34: Specifications
Specifications FM Frequency Range 87.5 MHz — 108.0 MHz (50 kHz step) Signal-to-Noise Ratio (1 kHz) 99 dB Usable Sensitivity 8.2 dBf (0.71 μV/75 Ω) Dynamic Range 92 dB (S/N = 30 dB) Channel Separation 90 dB Quieting Sensitivity 17.2 dBf (2.0 μV/75 Ω) MP3 Decode Compliant with MPEG-1/2 Audio Layer-3 (DIN S/N = 46 dB) - Page 35 Specifications Frequency Response (±3 dB) 20 Hz — 20 kHz Input Maximum Voltage 1 000 mV Input Impedance 30 kΩ Maximum Output Power 50 W × 4 Full Bandwidth Power 22 W × 4 (at less than 1 % THD) Speaker Impedance 4 Ω...
- Page 36 Specifications • Microsoft and Windows Media are either registered trademarks or trademarks of Microsoft The marking of products using lasers Corporation in the United States and/or other countries. The label is attached to the chassis/case and says that the • Use of the Made for Apple badge means that an accessory has been designed to connect specifically component uses laser beams that have been classified as to the Apple product(s) identified in the badge and has been certified by the developer to meet Apple Class 1.
- Page 37 SOFTWARE LICENSE AGREEMENT Article 4 Right pertaining to the Licensed Software Any and all copyrights and other rights pertaining to the Licensed Software and related documents The software embedded in the Product (hereinafter the "Licensed Software") provided by Licensor is shall belong to the Licensor or the original holder of the right who granted to the Licensor the license or copyrighted to or sublicensable by the Licensor, and this Agreement provides for the terms and conditions sublicense for the Licensed Software (hereinafter the "Original Rightholder"), and the User shall not be...
- Page 38 Important Notice concerning the Software Article 9 Destruction of the Licensed Software If this Agreement is terminated pursuant to the provision of Article 8, the User shall destroy the Licensed -jansson Software, any related documents and copies thereof within two (2) weeks from such date of termination. Copyright (c) 2009-2012 Petri Lehtinen <petri@digip.org>...
- Page 39 -CMP sha2 AUTHOR: Aaron D. Gifford - http://www.aarongifford.com/ The MIT License (MIT) Copyright (c) 2014 Charles Gunyon Copyright (c) 2000-2001, Aaron D. Gifford All rights reserved. Permission is hereby granted, free of charge, to any person obtaining a copy of this software and associated documentation files (the "Software"), to deal in the Software without restriction, including without You may obtain a copy of the license at limitation the rights to use, copy, modify, merge, publish, distribute, sublicense, and/or sell copies of the...
- Page 40 Copyright (c) 1995, 1996 Carnegie-Mellon University. All rights reserved. T-Kernel 2.0 This product uses the source code of T-Kernel 2.0 under T-License 2.0 granted by T-Engine Forum Author: Chris G. Demetriou (www.tron.org) Permission to use, copy, modify and distribute this software and its documentation is hereby granted, BSD-3-Clause provided that both the copyright notice and this permission notice appear in all copies of the software, Copyright (c) 2000-2001, Aaron D.
- Page 41 ﺍﻟﻤﻮﺍﺻﻔﺎﺕ ﻭﺿﻊ ﻋﻼﻣﺎﺕ ﻋﻠﻰ ﺍﻟﻤﻨﺘﺠﺎﺕ ﺑﺎﺳﺘﺨﺪﺍﻡ ﺍﻟﻠﻴﺰﺭ • Microsoft and Windows Media are either registered trademarks or trademarks of Microsoft Corporation in the United States and/or other countries. ﻫﺬﺍ ﺍﻟﻤﻠﺼﻖ ﻋﻠﻰ ﺍﻟﺸﺎﺳﻴﻪ / ﺍﻟﺼﻨﺪﻭﻕ ﻭﻳﻌﻨﻲ ﺃﻥ • Use of the Made for Apple badge means that an accessory has been designed to connect specifically ﺍﻟﻤﻜﻮﻥ...
- Page 42 ﺍﻟﻤﻮﺍﺻﻔﺎﺕ 02 ﻫﺮﺗﺰ — 02 ﻛﻴﻠﻮ ﻫﺮﺗﺰ (ﺍﺳﺘﺠﺎﺑﺔ ﺍﻟﺘﺮﺩﺩ )3± ﺩﻳﺴﻴﺒﻞ 000 1 ﻣﻠﻠﻲ ﻓﻮﻟﺖ ﺍﻟﺠﻬﺪ ﺍﻷﻗﺼﻰ ﻟﻠﺪﺧﻞ 03 ﻛﻴﻠﻮ ﺃﻭﻡ ﻣﻌﺎﻭﻗﺔ ﺍﻟﺪﺧﻞ 4 × 05 ﻭﺍﻁ ﻗﺪﺭﺓ ﺍﻟﺨﺮﺝ ﺍﻟﻘﺼﻮﻯ 4 × 22 ﻭﺍﻁ ﻗﺪﺭﺓ ﺳﻌﺔ ﻧﻄﺎﻕ ﺍﻟﺒﺚ ﺍﻟﻜﺎﻣﻞ )ﻋﻨﺪ ﺃﻗﻞ ﻣﻦ 1% ﺇﺟﻤﺎﻟﻲ ﺗﺸﺘﺖ (ﺍﻟﺼﻮﺕ...
- Page 43 ﺍﻟﻤﻮﺍﺻﻔﺎﺕ 99 ﺩﻳﺴﻴﺒﻞ ﻧﺴﺒﺔ ﺍﻹﺷﺎﺭﺓ ﺇﻟﻰ ﺍﻟﻀﻮﺿﺎﺀ 5.78 ﻣﻴﺠﺎﻫﺮﺗﺰ — 0.801 ﻣﻴﺠﺎﻫﺮﺗﺰ ﻧﻄﺎﻕ ﺍﻟﺘﺮﺩﺩ ()1 ﻛﻴﻠﻮ ﻫﺮﺗﺰ ()05 ﻛﻴﻠﻮ ﻫﺮﺗﺰ ﻟﻠﺨﻄﻮﺓ 29 ﺩﻳﺴﻴﺒﻞ ﺍﻟﻤﺠﺎﻝ ﺍﻟﺪﻳﻨﺎﻣﻴﻜﻲ ( 2.8 )17.0 ﻣﻴﻜﺮﻭ ﻓﻮﻟﺖ/57 ﺍﻭﻡdBf ﺍﻟﺤﺴﺎﺳﻴﺔ ﺍﻟﻘﺎﺑﻠﺔ ﻟﻼﺳﺘﺨﺪﺍﻡ ( = 03 ﺩﻳﺴﻴﺒﻞS/N) 09 ﺩﻳﺴﻴﺒﻞ ﻓﺼﻞ...
- Page 44 ﺍﻟﺒﺤﺚ ﻋﻦ ﺍﻻﻋﻄﺎﻝ ﻭﺍﻻﺻﻼﺡ ﻣﻌﺎﻟﺠﺔ ﺍﻷﻋﻄﺎﻝ ﺍﻻﻋﺮﺍﺽ ﻣﻌﺎﻟﺠﺔ ﺍﻷﻋﻄﺎﻝ ﺍﻻﻋﺮﺍﺽ ﺍﻟﻬﺎﺗﻒ ﺍﻟﻤﻮﺻﻮﻝ ﻻ ﻳﺪﻋﻢ ﻣﻴﺰﺓ ﺍﻟﺘﻌﺮﻑ ﻋﻠﻰ ﺍﻟﺼﻮﺕ ﺍﻭ . ﻣﺮﺓ ﺃﺧﺮﻯBluetooth • ﺍﻟﺒﺤﺚ ﻣﻦ ﺟﻬﺎﺯ ﻟﻢ ﻳﺘﻢ ﺍﻟﺘﻌﺮﻑ ﻋﻠﻰ ﺟﻬﺎﺯ “NOT SUPPORT” .ﺍﺭﺳﺎﻝ ﺩﻟﻴﻞ ﺍﻟﻬﺎﺗﻒ (4 • ﺃﻋﺪ ﺿﺒﻂ ﺍﻟﻮﺣﺪﺓ. )ﺻﻔﺤﺔ .Bluetooth ﻻ...
- Page 45 ﺍﻟﺒﺤﺚ ﻋﻦ ﺍﻻﻋﻄﺎﻝ ﻭﺍﻻﺻﻼﺡ ﻣﻌﺎﻟﺠﺔ ﺍﻷﻋﻄﺎﻝ ﺍﻻﻋﺮﺍﺽ ﻣﻌﺎﻟﺠﺔ ﺍﻷﻋﻄﺎﻝ ﺍﻻﻋﺮﺍﺽ .iPhone/iPod • ﺍﻓﺤﺺ ﺍﻟﻮﺻﻠﺔ ﺑﻴﻦ ﻫﺬﻩ ﺍﻟﻮﺣﺪﺓ ﻭ ﻻ ﺗﺼﻞiPhone/iPod ﺟﻬﺎﺯ .ﻹﺧﺮﺍﺝ ﺍﻷﺳﻄﻮﺍﻧﺔ ﺑﺎﻟﻘﻮﺓ ﺍﺿﻐﻂ ﻣﻊ ﺍﻻﺳﺘﻤﺮﺍﺭ ﻋﻠﻰ .ﺗﻌﺬﺭ ﺇﺧﺮﺍﺝ ﺍﻷﺳﻄﻮﺍﻧﺔ ﻭﺃﻋﺪ ﺿﺒﻄﻪ ﺑﺎﺳﺘﺨﺪﺍﻡ ﺍﻹﻏﻼﻕiPhone/iPod • ﺍﻓﺼﻞ .ﺇﻟﻴﻪ ﺍﻟﻄﺎﻗﺔ ﺃﻭ ﻻ ﻳﻌﻤﻞ .ﻛﻦ...
- Page 46 ﺍﻟﺒﺤﺚ ﻋﻦ ﺍﻻﻋﻄﺎﻝ ﻭﺍﻻﺻﻼﺡ ﻣﺮﺍﺟﻊ ﺗﻐﻴﻴﺮ ﻣﻌﻠﻮﻣﺎﺕ ﺍﻟﺸﺎﺷﺔ ﻣﻌﺎﻟﺠﺔ ﺍﻷﻋﻄﺎﻝ ﺍﻻﻋﺮﺍﺽ • ﺍﺿﺒﻂ ﻣﺴﺘﻮﻯ ﻗﻮﺓ ﺍﻟﺼﻮﺕ ﻋﻠﻰ ﺍﻓﻀﻞ ﻣﺴﺘﻮﻯ .ﻻ ﻳﻤﻜﻦ ﺳﻤﺎﻉ ﺍﻟﺼﻮﺕ .، ﺗﺘﻐﻴﺮ ﻣﻌﻠﻮﻣﺎﺕ ﺍﻟﺸﺎﺷﺔDISP ﻛﻠﻤﺎ ﺿﻐﻄﺖ ﻋﻠﻰ .ﻣﻤﻜﻦ “ ﺃﻭNO INFO” “ ﺃﻭNO TEXT” • ﺍﺫﺍ ﻟﻢ ﺗﻜﻦ ﺍﻟﻤﻌﻠﻮﻣﺎﺕ ﻣﺘﻮﻓﺮﺓ ﺃﻭ ﺍﻧﻬﺎ ﻏﻴﺮ ﻣﺴﺠﻠﺔ، ﻳﻈﻬﺮ .•...
- Page 47 • ﻗﺪ ﻳﺨﺘﻠﻒ ﺗﺮﺗﻴﺐ ﺍﻷﻏﺎﻧﻲ ﺍﻟﻤﻌﺮﻭﺿﺔ ﻓﻲ ﻗﺎﺋﻤﺔ ﺍﻻﺧﺘﻴﺎﺭ ﻓﻲ ﻫﺬﻩ ﺍﻟﻮﺣﺪﺓ ﻋﻦ ﺍﻟﺘﺮﺗﻴﺐ ﻓﻲ .iPhone/iPod ﺟﻬﺎﺯ .iPod “ ﺃﻭ ” “ ﻓﻲ ﺟﻬﺎﺯKENWOOD” ﻓﻲ ﺣﺎﻟﺔ ﻇﻬﻮﺭiPod • ﻟﻦ ﻳﻤﻜﻨﻚ ﺗﺸﻐﻴﻞ ﺟﻬﺎﺯ ، ﻗﺪ ﻻ ﺗﻌﻤﻞ ﺑﻌﺾ ﺍﻟﻮﻇﺎﺋﻒiPhone/iPod • ﺍﻋﺘﻤﺎﺩﺍ ﻋﻠﻰ ﻧﺴﺨﺔ ﻧﻈﺎﻡ ﺍﻟﺘﺸﻐﻴﻞ ﺍﻟﺨﺎﺹ ﺑﺠﻬﺎﺯ...
- Page 48 ﻋﻨﺪ ﺗﻮﺻﻴﻞ ﻣﻀﺨﻢ ﺻﻮﺕ ﺧﺎﺭﺟﻲ ﺍﻟﻰ ﺍﻃﺮﺍﻑ ﺍﻻﺧﺮﺍﺝ ﻋﻠﻰ ﻫﺬﻩ ﺍﻟﻮﺣﺪﺓ، ﻗﻢ ﺑﺘﻮﺻﻴﻞ ﺳﻠﻚ ﻣﺰﻳﺪ ﻣﻦ ﺍﻟﻤﻌﻠﻮﻣﺎﺕ .ﺍﻟﺘﺄﺭﻳﺾ ﺍﻟﺨﺎﺹ ﺑﻤﻀﺨﻢ ﺍﻟﺼﻮﺕ ﺍﻟﻰ ﺷﺎﺳﻴﻪ ﺍﻟﺴﻴﺎﺭﺓ ﺑﺈﺣﻜﺎﻡ ﻟﺘﺘﺠﻨﺐ ﺍﺗﻼﻑ ﺍﻟﻮﺣﺪﺓ ﻟـ: – ﺁﺧﺮ ﺗﺤﺪﻳﺜﺎﺕ ﺍﻟﺒﺮﺍﻣﺞ ﺍﻟﺜﺎﺑﺘﺔ ﻭﺍﺣﺪﺙ ﻗﺎﺋﻤﺔ ﺑﻨﻮﺩ ﻣﺘﻮﺍﻓﻘﺔ ﺍﻻﺻﻠﻲKENWOOD – ﺍﻟﺘﻄﺒﻴﻖ :ﺗﻌﺪﻳﺔ 3 ﻗﻨﻮﺍﺕ ﺍﻟﺘﻌﺪﻳﺔ ﺑﻘﻨﺎﺗﻴﻦ ﺍﻃﺮﺍﻑ ﺍﻟﺨﺮﺝ...
- Page 49 .ﺇﺫﺍ ﻟﻢ ﻳﺘﻢ ﻋﻤﻞ ﺃﻳﺔ ﺗﻮﺻﻴﻼﺕ، ﻓﻼ ﺗﺠﻌﻞ ﺍﻟﺴﻠﻚ ﻳﺒﺮﺯ ﻣﻦ ﺍﻟﺸﺮﻳﻂ ﻟﻠﺘﻌﺪﻳﺔ 3 ﻗﻨﻮﺍﺕ: ﺳﻤﺎﻋﺔ ﻣﺘﻮﺳﻄﺔ ﺍﻟﻨﻄﺎﻕ ﺃﺑﻴﺾ/ﺃﺳﻮﺩ ()ﺍﻟﻴﺴﺮﻯ ﺭﻣﺎﺩﻱ /(ﺇﻟﻰ ﺍﻟﺴﻤﺎﻋﺔ ﺍﻷﻣﺎﻣﻴﺔ )ﺍﻟﻴﻤﻨﻰ ﺑﻨﻲ ، ﻋﻠﻴﻚ ﺑﺎﻟﺮﺟﻮﻉKENWOOD ﻟﺘﻮﺻﻴﻞ ﻧﻈﺎﻡ ﺍﻟﻤﻼﺣﺔ ﻣﻦ ﺭﻣﺎﺩﻱ/ﺃﺳﻮﺩ ﻟﻠﺘﻌﺪﻳﺔ 3 ﻗﻨﻮﺍﺕ: ﺳﻤﺎﻋﺔ ﻣﺘﻮﺳﻄﺔ ﺍﻟﻨﻄﺎﻕ )ﺳﻠﻚ ﺍﻟﺘﺤﻜﻢ ﻓﻲ ﻛﺘﻢ ﺇﻟﻰ ﺩﻟﻴﻞ ﺍﻟﻤﻼﺣﺔ ()ﺍﻟﻴﻤﻨﻰ ﺃﺧﻀﺮ...
- Page 50 ﺍﻟﺘﺮﻛﻴﺐ/ﺍﻟﺘﻮﺻﻴﻞ (ﺗﺮﻛﻴﺐ ﺍﻟﻮﺣﺪﺓ )ﺑﺪﻭﻥ ﺇﻃﺎﺭ ﺍﻟﺘﺮﻛﻴﺐ (ﺗﺮﻛﻴﺐ ﺍﻟﻮﺣﺪﺓ )ﺩﺍﺧﻞ ﺗﺎﺑﻠﻮ ﺍﻟﺴﻴﺎﺭﺓ .ﺍﻧﺰﻉ ﺇﻃﺎﺭ ﺍﻟﺘﺮﻛﻴﺐ ﻭﻟﻮﺣﺔ ﺍﻟﺘﻬﻴﺌﺔ ﻣﻦ ﺍﻟﻮﺣﺪﺓ ﻗﻢ ﺑﻤﺤﺎﺫﺍﺓ ﺍﻟﺘﺠﺎﻭﻳﻒ ﺍﻟﻤﻮﺟﻮﺩﺓ ﻓﻲ ﺍﻟﺠﻬﺎﺯ )ﻓﻲ ﻛﻼ ﺍﻟﺠﺎﻧﺒﻴﻦ( ﻣﻊ ﺭﻑ .(ﺍﻟﺘﺮﻛﻴﺐ ﺑﺎﻟﺴﻴﺎﺭﺓ ﻭﻗﻢ ﺑﺘﺜﺒﻴﺖ ﺍﻟﺠﻬﺎﺯ ﺑﺎﺳﺘﺨﺪﺍﻡ ﺍﻟﺒﺮﺍﻏﻲ )ﻣﺮﻓﻖ ﺍﺳﺘﺨﺪﻡ ﺍﻟﺒﺮﺍﻏﻲ ﺍﻟﻤﺤﺪﺩﺓ ﻓﻘﻂ. ﻓﻘﺪ ﻳﺴﺒﺐ ﺍﺳﺘﺨﺪﺍﻡ ﺍﻟﺒﺮﺍﻏﻲ ﻏﻴﺮ ﺍﻟﺼﺤﻴﺤﺔ ﺗﻠ ﻔ ﹰ ﺎ .ﻟﻠﺠﻬﺎﺯ...
- Page 51 ﺍﻟﺘﺮﻛﻴﺐ/ﺍﻟﺘﻮﺻﻴﻞ ﻗﺎﺋﻤﺔ ﻗﻄﻊ ﺍﻟﻐﻴﺎﺭ ﺍﻟﻤﺴﺘﺨﺪﻣﺔ ﻓﻲ ﺍﻟﺘﺮﻛﻴﺐ .ﻫﺬﺍ ﺍﻟﻘﺴﻢ ﻫﻮ ﻟﻠﻤﺸﺒﺖ ﺍﻟﻤﺤﺘﺮﻑ ﻟﺪﻭﺍﻋﻲ ﺍﻟﺴﻼﻣﺔ، ﺍﺗﺮﻙ ﻣﻬﻤﺔ ﺗﻮﺻﻴﻞ ﺍﻷﺳﻼﻙ ﻭﺍﻟﺘﺮﻛﻴﺐ ﻟﻠﻔﻨﻴﻴﻦ ﺍﻟﻤﺨﺘﺼﻴﻦ. ﺍﺳﺘﺸﻴﺮ ﺑﺎﺋﻊ (1×) ﻭﺣﺔ ﺍﻟﺰﻳﻨﺔ (1×) ﻭﺍﺟﻬﺔ ﺍﻟﺠﻬﺎﺯ .ﺃﺟﻬﺰﺓ ﺍﻟﺼﻮﺗﻴﺎﺕ ﺍﻟﺨﺎﺻﺔ ﺑﺎﻟﺴﻴﺎﺭﺍﺕ ﺗﺤﺬﻳﺮ .• ﻳﻤﻜﻦ ﺍﺳﺘﺨﺪﺍﻡ ﺍﻟﻮﺣﺪﺓ ﻓﻘﻂ ﻓﻲ ﺳﻴﺎﺭﺓ ﺑﻬﺎ ﻣﺼﺪﺭ ﺗﻴﺎﺭ ﻣﺒﺎﺷﺮ 21 ﻓﻮﻟﺖ، ﻭﺗﺄﺭﻳﺾ ﺳﻠﺒﻲ .•...
- Page 52 ﺇﻋﺪﺍﺩﺍﺕ ﺍﻟﺸﺎﺷﺔ [XX] :ﺍﻓﺘﺮﺍﺿﻲ [: ﻳﻌﺮﺽ ﻋﺪﺍﺩ ﺍﻟﻤﺴﺘﻮﻯ ﻋﻠﻰ ﻧﺎﻓﺬﺓ ﺍﻟﻌﺮﺽ )ﻛﻤﺎ ﻣﺒﻴﻦ ﺍﺩﻧﺎﻩ(. ؛ON] [LEVEL METER] .[: ﺍﻟﻐﺎﺀOFF] [DISPLAY] [ ﺷﻜﻞZONE 2] [ ﻭZONE 1] [ ﻭALL ZONE] ﻳﺨﺘﺎﺭ ﺍﻟﻮﺍﻥ ﺍﻻﺿﺎﺀﺓ ﻟﻜﻞ ﻣﻦ [COLOR SELECT] .ﻣﻨﻔﺼﻞ (.24 1 ﺍﺧﺘﺮ ﻣﻨﻄﻘﺔ. )ﺭﺍﺟﻊ ﺍﻟﺮﺳﻢ ﺍﻟﺘﻮﺿﻴﺤﻲ ﻓﻲ ﺻﻔﺤﺔ ﻣﻘﻴﺎﺱ...
- Page 53 ﺇﻋﺪﺍﺩﺍﺕ ﺍﻟﺸﺎﺷﺔ ﺇﻋﺪﺍﺩﺍﺕ ﺍﻟﺼﻮﺕ ﺗﺤﺪﻳﺪ ﻣﻨﻄﻘﺔ ﻹﻋﺪﺍﺩﺍﺕ ﺍﻟﻠﻮﻥ ﻭﺇﻋﺪﺍﺩﺍﺕ ﺍﻟﺴﻄﻮﻉ :ﻋﻨﺪﻣﺎ ﺗﻜﻮﻥ ﺗﻌﺪﻳﺔ 3 ﻗﻨﻮﺍﺕ ﻣﺨﺘﺎﺭﺓ [WOOFER]/[MID RIGHT]/[MID LEFT]/[TWEETER RIGHT]/[TWEETER LEFT] [ ﻓﻲWOOFER] [ ﻣﺨﺘﺎﺭ ﻟﻠﺒﻨﺪNONE] [ ﻓﻘﻂ ﺍﺫﺍ ﻛﺎﻥ ﺍﻱ ﺑﻨﺪ ﻏﻴﺮWOOFER] – ﻳﻤﻜﻦ ﺍﺧﺘﻴﺎﺭ (22 [. )ﺻﻔﺤﺔSPEAKER SIZE] :[ ﻗﺎﺑﻞ...
- Page 54 ﺇﻋﺪﺍﺩﺍﺕ ﺍﻟﺼﻮﺕ /[90HZ]/[80HZ]/[70HZ]/[60HZ]/[50HZ]/[40HZ]/[30HZ] [DTA SETTINGS] [HPF FRQ] [MID RANGE] /[250HZ]/[220HZ]/[180HZ]/[150HZ]/[120HZ]/[100HZ] .(ﻳﺨﺘﺎﺭ ﻣﻮﺿﻊ ﺍﻻﺳﺘﻤﺎﻉ )ﻧﻘﻄﺔ ﻣﺮﺟﻌﻴﺔ [POSITION] [: ﺍﻟﻤﻘﻌﺪ ﺍﻻﻣﺎﻣﻲ ﺍﻻﻳﻤﻦ ؛FRONT RIGHT] [: ﻻ ﺗﻌﻮﻳﺾ ؛ALL] [THROUGH] [: ﺍﻟﻤﻘﺎﻋﺪFRONT ALL] [: ﺍﻟﻤﻘﻌﺪ ﺍﻻﻣﺎﻣﻲ ﺍﻻﻳﺴﺮ ؛FRONT LEFT] [HPF SLOPE] [–12DB]/[–6DB] ﺍﻻﻣﺎﻣﻴﺔ /[6.3KHZ]/[5KHZ]/[4KHZ]/[2.5KHZ]/[1.6KHZ]/[1KHZ] [LPF FRQ] .[2-WAY X’OVER] [ ﻓﻘﻂ...
- Page 55 ﺇﻋﺪﺍﺩﺍﺕ ﺍﻟﺼﻮﺕ ﺑﻨﻮﺩ ﺇﻋﺪﺍﺩ ﺗﻌﺪﻳﺔ 2 ﻗﻨﻮﺍﺕ /[80HZ]/[70HZ]/[60HZ]/[50HZ]/[40HZ]/[30HZ] [SW LPF FRQ] [SUBWOOFER /[180HZ]/[150HZ]/[120HZ]/[100HZ]/[90HZ] LPF] [SPEAKER SIZE] [THROUGH]/[250HZ]/[220HZ] /[17CM]/[16CM]/[13CM]/[12CM]/[10CM]/[8CM] [SIZE] [FRONT] [SW LPF SLOPE] [–24DB]/[–18DB]/[–12DB]/[–6DB] [7×10]/[6×9]/[6×8]/[5×7]/[4×6]/[18CM] (0°) [NORMAL]/(180°) [REVERSE] [SW LPF PHASE] ([ )ﻏﻴﺮ ﻣﻮﺻﻮﻝNONE]/[LARGE]/[MIDDLE]/[SMALL] [TWEETER] [0] ]8–[ ﺇﻟﻰ [SW LPF GAIN] /[4×6]/[18CM]/[17CM]/[16CM]/[13CM]/[12CM]/[10CM]/[8CM] [REAR] [ ﺍﻟﺨﺎﺹSUBWOOFER LPF] [ ﺍﻭSPEAKER SIZE] [ ﺍﻟﺨﺎﺹ...
- Page 56 ﺇﻋﺪﺍﺩﺍﺕ ﺍﻟﺼﻮﺕ ﺇﻋﺪﺍﺩﺍﺕ ﺍﻟﺘﻌﺪﻳﺔ (.)ﻏﻴﺮ ﻗﺎﺑﻞ ﻟﻠﺘﻄﺒﻴﻖ ﻋﻦ ﺍﺧﺘﻴﺎﺭ ﺗﻌﺪﻳﺔ 3 ﻗﻨﻮﺍﺕ [FADER] .[ )]0[(: ﺍﺿﺒﻂ ﺗﻌﺎﺩﻝ ﺧﺮﺝ ﺍﻟﺴﻤﺎﻋﺔ ﺍﻟﺨﻠﻔﻴﺔ ﻭﺍﻷﻣﺎﻣﻴﺔF15] [ ﺇﻟﻰR15] .ﻓﻴﻤﺎ ﻳﻠﻲ ﺑﻨﻮﺩ ﺍﻹﻋﺪﺍﺩ ﺍﻟﻤﺘﺎﺣﺔ ﻟﻠﺘﻌﺪﻳﺔ ﺑﻘﺎﺗﻴﻦ ﺃﻭ ﺑﻌﺪﻳﺔ 3 ﻗﻨﻮﺍﺕ [ )]0[(: ﻳﻀﺒﻂ ﺗﻮﺍﺯﻥ ﺇﺧﺮﺍﺝ ﺍﻟﺴﻤﺎﻋﺘﻴﻦ ﺍﻟﻴﻤﻨﻰR15] [ ﺇﻟﻰL15] [BALANCE] .ﻭﺍﻟﻴﺴﺮﻯ...
- Page 57 ﺇﻋﺪﺍﺩﺍﺕ ﺍﻟﺼﻮﺕ .ﻳﻀﺒﻂ ﺍﻋﺪﺍﺩﺍﺕ ﺍﻟﺼﻮﺕ ﺍﻟﺨﺎﺻﺔ ﺑﻚ ﻟﻜﻞ ﻣﺼﺪﺭ [MANUAL EQ] .[PRESET EQ] [ ﻓﻲ ﺍﻟﻮﺿﻊUSER] • ﺗﻢ ﺗﺨﺰﻳﻦ ﺍﻹﻋﺪﺍﺩ ﻟﻠﺒﻨﺪ .[EASY EQ] • ﺍﻹﻋﺪﺍﺩﺍﺕ ﺍﻟﺘﻲ ﺗﻢ ﺗﻨﻔﻴﺬﻫﺎ ﻗﺪ ﺗﺆﺛﺮ ﻋﻠﻰ ﺇﻋﺪﺍﺩﺍﺕ [(: ﺿﺒﻂLEVEL +5]) [LEVEL +9] [ ﺇﻟﻰLEVEL –9] [LEVEL] [62.5HZ] .ﺍﻟﻤﺴﺘﻮﻯ...
- Page 58 Bluetooth® — ﺻﻮﺕBluetooth ﻋﻠﻰ ﻏﻄﺎﺀ ﺍﻟﺤﻤﺎﻳﺔ ﺇﻟﻰ .4 ﺑﺘﻜﺮﺍﺭ ﺍﺿﻐﻂ ﺗﻜﺮﺍﺭ ﺍﻟﺘﺸﻐﻴﻞ ،*[GROUP REPEAT] ،[FILE REPEAT] ،[ALL REPEAT] [REPEAT OFF] [ALL RANDOM] 3 ﻟﺘﺤﺪﻳﺪ ﺍﺿﻐﻂ ﺑﺎﺳﺘﻤﺮﺍﺭ ﻋﻠﻰ ﺍﻟﺘﺸﻐﻴﻞ ﺑﺘﺮﺗﻴﺐ ﻋﺸﻮﺍﺋﻲ .*[GROUP RANDOM] ﺃﻭ .[RANDOM OFF] 3 ﻻﺧﺘﻴﺎﺭ • ﺍﺿﻐﻂ Bluetooth ،...
- Page 59 ﺍﺿﻐﻂ ﻣﻊ ﺍﻻﺳﺘﻤﺮﺍﺭ ﻋﻠﻰ ﻟﻠﺮﺟﻮﻉ ﺇﻟﻰ ﻋﻨﺼﺮ ﺍﻹﻋﺪﺍﺩ ﺍﻟﺴﺎﺑﻖ، ﺍﺿﻐﻂ ﻋﻠﻰ .“ ﺍﻟﺘﻲ ﺗﻈﻬﺮ ﻋﻠﻰ ﺍﻟﺸﺎﺷﺔPLEASE PAIR YOUR PHONE PIN 0000” “( ﻋﻠﻰKDC-BT640U”) ﺍﺑﺤﺚ ﻭﺍﺧﺘﺮ ﺍﺳﻢ ﺟﻬﺎﺯ ﺍﻻﺳﺘﻘﺒﺎﻝ ﺍﻟﺨﺎﺹ ﺑﻚ [XX] :ﺍﻓﺘﺮﺍﺿﻲ .Bluetooth ﺟﻬﺎﺯ . ﻟﺘﺄﻛﻴﺪ ﺍﻹﻗﺮﺍﻥBluetooth ﻗﻢ ﺑﺘﺸﻐﻴﻞ ﺟﻬﺎﺯ...
- Page 60 Bluetooth® ﺍﺟﺮﺍﺀ ﻣﻜﺎﻟﻤﺔ ﺑﻮﺍﺳﻄﺔ ﻣﻴﺰﺓ ﺍﻟﺘﻌﺮﻑ ﻋﻠﻰ ﺍﻟﺼﻮﺕ (.PBAP )ﻗﺎﺑﻞ ﻟﻠﺘﻄﺒﻴﻖ ﻓﻘﻂ ﺍﺫﺍ ﻛﺎﻥ ﺍﻟﻬﺎﺗﻒ ﻳﺪﻋﻢ [PHONE BOOK] 1 ﺃﺩﺭ ﻗﺮﺹ ﻣﺴﺘﻮﻯ ﺍﻟﺼﻮﺕ ﺑﺴﺮﻋﺔ ﻟﻠﺪﺧﻮﻝ ﻓﻲ ﻭﺿﻊ ﺍﻟﺒﺤﺚ ﺣﺴﺐ ﺍﻟﺤﺮﻭﻑ ﻟﺘﻨﺸﻴﻂ ﻣﻴﺰﺓ ﺍﻟﺘﻌﺮﻑ ﻋﻠﻰ ﺍﺿﻐﻂ ﻣﻊ ﺍﻻﺳﺘﻤﺮﺍﺭ ﺑﺎﻟﻀﻐﻂ ﻋﻠﻰ .(ﺍﻻﺑﺠﺪﻳﺔ )ﺍﺫﺍ ﻛﺎﻥ ﺩﻟﻴﻞ ﺍﻟﻬﺎﺗﻒ ﻳﺤﺘﻮﻱ ﻋﻠﻰ ﺍﻟﻌﺪﻳﺪ ﻣﻦ ﺟﻬﺎﺕ ﺍﻻﺗﺼﺎﻝ .ﺍﻟﺼﻮﺕ...
- Page 61 Bluetooth® ﺍﺟﺮﺍﺀ ﻣﻜﺎﻟﻤﺔ .*1 ﻟﻦ ﺗﺆﺛﺮ ﻋﻤﻠﻴﺔ ﺍﻟﻀﺒﻂ ﻫﺬﻩ ﻋﻠﻰ ﻣﺴﺘﻮﻯ ﺻﻮﺕ ﺍﻟﻤﺼﺎﺩﺭ ﺍﻷﺧﺮﻯ ﻟﺰﻳﺎﺩﺓ ﻣﺴﺘﻮﻯ ﺍﻟﺼﻮﺕ ﺑﻤﻘﺪﺍﺭVOL *2 ﺍﺿﻐﻂ ﻣﻊ ﺍﻻﺳﺘﻤﺮﺍﺭ ﺑﺎﻟﻀﻐﻂ ﻋﻠﻰ .51 ﻣﺮﺣﻠﺔ ﺑﺸﻜﻞ ﻣﺴﺘﻤﺮ ﻳﻤﻜﻦ ﺍﺟﺮﺍﺀ ﻣﻜﺎﻟﻤﺔ ﻣﻦ ﺳﺠﻞ ﺍﻟﻤﻜﺎﻟﻤﺎﺕ ﺃﻭ ﻣﻦ ﺩﻟﻴﻞ ﺍﻟﻬﺎﺗﻒ ﺃﻭ ﺍﻻﺗﺼﺎﻝ ﺑﺎﻟﺮﻗﻢ. ﻛﻤﺎ ﺗﺘﻮﻓﺮ ....
- Page 62 Bluetooth® .ﻗﺪ ﺗﺨﺘﻠﻒ ﻋﻤﻠﻴﺎﺕ ﺍﻟﺘﺸﻐﻴﻞ ﺍﻟﺘﺎﻟﻴﺔ ﺍﻭ ﺗﻜﻮﻥ ﻏﻴﺮ ﻣﺘﺎﺣﺔ ﻭﻓﻘﺎ ﻟﻠﻬﺎﺗﻒ ﺍﻟﻤﺤﻤﻮﻝ ﺍﻻﻗﺘﺮﺍﻥ ﺍﻟﺘﻠﻘﺎﺋﻲ ﻋﻠﻰ ﻭﺣﺪﺓ ﺍﻟﺘﺤﻜﻢ ﻋﻠﻰ ﻏﻄﺎﺀ ﺍﻟﺤﻤﺎﻳﺔ ﺇﻟﻰ ، ﻳﺘﻢ ﺗﻔﻌﻴﻞ ﻃﻠﺐ ﺍﻹﻗﺮﺍﻥUSB ﺍﻟﻰ ﻃﺮﻑ ﺍﻻﺩﺧﺎﻝiPod touch/iPhone ﻋﻨﺪ ﺗﻮﺻﻴﻞ ﺟﻬﺎﺯ ﻋﻦ ﺑﻌﺪ (18 [. )ﺻﻔﺤﺔON] [ ﻣﻀﺒﻮﻃﺎ ﺍﻟﻰAUTO PAIRING] ( ﺗﻠﻘﺎﺋﻴ ﺎ ﹰ ﺍﺫﺍ ﻛﺎﻥBluetooth )ﻋﺒﺮ ...ﺍﻭﻝ...
- Page 63 . ﻣﻊ ﻫﺬﻩ ﺍﻟﻮﺣﺪﺓBluetooth ﻻ ﺗﻌﻤﻞ ﻣﻴﺰﺍﺕ . ﻟﺘﺸﻐﻴﻞ ﺍﻟﻮﺣﺪﺓB SRC ﺍﺿﻐﻂ ﻋﻠﻰ . ﺍﻟﺨﺎﺻﺔ ﺑﺎﻟﺠﻬﺎﺯ ﻟﺘﻨﻔﻴﺬ ﻋﻤﻠﻴﺎﺕ ﺍﻟﺘﺸﻐﻴﻞ ﺍﻟﺘﺎﻟﻴﺔBluetooth • ﺗﺄﻛﺪ ﻣﻦ ﺗﺸﻐﻴﻞ ﻭﻇﻴﻔﺔ “( ﻋﻠﻰKDC-BT640U”) ﺍﺑﺤﺚ ﻭﺍﺧﺘﺮ ﺍﺳﻢ ﺟﻬﺎﺯ ﺍﻻﺳﺘﻘﺒﺎﻝ ﺍﻟﺨﺎﺹ ﺑﻚ .• ﺗﺨﺘﻠﻒ ﻇﺮﻭﻑ ﺍﻹﺷﺎﺭﺓ ﺣﺴﺐ ﺍﻟﻈﺮﻭﻑ ﺍﻟﻤﺤﻴﻄﺔ .Bluetooth ﺟﻬﺎﺯ...
- Page 64 :ﺍﻟﺘﺤﻀﻴﺮ .[( ﻻﺳﺘﺨﺪﺍﻡ ﺍﻟﺘﻄﺒﻴﻖANDROID] [ ﺍﻭIOS]) ﺍﺧﺘﺮ ﺍﻟﺠﻬﺎﺯ [SELECT] . ﻋﻠﻰ ﺟﻬﺎﺯﻙ ﻗﺒﻞ ﺍﻟﺘﻮﺻﻴﻞKENWOOD Remote ﻗﻢ ﺑﺘﺜﺒﻴﺖ ﺍﺣﺪﺙ ﺍﺻﺪﺍﺭ ﻣﻦ ﺍﻟﺘﻄﺒﻴﻖ ﺍﻭBluetooth ﻻﺳﺘﺨﺪﺍﻡ ﺍﻟﺘﻄﺒﻴﻖ ﻋﺒﺮiPod touch/iPhone [: ﻳﺨﺘﺎﺭ ﺟﻬﺎﺯYES] [IOS] .[: ﺍﻟﻐﺎﺀNO] . ؛USB ﺍﻟﻤﻮﺻﻮﻝ ﻋﺒﺮ ﻃﺮﻑ ﺍﻻﺩﺧﺎﻝ...
- Page 65 Spotify .ﻳﻤﻜﻦ ﺍﻻﺳﺘﻤﺎﻉ ﺍﻟﻰ ﺍﻟﻤﻮﺳﻴﻘﻰ ﻣﻦ ﻣﺸﻐﻞ ﺻﻮﺕ ﻣﺤﻤﻮﻝ ﻋﺒﺮ ﻣﻘﺒﺲ ﺍﻟﻤﺪﺧﻞ ﺍﻻﺿﺎﻓﻲ ﺍﻟﺒﺤﺚ ﻋﻦ ﺍﻏﻨﻴﺔ ﺍﻭ ﻣﺤﻄﺔ :ﺍﻟﺘﺤﻀﻴﺮ ﺍﺿﻐﻂ .ﺃﺩﺭ ﻗﺮﺹ ﻣﺴﺘﻮﻯ ﺍﻟﺼﻮﺕ ﻟﺘﺤﺪﻳﺪ ﻧﻮﻉ ﺍﻟﻘﺎﺋﻤﺔ، ﺛﻢ ﺍﺿﻐﻂ ﻋﻠﻰ ﺍﻟﻘﺮﺹ (6 [. )ﺻﻔﺤﺔSOURCE SELECT] [ ﻓﻲBUILT-IN AUX] [ ﻟـON] .Spotify ﺗﺨﺘﻠﻒ...
- Page 66 Spotify ﺍﻭ ﻋﺒﺮ ﻃﺮﻑBluetooth )ﻋﺒﺮiPod touch/iPhone ﻣﻦ ﺟﻬﺎﺯSpotify ﻳﻤﻜﻦ ﺍﻻﺳﺘﻤﺎﻉ ﺍﻟﻰ ﻋﻠﻰ ﻭﺣﺪﺓ ﺍﻟﺘﺤﻜﻢ ﻋﻠﻰ ﻏﻄﺎﺀ ﺍﻟﺤﻤﺎﻳﺔ ﺇﻟﻰ .(Bluetooth )ﻋﺒﺮAndroid ( ﺃﻭ ﺟﻬﺎﺯUSB ﺍﺩﺧﺎﻝ ﻋﻦ ﺑﻌﺪ :ﺍﻟﺘﺤﻀﻴﺮ .ENT IW ﺍﺿﻐﻂ .6 IW ﺍﺿﻐﻂ ﺍﻟﺘﺸﻐﻴﻞ/ ﺍﻹﻳﻘﺎﻑ ﺍﻟﻤﺆﻗﺖ ...
- Page 67 iPod/USB/CD .ﺍﺩﺭ ﻣﻘﺒﺾ ﻣﺴﺘﻮﻯ ﺍﻟﺼﻮﺕ ﻻﺧﺘﻴﺎﺭ ﻣﻠﻒ، ﺛﻢ ﺍﺿﻐﻂ ﺍﻟﻤﻘﺒﺾ .DIRECT ﺃﻭ • ﻟﻺﻟﻐﺎﺀ، ﺍﺿﻐﻂ ﻋﻠﻰ .• ﻏﻴﺮ ﻣﺘﺎﺡ ﻓﻲ ﺣﺎﻟﺔ ﺗﺤﺪﻳﺪ ﺍﻟﺘﺸﻐﻴﻞ ﺍﻟﻌﺸﻮﺍﺋﻲ .ﻳﺒﺪﺃ ﺗﺸﻐﻴﻞ ﺍﻟﻤﻠﻒ ﺍﻟﻤﺤﺪﺩ .iPod USB • ﻏﻴﺮ ﻗﺎﺑﻞ ﻟﻠﺘﻄﺒﻴﻖ ﻟﻤﺼﺪﺭ [SKIP SEARCH] ﺇﻋﺪﺍﺩ .[FUNCTION] ﺍﺿﻐﻂ ﻋﻠﻰ ﻗﺮﺹ ﻣﺴﺘﻮﻯ ﺍﻟﺼﻮﺕ ﻟﻠﺪﺧﻮﻝ ﺇﻟﻰ ﺍﻳﺨﺘﺎﺭ...
- Page 68 iPod/USB/ CD ﺍﺧﺘﺮ ﻣﺸﻐﻞ ﻣﻮﺳﻴﻘﻰ .، ﺍﺿﻐﻂ 5 ﺑﺸﻜﻞ ﻣﺘﻜﺮﺭUSB ﻋﻨﺪﻣﺎ ﻳﻜﻮﻥ ﺍﻟﻤﺼﺪﺭ .ﺳﻴﺘﻢ ﺗﺸﻐﻴﻞ ﺍﻻﻏﻨﻴﺎﺕ ﺍﻟﻤﺨﺰﻧﺔ ﻓﻲ ﺍﻟﻤﺸﻐﻞ ﺍﻟﺘﺎﻟﻲ .(Mass Storage Class) • ﺍﻟﺬﺍﻛﺮﺓ ﺍﻟﺪﺍﺧﻠﻴﺔ ﺃﻭ ﺍﻟﺨﺎﺭﺟﻴﺔ ﻟﻠﻬﺎﺗﻒ ﺍﻟﺬﻛﻲ .• ﺍﻟﻤﺸﻐﻞ ﺍﻟﻤﺨﺘﺎﺭ ﻟﺠﻬﺎﺯ ﻣﺘﻌﺪﺩ ﺍﻟﻮﺳﺎﺋﻂ .[FUNCTION] ﻛﻤﺎ ﻳﻤﻜﻦ ﺍﺧﺘﻴﺎﺭ ﻣﺸﻐﻞ ﺍﻟﻤﻮﺳﻴﻘﻰ ﻣﻦ ﺍﻟﻘﺎﺋﻤﺔ ﻋﻠﻰ...
- Page 69 ﺍﻟﺮﺍﺩﻳﻮ iPod/USB/ CD ﺍﺩﺧﺎﻝ ﺍﻻﺳﻄﻮﺍﻧﺔ [: ﻳﺴﻤﺢ ﻟﻠﻮﺣﺪﺓ ﺑﺎﻟﺘﺤﻮﻝ ﻣﺆﻗﺘ ﺎ ﹰ ﺍﻟﻰ ﻣﻌﻠﻮﻣﺎﺕ ﺍﻟﻤﺮﻭﺭ ﺇﺫﺍ ﻛﺎﻧﺖON] [TI] .[: ﺍﻟﻐﺎﺀOFF] “(. ؛TI” ﻣﺘﻮﻓﺮﺓ )ﻳﻀﺎﺀ ﺍﻟﻤﺆﺷﺮ ﺇﺧﺮﺍﺝ ﺍﻷﺳﻄﻮﺍﻧﺔ ﺟﺎﻧﺐ ﺍﻟﻤﻠﺼﻖ 1 ﺃﺩﺭ ﻗﺮﺹ ﻣﺴﺘﻮﻯ ﺍﻟﺼﻮﺕ ﻟﺘﺤﺪﻳﺪ ﻧﻮﻉ ﺍﻟﺒﺮﻧﺎﻣﺞ ﺍﻟﻤﺘﺎﺡ )ﺭﺍﺟﻊ ”ﻧﻮﻉ [PTY SEARCH] .[“...
- Page 70 ﺍﻟﺮﺍﺩﻳﻮ ﺇﻋﺪﺍﺩﺍﺕ ﺃﺧﺮﻯ .[FUNCTION] ﺍﺿﻐﻂ ﻋﻠﻰ ﻗﺮﺹ ﻣﺴﺘﻮﻯ ﺍﻟﺼﻮﺕ ﻟﻠﺪﺧﻮﻝ ﺇﻟﻰ ﺃﺩﺭ ﻗﺮﺹ ﻣﺴﺘﻮﻯ ﺍﻟﺼﻮﺕ ﻟﺘﺤﺪﻳﺪ ﺑﻨﺪ )ﺭﺍﺟﻊ ﺍﻟﺠﺪﻭﻝ ﺍﻟﺘﺎﻟﻲ(، ﺛﻢ ﺍﺿﻐﻂ .ﺍﻟﻘﺮﺹ ﻛﺮﺭ ﺍﻟﺨﻄﻮﺓ 2 ﺍﻟﻰ ﺍﻥ ﻳﺘﻢ ﺍﺧﺘﻴﺎﺭ ﺍﻟﺒﻨﺪ ﺍﻟﻤﺮﻏﻮﺏ ﺍﻭ ﺍﺗﺒﻊ ﺍﻟﺘﻌﻠﻴﻤﺎﺕ .ﺍﻟﻤﺘﻌﻠﻘﺔ ﺑﺎﻟﺒﻨﺪ ﺍﻟﻤﺨﺘﺎﺭ .ﻣﻦ ﺃﺟﻞ ﺍﻹﻧﻬﺎﺀ ﺍﺿﻐﻂ...
- Page 71 [ ﺍﻟﻰ ﻟﻮﻥ ﺍﺑﻴﺾ. ؛ZONE 1] [: ﻳﺘﻐﻴﺮ ﺍﻟﺮﺳﻢ ﺍﻟﺘﻮﺿﻴﺤﻲON] ﻟﻠﺤﺼﻮﻝ ﻋﻠﻰ ﺗﻔﺎﺻﻴﻞ ﺣﻮﻝ ﻛﻴﻔﻴﺔ ﺗﺤﺪﻳﺚ ﺍﻟﺒﺮﻧﺎﻣﺞ ﺍﻟﺜﺎﺑﺖ، ﻗﻢ ﺑﺰﻳﺎﺭﺓ .[COLOR SELECT] [ ﻛﻠﻮﻥZONE 1] [: ﻳﻴﻘﻰ ﺍﻟﺮﺳﻢ ﺍﻟﺘﻮﺿﻴﺤﻲOFF] .<www.kenwood.com/cs/ce/> (25 )ﺻﻔﺤﺔ [: ﻳﻌﻴﺪ ﺍﻹﻋﺪﺍﺩﺍﺕ ﺍﻟﻰ ﺍﻹﻋﺪﺍﺩﺍﺕ ﺍﻻﻓﺘﺮﺍﺿﻴﺔ )ﺑﺎﺳﺘﺜﻨﺎﺀ ﺍﻟﻤﺤﻄﺎﺕYES] [ ﺍﻟﻰ...
- Page 72 ﺍﻟﺸﺮﻭﻉ ﻓﻲ ﺍﻟﻌﻤﻞ ﻟﻀﺒﻂ ﺍﻟﺴﺎﻋﺔ .[، ﺛﻢ ﺍﺿﻐﻂ ﻋﻠﻰ ﺍﻟﻘﺮﺹCLOCK ADJUST] ﺃﺩﺭ ﻗﺮﺹ ﻣﺴﺘﻮﻯ ﺍﻟﺼﻮﺕ ﻟﺘﺤﺪﻳﺪ .ﺃﺩﺭ ﻗﺮﺹ ﻣﺴﺘﻮﻯ ﺍﻟﺼﻮﺕ ﻟﺘﺤﺪﻳﺪ ﺍﻹﻋﺪﺍﺩﺍﺕ، ﺛﻢ ﺍﺿﻐﻂ ﻋﻠﻰ ﺍﻟﻘﺮﺹ .“”ﺩﻗﻴﻘﺔ “ﺍﺿﺒﻂ ﺍﻟﻮﻗﺖ ﺑﺎﻟﺘﺮﺗﻴﺐ ”ﺳﺎﻋﺔ [، ﺛﻢ ﺍﺿﻐﻂ ﻋﻠﻰCLOCK FORMAT] ﺃﺩﺭ ﻗﺮﺹ ﻣﺴﺘﻮﻯ ﺍﻟﺼﻮﺕ ﻟﺘﺤﺪﻳﺪ .ﺍﻟﻘﺮﺹ...
- Page 73 ﺃ ﹶ ﺳﺎﺳ ﹺ ﻴ ﹼ ﺎﺕ (RC-406) ﺭﻳﻤﻮﺕ ﺍﻟﺘﺤﻜﻢ ﻭﺍﺟﻬﺔ ﺍﻟﺠﻬﺎﺯ ﻗﺮﺹ ﻣﺴﺘﻮﻯ ﺍﻟﺼﻮﺕ ﻓﺘﺤﺔ ﺍﻟﺘﺤﻤﻴﻞ ﺣﺴﺎﺱ ﺍﻟﺘﺤﻜﻢ ﻋﻦ ﺑﻌﺪ )ﺗﺠﻨﺐ (.ﺍﻟﺘﻌﺮﻳﺾ ﻟﻀﻮﺀ ﺍﻟﺸﻤﺲ ﺍﻟﺴﺎﻃﻊ ﻳﻀﻲﺀ ﺍﻟﺮﻣﺰ ﻋﻨﺪ ﺇﻧﺸﺎﺀ .Bluetooth ﺍﺗﺼﺎﻝ ﺑﻠﻮﺗﻮﺙ (14 )ﺻﻔﺤﺔ ﻗﻢ ﺑﺴﺤﺐ ﻏﻄﺎﺀ ﻋﺎﺯﻝ ﺍﻟﻜﻬﺮﺑﺎﺀ .ﻋﻨﺪ...
- Page 74 ﻗﺒﻞ ﺍﻻﺳﺘﺨﺪﺍﻡ ﻫﺎﻡ • ﻓﻲ ﺣﺎﻟﺔ ﺣﺪﻭﺙ ﺧﻄﺄ ﺑﺎﻷﺳﻄﻮﺍﻧﺔ ﻧﺘﻴﺠﺔ ﻟﻌﻤﻠﻴﺔ ﺍﻟﺘﻜﺎﺛﻒ ﻋﻠﻰ ﻋﺪﺳﺔ ﺍﻟﻠﻴﺰﺭ، ﻗﻢ ﺑﺈﺧﺮﺍﺝ .ﺍﻷﺳﻄﻮﺍﻧﺔ ﻭﺍﻧﺘﻈﺮ ﺣﺘﻰ ﺗﺘﺒﺨﺮ ﺍﻟﺮﻃﻮﺑﺔ • ﻟﻀﻤﺎﻥ ﺍﻻﺳﺘﺨﺪﻟﻢ ﺍﻟﻤﻨﺎﺳﺐ، ﻳﺮﺟﻰ ﻗﺮﺍﺀﺓ ﻫﺬﺍ ﺍﻟﺪﻟﻴﻞ ﺑﺘﻤﻌﻦ ﻗﺒﻞ ﺍﺳﺘﺨﺪﺍﻡ ﻫﺬﺍ ﺍﻟﻤﻨﺘﺞ. ﻣﻦ (4 ﻣﻮﺿﺢ ﻋﻠﻰ ﺍﻟﻮﺣﺪﺓ ﺍﻟﺮﺋﻴﺴﻴﺔ. ﻟﻤﺸﺎﻫﺪﺗﻪ، ﺍﻓﺼﻞ ﻟﻮﺣﺔ ﺍﻟﻮﺍﺟﻬﺔ. )ﺻﻔﺤﺔUSB • ﺗﺼﻨﻴﻒ .ﺍﻟﻤﻬﻢ...
- Page 75 .[ ﺗﺸﻴﺮ ﺇﻟﻰ ﺍﻟﻌﻨﺎﺻﺮ ﺍﻟﻤﺤﺪﺩﺓXX] • 12 ..................AUX .( ﺗﺸﻴﺮ ﺇﻟﻰ ﺃﻥ ﺍﻟﻤﺮﺍﺟﻊ ﻣﺘﻮﻓﺮﺓ ﻓﻲ ﺍﻟﺼﻔﺤﺔ ﺍﻟﻤﺤﺪﺩﺓXX • )ﺻﻔﺤﺔ 13 ............ﺍﺳﺘﺨﺪﺍﻡ ﺍﻟﺘﻄﺒﻴﻘﺎﺕ ﺍﻻﺧﺮﻯ KENWOOD Remote ﺍﻟﺘﻄﺒﻴﻖ ﻫﺬﺍ ﺍﻟﺮﻣﺰ ﻓﻲ ﺍﻟﻤﻨﺘﺞ ﻳﻌﻨﻲ ﻭﺟﻮﺩ ﺗﻌﻠﻴﻤﺎﺕ ﺗﺸﻐﻴﻞ ﻭﺻﻴﺎﻧﺔ ﻣﻬﻤﺔ ﻓﻲ ﻫﺬﺍ .ﺍﻟﺪﻟﻴﻞ TuneIn Radio Pro/TuneIn Radio 14 ................
- Page 76 KDC-BT640U...
Need help?
Do you have a question about the KDC-BT640U and is the answer not in the manual?
Questions and answers