
Related Manuals for Black & Decker Price Pfister Classic Series


Summary of Contents for Black & Decker Price Pfister Classic Series
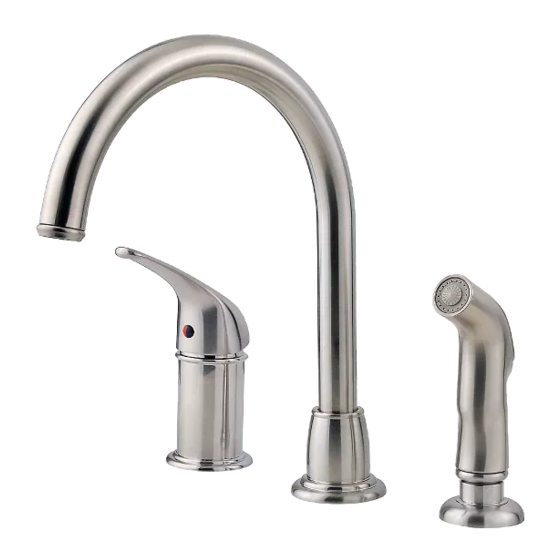
- Page 1 ■ WK1-63 ■ SINGLE CONTROL KITCHEN FAUCET GRIFO MONOMANDO PARA LA COCINA MITIGEUR DE CUISINE 31598-0100 05-09-07 EO7115A Copyright © 2007, Price Pfister, Inc. COMPANY...
- Page 2 ■ WK1-63 ■ 961-038* 940-076* SOAP DISPENSER HANDLE DISPENSADOR DE JABÓN SPOUT MANIJA SCREW DISTRIBUTEUR DE SAVON CANALÓN POGNÉE TORNILLO DISPENSER HEAD 941-118 CABEZA DEL DISPENSADOR TAPA BUTTON TÊTE CHAPEAU BOTÓN WASHER BOUTON ARANDELLA BONNET RONDELLE CAPO CAPOT PUMP MECHANISM MECANISMO DE LA BOMBA 974-044 MÉCANISME DE POMPAGE...
-
Page 3: Installation Time
Thank you for purchasing this Price Pfister product. All Price Pfister products are carefully engineered, and factory tested to provide long trouble-free use under normal conditions. This faucet is easy to install using basic tools and our easy to follow illustrated instructions. If you have any questions regarding this product, contact your local distributor. - Page 4 4 SPOUT BODY INSTALLATION 5 SECURING SPOUT BODY Place Gasket (4A) under base of Spout Body (4B). From above sink, insert Mounting From underneath sink, secure the faucet by placing Rubber Washer (5A), Metal Shank (4C) through center hole of sink. Washer (5B) and Mounting Nut (5C) onto Mounting Post (5D).
- Page 5 6 CONTROL BODY INSTALLATION 7 SECURING CONTROL BODY Place Gasket (6A) under base of Control Body (6B). From above sink, insert From underneath sink, place Rubber Washer (7A), Metal Washer (7B), and Locknut Threaded Shank (6C) and Tubing (6D) through side hole of sink. (7C) onto Mounting Shank (7D).
- Page 6 8 HOSE GUIDE & SOAP DISPENSER GUIDE INSTALLATION 9 SECURING HOSE GUIDE & SOAP DISPENSER GUIDE Insert Soap Dispenser Shank (8A) through Gasket (8B) and insert Hose Guide Shank From underneath sink, secure Hose Guide (9A) and Soap Dispenser Guide (9B) by (8C) through the sink holes.
- Page 7 10 SIDE SPRAY & SOAP DISPENSER INSTALLATION 11 CONTROL HOSE CONNECTION Insert Side Spray Hose (10A) through Hose Guide (10B). Pour in liquid soap Connect one end of Control Hose (11A) to Spout Shank (11B) and the other end (not included) into Guide Orifice (10C). Insert Pump Mechanism (10D) into Soap to Control Supply Tube (11C).
- Page 8 14 UNIT START UP Turn on hot and cold water supplies, and check for leaks above and below the sink. Note: After installation is complete, flush faucet (see step 18). 14 Español: CÓMO ENCENDER LA UNIDAD Active el suministro de agua fría y caliente y verifique que no hay fugas arriba y abajo del fregadero.
- Page 9 18 FLUSHING & AERATOR CLEANING After installation is complete, remove Aerator Housing (18A). Turn Valve on and 16 SIDE SPRAY OPERATION allow both hot and cold water to run for at least one minute each. While water is Side Spray (16A) can be pulled out to spray water in any direction. To activate the running, check for leaks.
-
Page 10: Cartridge Removal
CAUTION: Maintenance DISASSEMBLY: Replacement parts may be available at the store where you purchased your faucet. When replacement parts are not available, please write or call Price Pfister Consumer Service. Always turn off water and relieve pressure before working on your faucet. NOTE: Trim Care Cleaning Instructions: For all handles and decorative finishes, use only a soft cloth dampened with plain water to...
Need help?
Do you have a question about the Price Pfister Classic Series and is the answer not in the manual?
Questions and answers