Stryker 6254 Operation Manual
Evacuation chair
Hide thumbs
Also See for 6254:
- Operation & maintenance manual (490 pages) ,
- Maintenance manual (40 pages) ,
- Operation manual (390 pages)

Related Manuals for Stryker 6254


Summary of Contents for Stryker 6254
- Page 1 E E v v a a c c u u a a t t i i o o n n C C h h a a i i r r O O p p e e r r a a t t i i o o n n s s M M a a n n u u a a l l 6254 6254-109-001 Rev B.3 2019/09...
- Page 3 Operating instructions/Consult instructions for use CE mark Authorized representative in the European Community European medical device General warning Caution Catalogue number Serial number For US Patents see www.stryker.com/patents Manufacturer Date of manufacture Do not lubricate Safe working load 6254-109-001 Rev B.3...
-
Page 5: Table Of Contents
Installing the optional wall storage bracket ......................18 Installing the optional cabinet ..........................19 Installing the optional cover............................20 Removing the optional cover..........................21 Installing the elastic oxygen bottle holder ........................21 Accessories and parts ............................22 Cleaning ..................................23 Cleaning the track frame............................23 Suggested cleaners ..............................23 Preventive maintenance ............................24 6254-109-001 Rev B.3... - Page 6 • Always wipe the product with clean water and dry after cleaning. Some cleaning products are corrosive in nature and may cause damage to the product. Failure to properly rinse and dry the product leaves a corrosive residue on the surface of the product and may cause premature corrosion of critical components. 6254-109-001 Rev B.3...
- Page 7 • Always use caution when you use casters. Casters are not suitable for all surfaces. • The elastic oxygen bottle holder is for use only with Stryker Evacuation Chairs and S S t t a a i i r r - - P P R R O O ® Stair Chairs. Use only D-size oxygen bottles with the elastic oxygen bottle holder.
-
Page 8: Expected Service Life
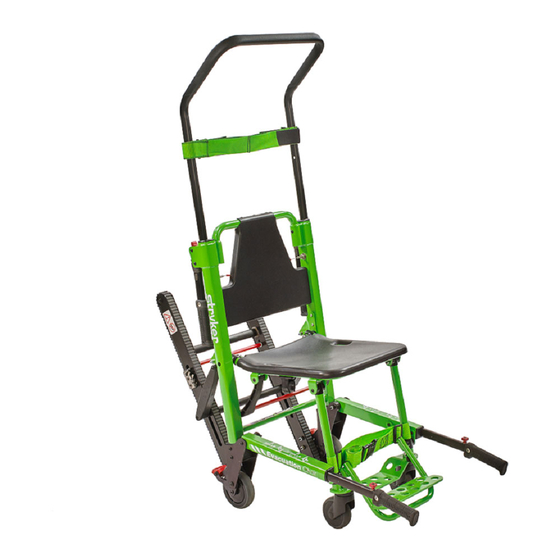
I I n n d d i i c c a a t t i i o o n n s s f f o o r r u u s s e e The Stryker Model 6254 Evacuation Chair is a hand carried device that consists of a light weight frame on which an occupant can be carried. -
Page 9: Specifications
Depth dimensions are measured with extendable handles retracted. Stryker reserves the right to change specifications without notice. O O p p e e r r a a t t i i o o n n... - Page 10 Competent authority of the European Member State where the user and/or occupant is established. To view your operations or maintenance manual online, see https://techweb.stryker.com/. Have the serial number (A) of your Stryker product available when calling Stryker Customer Service or Technical Support. Include the serial number in all written communication.
-
Page 11: Setup
S S e e t t u u p p During setup, unpack the cartons and check all items for proper operation. Make sure that the product operates before you place it into service. Remove all the shipping and packaging materials from the product before use. 6254-109-001 Rev B.3... -
Page 12: Instructions
5. Maintaining the angle, guide the chair over the edge of the stairs, allowing the S S t t a a i i r r - - T T R R E E A A D D system to connect with the first step. 6. Glide down the stairs until the treads are level across the edges of two or three steps. 6254-109-001 Rev B.3... -
Page 13: Operation
2. Buckle the restraint straps. Fold the restraint straps to prevent them from interfering. Secure the head support strap behind the chair frame. 3. Stand at the side of the chair. 4. Pull up on the chair (red) fold lock bar (A) at the rear of the chair (Figure 2). 6254-109-001 Rev B.3... -
Page 14: Folding The Chair
S S e e c c u u r r i i n n g g t t h h e e o o c c c c u u p p a a n n t t w w i i t t h h t t h h e e r r e e s s t t r r a a i i n n t t s s t t r r a a p p s s W W A A R R N N I I N N G G - - Always use all restraint straps to secure the occupant on the product. An unrestrained occupant may fall from the product. 6254-109-001 Rev B.3... - Page 15 2. Pull the strap across the occupant’s chest. Lengthen the strap as necessary. 3. Buckle the strap. 4. Pull the loose end of the strap to tighten it around the occupant. 5. Repeat for the second strap and the lap belt. 6254-109-001 Rev B.3...
-
Page 16: Proper Lifting Techniques
N N o o t t e e - - The extendable upper control handle can be used in any position to roll and guide the chair. Pull the red release cable with one hand and pull up on the control handle with the other to extend the upper control handle. Release the cable to lock the handle in either the mid or fully extended position. 6254-109-001 Rev B.3... - Page 17 3. Head end operator: Use one hand to pull the red upper control handle release cable (B) (Figure 7). Use the other hand to pull up and fully extend the handle. Release the cable and make sure that the handle is locked on both sides in the fully extended position. 6254-109-001 Rev B.3...
- Page 18 9. Head end operator: Apply slight downward pressure on the extendable upper control handle while the foot end operator applies slight upward pressure on the foot end lift handles to keep the chair from rocking forward as it glides down the stairs. 6254-109-001 Rev B.3...
-
Page 19: Transporting The Occupant On Flat Surfaces
1. Roll the chair to the bottom of the stairs with the occupant’s back to the stairs. 2. Foot end operator: Push the red release buttons to extend the foot end lift handles and pull the handles out until they stop. Release the buttons to lock the handles. 6254-109-001 Rev B.3... - Page 20 18). The top of the pedal will rest against the caster frame when you release the wheel lock. N N o o t t e e - - Wheel locks help prevent the product from rolling while unattended. Wheel locks may not provide sufficient resistance on all surfaces or under loads. 6254-109-001 Rev B.3...
-
Page 21: Attaching The Optional Head Support To The Upper Control Handle
P P o o s s i i t t i i o o n n i i n n g g o o p p e e r r a a t t o o r r s s a a n n d d h h e e l l p p e e r r s s W W A A R R N N I I N N G G - - Always transport an occupant weighing more than 200 lb on stairs with a minimum of two trained operators. 6254-109-001 Rev B.3... - Page 22 I I n n s s t t a a l l l l i i n n g g t t h h e e o o p p t t i i o o n n a a l l w w a a l l l l s s t t o o r r a a g g e e b b r r a a c c k k e e t t N N o o t t e e - - The footrest option (6254-029-000) is not compatible with the optional wall storage bracket (6254-050-000).
- Page 23 12 inches. 2. Using fasteners (not supplied) appropriate for the wall type, use at least four mounting holes to install the cabinet. 3. Hang the chair from the bracket using the upper control handle. 6254-109-001 Rev B.3...
- Page 24 N N o o t t e e • For ease of installation, hang the chair on the storage bracket before you install the cover. • The footrest option (6254-029-000) is not compatible with the optional cover (6254-055-000). To install the optional vinyl cover: 1.
- Page 25 C C A A U U T T I I O O N N • The elastic oxygen bottle holder is for use only with Stryker Evacuation Chairs and S S t t a a i i r r - - P P R R O O ® Stair Chairs. Use only D-size oxygen bottles with the elastic oxygen bottle holder.
- Page 26 A A c c c c e e s s s s o o r r i i e e s s a a n n d d p p a a r r t t s s These accessories may be available for use with your product. Confirm availability for your configuration or region. Call Stryker Customer Service: 1-800-327-0770. N N a a m m e e...
- Page 27 • Follow the cleaning solution manufacturer’s dilution recommendations exactly. • The preferred method Stryker Medical recommends for power washing the product is with the standard hospital surgical cart washer or hand held wand unit. • Clean V V e e l l c c r r o o ® after each use. Saturate V V e e l l c c r r o o ® with disinfectant and allow disinfectant to evaporate. Appropriate disinfectant for nylon V V e e l l c c r r o o ®...
- Page 28 Remove product from service before you perform the preventive maintenance inspection. Check all items listed during annual preventive maintenance for all Stryker Medical products. You may need to perform preventive maintenance checks more often based on your level of product usage. Service only by qualified personnel.
-
Page 29: Accessories And Parts
Optional accessories and parts intact and operating properly Product serial number: Completed by: Date: 6254-109-001 Rev B.3... - Page 30 Stryker Medical 3800 E. Centre Avenue Portage, MI 49002 6254-109-001 Rev B.3 2019/09 WCR: AA.22...
Need help?
Do you have a question about the 6254 and is the answer not in the manual?
Questions and answers