Table of Contents
Advertisement
Advertisement
Table of Contents

Related Manuals for Night Owl WG4 Series

Summary of Contents for Night Owl WG4 Series
- Page 1 USER’S MANUAL WG4 SERIES www.NightOwlSP.com...
- Page 2 Thank you for choosing Night Owl Security Products! By purchasing a Night Owl product, you receive a one (1) year warranty covering manufacturing defects in material and workmanship. In addition to warranty and technical support benefits, you will have access to our multitude of free instructional “How to Videos”.
- Page 3 TABLE OF CONTENTS...
-
Page 4: Table Of Contents
6.2 Night Owl Connect ................23 6.2.1 Add Gateway ................23 6.2.2 Main Screen Explanation ............26 6.2.2 (a) Status Explanation ............27 6.2.3 Add Night Owl Device to Gateway ..........28 6.2.3 (a) Pressing “ADD” Icon ............29 6.2.4 Night Owl Gateway Settings ............31 6.2.5 Individual Channel Screen ............32 6.2.6 Individual Channel Settings ............33... -
Page 5: Chapter 1 Fcc Warnings
CHAPTER 1 FCC WARNINGS... - Page 6 Chapter 1: FCC Warnings This device complies with Part 15 of the FCC Rules. Operation is subject to the following two conditions: (1) this device may not cause harmful interference and (2) this device must accept any interference received, including interference that may cause undesired operation. FCC Compliance Statement These limits are designed to provide reasonable protection against frequency interference in residential installation.
-
Page 7: Chapter 2 Safety Instructions
CHAPTER 2 SAFETY INSTRUCTIONS... - Page 8 Chapter 2: Safety Instructions USE THE PROVIDED POWER ADAPTER. Do not use this product with a power source that applies more than the specified voltage. NEVER INSERT METAL INTO THE GATEWAY CASE OR ITS OPENINGS. Inserting metal into the Gateway case may cause electric shock. DO NOT OPERATE IN WET OR DUSTY AREAS.
-
Page 9: Chapter 3 Specifications
CHAPTER 3 SPECIFICATIONS... -
Page 10: System Requirements
16.4 ft. Camera Bracket Mounting (1 per camera) Power Supply Hardware * If included, screw onto Camera (1 per Camera) (1 per Camera) NOTE: For best results, use the included Night Owl accessories. Third party accessories may not work properly. -
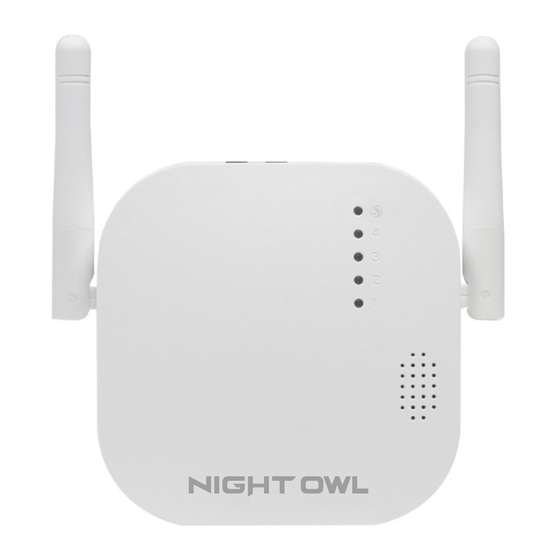
Page 11: Gateway Diagram
3.2.1 Gateway Diagram TOP VIEW Status Lights Antenna Antenna Audio Speaker... - Page 12 Reset – Press for approximately 10 seconds to reset the Gateway to Factory Settings. This process will reboot the Gateway and clear all the Channels of synced devices. This process will unlink the connection of the Gateway from the Night Owl App. The Gateway will have to be deleted from the App, and then re-added.
- Page 13 BOTTOM VIEW NEED SUPPORT? 1. Please visit www.NightOwlSP.com 2. Click Support on the top of the homepage. 3. Type WG4 in the top right search bar.
- Page 14 MOUNTING THE GATEWAY For the best experience, the Gateway should be centrally located in your home/business and close to your router. Measure the distance between NEED SUPPORT? 1. Please visit www.NightOwlSP.com 2. Click Support on the top of the homepage. 3.
- Page 15 Insert the included wall anchors into each hole Insert a screw into each wall anchor . Fasten until it is almost flush with the surface. Side View Fit the Gateway over the screws and slowly slide down until secured Side View...
-
Page 16: Chapter 4 Status Light Keys
CHAPTER 4 STATUS LIGHT KEYS... - Page 17 Chapter 4: Status Light Keys Gateway Status Light Key Internet Status Light: Green Steady: Connected to the Internet. Green Blinking: Internet is not available. No Light: Gateway has no power. Channel Status Lights: Green Steady: A Device is synced to the Gateway. Green Blinking: Device is associated to the Gateway but there is NO connection between them.
-
Page 18: Chapter 5 Getting Started
CHAPTER 5 GETTING STARTED... -
Page 19: Booting Process
If the upgrade is successful, the Gateway will automatically reboot and update the Firmware. The Gateway searches its channels for connected Night Owl devices. If there are no devices paired with the Gateway, the voice prompt “Pair me to other Night Owl devices by pressing my Sync button for 3 seconds” will play. -
Page 20: Gateway Functionality
If the Gateway doesn’t find any Night Owl Devices to pair with, the voice prompt “Oops, the pairing failed, please repeat the process” will play. When adding multiple Night Owl Devices to the Gateway, if at least one fails to pair, you will hear the voice prompt “Oops, the pairing failed, please repeat the process.”... -
Page 21: Resetting Gateway To Factory Settings
NOTE: If a Night Owl Device (i.e., Cameras, Doorbell) is restored to its factory settings, it MUST be in pairing mode to be added to the Gateway. The Gateway MUST be deleted from the Night Owl App and then added again. -
Page 22: Chapter 6 Software Description
CHAPTER 6 SOFTWARE DESCRIPTION... -
Page 23: Apps
Download and Install Application Download the App from the App Store or Google Play Store and install the application on your device. 6.2 Night Owl Connect 6.2.1 Add Gateway Press the “+” icon. Select “Gateway” from the device list and... - Page 24 Make sure the Smart Device running the Be patient as the App finds the Gateway. Night Owl App is on the same network as the Gateway during setup. Tap “Continue” to allow the App to locate the Gateway. If the Night Owl App does not find the If there are multiple Gateways on the same Gateway, tap “View setup instructions again”...
- Page 25 When the setup is successful, you will be prompted to name the Gateway. Example of a newly added Gateway with no cameras.
-
Page 26: Main Screen Explanation
The channels bar scrolls left and right. Tapping the “+” icon on an individual channel allows the user to add more Night Owl devices to the Gateway. This method adds all the Night Owl Devices that are in pairing mode to the Gateway. -
Page 27: A) Status Explanation
6.2.2 (a) Status Explanation Offline: The Night Owl App isn’t communicating with Authentication Failed: The Gateway has been the Gateway due to one of the following reasons: reset to Factory Settings but hasn’t been deleted from the App. You MUST delete the Gateway The Gateway is turned OFF. -
Page 28: Add Night Owl Device To Gateway
6.2.3 Add Night Owl Device to Gateway Tap the channels “+” icon to go directly to the instructions for adding Night Owl devices to the Gateway. Select a Night Owl device (except the Gateway) and follow the onscreen instructions to add to the... -
Page 29: A) Pressing "Add" Icon
“Continue.” tap “Continue.” NOTE: All Night Owl devices in “Pairing Mode” and in proximity to the Gateway will begin the pairing process. Devices added cannot exceed the number of channels. The Pairing process may take up to a minute. - Page 30 1 of this section. When adding a Night Owl device to the Gateway, the “Devices” screen will look like the picture above. Tap the “Play Button” on an individual channel to view the live stream.
-
Page 31: Night Owl Gateway Settings
6.2.4 Night Owl Gateway Settings Device Name: View and edit the device’s name. Model: The model # of your Gateway. Firmware Version: Version of the software running on the Gateway. microSD Status: Indicates the SD card is formatted correctly. Free/Capacity: The amount of memory used and total available on the microSD card. -
Page 32: Individual Channel Screen
Capture: Take a snapshot of the live stream. Record: Manually record the live stream. Sound: Tap to mute or unmute sound around the Night Owl device. Talk: Press and hold to talk, release to listen. (Sound must be unmuted) NOTE: Pressing and holding the “Talk Button”... -
Page 33: Individual Channel Settings
6.2.6 Individual Channel Settings Channel: Name of the live view. Edit: Edit the channel’s name. Model: The model # of your Gateway. Firmware Version: Version of the software running on the Gateway. Push Notification: Enable/disable push notifications. Motion Sensitivity: Adjust the motion sensitivity of the device to Low, Medium, or High. Recording Mode: Select recording mode type. -
Page 34: Chapter 7 Warranty
CHAPTER 7 WARRANTY... - Page 35 Product. In no event shall Night Owl be liable for any special or consequential damages arising from the use of the Product or arising from the malfunctioning or nonfunctioning of the Product or for any delay in the performance of this warranty due to any cause beyond its control.
- Page 36 Returns Under This Warranty In order to obtain service, please make sure that you have registered your product on-line no later than thirty (30) days after purchase at www.NightOwlSP.com in the warranty registration section or in any other manner described in the instructions. Disclaimer Certain uses, publication and/or distribution of video/audio recordings from security cameras and/or audio devices are prohibited or restricted by federal, state and local laws.
-
Page 37: Chapter 8: Troubleshooting
CHAPTER 9 TROUBLESHOOTING... - Page 38 To sync the Gateway to a device, press and hold the sync button until the voice prompt says, “I am pairing to the Night Owl device, please be patient”. If the synchronization fails, make sure the Night Owl device the Gateway is searching for is in pairing mode and try again.
- Page 39 Need Help? For system manuals, troubleshooting guides, FAQs, video tutorials and more: Please refer to the sticker located on the bottom of the device for steps on how to NEED SUPPORT? 1. Please visit www.NightOwlSP.com 2. Click Support on the top of the homepage. 3.
Need help?
Do you have a question about the WG4 Series and is the answer not in the manual?
Questions and answers