SMA SB3.0-1SP-US-40 Service Manual
Hide thumbs
Also See for SB3.0-1SP-US-40:
- Service manual (46 pages) ,
- Installation manual (236 pages) ,
- Technical information (8 pages)
Table of Contents
Advertisement
Quick Links
Advertisement
Table of Contents

Related Manuals for SMA SB3.0-1SP-US-40


Summary of Contents for SMA SB3.0-1SP-US-40
- Page 1 SB3.0-1SP-US-40 / SB3.8-1SP-US-40 / SB5.0-1SP-US-40 / SB6.0-1SP-US-40 / SB7.0-1SP-US-40 / SB7.7-1SP-US-40 Replacing a Defective Power Unit Service Manual Instrucciones de servicio técnico ENGLISH ESPAÑOL FRANÇAIS Manuel de service SB30-77-1SP-US-40-AT-PU-SG-xx-11 | 102509-00.01 | Version 1.1...
-
Page 2: Table Of Contents
Table of Contents SMA Solar Technology America LLC Table of Contents Information on this Document..........Validity ....................Target group ..................Symbols....................Safety Information ..............Overview of the Enclosure Parts..........Disconnecting the Inverter from Voltage Sources ....Disassembling the Defective Power Unit........ -
Page 3: Information On This Document
Read and observe all documents supplied with the product. This document is valid for the following device types: • SB3.0-1SP-US-40 (Sunny Boy 3.0-US) • SB3.8-1SP-US-40 (Sunny Boy 3.8-US) • SB5.0-1SP-US-40 (Sunny Boy 5.0-US) •... -
Page 4: Safety Information
• All work on the inverter must be carried out by qualified persons only. Qualified persons must at least have the following skills: – Knowledge of how SMA inverters work and are operated – Training in how to deal with the dangers and risks associated with installing, repairing and using electrical devices and installations –... -
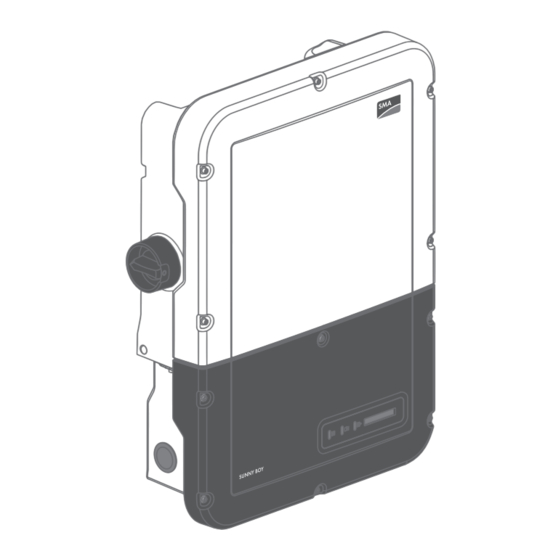
Page 5: Overview Of The Enclosure Parts
SMA Solar Technology America LLC 3 Overview of the Enclosure Parts 3 Overview of the Enclosure Parts Figure 1 : Overview of the enclosure parts Position Designation Power Unit Connection Unit Service Manual SB30-77-1SP-US-40-AT-PU-SG-xx-11... -
Page 6: Disconnecting The Inverter From Voltage Sources
4 Disconnecting the Inverter from Voltage Sources SMA Solar Technology America LLC 4 Disconnecting the Inverter from Voltage Sources Prior to performing any work on the inverter, always disconnect it from all voltage sources as described in this section. Always adhere to the prescribed sequence. - Page 7 SMA Solar Technology America LLC 4 Disconnecting the Inverter from Voltage Sources Danger to life due to high voltages on the DC-in connecting terminal plate When exposed to sunlight, the PV array generates dangerous direct voltage. Touching the DC conductors can lead to lethal electric shocks. Even if the DC load-break switch of the inverter is in the O, position, there will be dangerous direct voltage present in the DC conductors and on the DC-in connecting terminal plate in the Connection Unit.
-
Page 8: Disassembling The Defective Power Unit
5 Disassembling the Defective Power Unit SMA Solar Technology America LLC 5 Disassembling the Defective Power Unit Prior to disassembling the defective Power Unit, all connections between the Power Unit and the Connection Unit must be severed. Only then can the Power Unit be removed from the Connection Unit. - Page 9 SMA Solar Technology America LLC 5 Disassembling the Defective Power Unit 3. Remove the connecting terminal plate with the connected AC conductors from slot AC-out. To do this, unscrew the screws using a flat-blade screwdriver (blade width: 3.5 mm (0.14 in)) and pull the connecting terminal plate out of the slot.
- Page 10 5 Disassembling the Defective Power Unit SMA Solar Technology America LLC 7. If the inverter is fitted with a padlock for theft protection, open the padlock and remove it. 8. Using a Torx screwdriver (TX 25), unscrew the screw M5x60 which fastens the inverter to the wall mounting bracket.
- Page 11 SMA Solar Technology America LLC 5 Disassembling the Defective Power Unit 11. If necessary, remove residual insulation material from the two connection openings at the top of the Connection Unit. Service Manual SB30-77-1SP-US-40-AT-PU-SG-xx-11...
-
Page 12: Mounting The New Power Unit
6 Mounting the New Power Unit SMA Solar Technology America LLC 6 Mounting the New Power Unit Danger to life due to high voltages • Disconnect the inverter from all voltage sources (see Section 4, page 6). 2. Hook the new Power Unit into the upper recesses of the wall mounting bracket, thus plugging the Power Unit into the Connection Unit. - Page 13 SMA Solar Technology America LLC 6 Mounting the New Power Unit 7. Plug the connecting terminal plate with the connected DC conductors into slot DC-in in the Connection Unit. While doing so, only touch the connecting terminal plate on the black enclosure.
- Page 14 ☑ Through the replacement of the Power Unit, the inverter has been assigned a new serial number (see type label). 12. If the inverter is registered in Sunny Portal, replace the inverter in Sunny Portal (see installation manual "Replacement of SMA Devices in Systems with Communication Products" at www.SMA-Solar.com). SB30-77-1SP-US-40-AT-PU-SG-xx-11...
-
Page 15: Packaging The Defective Power Unit For Pick-Up
7 Packaging the Defective Power Unit for Pick-Up 1. Package the defective Power Unit for pick-up. Use the original packaging of the new Power Unit for this purpose. 2. Arrange for pick-up by SMA. To do this, contact Service (refer to www.SMA-Solar.com for contact details). Service Manual... -
Page 16: Contact
8 Contact SMA Solar Technology America LLC 8 Contact If you have technical problems with our products, please contact the SMA Service Line. We require the following information in order to provide you with the necessary assistance: • Inverter device type • Inverter serial number •... - Page 17 www.SMA-Solar.com...
Need help?
Do you have a question about the SB3.0-1SP-US-40 and is the answer not in the manual?
Questions and answers