Table of Contents
Advertisement
Service Manual (English)
OsteoSys Co., Ltd.
Model Designation: DEXXUM T
Appendix4. FPGA download Document Rev. : 1.0
Service Manual
Device Service Manual
Service Manual Document Rev. : 6.0
Appendix1. Alignment Document Rev. : 3.0
Appendix2. Calibration Document Rev. : 4.0
Appendix3. Installation Document Rev. : 2.0
Appendix5. Disassembling Document Rev. : 1.0
DOC. No. : OT09-2F7431-SVM-05
1
Table of all contents
Advertisement
Table of Contents
Troubleshooting

Related Manuals for OsteoSys DEXXUM T


Summary of Contents for OsteoSys DEXXUM T
- Page 1 Service Manual (English) OsteoSys Co., Ltd. Model Designation: DEXXUM T DOC. No. : OT09-2F7431-SVM-05 Device Service Manual Service Manual Document Rev. : 6.0 Appendix1. Alignment Document Rev. : 3.0 Appendix2. Calibration Document Rev. : 4.0 Appendix3. Installation Document Rev. : 2.0 Appendix4.
-
Page 2: Revision History
The solution according to the error code 2015.01.21 07.01 M.J.PARK J.J.KIM J.J.KIM The solution according to the error code This document is prepared/distributed by OsteoSys Co., Ltd. Legal action will be applied to illegal use Service Manual Table of all contents... - Page 3 Cautions ............................. 4 Field Replaceable Unit and Ordering Code ...............11 Trouble Shooting Guide ......................15 Service Manual ..........................46 Appendix 1 : DEXXUM T Mechanical alignment manual Appendix 2 : DEXXUM T Calibration manual (Confidential) Appendix 3 : DEXXUM T installation manual...
-
Page 4: Table Of Contents
Service Manual (English) OsteoSys Co., Ltd. Model Designation: DEXXUM T DOC. No. : OT09-2F7431-SVM-05 1. Cautions Representations in the Service Manual ................5 Service engineer training ......................8 Cautions ............................. 9 Service program and service documents .................10 Personal data protection ......................10... -
Page 5: Representations In The Service Manual
Service Manual (English) OsteoSys Co., Ltd. Model Designation: DEXXUM T DOC. No. : OT09-2F7431-SVM-05 1. Representations in the Service Manual 1) Representation method User manual and installation manual are described based on the following marking and representation method. Method of describing order, signs and icons Alphabetical order is used to indicate execution order. - Page 6 Service Manual (English) OsteoSys Co., Ltd. Model Designation: DEXXUM T DOC. No. : OT09-2F7431-SVM-05 Indication of “CAUTION” The mark and phrase “CAUTION!“ as below is designed to draw users’ attention since there can be safety risks during use of the equipment.
- Page 7 Service Manual (English) OsteoSys Co., Ltd. Model Designation: DEXXUM T DOC. No. : OT09-2F7431-SVM-05 2) Symbols : X-ray on Symbol that Indicates X-ray is currently emitted for examination. The symbol appears on the equipment controller or on monitor during examination of a testee or daily tests.
-
Page 8: Service Engineer Training
You need to pay keen attention to “Caution” symbol for Cautions or warnings. Service engineers shall complete training on “safety on duty” to be provided by Osteosys on a regular or irregular basis. Service engineers shall receive trainings on proper use of the equipment and service. -
Page 9: Cautions
4. Disconnect main power cable from the device whenever disassembling the device. 5. As DEXXUM T is using high voltage, even when the power is off, some voltage can be left in the device around the power supply part. Be sure not to cause short circuit between devices when using conductive tools. -
Page 10: Service Program And Service Documents
4. Service program and service documents Documents regarding our service program and equipment services are protected by copy right. Only the users who are authorized by Osteosys have the right to use our software and manual. Service engineers who are authorized by Osteosys have the right to use our service program and manual. - Page 11 Service Manual (English) OsteoSys Co., Ltd. Model Designation: DEXXUM T DOC. No. : OT09-2F7431-SVM-05 2. Field Replaceable Unit List and Ordering code Ordering Code Qt’ Description Remarks,page FRU009-001 BED-TABLE-MDF 4-7;P110 FRU009-002 BED –MAT-BLUE Urethane Mat 4-7;P110 FRU009-003 BED –MAT-ORANGE Urethane Mat 4-7;P110...
- Page 12 Service Manual (English) OsteoSys Co., Ltd. Model Designation: DEXXUM T DOC. No. : OT09-2F7431-SVM-05 Ordering code Qt’ Description Remarks, page FRU009-086 CARRIAGE-PMT DETECTOR ASSY Detector module 7-4;P130 FRU009-031 CARRIAGE-HFG-FAN 7-21;P174 FRU009-032 CARRIAGE-HFG-SHUTTER Shutter 7-6;P134 FRU009-033 CARRIAGE-MOTOR-DRIVER Motor Driver 7-5;P133 FRU009-034...
- Page 13 Service Manual (English) OsteoSys Co., Ltd. Model Designation: DEXXUM T DOC. No. : OT09-2F7431-SVM-05 Ordering code Qt’ Description Remarks,page FRU009-057 CABLE-MOTORDRIVER X- Cable Harness 1-7;P57 MOTOR X FRU009-058 CABLE-MAINSWITCH- Cable Harness 1-7;P57 CONNECTORBOX FRU009-059 CABLE-MAIN-CONNECTORBOX Cable Harness 1-7;P57 SCSI FRU009-060...
- Page 14 Service Manual (English) OsteoSys Co., Ltd. Model Designation: DEXXUM T DOC. No. : OT09-2F7431-SVM-05 Ordering code FRU 명칭 Qt’ Description Remarks,page FRU009-083 ACC-FOOTSUPPORT2 Supporter (Square shape) FRU009-084 DEXXUM T SOFTWARE User Software FRU009-091 FRU009-085 DEXXUM T SOFTWARE UPGRADE Software FRU009-092...
- Page 15 Service Manual (English) OsteoSys Co., Ltd. Model Designation: DEXXUM T DOC. No. : OT09-2F7431-SVM-05 3. Trouble Shooting Guide 0. How to use Trouble Shooting Guide ................ 18 1. Power ........................19 System doesn’t start when Power is ON. 1-1. Fuse breaks off at Power “ON”...
- Page 16 Service Manual (English) OsteoSys Co., Ltd. Model Designation: DEXXUM T DOC. No. : OT09-2F7431-SVM-05 7. Trouble Shooting on Error Codes ................31 7-1. A-002 Hard Disk Space Insufficiency 7-2. B-002 Under Temperature 7-3. B-011 Check Detector or Main Board 7-4.
- Page 17 Service Manual (English) OsteoSys Co., Ltd. Model Designation: DEXXUM T DOC. No. : OT09-2F7431-SVM-05 7-34. D-021 Scan site is not selected 7-35. D-024 Release ROI button 7-36. D-026 Database server could not be found 7-37. Daily QC is not finished 7-38.
- Page 18 (Option) APPENDIX 2 : DEXXUM T Calibration Manual is provided when Master Phantom for Calibration is purchased through OsteoSys HQ or its agencies, for which it is marked (Option) in this Service Manual.
- Page 19 1-1. A. Test Main switch/Emergency switch/Inlet/Fuse/Wall power with DVM. A-1. Main Switch Test ☞ 1-2. Outer figure of DEXXUM T (Inlet, Switch) A-2. Emergency Switch Test ☞ 1-1. Outer figure of DEXXUM T (Inlet, Switch) A-3. Inlet Test ☞ 1-2. Outer figure of DEXXUM T (Inlet, Switch) A-4.
- Page 20 Service Manual (English) OsteoSys Co., Ltd. Model Designation: DEXXUM T DOC. No. : OT09-2F7431-SVM-05 Fuse breaks off at Power “ON” 1-2. A. Lift bed and MDF, Motor driver and Main module connected to Power module, and every connector including X-ray generator power connector.
- Page 21 D. Open the carriage on both sides with hands when Power is OFF and check for noise/abnormality. ☞ See Outer figure of 1-1 DEXXUM T D-1. If problems on parts, go to 3. Problems on Parts in Trouble Shooting Guide E.
- Page 22 Replacing timing belt of X-ray generator ☞ 7-9. Replacing timing belt Replacing timing belt of detector ☞ 7-9. Replacing timing belt Replacing timing belt of Y-axis of DEXXUM T ☞ 7-9. Replacing timing belt Make sure to test Alignment, QC and system after replacing timing belt related to X-axis.
- Page 23 Service Manual (English) OsteoSys Co., Ltd. Model Designation: DEXXUM T DOC. No. : OT09-2F7431-SVM-05 D. Movement is slow and unstable. D-1. Lift bed and MDF, press Y or X-axis timing belt with hands to check for tension of timing belt ☞...
- Page 24 Service Manual (English) OsteoSys Co., Ltd. Model Designation: DEXXUM T DOC. No. : OT09-2F7431-SVM-05 2-3. Noise during operation If noise occurs during movement/measuring of the equipment, check connection of all covers to determine whether the cause is the equipment covers or parts.
- Page 25 Service Manual (English) OsteoSys Co., Ltd. Model Designation: DEXXUM T DOC. No. : OT09-2F7431-SVM-05 3. Problems on Parts 3-1. Problems with noise and operation of driver Noise on parts occurs in driver such as bearing. A. Check whether the cause of noise is X or Y-axis; to check whether the cause is parts or hardware of Motor Driver, check for the cause of noise by pushing with hands with Power OFF.
- Page 26 Service Manual (English) OsteoSys Co., Ltd. Model Designation: DEXXUM T DOC. No. : OT09-2F7431-SVM-05 B-2. If the cause is not Motor, remove top/bottom carriage cover from the equipment to check pulley/bearing on detector Driver. Check pulley on the opposite side as well.
- Page 27 C. Remove bed and MDF and check connection from Inlet board to connector box and Main board. C-1. Checking Inlet board ☞ 1-2. Outer figure of DEXXUM T (Inlet, Switch) , ☞ 7-20. Replacing Inlet / Inlet board C-2. Checking cable ☞ 1-7. System connection diagram D.
- Page 28 Main board or cable may be the problem. Remove Main board cover from the equipment. Apply forced initialization on DEXXUM T equipment, measure test Point with DVM and check for switch input. (Replacing Main board or User Operated Switch and test are sufficient to solve problems.)
- Page 29 Service Manual (English) OsteoSys Co., Ltd. Model Designation: DEXXUM T DOC. No. : OT09-2F7431-SVM-05 5-3. Problem with buzzer If no “beep” buzzer sound or X-ray exposure warning sound at the end of scanning line 1 at the initial Power ON, there might be a problem on the buzzer. Replace Main board.
- Page 30 Service Manual (English) OsteoSys Co., Ltd. Model Designation: DEXXUM T DOC. No. : OT09-2F7431-SVM-05 5-5. Problem with Limit switch A. Problems on Limit switch of the equipment may cause loud noise and trembling when the equipment makes initial movement at Power ON or its movement deviates from the movement range.
- Page 31 Service Manual (English) OsteoSys Co., Ltd. Model Designation: DEXXUM T DOC. No. : OT09-2F7431-SVM-05 7. Trouble Shooting on Error Codes 7-1. A-002 Hard disk Space Insufficiency Error Code Method Cause of error Error Description Check Order 1) Add Hard disk. or delete data after backup A-002 * Hard disk backup ☞...
- Page 32 4) If you have a scintillator, you can check HFG operation. 1) Replacing X-ray generator 2) Align the alignment. Order 3) Replacing X- * DEXXUM T Alignment Manual ☞ APPENDIX 1 ray generator 3) calibration * DEXXUM T Calibration Manual ☞ APPENDIX 2 (Option) Service manual Trouble Shooting Guide...
- Page 33 Service Manual (English) OsteoSys Co., Ltd. Model Designation: DEXXUM T DOC. No. : OT09-2F7431-SVM-05 7-3. B-011 Check Detector or Main Board Error Code Method Cause of error Error Description Check Order 1) Open bottom cover of carriage. Order 1) Check 2) Check detector cable connection status.
- Page 34 Service Manual (English) OsteoSys Co., Ltd. Model Designation: DEXXUM T DOC. No. : OT09-2F7431-SVM-05 7-4. B-012 ~ B-018 X-ray generator working error Error Code Method Cause of error Error Description Check Order B-012 (Filament Order 1) some part(in 1) Replacing X-ray generator...
- Page 35 Service Manual (English) OsteoSys Co., Ltd. Model Designation: DEXXUM T DOC. No. : OT09-2F7431-SVM-05 Error Code Method Cause of error Error Description Check Order B-014 Order 1) some part(in 1) Replacing X-ray generator Tube current HFG) problem, feedback mA over current 2) Align the alignment.
- Page 36 Service Manual (English) OsteoSys Co., Ltd. Model Designation: DEXXUM T DOC. No. : OT09-2F7431-SVM-05 Error Code Method Cause of error Error Description Check Order B-016 Order 1) some part(in 1) Replacing X-ray generator feedback Tube current mA feedback HFG) problem, 2) Align the alignment.
- Page 37 Service Manual (English) OsteoSys Co., Ltd. Model Designation: DEXXUM T DOC. No. : OT09-2F7431-SVM-05 Error Code Method Cause of error Error Description Check Order B-018 Order 1) some part(in (KV feedback 1) Replacing X-ray generator Tube voltage KV feedback voltage...
- Page 38 Service Manual (English) OsteoSys Co., Ltd. Model Designation: DEXXUM T DOC. No. : OT09-2F7431-SVM-05 B-0110 HFG’s temperature getting higher than high temp limit range 7-5. Error Code Method Cause of error Error Description Check Order B-0110 1) Turn on the equipment and wait until drop the temperature.
- Page 39 Service Manual (English) OsteoSys Co., Ltd. Model Designation: DEXXUM T DOC. No. : OT09-2F7431-SVM-05 7-6. B-0111 HFG working time be exceeded (continuous 13min) Error Code Method Cause of error Error Description Check Order 1) Check HFG working properly (When X-ray shot, if in case B-0111 the green LED is continuously on normal operation.
- Page 40 Service Manual (English) OsteoSys Co., Ltd. Model Designation: DEXXUM T DOC. No. : OT09-2F7431-SVM-05 7-8. B-031 HFG Mechanic Error Error Code Method Cause of error Error Description Check Order Order1) Check HFG 1) Open bed to Main board cable 2) Check HFG data cable connection status.
- Page 41 Service Manual (English) OsteoSys Co., Ltd. Model Designation: DEXXUM T DOC. No. : OT09-2F7431-SVM-05 7-9. B-041 Request Command Time Out Error Code Method Cause of error Error Description Check Order Order1) Check HFG 1) Open bed to Main board cable 2) Check HFG data cable connection status.
- Page 42 Service Manual (English) OsteoSys Co., Ltd. Model Designation: DEXXUM T DOC. No. : OT09-2F7431-SVM-05 7-10. B-051 EEPROM mA Read Failed Error Code Method Cause of error Error Description Check Order 1) Check laser pointer is turned on. Order 1) Check Laser...
- Page 43 Service Manual (English) OsteoSys Co., Ltd. Model Designation: DEXXUM T DOC. No. : OT09-2F7431-SVM-05 7-11. B-061 Retry (B-061) Error Code Method Cause of error Error Description Check Order Order1) Check 1) Refer to alignment manual alignment 1) Open syspreset.txt file. (in %appdata% folder)
- Page 44 Service Manual (English) OsteoSys Co., Ltd. Model Designation: DEXXUM T DOC. No. : OT09-2F7431-SVM-05 7-12. C-003 image File could not be found Error Code Method Cause of error Error Description Check Order C-003 Image file 1) Follow below procedure : run User program → Main Manu →...
- Page 45 Service Manual (English) OsteoSys Co., Ltd. Model Designation: DEXXUM T DOC. No. : OT09-2F7431-SVM-05 7-14. C-005 Could not find the print format Error Code Method Cause of error Error Description Check Order C-005 RPT file is not RPT file is not...
- Page 46 Service Manual (English) OsteoSys Co., Ltd. Model Designation: DEXXUM T DOC. No. : OT09-2F7431-SVM-05 7-16. C-007/C-008 It is not scan area Error Code Method Cause of error Error Description Check Order C-007 It occurred someone C-008 Order 1) Re- selected area which is Off the pointed 1) To suggest patient’s relocation in the scan area.
- Page 47 Service Manual (English) OsteoSys Co., Ltd. Model Designation: DEXXUM T DOC. No. : OT09-2F7431-SVM-05 7-18. C-010 Right Limit Line Error Code Method Cause of error Error Description Check Order C-010 When patient is lean Limitation line toward to right side...
- Page 48 Service Manual (English) OsteoSys Co., Ltd. Model Designation: DEXXUM T DOC. No. : OT09-2F7431-SVM-05 7-20. C-012 Disconnected Error Code Method Cause of error Error Description Check Order Check the equipment is turned on. Order 1) Check 2) Check cable connection between PC and the equipment.
- Page 49 Service Manual (English) OsteoSys Co., Ltd. Model Designation: DEXXUM T DOC. No. : OT09-2F7431-SVM-05 7-21. C-013 This program does not support current Resolution Error Code Method Cause of error Error Description Check Order C-013 (This Program DEXXUM T User Low monitor...
- Page 50 Service Manual (English) OsteoSys Co., Ltd. Model Designation: DEXXUM T DOC. No. : OT09-2F7431-SVM-05 7-23. D-002 Patient not selected Error Code Method Cause of error Error Description Check Order D-002 Select the name of patient for Order 1) Reselect Patient not...
- Page 51 Service Manual (English) OsteoSys Co., Ltd. Model Designation: DEXXUM T DOC. No. : OT09-2F7431-SVM-05 7-24. D-004 There is problem in the year of birth Error Code Method Cause of error Error Description Check Order D-004 There is problem There is problem with...
- Page 52 Service Manual (English) OsteoSys Co., Ltd. Model Designation: DEXXUM T DOC. No. : OT09-2F7431-SVM-05 7-26. D-006 There is problem in the day of birth Error Code Method Cause of error Error Description Check Order D-006 There is problem Order 1) Re-input...
- Page 53 Service Manual (English) OsteoSys Co., Ltd. Model Designation: DEXXUM T DOC. No. : OT09-2F7431-SVM-05 7-28. D-008 ‘Ethnic’ is required Error Code Method Cause of error Error Description Check Order D-008 Order 1) Select ‘Ethnic’ is 1) Provide ethnicity in a proper format ‘Ethnic’...
- Page 54 Service Manual (English) OsteoSys Co., Ltd. Model Designation: DEXXUM T DOC. No. : OT09-2F7431-SVM-05 7-30. D-010 ‘Weight’ is required Error Code Method Cause of error Error Description Check Order D-010 Order 1) Input ‘Weight’ is Error of input weight 1) Provide weight in a proper format ( ‘Weight’...
- Page 55 Service Manual (English) OsteoSys Co., Ltd. Model Designation: DEXXUM T DOC. No. : OT09-2F7431-SVM-05 7-32. D-012 'Password Confirmation' is not equal to 'New Password’ Error Code Method Cause of error Error Description Check Order D-012 Confirm ( 'Password password (2...
- Page 56 Service Manual (English) OsteoSys Co., Ltd. Model Designation: DEXXUM T DOC. No. : OT09-2F7431-SVM-05 7-34. D-014 ‘Retype password’ is required Error Code Method Cause of error Error Description Check Order If new user click “OK” D-014 Did not input in order to create new...
- Page 57 Service Manual (English) OsteoSys Co., Ltd. Model Designation: DEXXUM T DOC. No. : OT09-2F7431-SVM-05 7-36. D-020 Image is not selected Error Code Method Cause of error Error Description Check Order D-020 It occurred if click the “Print” by user without...
- Page 58 Service Manual (English) OsteoSys Co., Ltd. Model Designation: DEXXUM T DOC. No. : OT09-2F7431-SVM-05 7-38. D-024 Release ROI button Error Code Method Cause of error Error Description Check Order D-024 Press ROI button; in It occurred did not Order 1) Click ROI manual mode, press 1) Press ROI button again.
- Page 59 Service Manual (English) OsteoSys Co., Ltd. Model Designation: DEXXUM T DOC. No. : OT09-2F7431-SVM-05 7-40. Daily QC is not finished Error Code Method Cause of error Error Description Check Order D-029 It occurred if It occurred if Calibration has Order 1) Analysis Calibration has failed 1) See 8.1) Daily TEST Fail.
- Page 60 Service Manual (English) OsteoSys Co., Ltd. Model Designation: DEXXUM T DOC. No. : OT09-2F7431-SVM-05 7-42. D-031 Work List Mode Error Code Cause of error Error Description Check Order Method It was ticked in the checkbox of work list mode in patient list and...
- Page 61 Service Manual (English) OsteoSys Co., Ltd. Model Designation: DEXXUM T DOC. No. : OT09-2F7431-SVM-05 7-43. D-040 There may be an object on this position. Please remove object and retry. Error Code Cause of error Error Description Check Order Method Order1) 1) Do not place anything on top of this equipment to measure.
- Page 62 Service Manual (English) OsteoSys Co., Ltd. Model Designation: DEXXUM T DOC. No. : OT09-2F7431-SVM-05 8. Daily Inspection Test Repair as follows if failure occurs during Daily test once a day: 8-1. BMD CHECK fail BMD CHECK is BMD value extracted by scanning Daily Phantom which determines Pass/Fail.
- Page 63 Service Manual (English) OsteoSys Co., Ltd. Model Designation: DEXXUM T DOC. No. : OT09-2F7431-SVM-05 E. Press Scan Mode in Test program, move the coordinates to X:150000 Y:150000, set KV: 83,mA를 150 place MDF on the equipment and execute Scan. D-1. When Scan complete, check for wave pattern or lines on the image.
- Page 64 If Back ground TEST fails, check for operation of other radiation equipments around DEXXUM T since interference of other X-rays or radiation equipments may be a cause. If no radiation cover provided on walls, check the other side of walls in the hospital as well for operation of the equipment.
- Page 65 Service Manual (English) OsteoSys Co., Ltd. Model Designation: DEXXUM T DOC. No. : OT09-2F7431-SVM-05 C-1. Get Count on currently selected area, compare High/Low ratio with setting value in Calibration Manual; if the difference between current and setting value is less than 0.05, execute re-calibration.
- Page 66 Service Manual (English) OsteoSys Co., Ltd. Model Designation: DEXXUM T DOC. No. : OT09-2F7431-SVM-05 8-5. Moving Test It is a test to check for change in each area by Get Count in each area. A. Remove bed and MDF from the equipment and check abnormality on shutter movement using Test program.
- Page 67 Service Manual (English) OsteoSys Co., Ltd. Model Designation: DEXXUM T DOC. No. : OT09-2F7431-SVM-05 9. Trouble Shooting on Image Measured 9-1. Lines or black spots on image. Factors that affect image include X-ray generator and detector problems. A. To check noise on detector, run Test program, set as follows, move coordinates to X:100000 Y:100000 and execute Get count.
- Page 68 A-1. Check whether each Calibration-related QC file is correctly placed. Advance setting ☞ B. If no problem found on QC file, receive Spectrum using test program. Use DEXXUM T Calibration Manual to compare current received spectrum with specified value in the Manual. B-1. Replace detector by following Spectrum criteria.
- Page 69 Outer Figure of DEXXUM T 1-2. Outer Figure of DEXXUM T (Inlet,Switch) 1-3. Main Components of DEXXUM T 1-4. Inside of the carriage mechanism of DEXXUM T 1-5. Locations and names of carriage pulley and coupling 1-6. Mechanism and frame inside bed 1-7.
- Page 70 Service Manual (English) OsteoSys Co., Ltd. Model Designation: DEXXUM T DOC. No. : OT09-2F7431-SVM-05 4. How to disassemble the cover ....................102 4-1. Removing Front Cover 4-2. Removing Back Cover 4-3. Removing carriage Top & Bottom cover 4-4. Removing Column Front Cover & Column Rear Cover 4-5.
- Page 71 Advanced UI setup 8-5. UI patient data backup & recovery 8-6. PACS link 8-7. Work List link 8-8. Password confirmation 8-9. Check the Firmware Version of DEXXUM T main module 8-10. Check using Diagnostic function Service manual Table of Service Main Contents...
- Page 72 Service Manual (English) OsteoSys Co., Ltd. Model Designation: DEXXUM T DOC. No. : OT09-2F7431-SVM-05 Service manual Table of Service Main Contents...
- Page 73 Service Manual (English) OsteoSys Co., Ltd. Model Designation: DEXXUM T DOC. No. : OT09-2F7431-SVM-05 0. Service Manual Revision The initial release version of the service manual is v. 1.00 and this manual is updated in accordance with equipment updates. As service manual version varies depending on serial number of each equipment, make sure to refer to the update page of the service manual to provide services based on the right service manual version.
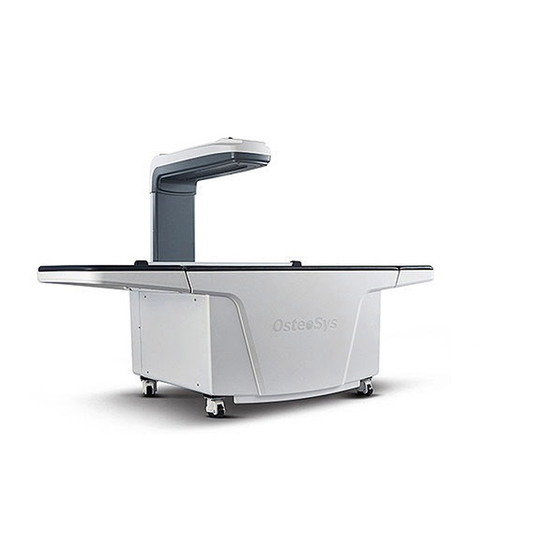
- Page 74 Model Designation: DEXXUM T DOC. No. : OT09-2F7431-SVM-05 System Information 1-1. Outer Figure of DEXXUM T Figure1-1. Outer figure of DEXXUM T ① emergency switch ② carriage ③ bed curtain film ④ bed wing ⑤ bed wing (upper) – when folded ⑥...
- Page 75 DOC. No. : OT09-2F7431-SVM-05 1-2. Outer Figure of DEXXUM T (Inlet, Switch) Figure 1-2. AC input terminal and communication port of DEXXUM T ① AC input / Ethernet communication port ② Main switch Figure 1-3. AC input terminal and communication port of DEXXUM T...
- Page 76 Service Manual (English) OsteoSys Co., Ltd. Model Designation: DEXXUM T DOC. No. : OT09-2F7431-SVM-05 1-3. Main Components of DEXXUM T Figure 1-4. Inside of DEXXUM T ① carriage ② X-RAY generator ③ main board ④ power board ⑤ Y-axis motor driver ⑥...
- Page 77 Model Designation: DEXXUM T DOC. No. : OT09-2F7431-SVM-05 1-4. Inside of carriage mechanism of DEXXUM T Figure 1-5. Inside of carriage of DEXXUM T ① TOP cover ⑩ limit switch to the bottom ② CZT Detector ⑪ limit switch to the left ③...
- Page 78 Service Manual (English) OsteoSys Co., Ltd. Model Designation: DEXXUM T DOC. No. : OT09-2F7431-SVM-05 1-5. Locations and names of carriage pulley and coupling Figure 1-6. Pully Assy; and coupling Replacing bearing and pulley ☞ ① PULLEY STROKE ASSY ⑤ PULLEY STROKE ASSY ②...
- Page 79 Service Manual (English) OsteoSys Co., Ltd. Model Designation: DEXXUM T DOC. No. : OT09-2F7431-SVM-05 1-6. Mechanism and frame inside the bed Figure 1-7. Inside and frame of the bed ① carriage curtain film ② curtain roller ③ connector box ④ Y-axis timing belt ⑤...
- Page 80 Service Manual (English) OsteoSys Co., Ltd. Model Designation: DEXXUM T DOC. No. : OT09-2F7431-SVM-05 1-7. System cable connection Service Manual Service Description...
- Page 81 2. Testing each module of Hardware 2-1. Removing DEXXUM T bed and MDF To see Main module, Power module and X-ray generator installed inside DEXXUM T SYSTEM, remove bed and MDF from the equipment. Figure 2-1. DEXXUM T SYSTEM 1) Since bed doesn’t have fix points, life the bed for removal.
- Page 82 Service Manual (English) OsteoSys Co., Ltd. Model Designation: DEXXUM T DOC. No. : OT09-2F7431-SVM-05 3) Once the procedure complete, recombine MDF and bed as shown as Figure 2-3. For combining with MDF, rear side of bed has smaller space than front of the bed.
- Page 83 Testing Main module and reading the indicator 1) Removing cover To measure Test Point of Main board of DEXXUM T, remove Main module and cover from DEXXUM T system and reinstall. For location of Main module, see 1-3. Main components of DEXXUM T A.
- Page 84 Service Manual (English) OsteoSys Co., Ltd. Model Designation: DEXXUM T DOC. No. : OT09-2F7431-SVM-05 3) Locations of Main board Test Point, 7-segment and Ethernet indicator. Figure 2-7. Location of Main board Test Point, 7-segment and Ethernet indicator Service Manual Service Description...
- Page 85 Service Manual (English) OsteoSys Co., Ltd. Model Designation: DEXXUM T DOC. No. : OT09-2F7431-SVM-05 4) Voltage for each Test Point Test point Voltage (No load) Test point Voltage(No load) ATP1 4.75v < 5v < 5.25v ATP13 1.18v < 1.25v < 1.31v ATP2 -5.25v <...
- Page 86 Even without IP address setting, physical connection makes WD1 ON; WD4 is ON if connected at100M. DEXXUM T used 100M bps therefore both WD1 and WD4 should be “ON”. No problem in data processing even if connected at 10Mbps.
- Page 87 2-2-1. Testing PMT detector Main module and reading the indicator (PMC Assy: FRU009-84) 1) Removing cover To measure Test Point of Main board of DEXXUM T, remove Main module and cover from DEXXUM T system and reinstall. For location of Main module, see 1-3. Main components of DEXXUM T D.
- Page 88 Service Manual (English) OsteoSys Co., Ltd. Model Designation: DEXXUM T DOC. No. : OT09-2F7431-SVM-05 3) Locations of Main board Test Point, 7-segment and Ethernet indicator. Figure 2-7-1. Location of Main board Test Point, 7-segment and Ethernet indicator Service Manual Service Description...
- Page 89 Service Manual (English) OsteoSys Co., Ltd. Model Designation: DEXXUM T DOC. No. : OT09-2F7431-SVM-05 4) Voltage for each Test Point Voltage TP location Range Remarks +5VA ATP1 4.75 < 5 < 5.25 -5VA ATP2 -5.25 < -5 < -4.75 +12VA ATP3 11.4 <...
- Page 90 Even without IP address setting, physical connection makes WD1 ON; WD4 is ON if connected at100M. DEXXUM T used 100M bps therefore both WD1 and WD4 should be “ON”. No problem in data processing even if connected at 10Mbps.
- Page 91 Testing Power module and reading the indicator 1) Removing cover To measure Test Points of DEXXUM T Power board, remove Power module from DEXXUM T system and cover and reinstall. For Main module location, see 1-3. Main components of DEXXUM T.
- Page 92 OsteoSys Co., Ltd. Model Designation: DEXXUM T DOC. No. : OT09-2F7431-SVM-05 3) Locations of Power board indicator and voltage Test Points. Figure 2-10. DEXXUM T Power board Test Points Figure 2-11. DEXXUM T SMPS connector and indicator Service Manual Service Description...
- Page 93 Service Manual (English) OsteoSys Co., Ltd. Model Designation: DEXXUM T DOC. No. : OT09-2F7431-SVM-05 4) Voltage of each Power board Test Point Test point Voltage Test point Voltage 4.75v < 5v < 5.25v TP11 23.28v < 24v < 24.72v -15.75v < -15v < -14.25v TP10 14.25v <...
- Page 94 Service Manual (English) OsteoSys Co., Ltd. Model Designation: DEXXUM T DOC. No. : OT09-2F7431-SVM-05 7) Power board indicator (inner power board : H2EA-002B) Figure 2-12. Power board indicator Indicator Description Description NO USE NO USE X-ray generator ON X-ray generator ON...
- Page 95 2-3-1. Testing Power module and reading the indicator (Added 24VDC relay) 1) Removing cover To measure Test Points of DEXXUM T Power board, remove Power module from DEXXUM T system and cover and reinstall. For Main module location, see 1-3. Main components of DEXXUM T.
- Page 96 OsteoSys Co., Ltd. Model Designation: DEXXUM T DOC. No. : OT09-2F7431-SVM-05 3) Locations of Power board indicator and voltage Test Points. Figure 2-10-1. DEXXUM T Power board Test Points Figure 2-11-1. DEXXUM T SMPS connector and indicator Service Manual Service Description...
- Page 97 Service Manual (English) OsteoSys Co., Ltd. Model Designation: DEXXUM T DOC. No. : OT09-2F7431-SVM-05 4) Voltage of each Power board Test Point Test point Voltage Test point Voltage 4.75v < 5v < 5.25v TP11 23.28v < 24v < 24.72v -15.75v < -15v < -14.25v TP12 11.4v <...
- Page 98 Service Manual (English) OsteoSys Co., Ltd. Model Designation: DEXXUM T DOC. No. : OT09-2F7431-SVM-05 7) Power board indicator (inner power board : H2EA-002C) Figure 2-12-1. Power board indicator Indicator Description Description DC relay ON Input 24V to regulator for DC relay...
- Page 99 2-4. Testing X-ray generator control board and reading the indicator 1) Removing cover To measure Test Points of DEXXUM T X-ray generator, remove side cover of X-ray generator. A. Remove cables from X-ray generator. B. Remove 6 round headed bolts for fixing X-ray generator cover with (+)screw driver.
- Page 100 Service Manual (English) OsteoSys Co., Ltd. Model Designation: DEXXUM T DOC. No. : OT09-2F7431-SVM-05 3) X-ray generator Feedback Point Out of 4 boards of X-ray generator, bottom left is X-ray generator main board. By using DMM as shown in the Figure, measuring Feedback voltage is available.
- Page 101 Service Manual (English) OsteoSys Co., Ltd. Model Designation: DEXXUM T DOC. No. : OT09-2F7431-SVM-05 4) X-ray generator indicator and Test Points X-ray generator has one status LED on board side. Indicator LED STATE Description LED flickering Waiting mode LED not flickering X-ray generation mode Chart 2-9.
- Page 102 DOC. No. : OT09-2F7431-SVM-05 2-5. Checking for short-circuit on Motor Driver Power and setting the indicator and Driver 1) DEXXUM T system uses 2(X and Y-axis) Motor Drivers(KR55MC). To check short-circuit, set DVM to resistance test(Ω) to check for short-circuit as shown in Figure 2-17.
- Page 103 Service Manual (English) OsteoSys Co., Ltd. Model Designation: DEXXUM T DOC. No. : OT09-2F7431-SVM-05 2-6. Checking User Control switches 1) User Operated Switch is composed of 9 switches and 9 LEDs. To measure, move to the following coordinates using Test program at initialized state.
- Page 104 Service Manual (English) OsteoSys Co., Ltd. Model Designation: DEXXUM T DOC. No. : OT09-2F7431-SVM-05 Figure 2-18. Test Points of User Control Panel Listed in the order of Test Points located in the right of OCON1 Test Point Description Test Point...
- Page 105 Service Manual (English) OsteoSys Co., Ltd. Model Designation: DEXXUM T DOC. No. : OT09-2F7431-SVM-05 2-7. Measuring Laser pointer voltage 1) Click “OP CONTROL” button in Test program to turn laser pointer ON and move carriage using User Operated Switch. If abnormality detected on laser pointer, remove carriage top/bottom cover as shown in Figure 2-19.
- Page 106 Service Manual (English) OsteoSys Co., Ltd. Model Designation: DEXXUM T DOC. No. : OT09-2F7431-SVM-05 6) Prepare (+) screw driver and M5 wrench to remove top cover. Remove 2 wrench bolts in the front with M6 wrench and the rest 4 round headed bolts with (+) screw driver to remove the cover.
- Page 107 DOC. No. : OT09-2F7431-SVM-05 2-8. Testing Limit switch and shutter board Limit switch 1) Limit switch has 3 terminals; DEXXUM T uses #1 and #2 and doesn’t use #3 as shown in Figure 2-25. Set DVM to resistance test(Ω) to check for damage; check whether #1 and #2 switch are working as shown in Figure 2-24.
- Page 108 Service Manual (English) OsteoSys Co., Ltd. Model Designation: DEXXUM T DOC. No. : OT09-2F7431-SVM-05 2-9. Testing detector noise Using Test program ☞ 3. Using Test program 1) Strong impact or unexpected electronic hindrance may cause noise on detector. Noise might affect BMD value therefore check for noise if image or BMD value are not normal.
- Page 109 Service Manual (English) OsteoSys Co., Ltd. Model Designation: DEXXUM T DOC. No. : OT09-2F7431-SVM-05 2-10. Measuring shutter motor signal To measure Motor signal with DVM, check Main board signal. 1) Remove MDF and bed from the equipment. 2) Remove Main board cover.
- Page 110 Service Manual (English) OsteoSys Co., Ltd. Model Designation: DEXXUM T DOC. No. : OT09-2F7431-SVM-05 CZT Main Module FRU009-027 PMT Main module FRU009-084 Figure 5-15. DVM measuring point 5) If abnormality detected, replace Main module and assemble in the reversed order of disassembly.
- Page 111 Service Manual (English) OsteoSys Co., Ltd. Model Designation: DEXXUM T DOC. No. : OT09-2F7431-SVM-05 3. How to use TEST program and Checking errors of X-ray by suing TEST program TEST program is a program that controls all the functions of device. Each function can be tested respectively.
- Page 112 TEST program is an intellectual property of OsteoSys and cannot be distributed without approval. Only authorized personnel from OsteoSys can use the Test program. OsteoSys is not held responsible for any malfunction of device or error on BMD value used by an unauthorized person. 3-1. Connecting Test program Setting PC LAN CARD Network IP 1) Click on the network setting icon on desktop with right button of mouse.
- Page 113 Service Manual (English) OsteoSys Co., Ltd. Model Designation: DEXXUM T DOC. No. : OT09-2F7431-SVM-05 3-2. How to use Test program and How to change the setting value of X-ray generator Test program is a ‘Get spectrum’ that receives the data values by generating X-ray, while for 'Get count’, setting Energy Level, X-ray generator value and sampling Time are...
- Page 114 ‘OFF’ the laser pointer. 3-4. Activating temperature sensor and shutter movement testing DEXXUM T has its own temperature sensor inside X-ray generator so as to easily obtain temperature data. Also, it is possible to control the shutter that blocks the X-ray spinneret by using Test program.
- Page 115 Service Manual (English) OsteoSys Co., Ltd. Model Designation: DEXXUM T DOC. No. : OT09-2F7431-SVM-05 Figure 3-9. Get Temperature You can read the temperature data by Clicking “Get Temperature” as shown in the figure. Figure 3-10. Indicating temperature Once the device is “ON”, the shutter moves to the initial position where the limit switch of shutter module is.
- Page 116 Service Manual (English) OsteoSys Co., Ltd. Model Designation: DEXXUM T DOC. No. : OT09-2F7431-SVM-05 Figure 3-12. Get count window Low count graph It draws a graph every hour set for low energy value. High count graph It draws a graph every hour set for high energy value.
- Page 117 Calibration manual is distributed in accordance with Master Phantom purchase conditions. DEXXUM T Calibration manual ☞ APPENDIX 2 (Option) 3-6. Way to obtain Get spectrum and Checking errors of Spectrum Spectrum is a way to see the energy distribution on the entire range in a graph.
- Page 118 Service Manual (English) OsteoSys Co., Ltd. Model Designation: DEXXUM T DOC. No. : OT09-2F7431-SVM-05 Get spectrum window shows up as shown below. Menu is shown below. Figure 3-14. Get spectrum window Spectrum Window A window where spectrum is drawn. Window Range bar...
- Page 119 10 in Sampling Time and click “set”. 6) The way to check errors on Spectrum is to compare the ratio of energy bands and Count value when emitting after setting Spectrum in DEXXUM T Calibration manual.
- Page 120 Service Manual (English) OsteoSys Co., Ltd. Model Designation: DEXXUM T DOC. No. : OT09-2F7431-SVM-05 3-7. Way to obtain the scanned image and Checking errors of scanned image Scan can produce an image by moving similar to actual measurement. It is mainly used to check the picture or motor drive.
- Page 121 Service Manual (English) OsteoSys Co., Ltd. Model Designation: DEXXUM T DOC. No. : OT09-2F7431-SVM-05 Scan Window A part where the image is shown after the scanning starts Window Range bar A part to adjust light and shade of produced image (low...
- Page 122 Service Manual (English) OsteoSys Co., Ltd. Model Designation: DEXXUM T DOC. No. : OT09-2F7431-SVM-05 3) Enter the size of image, set Move control and set Scan Mode. Make sure to click ‘Scan Mode Set’. 4) Move the scan to a desired position by using Move menu.
- Page 123 Service Manual (English) OsteoSys Co., Ltd. Model Designation: DEXXUM T DOC. No. : OT09-2F7431-SVM-05 3-8. Gain Control method and checking errors on Main control B/D(PMC Assy only) Voltage, and Detector information It is only used in a system that PMT Detector and PMC Assy are installed, and also used to check Gain Control of Detector Signal, and Voltage Check, Detector Information ofMain Control B/D (PMC Assy).
- Page 124 Service Manual (English) OsteoSys Co., Ltd. Model Designation: DEXXUM T DOC. No. : OT09-2F7431-SVM-05 Gain Control Window It carries out the function of controlling Signal Gain of PMT Detector and also shows the Gain control History. Set button sets the limit of Signal Gain of Detector.
- Page 125 Service Manual (English) OsteoSys Co., Ltd. Model Designation: DEXXUM T DOC. No. : OT09-2F7431-SVM-05 4. How to disassemble the cover 4-1. Removing Front Cover (FRU NO: FRU009-061) Turn Main Power OFF. Remove bed and MDF from the equipment. As shown in Figure 6-1. Front Cover on fixing parts, remove wrench bolts fixed inside with M5 wrench to remove front cover.
- Page 126 Service Manual (English) OsteoSys Co., Ltd. Model Designation: DEXXUM T DOC. No. : OT09-2F7431-SVM-05 4-2. Removing Back Cover (FRU NO:FRU009-066) Turn Power OFF Remove bed and MDF from the equipment. Remove back cover using M6 wrench. See Figure 4-2. Back cover contains H2EA-006A board connected to cable; remove bed and MDF from the equipment to release inside connector connection.
- Page 127 Service Manual (English) OsteoSys Co., Ltd. Model Designation: DEXXUM T DOC. No. : OT09-2F7431-SVM-05 Figure 4-4. Back cover removed 4-3. Removing carriage Top & Bottom cover (Top Cover FRU NO: FRU009-062) (Bottom Cover FRU NO: FRU009-063) 1) Turn Power OFF.
- Page 128 Service Manual (English) OsteoSys Co., Ltd. Model Designation: DEXXUM T DOC. No. : OT09-2F7431-SVM-05 4) To remove top cover, remove emergency switch connector and User Operated Switch connector inside the cover. Figure 4-7. Removing connector 5) Remove 2 wrench bolts in the front with M6 wrench and the rest 4 round headed bolts with (+) screw driver to remove the cover.
- Page 129 Service Manual (English) OsteoSys Co., Ltd. Model Designation: DEXXUM T DOC. No. : OT09-2F7431-SVM-05 4-4. Removing Column Front Cover & Column Rear Cover (Column Front Cover FRU No: FRU009-068) (Column Back Cover FRU No: FRU009-067) Turn Power OFF. Remove bottom cover as described in C. Removing Top & Bottom cover As shown in Figure 4-9, remove bolts fixed between Front Cover and Back Cover.
- Page 130 Service Manual (English) OsteoSys Co., Ltd. Model Designation: DEXXUM T DOC. No. : OT09-2F7431-SVM-05 4-5. Removing Left Side Cover & Right Side Cover (Left Side Cover FRU NO: FRU009-064) (Right Side Cover FRU NO: FRU009-065) Turn Power OFF. Replace each cover by loosening 4 round headed bolts as shown in Figure 4-11 and combine.
- Page 131 Service Manual (English) OsteoSys Co., Ltd. Model Designation: DEXXUM T DOC. No. : OT09-2F7431-SVM-05 4-6. Replacing bed Wing (Long Wing Cover (43cm) FRU No: FRU009-014) (Middle bed Cover (33cm) FRU No: FRU009-015) (Short bed Cover (23cm) FRU No: FRU009-016) Turn Power OFF.
- Page 132 Service Manual (English) OsteoSys Co., Ltd. Model Designation: DEXXUM T DOC. No. : OT09-2F7431-SVM-05 Middle bed Wing Figure. 4-15. Metal panel after removing Middle bed Wing Cover and Cover Long bed Wing Figure 4-16. Inside of metal panel after removing Long bed Wong Cover and Cover...
- Page 133 Service Manual (English) OsteoSys Co., Ltd. Model Designation: DEXXUM T DOC. No. : OT09-2F7431-SVM-05 4-7. Replacing MDF and urethane bed MDF FRU No: FRU009-001 Center bed (Blue) FRU No: FRU009-002 Center bed (Orange) FRU No: FRU009-003 Center bed (Purple) FRU No: FRU009-004...
- Page 134 Service Manual (English) OsteoSys Co., Ltd. Model Designation: DEXXUM T DOC. No. : OT09-2F7431-SVM-05 Figure 4-18. After MDF removed B. Replacing Center bed Remove the existing Center bed referring to Figure 4-19. Figure 4-19. DEXXUM T Center bed Service Manual Service Description...
- Page 135 The bed should be correctly combined with MDF, otherwise it is indented. Replace bed referring to Figure 4-20. Figure 4-20. DEXXUM T Center bed assembly location Check for gap or rolling of urethane bed after installation. Figure 4-21. Checking flatness of urethane bed...
- Page 136 Service Manual (English) OsteoSys Co., Ltd. Model Designation: DEXXUM T DOC. No. : OT09-2F7431-SVM-05 C. Combining wing bed 1) Remove the existing bed from bed Cover. Figure 4-22. Removing bed cover and urethane bed 2) Remove bed stickers from the new urethane bed and attach the bed to the cover.
- Page 137 Service Manual (English) OsteoSys Co., Ltd. Model Designation: DEXXUM T DOC. No. : OT09-2F7431-SVM-05 5. Testing parts 5-1. Testing film curtain 1) If sandblasting-like noise other than drive/bearing part noise, check for break of curtain film edge or other abnormality.
- Page 138 Service Manual (English) OsteoSys Co., Ltd. Model Designation: DEXXUM T DOC. No. : OT09-2F7431-SVM-05 4) Once wrench bolts are removed, hold and pull Back cover to remove from the equipment. Figure 5-3. Back cover removed 5) By observing from top of curtain film, check for break on left/right contacted with top/bottom/left/right roller, replace if broken referring to “Replacing curtain film”...
- Page 139 Service Manual (English) OsteoSys Co., Ltd. Model Designation: DEXXUM T DOC. No. : OT09-2F7431-SVM-05 5-2. Testing timing belt If Motor driver abnormality or noise, check timing belt. (To adjust tension of timing belt, FRU NO. FRU009-74 tension adjusting torque wrench is used.) Timing belts are used in 3 locations: 2 in carriage and 1 in bed.
- Page 140 Service Manual (English) OsteoSys Co., Ltd. Model Designation: DEXXUM T DOC. No. : OT09-2F7431-SVM-05 B. Timing belt in bed is used to move the entire carriage. SIDE VIEW Figure 4-6. Bed timing belt 3) Checking and Testing for timing belt abnormality A.
- Page 141 Service Manual (English) OsteoSys Co., Ltd. Model Designation: DEXXUM T DOC. No. : OT09-2F7431-SVM-05 4) Adjusting timing belt tension and tension Figure 5-7 shows torque wrench used for adjusting tension. Figure 5-7. Torque wrench for tension adjustment A. Adjusting Y-axis timing belt tension Y-axis timing belt inside the bed is fixed to Y-axis Step Motor and Pulley on the opposite side.
- Page 142 Service Manual (English) OsteoSys Co., Ltd. Model Designation: DEXXUM T DOC. No. : OT09-2F7431-SVM-05 B. Adjusting X-ray generator timing belt Carriage contains 2 timing belts: one is in the bottom of X-ray generator, the other is in detector. To adjust X-ray generator timing belt tension, attach timing belt tension jig as shown in Figure 4-10, connect torque wrench to the bolts(No.
- Page 143 Service Manual (English) OsteoSys Co., Ltd. Model Designation: DEXXUM T DOC. No. : OT09-2F7431-SVM-05 C. Adjusting detector timing belt To adjust detector timing belt tension, attach detector timing belt tension adjusting jig as shown in Figure 4-11 to the bottom of Pulley, connect torque wrench(No. 1 in Figure 5-11), set torque value to 8KG.
- Page 144 Service Manual (English) OsteoSys Co., Ltd. Model Designation: DEXXUM T DOC. No. : OT09-2F7431-SVM-05 5-3. Testing Motor key/coupling Motor key is for turning Pulley on Motor shaft. If Motor key abnormal, X-ray generator or carriage may not move. Coupling connect Motor axis and Driver axis;...
- Page 145 Service Manual (English) OsteoSys Co., Ltd. Model Designation: DEXXUM T DOC. No. : OT09-2F7431-SVM-05 1) Remove MDF and bed from the equipment. 2) Turn the equipment ON, run Test program and check whether the equipment doesn’t respond to Move command or there is a problem in movement.
- Page 146 If problem identification is difficult, remove timing belt, turn bearing with hands to check bearing operation. Replace abnormal bearing and adjust timing belt tension using DEXXUM T tension jig. After timing belt recovery, make sure to check system Alignment. Service Manual...
- Page 147 Power board indicator for several tests. 1) Forced initialization when moving the equipment. At any position, DEXXUM T automatically moves to coordinates (0.0) of initial position once the equipment is ON. For reading Main board or Power board indicator for service, press bottom Limit switch and left Limit switch simultaneously to execute forced initialization.
- Page 148 Service Manual (English) OsteoSys Co., Ltd. Model Designation: DEXXUM T DOC. No. : OT09-2F7431-SVM-05 7. Replacing module and parts and adjusting location 7-1. Replacing and testing Main module, PMC Assy (FRU No: FRU009-027, FRU009-084) Replace Main module or PMC assy’ as follows: 1) Turn Power OFF.
- Page 149 Service Manual (English) OsteoSys Co., Ltd. Model Designation: DEXXUM T DOC. No. : OT09-2F7431-SVM-05 7-2. Replacing Power module (FRU No: FRU009-28) Replace Power module as follows: 1) Turn Power OFF, remove system Power cable from the socket. 2) Remove bed and MDF from the equipment.
- Page 150 Service Manual (English) OsteoSys Co., Ltd. Model Designation: DEXXUM T DOC. No. : OT09-2F7431-SVM-05 7-3. Replacing X-ray generator (FRU No: FRU009-29) To replace X-ray generator, follow the procedure below: 1) Turn Power OFF, remove all cables from the socket. 2) Remove bed and MDF from the equipment.
- Page 151 Service Manual (English) OsteoSys Co., Ltd. Model Designation: DEXXUM T DOC. No. : OT09-2F7431-SVM-05 face inside of system carriage; fan location should be on the opposite side of module guide. Figure 7-5. X-ray generator installation direction 7) As shown in Figure 7-6, fix 4 fixing points using M6 X 12 wrench bolts and square nuts.
- Page 152 Service Manual (English) OsteoSys Co., Ltd. Model Designation: DEXXUM T DOC. No. : OT09-2F7431-SVM-05 8) Lift shielding cover where shutter is fixed, combine it with M4 X 8 round headed bolts. 9) Connect all cables to X-ray generator and shutter.
- Page 153 Service Manual (English) OsteoSys Co., Ltd. Model Designation: DEXXUM T DOC. No. : OT09-2F7431-SVM-05 7-4. Replacing detector (CZT,PMT) (FRU No: FRU009-30, FRU009-086) To replace detector, follow the procedure below: Turn Power OFF. Prepare M5/M6 wrench and (+) driver for removing the cover.
- Page 154 Service Manual (English) OsteoSys Co., Ltd. Model Designation: DEXXUM T DOC. No. : OT09-2F7431-SVM-05 6) Remove 2 wrench bolts in the front with M6 wrench and the rest 4 round headed bolts with (+) screw driver to remove Top cover.
- Page 155 Service Manual (English) OsteoSys Co., Ltd. Model Designation: DEXXUM T DOC. No. : OT09-2F7431-SVM-05 Figure 7-12. Detector fixing points Reconnect connector and fix two M4 X 8 round headed bolts of cable duct using (+) screw driver. If X-ray generator or detector replaced, make sure to check for Alignment.
- Page 156 Service Manual (English) OsteoSys Co., Ltd. Model Designation: DEXXUM T DOC. No. : OT09-2F7431-SVM-05 7-5. Replacing Motor Driver (FRU NO: FRU009-33A) To replace Motor Driver, follow the procedure below: 1) Turn Power OFF. 2) Remove bed and MDF from the equipment.
- Page 157 Service Manual (English) OsteoSys Co., Ltd. Model Designation: DEXXUM T DOC. No. : OT09-2F7431-SVM-05 7-6. Replacing shutter module To replace shutter module, follow the procedure below: 1) Turn Main Power OFF. 2) Remove bed and MDF from the equipment. 3) As shown in Figure 7-14, remove shielding cover using (-) screw and Shutter Assy’...
- Page 158 Service Manual (English) OsteoSys Co., Ltd. Model Designation: DEXXUM T DOC. No. : OT09-2F7431-SVM-05 7-7. Replacing Limit switch (FRU NO: FRU009-038) To replace Limit switch, follow the procedure below: 1) Turn Main Power OFF. 2) Remove bed and MDF from the equipment.
- Page 159 Service Manual (English) OsteoSys Co., Ltd. Model Designation: DEXXUM T DOC. No. : OT09-2F7431-SVM-05 7-8. Replacing and adjusting Limit block Y axis Bottom: Leg (FRU NO: FRU009-021) Y axis Top: Head (FRU NO: FRU009-022) To replace Limit block, follow the procedure below: 1) Turn Main Power OFF.
- Page 160 Service Manual (English) OsteoSys Co., Ltd. Model Designation: DEXXUM T DOC. No. : OT09-2F7431-SVM-05 Marked AL profile Marked AL profile Figure 7-17. Y-axis Limit block location 8) As shown Fig 7-17. Y axis limit block is placed position which marked on AL profile.
- Page 161 Service Manual (English) OsteoSys Co., Ltd. Model Designation: DEXXUM T DOC. No. : OT09-2F7431-SVM-05 7-9. Replacing timing belt Y-axis timing belt (FRU NO:FRU009-071) Replacing detector timing belt (FRU NO: FRU009-072) Replacing X-ray generator timing belt (FRU NO: FRU009-073) Y-axis timing belt (FRU NO: FRU009-71) 1) Turn Main Power OFF..
- Page 162 Service Manual (English) OsteoSys Co., Ltd. Model Designation: DEXXUM T DOC. No. : OT09-2F7431-SVM-05 Replacing detector timing belt (FRU NO: FRU009-072) 1) Turn Main Power of the equipment OFF. 2) Remove bed and MDF from the equipment. 3) Prepare M5/ M6 wrench, (+) screw driver to remove top/bottom cover for timing belt replacement.
- Page 163 Service Manual (English) OsteoSys Co., Ltd. Model Designation: DEXXUM T DOC. No. : OT09-2F7431-SVM-05 6) Remove 2 wrench bolts in the front with M6 wrench and the rest 4 round headed bolts with (+) screw driver to remove Top cover.
- Page 164 Service Manual (English) OsteoSys Co., Ltd. Model Designation: DEXXUM T DOC. No. : OT09-2F7431-SVM-05 Replacing X-ray generator timing belt (FRU NO: FRU009-073) 1) Turn Main Power of the equipment OFF. 2) Remove bed and MDF and X-ray generator from the equipment.
- Page 165 Service Manual (English) OsteoSys Co., Ltd. Model Designation: DEXXUM T DOC. No. : OT09-2F7431-SVM-05 4) To remove X-ray generator Plate fixed to timing belt and Assy’ connected to timing belt from timing belt, remove wrench blots installed on Plate using M3 wrench.
- Page 166 Service Manual (English) OsteoSys Co., Ltd. Model Designation: DEXXUM T DOC. No. : OT09-2F7431-SVM-05 9) Referring to System Alignment, adjust location of timing belt combined to timing belt Pulley Assy’ to align detector and fixing Plate. Change location of X-ray generator on Plate slightly;...
- Page 167 Service Manual (English) OsteoSys Co., Ltd. Model Designation: DEXXUM T DOC. No. : OT09-2F7431-SVM-05 7-10. Replacing Motor and coupling Motor key Motor (FRU NO: FRU009-45) Coupling (FRU NO: FRU009-44) To replace X-axis Motor, follow the procedure below: Replacing Motor Turn Power OFF.
- Page 168 Service Manual (English) OsteoSys Co., Ltd. Model Designation: DEXXUM T DOC. No. : OT09-2F7431-SVM-05 4) Once wrench bolts are removed, hold and pull Back cover to remove it. Figure 7-33. After Back cover removed 5) Red squire part in Figure 7-33 is X-axis Motor. Remove coupling first to remove Motor.
- Page 169 Service Manual (English) OsteoSys Co., Ltd. Model Designation: DEXXUM T DOC. No. : OT09-2F7431-SVM-05 7) As shown in Figure 7-35, remove M5 wrench bolts that support Motor from top to bottom; remove Motor released from coupling as well. Figure 7-35. X축 모터의 분리 방법...
- Page 170 Service Manual (English) OsteoSys Co., Ltd. Model Designation: DEXXUM T DOC. No. : OT09-2F7431-SVM-05 Replacing Y-axis Motor Turn the equipment OFF. Remove bed and MDF from the equipment. Loosen Pulley in the bottom of the equipment. Figure 7-36. Locations of Y-axis Pulley and Motor Assy’ fixing Loosen timing belt tension adjusting wrench bolts.
- Page 171 Service Manual (English) OsteoSys Co., Ltd. Model Designation: DEXXUM T DOC. No. : OT09-2F7431-SVM-05 Remove Motor fixing Brkt’ and Motor using M5 wrench. Figure 7-40. Removing Brkt’ and Motor Replace Motor, recombine in the reversed order of disassembly. Motor Assy’ should be combined and aligned with Motor fixing Brkt’ to the edge market on profile as shown in Figure 6-41.
- Page 172 Service Manual (English) OsteoSys Co., Ltd. Model Designation: DEXXUM T DOC. No. : OT09-2F7431-SVM-05 7-11. Replacing bearing and pulley (FRU NO: FRU009-44) To replace bearing and Pulley, follow the procedure below and for Pulley location, See ☞ 1-5. Pulley Assy’ and coupling locations To replace bearing and Pulley, Top/Bottom/Front Cover should be removed.
- Page 173 Service Manual (English) OsteoSys Co., Ltd. Model Designation: DEXXUM T DOC. No. : OT09-2F7431-SVM-05 3) Fix by adjusting timing belt tension. Adjusting timing belt tension ☞ 5-2. Adjusting timing belt tension 4) Once new Idle Pulley/Roller Idle FLAT prepared, reassemble in the reversed order of disassembly.
- Page 174 Service Manual (English) OsteoSys Co., Ltd. Model Designation: DEXXUM T DOC. No. : OT09-2F7431-SVM-05 C. Replacing Shaft Pulley (FRU NO: FRU009-42) 1) Remove Top /Bottom cover. 2) Loosen timing belt tension by loosening wrench bolts of Idle Pulley Assy’. 3) As shown in Figure 7-46, remove 3 wrench bolts..
- Page 175 Service Manual (English) OsteoSys Co., Ltd. Model Designation: DEXXUM T DOC. No. : OT09-2F7431-SVM-05 7-12. Replacing curtain film (FRU NO: FRU009-69) To replace curtain film, follow the procedure below: Turn Power OFF. Remove bed and MDF from the equipment. Remove back cover in the back using M6 wrench.
- Page 176 In view from the back, left Brkt’ contains two 4mm wrench bolts front/back; right Brkt’ has two 4mm wrench bolts in front. Figure 7-51. DEXXUM T film fixing Brkt’ 6) Once film and Brkt’ are separated, it forms a shape of a long film attaché with Brkt’;...
- Page 177 Service Manual (English) OsteoSys Co., Ltd. Model Designation: DEXXUM T DOC. No. : OT09-2F7431-SVM-05 7) After replacing film, fix to roller as shown in Figure 7-53. DEXXUM T film Figure 7-53. Fixing location of DEXXUM T curtain film Service Manual Service Description...
- Page 178 Service Manual (English) OsteoSys Co., Ltd. Model Designation: DEXXUM T DOC. No. : OT09-2F7431-SVM-05 8) As shown in Figure 7-51, fix Brkt’ to profile; to adjust film tension, adjust and fix film tension as shown in Figure 7-53. Fixing left Brkt’...
- Page 179 Service Manual (English) OsteoSys Co., Ltd. Model Designation: DEXXUM T DOC. No. : OT09-2F7431-SVM-05 7-13. Replacing carriage bottom cover(detector cover) film (FRU NO: FRU009-070) Turn Power OFF. Remove 6 M4 wrench bolts in Figure 7-54. Figure 7-54. Removing Bottom cover fixing wrench bolts Figure 7-55.
- Page 180 Service Manual (English) OsteoSys Co., Ltd. Model Designation: DEXXUM T DOC. No. : OT09-2F7431-SVM-05 7-14. Replacing User Control switch (FRU NO: FRU009-036) Turn Power OFF. Remove 6 M5 wrench bolts in Figure 7-57. Figure 7-57. Removing Bottom cover fixing wrench bolts Figure 7-58.
- Page 181 Service Manual (English) OsteoSys Co., Ltd. Model Designation: DEXXUM T DOC. No. : OT09-2F7431-SVM-05 Remove User Operated Switch from cover. Figure 7-60. Removing User Operated Switch Attach new User Operated Switch as shown in Figure 7-60 and insert cable and connector into the hole inside User Operated Switch.
- Page 182 Service Manual (English) OsteoSys Co., Ltd. Model Designation: DEXXUM T DOC. No. : OT09-2F7431-SVM-05 10) Once Test complete, reassemble the equipment in the reversed order of disassembly. Figure 7-62. User operated switch ① POWER “ON” : Green light is on when the power is on ②...
- Page 183 Service Manual (English) OsteoSys Co., Ltd. Model Designation: DEXXUM T DOC. No. : OT09-2F7431-SVM-05 7-15. Replacing emergency switch (FRU NO: FRU009-043) Turn Power OFF. Remove 6 M5 wrench bolts in Figure 7-63. Figure 7-63. Removing Bottom cover fixing wrench bolts Figure 7-64.
- Page 184 Service Manual (English) OsteoSys Co., Ltd. Model Designation: DEXXUM T DOC. No. : OT09-2F7431-SVM-05 Figure 7-66. Fixing metal location for emergency switch Figure 7-67. Removing fixing switch with tweezers Once fixing metal for switch removed from the equipment, remove fixing metal from below, switch from above Top cover.
- Page 185 Service Manual (English) OsteoSys Co., Ltd. Model Designation: DEXXUM T DOC. No. : OT09-2F7431-SVM-05 7-16. Replacing Laser pointer and Alignment of Laser pointer (FRU NO: FRU009-37) 1) Turn Main Power OFF. 2) Remove bed and MDF from the equipment. 3) Remove 6 M5 wrench bolts in Figure 7-69.
- Page 186 Service Manual (English) OsteoSys Co., Ltd. Model Designation: DEXXUM T DOC. No. : OT09-2F7431-SVM-05 6) Remove 2 wrench bolts in the front with M6 wrench and the rest 4 round headed bolts with (+) screw driver to remove Top cover from the equipment.
- Page 187 Service Manual (English) OsteoSys Co., Ltd. Model Designation: DEXXUM T DOC. No. : OT09-2F7431-SVM-05 8) Replace laser pointer, install Top cover in the reversed order of disassembly, combine the removed connectors. To combine User Operated Switch, see (6-14. Replacing User Operated Switch).
- Page 188 Service Manual (English) OsteoSys Co., Ltd. Model Designation: DEXXUM T DOC. No. : OT09-2F7431-SVM-05 7-16-1. Way to use the Laser pointer Alignment JIG 1) Work on same process until 7-16. Laser pointer replace 10) 2) Turn on laser pointer to excute TEST PROGRAM and to click “OP control”...
- Page 189 Service Manual (English) OsteoSys Co., Ltd. Model Designation: DEXXUM T DOC. No. : OT09-2F7431-SVM-05 6) Set vertical line of laser pointer to pass the collimator hole adjusting laser point Block using M3 hex wrench (refer ro 7-76-4, 7-76-5) Figure 7-76-4. Hole on cable duct guide Figure 7-76-5.
- Page 190 Service Manual (English) OsteoSys Co., Ltd. Model Designation: DEXXUM T DOC. No. : OT09-2F7431-SVM-05 7-17. Replacing curtain film roller and roller shaft Curtain roller Top 2EA (FRU NO: FRU009-018) Curtain roller Bottom 2EA (FRU NO: FRU009-19) Roller shaft 2EA (FRU NO: FRU009-20) ‘7-12.
- Page 191 Service Manual (English) OsteoSys Co., Ltd. Model Designation: DEXXUM T DOC. No. : OT09-2F7431-SVM-05 Once Snap ring is removed, roller can be removed by hands. Replace roller. Top of curtain film roller Bottom of curtain film roller Figure 7-79. Replacing curtain film roller Referring to ‘7-12.
- Page 192 Service Manual (English) OsteoSys Co., Ltd. Model Designation: DEXXUM T DOC. No. : OT09-2F7431-SVM-05 Replace damaged shafts for new shafts in Figure 7-81 and fix them with wrench bolts. Figure 7-81. Roller shafts and Back Cover supporter Figure 7-82. Location of each shaft...
- Page 193 Service Manual (English) OsteoSys Co., Ltd. Model Designation: DEXXUM T DOC. No. : OT09-2F7431-SVM-05 After replacing shaft, connect roller as described in A. Replacing curtain roller. As described in ‘7-12. Replacing curtain film’, install curtain film. Move carriage with curtain film installed with hands to check for abnormality on replaced curtain film roller.
- Page 194 2 fuses are inserted inside the Fuse Holder. They can be pulled out with hands. Figure 7-83 Location of the fuses and removing the fuses Use fuses with the following specifications for DEXXUM T: Power 220V~230V Country: Fuse 250V 3.15A Power 100V~120V Country: Fuse 125V 6.3A...
- Page 195 Figure 7-84. Removing Main switch and cable DEXXUM T Side Cover surface DEXXUM T Main switch Press in to push out. Figure 7-85. Removing DEXXUM T Cover and Main switch 4) Connect Power cable, turn Main switch ON to check Power input. Service Manual Service Description...
- Page 196 Service Manual (English) OsteoSys Co., Ltd. Model Designation: DEXXUM T DOC. No. : OT09-2F7431-SVM-05 7-20. Replacing Inlet/ Inlet board 1) Turn Power OFF, remove Power cable from the equipment. 2) As shown in Figure 7-86, remove Inlet Assy’ using (+) screw driver.
- Page 197 Service Manual (English) OsteoSys Co., Ltd. Model Designation: DEXXUM T DOC. No. : OT09-2F7431-SVM-05 7-21. Replacing X-ray generator fan 1) Turn Power OFF. 2) Remove MDF and bed from the equipment. 3) As shown in Figure 7-88, remove 6 bolts of X-ray generator cover.
- Page 198 Service Manual (English) OsteoSys Co., Ltd. Model Designation: DEXXUM T DOC. No. : OT09-2F7431-SVM-05 5) Use M3 wrench bolt for fixing 4 wrench bolts that fix fan to the side of X-ray generator to replace fan. Figure 7-90. Removing fan 6) In reversed order of disassembly, fix X-ray generator cover, and assemble the equipment in reversed order.
- Page 199 2) Click “My Computer” icon and right-click the drive where the CD is inserted. 3) Click “Search” and when window comes up, Click “Setup.exe“ file Figure 8-1. “Setup.exe”: DEXXUM T execution file 4) When a window comes up as below, click “Next”...
- Page 200 Service Manual (English) OsteoSys Co., Ltd. Model Designation: DEXXUM T DOC. No. : OT09-2F7431-SVM-05 5) When a window comes up as below, click “ Install “ to start installation. Figure 8-3. Start installation 6) Installation is automatically executed. Figure 8-4. Installation 7) Click “Finish”...
- Page 201 Service Manual (English) OsteoSys Co., Ltd. Model Designation: DEXXUM T DOC. No. : OT09-2F7431-SVM-05 8-2. Database installation Install database to save patients’ data. Save data in database and UI extracts such data from database. 1) Move to the database installed in User program.
- Page 202 Service Manual (English) OsteoSys Co., Ltd. Model Designation: DEXXUM T DOC. No. : OT09-2F7431-SVM-05 4) Click “Install”. Figure 8-8. Setup.exe 5) Database is automatically installed. Figure 8-9. Setup.exe 6) When the My-SQL sign up window comes up, click “Skip Sign-up” and “Next”...
- Page 203 Service Manual (English) OsteoSys Co., Ltd. Model Designation: DEXXUM T DOC. No. : OT09-2F7431-SVM-05 7) After database installation, click “Finish“. Automatically move to optimal Database setup and click “Next”. Figure 8-11. . MY SQL database installation Figure 8-12. MY SQL database installation 8) When a Mysql server interface configuration window comes up, select “Standard...
- Page 204 Service Manual (English) OsteoSys Co., Ltd. Model Designation: DEXXUM T DOC. No. : OT09-2F7431-SVM-05 9) On the next window, check “Install As windows Service” and press “Next” Figure 8-14. MY SQL database installation 10) Check Mysql Security Settings and enter the following in the field and click “Next”’...
- Page 205 Service Manual (English) OsteoSys Co., Ltd. Model Designation: DEXXUM T DOC. No. : OT09-2F7431-SVM-05 11) DATABASE configuration is completed. 12) Click “My computer” and move to the folder via C:\Program files\OsteoSys\DEXXUM T. 13) Execute “DBsetting.bat”. Figure 3-16. MY SQL database installation 14) When DBsettings.bat is executed, C:\Windows\System32\CMD.exe window...
- Page 206 Figure 8-18. Program change, recovery or removal on PC where installation is done A. Recovery If DEXXUM T UI file is damaged or of no use, click “Repair” and “Next” to automatically start recovery process. After recovery is completed, check the software in accordance with software inspection procedure.
- Page 207 Removal Before UI removal, check database is backed up and for backup, see page 109. If DEXXUM T UI program need to be deleted, Click “Remove” and “Next” with “Setup.exe” being executed. If you continue, the following message comes up: “Do you want to completely remove the selected application and all of its features?”...
- Page 208 DOC. No. : OT09-2F7431-SVM-05 8-4. Advanced UI setup Password is setup as advanced user program setup in DEXXUM T, contains BMD items including reference data input for BMD values and Phantom setup values and equipment controls. Please note that as the equipment contains control- and BMD-related values, those who...
- Page 209 Service Manual (English) OsteoSys Co., Ltd. Model Designation: DEXXUM T DOC. No. : OT09-2F7431-SVM-05 Description of advanced UI setup items Figure 8-23. Advanced UI setup screen Service Manual Service Description...
- Page 210 Service Manual (English) OsteoSys Co., Ltd. Model Designation: DEXXUM T DOC. No. : OT09-2F7431-SVM-05 1) Parameter Parameter is an item that gives a slope and offset for the value in accordance with the algorithm of BMD value. This is an item that reflects the compensated value to a particular part. For basic configuration, refer to the figure in the bottom.
- Page 211 It is the position information about 4 places that are tested during Daily TEST. 11) Load QC file It is the menu that is used when loading QC file. DEXXUM T uses total 4 QC files and inserts the 4 files that are generated after QC work.
- Page 212 Service Manual (English) OsteoSys Co., Ltd. Model Designation: DEXXUM T DOC. No. : OT09-2F7431-SVM-05 12) Command Check It is an option that decides to generate log file for the Command that is exchanged between the device and PC. The check is normally turned off unless it is necessary to check the command.
- Page 213 DOC. No. : OT09-2F7431-SVM-05 8-5. UI patient data backup and recovery As DEXXUM T has database in PC, when backup is needed to keep patient data or due to PC breakdown, use the following file. Figure 8-24. “D3NDBToFiles.EXE” A. UI patient data backup method Execute window search function to find the following path or enter the path directly.
- Page 214 Figure 8-25. Run “Regedit” Start -> Run -> Enter “regedit” -> Click “OK” 4) When Editor comes up, find the following path: (My Computer -> HKEY_ CURRENT_USER > Software > OsteoSys >DEXXUM T) Figure 8-26. DEXXUM T’s register path Service Manual...
- Page 215 OsteoSys Co., Ltd. Model Designation: DEXXUM T DOC. No. : OT09-2F7431-SVM-05 5) Right-click DEXXUM T folder. Click “Export” and “Export Registry File” window comes up. Designate the path, enter backup file name and click “Save”. Figure 8-27. Registry Editor Figure 8-28. Backup file generation 6) Copy and save the generated backup file in media that you want.
- Page 216 Service Manual (English) OsteoSys Co., Ltd. Model Designation: DEXXUM T DOC. No. : OT09-2F7431-SVM-05 7) Execute “D3NDBTofiles.exe”on the following path. Figure 8-29. UI Database Back-up program Service Manual Service Description...
- Page 217 Service Manual (English) OsteoSys Co., Ltd. Model Designation: DEXXUM T DOC. No. : OT09-2F7431-SVM-05 Click “DB Read” and patient information comes up. Figure 8-30. DB read 9) When patient data list comes up, click “File Save” and input window comes up.
- Page 218 Service Manual (English) OsteoSys Co., Ltd. Model Designation: DEXXUM T DOC. No. : OT09-2F7431-SVM-05 12) When list comes up, click “File Save”. When input window comes up, enter file name. 13) When file input is finished, click “Save”. 14) The file that the user arbitrarily saved automatically generates another file in DEXXUM T folder.
- Page 219 Service Manual (English) OsteoSys Co., Ltd. Model Designation: DEXXUM T DOC. No. : OT09-2F7431-SVM-05 Click “File Read” and message requesting doctor ID comes up. Figure 8-34. File Read 6) Press “OK”. 7) Select doctor on the window below. Then doctor ID confirmation message comes up.
- Page 220 Service Manual (English) OsteoSys Co., Ltd. Model Designation: DEXXUM T DOC. No. : OT09-2F7431-SVM-05 9) Select original file*.txt among *.txt , *1.txt , *12.txt , *123.txt, *1234.txt, *12345.txt and click “OPEN”. 10) When load correctly, a message comes up as below but if not, check *.txt , *1.txt , *12.txt , *123.txt, *1234.txt, *12345.txt files are copied properly.
- Page 221 8-6. PACS link A. PACS requirements - 2 LAN cards (inside DEXXUM T PC) - The hospital shall allocate certain IP, subnet mask and basic gateway from in- hospital network. (the hospital should provide the information) - PACS Server IP and Port (Hospital shall have PACS server data) - Remote A-title (contact hospital PACS administrator) B.
- Page 222 Service Manual (English) OsteoSys Co., Ltd. Model Designation: DEXXUM T DOC. No. : OT09-2F7431-SVM-05 To connect with hospital PACS Network, select and right-click on Local Area Connection 2 and click Properties. When Properties window comes up, click Internet Protocol (TCP/IP) and click “Properties”.
- Page 223 Service Manual (English) OsteoSys Co., Ltd. Model Designation: DEXXUM T DOC. No. : OT09-2F7431-SVM-05 5) Press Window Start button to check connection with hospital’s PACS server and click Execution. When Command window comes up, enter CMD to turn to the following DOS mode.
- Page 224 Service Manual (English) OsteoSys Co., Ltd. Model Designation: DEXXUM T DOC. No. : OT09-2F7431-SVM-05 7) When the following command is entered, connection details come up on the PC. “Reply from (IP address): byte=32 time=128” appears four times and “Packet: Send = 4, Receive = 4”...
- Page 225 Service Manual (English) OsteoSys Co., Ltd. Model Designation: DEXXUM T DOC. No. : OT09-2F7431-SVM-05 Figure 8-45. Configuration QC/DB/Back up setup All A-title and Modality are case sensitive. Make sure to receive them accurately from PACS /OCS administrator. 5) If the hospital wants to change Modality, receive Modality from PACS administrator.
- Page 226 Service Manual (English) OsteoSys Co., Ltd. Model Designation: DEXXUM T DOC. No. : OT09-2F7431-SVM-05 Figure 8-47. PACS TEST Basic Modality of DEXXUM T is “SC”. Be advised that they are case sensitive. 8-7. Work List link Work List link Work List provides the function of keeping basic patient data in database of hospital server and providing the data to any PCs connected to the server.
- Page 227 -> 4 - Modality -> 5 Figure 8-48. Work-list input 5) Notify OCS admin that Local A-title of DEXXUM T is “DEXXUMT”. A-title is not changeable. 6) Basically, Modality is “SC” and changeable. 7) After setup, click Apply or “OK” button.
- Page 228 Service Manual (English) OsteoSys Co., Ltd. Model Designation: DEXXUM T DOC. No. : OT09-2F7431-SVM-05 Figure 8-49. Patient loading on Work-list 10) After checked, Patient list is automatically updated in seconds. (No load is done if setup is not correct). Figure 8-50. Patient loading on Work-list 11) Call patient data as of today from server.
- Page 229 8-8. Checking Password When you forget Password, use the following program to fine the password. 1) Execute “DTDoctorPWFind.exe”. (download by using OsteoSys Web-hard) 2) Open the program and press “ Data Find”. Figure 8-53. Execute Password Finder 3) Name and Password appear as shown in Figure 8-53.
- Page 230 DOC. No. : OT09-2F7431-SVM-05 8-9. Check the Firmware Version of DEXXUM T main module Field Engineer could check the Firmware version of DEXXUM T main module using custom command on TEST PROGRAM 1) Execute Test Program and connect Ethernet communication 2) Insert in blank of custom command such as A: 14 B: 02 3) Click “Send”...
- Page 231 DOC. No. : OT09-2F7431-SVM-05 8-10. DEXXUM T Diagnostic function check (only support above S/W 2.0.0.0) This function is only working on DEXXUM T system with PMT detector, It can check Main control (PMC Assy) voltage read, firmware version read, comparator block working, EEPROM working, PMT detector information, each limit switch position check function working.
- Page 232 Service Manual (English) OsteoSys Co., Ltd. Model Designation: DEXXUM T DOC. No. : OT09-2F7431-SVM-05 Remarks: Service Manual Service Description...
Need help?
Do you have a question about the DEXXUM T and is the answer not in the manual?
Questions and answers