
Related Manuals for Auvon EasyStim TN28_OTC


Summary of Contents for Auvon EasyStim TN28_OTC
-
Page 1: User Manual
User Manual 1 ® AUVON EasyStim TN28_OTC Devive Device Name:EasyStim TN28_OTC Thank you for purchasing this product, please read this user manual carefully before use! -
Page 3: Table Of Contents
1.KNOW YOUR MACHINE ......................3 2.INSTALL BATTERIES ........................5 3.CONNECT LEAD WIRES TO CH1 OR CH2 ................6 4.CONNECT ELECTRODES PADS TO LEAD WIRES ..............7 5.PLACE ELECTRODES PADS ...................... 8 6.OPERATION OF THE DEVICE ..................... 7. INTRODUCTION OF PROGRAMS .................... -
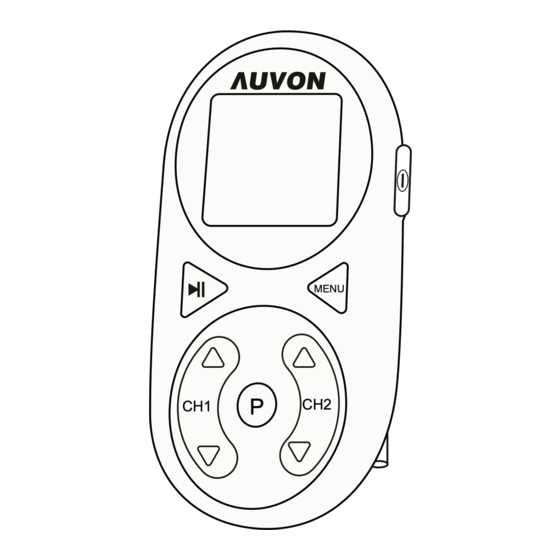
Page 4: Know Your Machine
1.KNOW YOUR MACHINE MENU... - Page 5 1. Frequency (Hz) 17. MENU button 2. Program 18. Channel 2 intensity increase 3. “P” (preset mode) / “M” (manual mode) 19. Channel 2 intensity decrease 4. Channel 1 intensity 20. Channel 1 5. Paused indicator 21. Belt Clip 6. Pause button 22.
-
Page 6: Install Batteries
2. INSTALL BATTERIES Step 1 Push and press the corner of clip as the picture shows with your left thumb and pull down with your right hand. Step 3 Insert the batteries. Make sure the ribbon is behind the Step 2 batteries. -
Page 7: Connect Lead Wires To Ch1 Or Ch2
When the batteries are running low, a low battery indicator will flash on the screen and it is important to change the batteries as soon as possible. CAUTION: There is a risk of explosion if the batteries are fitted incorrectly. Replace with AA Alkaline 1.5 volt batteries (LR6). -
Page 8: Connect Electrodes Pads To Lead Wires
4.CONNECT ELECTRODES PADS TO LEAD WIRES Take out electrodes from the bag and connect to the leads. Each lead should connect to one electrode pad. -
Page 9: Place Electrodes Pads
5.PLACE ELECTRODES PADS Remove electrodes pads from plastic film and place them on your skin. Ensure that the skin where you intend to place the electrodes is clean and thoroughly dry. Remove the electrodes from the clear plastic shield and position on your body as required. NOTE: The system will by default auto-set to “0”... -
Page 10: Operation Of The Device
6.OPERATION OF THE DEVICE Press this key for 2 seconds to turn on or off this device. The unit will turn off automatically if no other key is pressed within the next 5 minutes. Press this key to pause the unit and press this key again to continue it. - Page 11 Press these keys to increase or decrease the intensity of CH1/CH2 from level 0-60. Press this key to go through and select the programs. This device has 32 different programs.The symbol “P” (preset mode) / “M” (manual mode) will display on the LCD accordingly.
-
Page 12: Introduction Of Programs
7. INTRODUCTION Program Program OF PROGRAMS Mode Mode TENS TENS TENS TENS TENS TENS TENS Preset/Manual Preset/Manual For TENS programs: When using any of the Frequency (Hz) Frequency (Hz) 11(P1-P11) programs for pain Pulse width (uS) relief, always start with the Pluse width (uS)... - Page 13 Program Mode TENS TENS TENS TENS TENS TENS TENS TENS TENS TENS TENS TENS TENS TENS TENS TENS TENS TENS TENS TENS TENS TENS TENS TENS Preset/Manual Frequency (Hz) 1-150 1-150 Pulse width (uS) 50-250 50-250 Continuous time Continuous time Time (min)...
- Page 14 For EMS programs: Program Program For muscle stimulation (EMS), Mode Mode any of the 11 (P12-P22) Preset/Manual Preset/Manual programs is recommended to be used for muscle strains, Frequency (Hz) Frequency (Hz) massage muscles and restore Pluse width (uS) Pulse width (uS) muscle vitality.
- Page 15 Program Mode Preset/Manual Frequency (Hz) 1-150 1-120 Pulse width (uS) 50-400 50-400 Continuous time Continuous time Time (min) 10,20,30,45, 10,20,30,45, 60,90min 60,90min Waveform Suggested site for use...
- Page 16 For Massage Program Program programs: MASSAGE MASSAGE MASSAGE MASSAGE MASSAGE MASSAGE MASSAG Mode Mode For Massage, any of the 10 (P23-P32) programs may be Preset/Manual Preset/Manual used to relax anywhere Frequency (Hz) Frequency (Hz) anytime. Gentle massage modes are Pulse width (uS) Pluse width (uS)...
- Page 17 Program SSAGE MASSAGE MASSAGE MASSAGE MASSAGE MASSAGE MASSAGE MASSAGE MASSAGE MASSAGE MASSAGE MASSAGE MASSAGE MASSAGE MASSAGE MASSAGE MASSAGE MASSAGE MASSAGE MASSAGE MASSAGE Mode Preset/Manual Frequency (Hz) Pulse width (uS) Time (min) Waveform Suggested site for use...
- Page 18 a. Steps to use pre-set modes *Pre-set modes: P1-P10(TENS)&P12-P21(EMS)& P23-P32(Massage) NOTE: For your safety, the intensity level will default to “0” if the device is not set up properly. When you adjust waveform or switch modes, the intensity level will default to “0”. (1) Press P to select (2) Press ▲/▼...
- Page 19 NOTE: There will be two kinds of waveforms:Symmetri- Flash (3) Press MENU to cal Bi-phasic Rectangu- make waveform lar and Alternative flashing. mono-phasic Rectangular. ----------------------------------------------------------------------- Symmetrical Bi- Alternative mono- phasic rectangular phasic Rectangular -----------------------------------------------------------------------...
- Page 20 NOTE: Under pre-set modes, time, pulse width and frequency are fixed and not adjustable. (4) Only press CH2 ▲/▼ to select waveform. -------------------------------------- P30 and P31 only have one waveform. Alternative monophasic rectangular --------------------------------------...
- Page 21 b. Steps to use manual modes *Manual modes: P11(TENS)&P22(EMS) NOTE: For your safety, when changing any parameters such as pulse width, waveform, frequency or time, the intensity level will default to “0”. (1) If want to use manual (2) Adjust the intensity of the channel used, simply modes of TENS, press P to press ▲/▼...
- Page 22 NOTE: Select among Flash Continuous continuous time time 10,20,30,45,60 or 90 minutes. When select to continuous time, TIME will be displayed picture shows. (4) Press▲/▼ to select times (including continuous time). (3) Press MENU to make time flashing.
- Page 23 Frequency ---------- ---------------Pulse Width ---------------Time -----------------Waveform* (5) Repeat press MENU again to set up waveform, frequency,pulse width by pressing CH2▲/▼. ----------------------------------------------------------------------- Alternative mono- Symmetrical Bi- phasic Rectangular phasic rectangular -----------------------------------------------------------------------...
- Page 24 If you want to select manual modes of EMS, press P to adjust program to P22 and just repeat above steps of P11 to get started. Besides,P22 has 4 more adjustable parameters, they are rise time, action time, fall time and rest time.
- Page 25 ----------------------------------------------------------------------- Rise Time: the time when the output gradually increases from small to large.(maximum to 5 sec) ----------------------------------------------------------------------- Action Time: the duration when then intensity is maximum.(maxi- mum to 60 sec). ----------------------------------------------------------------------- Fall time: the time when the output gradually decreases from large to small.(maximum to 5 sec).
-
Page 26: Other Features
8. OTHER FEATURES 1. The intensity will immediately down to zero and keep flashing if the unit is not properly connected to the body. 2. When the output intensity level of CH1 and CH2 is over 0, the corresponding output sockets of CH1/CH2 will light up. -
Page 27: Store Properly After Use
b. Use TENS Pads Holder 9. STORE PROPERLY High quality ABS AFTER USE material to make sure your use safely. a. After Use Always ensure that the unit is switched OFF before removing the electrodes. After use, return the electrodes to the clear plastic shields. - Page 28 Instruction Stick the electrode patches on the Wind the thread around the holder Step 1 Step 2 holder to avoid getting dust. for easy use as the picture shown.
-
Page 29: Trouble Shooting
10.Trouble Shooting Always check the unit and accessories before use to prevent damage and defects. If this happens... Cause Try this solution... Batteries are not detected Device doesn’t turn on. Replace batteries. or expired. 1.Re-insert batteries according The device turns one Batteries are not detected to instructions. - Page 30 If this happens... Cause Try this solution... 1. Replace/reconnect lead wires. 2.Ensure lead wires are properly 1.Lead wires or electrode pads The device turns on,but does seated in CH1/CH2. are broken or disconnected. not generate electric pulses. 3.Switch the device to the OFF 2.Treatment time expired.
-
Page 31: Customer Service
● 12-Month Limited Warranty ● Lifetime Technical Support ® Warranty Extension:Register with AUVON , you could have 12 Months Free warranty extension This is in addition to our normal 12 month warranty giving you 24 full months of protection for your ®...
Need help?
Do you have a question about the EasyStim TN28_OTC and is the answer not in the manual?
Questions and answers