Table of Contents
Advertisement
Available languages
Available languages
Advertisement
Table of Contents

Related Manuals for Moretti Forni P110G C/A


Summary of Contents for Moretti Forni P110G C/A
- Page 1 Instructions manual Manuel d’instructions P110G – P150G Gas oven Four a gaz Cod.73300890 Ver.: A4...
- Page 2 NOTICE: The equipment warranty is not valid unless the oven is installed, started and demonstrated under the supervision of a factory certified installer. Retain This Manual For Future Reference Moretti Forni S.P.A. Via A. Meucci, 4 – 61037 Mondolfo (PU) ITALIA – Tel. +39-0721-9.61.61 – Fax +39-0721-9.61.62.99 www.morettiforni.com UK/1...
- Page 3 INDEX 01 TECHNICAL DATA 02 INSTALLATION 03 OPERATION 04 ORDINARY MAINTENANCE 05 SPECIAL MAINTENANCE 06 NOISE LEVELS 07 LIST OF SPARE PARTS Note: This catalogue is printed in two languages: English and French. WARRANTY Standards and rules Warranty only covers the replacement free to factory of pieces eventually broken or damaged because of faulty materials or manufacture. Warranty does not cover any damages caused by third party transport or due to incorrect installation or maintenance, to carelessness or negligence in usage, or to tampering by a third party.
-
Page 4: Technical Data 3
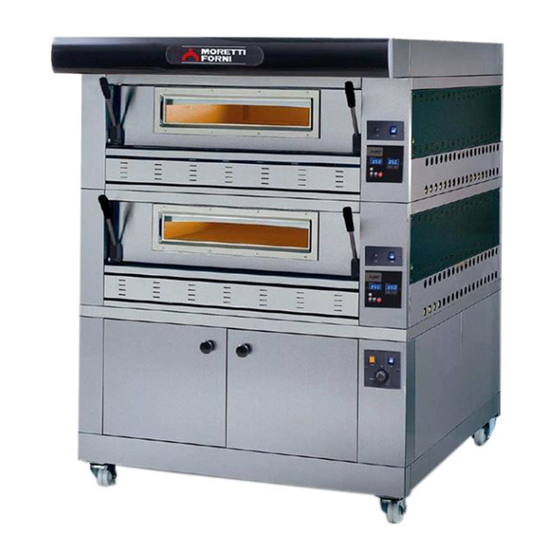
The doors giving access to the ovens are located at the front. MODELS There are nine models available: - P110G C/A - P110G C/B - P150G C/A - P110G C/A2 (double chamber) -
Page 5: Installation 4
INSTALLATION WARNING – For gas ovens, after any conversions, readjustments, or service work on the oven: Perform a gas leak test. Test for correct air supply. Test for proper combustion and gas supply. Check that the ventilation system is in operation. WARNING For electric ovens, after any conversions, readjustments, or service work on the oven, check that the ventilation system (if so equipped) is in operation. -
Page 6: Operation 6
TRANSPORT - bring the short upper pipes together, insert all the screws, move the tray The oven is generally delivered fastened to wooden pallets (fig. 4). holders together and tighten, Each part is protected by a plastic film or by cardboard boxes. - insert the four lower screws in the short base pipes and tighten. - Page 7 For aeration of the area where the oven will be installed, and discharge of Insert a cable with a minimum cross-section of 14 AWG (3 x 2,5 mm ) in exhaust fumes, see the instructions in 2.4. the cable raceway provided (fig.11 item A) and connect it to the terminal The vapour and gas exhaust pipe is located on the back of the oven (fig.
- Page 8 WARNING! MODELS P110G! The valve adjustment screws must not 3.1.6 VALVE OUTLET PRESSURE CONTROL To regulate the valve outlet pressure to the setting listed in the technical be tampered with: they are calibrated and sealed in the factory. It is necessary to intervene on the pressure regulator for the gas valve details TAB.1, it is necessary to: (fig.17 item C) , to guarantee the correct thermal capacity (see...
-
Page 9: Ordinary Maintenance 7
overheating mean that any further use will cause a fire hazard; always TRANSFORMATION AND / OR ADAPTATION replace the thermocouple (item 32 Plate A). All operations must be carried out by specialised and duly licensed To restore the oven to normal operation, unscrew the safety thermostat technicians. - Page 10 WARNING! Periodically (at least once a year), and every time operating malfunctions occur, the appliance must be checked by a specialist technician who must check the general state of the appliance, and in particular the state of the burner. In the presence of any type of irregularity the burner must be replaced immediately.
-
Page 11: Special Maintenance 7
SPECIAL MAINTENANCE 5.2.7 REPLACING THE TRANSFORMER After carrying out the operations described in 5.1 above, to replace the PRELIMINARY SAFETY OPERATIONS transformer proceed as follows: WARNING! All special maintenance operations must be carried out - Remove the right side panel by unfastening the four fixing screws; by specialised technical personnel with a proper licence. - Page 12 - Screw the cover back in place INSTRUCTIONS FOR ORDERING SPARE PARTS Orders for spare parts must contain the following information: 5.3.2 REPLACING THE DOOR KNOB - Oven serial number After carrying out the operations described in 5.1 above, to replace the ball - Oven type knob proceed as follows: - Name of part...
- Page 13 UK/12...
- Page 14 AVIS: La garantie de l’équipement n’est valide que si l’installation, la mise en marche, et la démonstration du four sont faites sous la surveillance d’un installateur qualifié de l’usine. Conservez ce manuel pour référence ultérieure Moretti Forni S.P.A. Via A. Meucci, 4 – 61037 Mondolfo (PU) ITALIA – Tel. +39-0721-9.61.61 – Fax +39-0721-9.61.62.99 www.morettiforni.com TABLE DES MATIÈRES...
- Page 15 01 SPÉCIFICATIONS TECHNIQUES 02 INSTALLATION 03 FONCTIONNEMENT 04 ENTRETIEN ORDINAIRE 05 ENTRETIEN EXTRAORDINAIRE 06 BRUIT 07 LISTE DES PIÈCES DE RECHANGE Remarque: Ce catalogue a été rédigé pour la lecture en deux langues: Anglais et Français. GARANTIE Normes et réglementation La garantie est limitée uniquement au remplacement franco usine de la pièce éventuellement cassée ou défectueuse, après constatation d'un vice de la matière ou de fabrication.
- Page 16 être surveillées. Les portes d’accès aux installations se trouvent sur la partie avant de l’appareil. MODÈLES Les modèles prévus sont neuf: - P110G C/A - P110G C/B - P150G C/A - P110G C/A2 (double chambre) - P110G C/B2 (double chambre)
- Page 17 INSTALLATION – Pour les fours à gaz, après tous règlages, conversions ou travaux d’entretien: AVERTISSEMENT Effectuez un essai d’étanchéité du circuit de gaz. Assurez-vous que l’approvisionnement en air est suffisant. Assurez-vous que l’alimentation en gaz et la combustion sont satisfaisant. Assurez-vous que le système de ventilation est en fonctionnement.
- Page 18 - insérer uniquement les vis les plus externes des éléments tubulaires avant TRANSPORT En principe, l’appareil est expédié monté sur des palettes en bois (fig.4). et arrière (longs), Chaque pièce est protégée par un film plastique ou par une boîte en carton. - insérer les écrous correspondant depuis le coté...
- Page 19 - Avant de commencer la procédure de branchement, vérifier que le 2.5.2 ÉVACUATION DES VAPEURS ET DES GAZ BRÛLÉS système de mise à la terre soit réalisé conformément aux normes en ATTENTION ! LE PROPRIÉTAIRE EST RESPONSABLE DE vigueur. L'INSTALLATION ET DE L'ENTRETIEN D'UN BON SYSTÈME - Avant de commencer la procédure de branchement, vérifier que l’interrupteur de l’installation générale soit sur la position “off”.
- Page 20 indiquée parmi les données techniques du TAB.1; le goulot de l’air (fig.21, détail D) doit posséder les caractéristiques suivantes: cote X= voir données techniques TAB.1; l’injecteur doit être celui indiqué dans le tableau des injecteurs (voir données techniques TAB.1). La possibilité de fonctionnement dépend de la pression d’entrée disponible (voir données techniques TAB.1): En cas de pression non comprise dans les valeurs reportées, prévenir la ATTENTION! Le constructeur décline toute responsabilité...
- Page 21 a) Allumer l’interrupteur général (fig.18, détail 1) sur le pupitre supérieur: - Augmenter la température à 250°C (480°F) et laisser en fonction la l’interrupteur et le panneau électronique au-dessous s’allument. chambre pour 1 heure environ. Si à l’intérieur de la chambre il y a b) Programmer la température de cuisson souhaitée en actionnant les beaucoup de vapeur ouvrir la porte pour quelques minutes pour la faire boutons (fig.18, détail 3).
-
Page 22: Personnel
Enlever le cachet sur le goulot de l’air primaire, régler le goulot (fig.21, - Aérer périodiquement les locaux. détail D) jusqu’à ce que la cote X= voir données techniques TAB.1. - Effectuer le nettoyage avant de l’utiliser à nouveau. Recacheter le goulot de l’air primaire avec une pointe de vernis rouge. - Exécuter la procédure de chauffage comme le premier démarrage (voir ATTENTION! Si une transformation a été... - Page 23 REMPLACEMENT DE LA CARTE D’ALLUMAGE ENTRETIEN EXTRAORDINAIRE 5.2.6 Après avoir effectué les opérations indiquées au point 5.1, pour le remplacement de la carte d’allumage, suivre les instructions reportées ci- OPÉRATIONS PRÉLIMINAIRES DE SÉCURITÉ ATTENTION! Toutes les opérations d’entretien extraordinaire après: doivent être effectuées par un personnel technique spécialisé...
- Page 24 Ouvrir la porte avant (détail 4, tab. A) et desserrer les deux vis dans la REPLACEMENT PARTIES partie supérieure avant de la chambre, qui bloquent le capteur du TRANSFORMATEUR 208V-240V thermostat. ATTENTION! Pour l'entretien de la boîte électrique à l'arrière de fours - Enlever le capteur du thermostat, qui se trouve à...
- Page 26 TAB.1 C-US P110GA P110GA2 P110GA3 P110GB P110GB2 P110GB3 Burner Main Burner Main Burner Main Burner Main Burner Main Burner Main Burner Brûleur Bruleur Prin. Bruleur Prin. Bruleur Prin. Bruleur Prin. Bruleur Prin. Bruleur Prin. Thermic capacity GAS (Btu/h) 73361 146722 220083 98952 197904...
- Page 27 C-US P150GA P150GA2 P150GA3 Burner Main Burner Main Burner Main Burner Brûleur Bruleur Prin. Bruleur Prin. Bruleur Prin. Thermic capacity GAS (Btu/h) 110000 220000 330000 Portèe thermique Consumption LP Gas m3/h 0,923 1,846 2,769 Consommation GPL Consumption Natural Gas m3/h 3,072 6,144 9,216...
- Page 28 P110GA P110GB P150GA 57 7/8“ (147) 57 7/8“ (147) X inch (cm) 78 3/4“ (200) 25 3/16“ (64) 25 3/16“ (64) 25 3/16“ (64) Z inch (cm) 40 5/32“ (102) 55 29/32“ (142) Y inch (cm) 44 7/8“ (114) 9 1/16“ (23) 9 1/16“...
- Page 29 I - L E + F...
- Page 30 Fig.9...
- Page 32 P150G A – P110G B...
- Page 36 Rif. Denomination Designation 1 Side panel Panneau latéral 3 Glass Verre 4 Door Porte 5 Left hinge Charnière gauche 6 Right hinge Charnière droite 7 Bush Douille 8 Bush Douille 9 Nozzle Gicleur 10 Joint Platine 11 Pin Pivot 12 Pin Pivot 13 Bush Douille...
- Page 38 Rif. Designation Denomination 2 Pommeau Knob 4 Interrupteur lumiere Light switch 5 Poignée Handle 6 Embout Ring nut 7 Thermostat Thermostat 8 Ampoule Lamp 9 Douille Lamp holder 10 Resistance Resistance 14 Voyant lumineux Warning ligth 16 Cover Calotte 17 Fixed wheel Roue fixée 18 Swiveling wheel Roue pivotante...
- Page 39 V240 1ph 50/60Hz 24 0V RF 29 230V 20 8 V BROW N - MARRON B LUE - B LEU W HITE BLACK - B LANC NOIR W HITE JOLLOW - B LANC JAUNE GREE N B LA CK - VE RT NOIR RED BLACK - ROUGE NOIR W HITE VIOLE T - B LA NC V IOLE V120 1ph...
- Page 40 Rif. Designation Denomination Safety thermostat Thermostat de securité Terminals board Platine des bornes Main switch Interrupteur Général Terminals 240V Bornes 240V Right light chamber Lampe témoin chambre doitre Left light chamber Lampe témoin chambre gauche Trasformer Transformateur Résistance d’allumage Light-up resistor Flame detector Révélateur de flamme Thermocouple...
- Page 41 L1 6 240Vac 1ph 208Vac 1ph P150L 74800040 Revisione 01 MOD. P110L P150L 208/240Vac 1ph...
- Page 42 Rif. Designation Denomination Light switch Interrupteur lumière étuve Thermostat switch Interrupteur thermostat Thermostat Thermostat Thermostat light Voyant lumineux du thermostat LC1-2 Light Lumière Heating elements Résistances 74800040 P110L P150L V208 V240 1ph...
Need help?
Do you have a question about the P110G C/A and is the answer not in the manual?
Questions and answers