Table of Contents
Advertisement
Available languages
Available languages
Quick Links
Het toestel-identificatieplaatje bevindt zich aan de binnenzijde van het toestel.
La plaque d'identification de l'appareil se trouve sur l'intérieur de l'appareil.
Das Gerätetypenschild befindet sich auf der Innenseite des Geräts.
The appliance identification card is located on the inside of the appliance.
Plak hier het toestel-identificatieplaatje.
Placez ici la plaque d'identification de l'appareil.
Kleben Sie hier das Gerätetypenschild ein.
Stick the appliance identification card here.
Houd, wanneer u contact opneemt met de serviceafdeling, het complete typenummer bij de hand.
En cas de contact avec le service après-vente, ayez auprès de vous le numéro de type complet.
Halten Sie die vollständige Typennummer bereit,
wenn Sie mit der Kundendienstabteilung Kontakt aufnehmen.
When contacting the service department,
have the complete type number to hand.
Adressen en telefoonnummers van de serviceorganisatie vindt u op de garantiekaart.
Les adresses et les numéros de téléphone du service après-vente se trouvent sur la carte de garantie.
Adressen und Telefonnummern der Kundendienstorganisation finden Sie auf der Garantiekarte.
You will find the addresses and phone numbers of the service organisation on the guarantee card.
Handleiding
Notice d'utilisation - Anleitung - Manual
MWA130
GWA720
GWA810
Advertisement
Chapters
Table of Contents

Related Manuals for Pelgrim MWA130


Summary of Contents for Pelgrim MWA130
- Page 1 MWA130 GWA720 GWA810 Het toestel-identificatieplaatje bevindt zich aan de binnenzijde van het toestel. La plaque d’identification de l’appareil se trouve sur l’intérieur de l’appareil. Das Gerätetypenschild befindet sich auf der Innenseite des Geräts. The appliance identification card is located on the inside of the appliance.
- Page 2 Handleiding 3 - 12 Notice dútilisation 13 - 22 Anleitung 23 - 32 Manual 33 - 42 Gebruikte pictogrammen - Pictogrammes utilisés Benutzte Piktogramme - Pictograms used Belangrijk om te weten - Important à savoir Wissenswertes - Important information...
-
Page 3: Table Of Contents
Inhoud Toestelbeschrijving en bediening Veiligheid 2.1 Waar u op moet letten 2.2 Afvoersystemen Installatie 3.1 Algemeen 3.2 Montage van de afzuigkap aan de zijwanden 3.3 Montage van de afzuigkap aan de wanden 3.4 Monteren van het deurpaneel Onderhoud 4.1 Reinigen 4.2 Vetfilters schoonmaken of vervangen 4.3 Koolstoffilters vervangen 4.4 Deur verwijderen en opnieuw plaatsen... -
Page 4: Toestelbeschrijving En Bediening
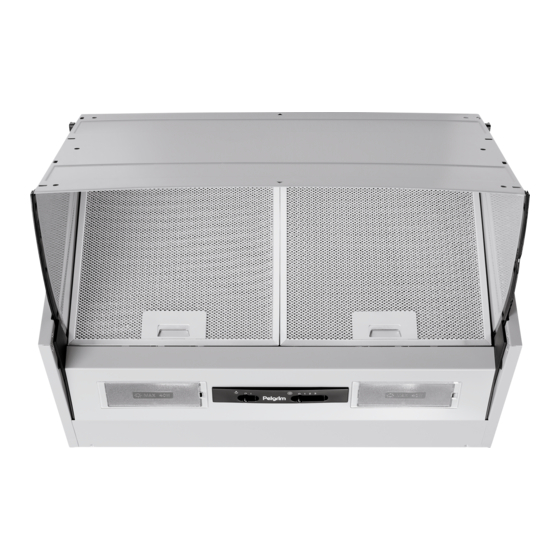
2 Veiligheid 1 Toestelbeschrijving en bediening 2.1 Waar u op moet letten Toestelbeschrijving 1 - Dampverzamelaar Attentie! Laat het toestel aansluiten door een erkend installateur (zie hoofdstuk 2 - Vetfilters “Installatie”). Het apparaat niet aan het stroomnet aansluiten voordat de installatie 3 - Bedieningspaneel volledig voltooid is. -
Page 5: Afvoersystemen
2 Veiligheid 3 Installatie 3.1 Algemeen Dit apparaat is voorzien van het merkteken volgens de Europese richtlijn inzake afvoeren afgedankte elektrische en elektronische apparaten (AEEA). Dit product moet worden afgedankt in overeenstemming met de plaatselijke milieuvoorschriften voor De aansluiting van dit apparaat op het lichtnet moet worden uitgevoerd door een erkend afvalverwerking. -
Page 6: Montage Van De Afzuigkap Aan De Zijwanden
3 Installatie 3 Installatie Montagevoorbereiding Boor dan de bevestigingsgaten in de kastjes. Kies de gewenste afvoeropening (B1 of B2) en maak deze vrij door de voorgeperforeerde Voor het bevestigen van de wasemkap aan kastjes met een plaat te verwijderen. Bevestig het kunststof aansluitstuk op de vrij gemaakte afvoer- wanddikte van 16 mm worden vulstukken meegeleverd. -
Page 7: Monteren Van Het Deurpaneel
3 Installatie 4 Onderhoud 3.4 Monteren van het deurpaneel Let op: Tijdens het reinigen en onderhoud de netspanning uitschakelen door de stekker uit het stopcontact te nemen of de zekering in de meterkast uit te schakelen. Open de deur, duw de haken naar binnen en verwijder de deur. 4.1 Reinigen Leg het deurpaneel, met de achterkant naar boven, op een vlakke ondergrond. - Page 8 Index 5 Bijlage Verpakking en toestel afvoeren Description et commande de l'appareil Bij de vervaardiging van dit toestel is gebruik gemaakt van duurzame materialen. Sécurité Dit toestel moet aan het eind van zijn levenscyclus op verantwoorde wijze worden afgevoerd. De overheid kan u hieromtrent informatie verschaffen. 2.1 Ce à...
-
Page 9: Description Et Commande De L'appareil
1 Description et commande de l'appareil 2 Sécurité 2.1 Ce à quoi vous devez prêter attention Description de l'appareil 1 - Collecteur de vapeur Attention ! Faites brancher l'appareil par un installateur agréé (voir chapitre 2 - Les filtres “Installation”). Ne branchez pas l'appareil sur le réseau avant que l'installation ne 3 - Panneau de commande soit complètement terminée. -
Page 10: Systèmes D'évacuation
2 Sécurité 3 Installation 3.1 Généralités Le courant doit être coupé lors d'une réparation ou d'un nettoyage. Débrancher la • fiche de la prise de courant ou mettez le disjoncteur en position d'interruption de courant. Le raccordement de l'appareil au réseau doit être effectué par un installateur agréé, La graisse et l'huile s'enflamment en cas de surchauffe. -
Page 11: Montage De La Hotte Aspirante Aux Parois Latérales
3 Installation 3 Installation Préparation du montage Percez les trous de fixation dans les éléments de cuisine. Choisissez l'orifice d'évacuation souhaité (B1 ou B2) et libérez celui-ci en enlever la plaque Des pièces intercalaires sont utilisées pour fixer la hotte perforée. -
Page 12: Montage Du Panneau De Porte
3 Installation 4 Entretien 3.4 Montage du panneau de porte Attention ! Lors du nettoyage ou de l'entretien, coupez le courant en débranchant la fiche de la prise de courant ou en mettant le disjoncteur en position d'interruption Ouvrez la porte, poussez les crochets vers l'intérieur et enlevez la porte. de courant. -
Page 13: Annexe
Inhalt 5 Annexe Mise au rebut de l’appareil et de l’emballage Gerätebeschreibung und Bedienung Des matériaux solides ont été utilisés pour fabriquer cet appareil. Evacuez ces matériaux Sicherheit correctement et conformément aux dispositions administratives. Les autorités de votre pays pourront vous fournir des informations à ce sujet. 2.1 Worauf Sie achten müssen 2.2 Abluftsysteme L’emballage de l’appareil est recyclable. -
Page 14: Gerätebeschreibung Und Bedienung
2 Sicherheit 1 Gerätebeschreibung und Bedienung 2.1 Worauf Sie achten müssen Gerätebeschreibung 1. - Dampfsammler 2. - Fettfilter Achtung! Lassen Sie das Gerät durch einen anerkannten Installateur anschließen 3. - Bedienfeld (Siehe das Kapitel "Installation"). Schließen Sie das Gerät nicht an das Stromnetz an, 4. -
Page 15: Abluftsysteme
2. Sicherheit 3 Installation 3.1 Allgemein Die Fettfilter werden bei Verwendung des Geräts heiß. Warten Sie nach dem Kochen • mindestens 30 Minuten vor der Reinigung. Bei Reperatur oder Reinigung des Geräts muss der Strom ausgeschaltet werden. Der Anschluss dieses Geräts an das Stromnetz muss von einem anerkannten Installateur •... -
Page 16: Montage Der Dunstabzugshaube An Die Seitenwände
3 Installation 3 Installation Montagevorbereitung Bohren Sie die Befestigungsöffnungen in die Schränke. Wählen Sie die gewünschte Abluftöffnung (B1 oder B2) und machen Sie diese frei, indem Zur Befestigung der Dunstabzugshaube an Schränken mit einer Sie die vorperforierte Platte entfernen. Befestigen Sie das Kunststoffanschlussstück an der Wandstärke von 16 mm sind Füllstücke mitgeliefert. -
Page 17: Montage Der Türfüllung
3 Installation 4 Wartung 3.4 Montage der Türfüllung Achtung: Schalten Sie während des Reinigens und der Wartung die Netzspannung aus, indem Sie den Stecker aus der Steckdose ziehen oder die Sicherung im Öffnen Sie die Tür, drücken Sie den Haken nach innen und entfernen Sie die Tür. Sicherungskasten herausnehmen. -
Page 18: Anlagen
Content 5 Anlagen Entsorgung Gerät und Verpackung Equipment description and use Bei der Herstellung dieses Gerätes wurden dauerhafte Werkstoffe verwendet. Dieses Safety Gerät ist am Ende seiner Nutzzeit ordnungsgemäß und gemäß den behördlichen Vorschriften zu entsorgen. Sie erhalten hierzu Informationen bei den zuständigen 2.1 What you need to take into account behörden. -
Page 19: Equipment Description And Use
2 Safety 1 Equipment description and use 2.1 What you need to take into account Appliance description 1 - Moisture collector Attention! Make sure the appliance is installed by an authorised installer (see 2 - Grease filters "Installation" chapter). Do not connect the appliance to the flow network before 3 - Control panel completing the installation. -
Page 20: Exhaust Circuit
2 Safety 3 Installation 3.1 General The main current must be switched off during reparation or cleaning. Remove the • plug from the mains current or turn the switch in the meter cupboard to zero. Grease and oil are flammable when they are overheated. Stay in the vicinity of the The connection of this appliance to the electric mains must be done by an authorised •... -
Page 21: Mounting The Exhaust Hood On The Side Walls
3 Installation 3 Installation Mounting preparation Drill the mounting holes in the cabinets. Choose the exhaust outlet (B1 of B2) and open it up by removing the perforated plate. Filling pieces are provided in order to mount the exhaust hood Attach the plastic connecting piece on the opened exhaust outlet. -
Page 22: Maintenance
3 Installation 4 Maintenance 3.4 Fitting the panel door Attention! Turn the mains voltage off during cleaning and maintenance by unplugging the plug from the socket or by switching off the circuit-breaker in the Open the door, push the brackets in and remove the door. meter cupboard. -
Page 23: Appendice
5 Appendice Disposal of appliance and packaging By ensuring this product is disposed of correctly, you will help prevent potential negative consequences for the environment and human health, which could otherwise be caused by inappropriate waste handling of this product. The local authorities can provide you with the relevant information.
Need help?
Do you have a question about the MWA130 and is the answer not in the manual?
Questions and answers