
Related Manuals for WELDY booster EX2


Summary of Contents for WELDY booster EX2
- Page 1 Weldy AG Galileo-Strasse 10 CH-6056 Kaegiswil / Switzerland Tel. +41 41 662 74 74 +41 41 662 74 16 www.weldy.com...
- Page 2 The machine may only be used by qualified specialists or under their supervision. Children are not authorized to use this machine. Protect tool from damp and wet. Repairs should only be carried out by Weldy partners. Restricted to use with origi- nal Weldy accessories and spare parts.
-
Page 3: Technical Data
According to the European Directive 2002/96 on waste electrical and electric equipment and its implementation in national law, power tools which can no longer be used must be collected separately and recycled. Technical Data booster EX2 booster EX3 Voltage Mains voltage is not reversible... -
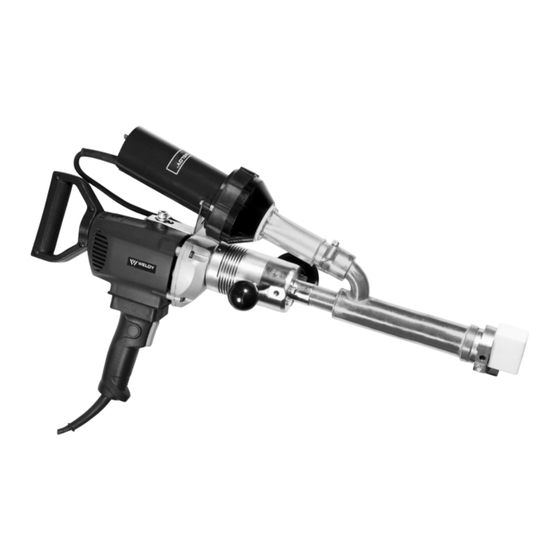
Page 4: Preparation For Welding
Description of tool 1. Welding shoe 6. Tail handle 11. Handle 2. Hot air tube group 7. Drive unit 12. Air temperature potentiometer 3. Tool rest 8. Overload protection fuse 13. Hot air blower switch 4. Welding rod opening 9. Locking device drive on/off switch 5. -
Page 5: Starting The Welding Process
Wait for 1 minute; press the overload protection fuse (8), the tool will re-start again. Starting the welding process • Fit the required WELDY welding shoe (1) according to the paragraph “change of the welding shoe”. • Welding can begin once the operating temperature has been attained. -
Page 6: Switching Off
Starting the welding process • Carry out test welding and analyse. • For interrupting material extrusion use the tool drive on/off switch (10). • Direct the welding shoe (1) to the welding zone. • Pre-warm the welding zone with back and forth movements. • Position the tool on the prepared welding zone and operate the tool drive on/off switch (10). - Page 7 Welding direction Recommended potentiometer steps on hot air blower: Type Material/Diameter Recommended step blower booster EX2 PE (Ø 3 / Ø 4) PP (Ø 3 / Ø 4) booster EX3 PE (Ø 3 / Ø 4) PP (Ø 3 / Ø 4) Noted: the potentiometer steps depend on the environment temperature and material used.
-
Page 8: Maintenance
Warranty • For this tool, the guarantee or warranty rights granted by the Weldy-partners shall apply. In case of guaran- tee or warranty claims any manufacturing or workmanship defects will either be repaired or replaced by the Weldy-partners at its discretion. - Page 12 © Copyright by Weldy Your partner: Weldy AG Galileo-Strasse 10 CH-6056 Kaegiswil /Switzerland Tel. +41 41 662 74 74 Fax +41 41 662 74 16 www.weldy.com...
Need help?
Do you have a question about the booster EX2 and is the answer not in the manual?
Questions and answers