Table of Contents
Advertisement
Advertisement
Table of Contents

Related Manuals for Gates MC3001


Summary of Contents for Gates MC3001
- Page 1 MC3001 OPERATING AND CALIBRATION INSTRUCTIONS...
-
Page 2: Table Of Contents
USER GUIDE - MC3001 TABLE OF CONTENTS 1 - CERTIFICATE OF CONFORMITY ........................3 2 - DESCRIPTION ..............................4 2.1 - GENERAL .............................. 4 2.2 - CHARACTERISTICS ..........................4 2.3 - WORKING PRINCIPLE .......................... 5 2.3.1 - Hydraulic system ........................5 2.3.2 - Electrical system ........................ -
Page 3: Certificate Of Conformity
GATES hereby declares that the new equipment described below: MC3001 - serial number: complies with the machinery directive and the specifications given by GATES and with the regula- tions regarding health and safety at work, as applicable. Drawn up: date:... -
Page 4: Description
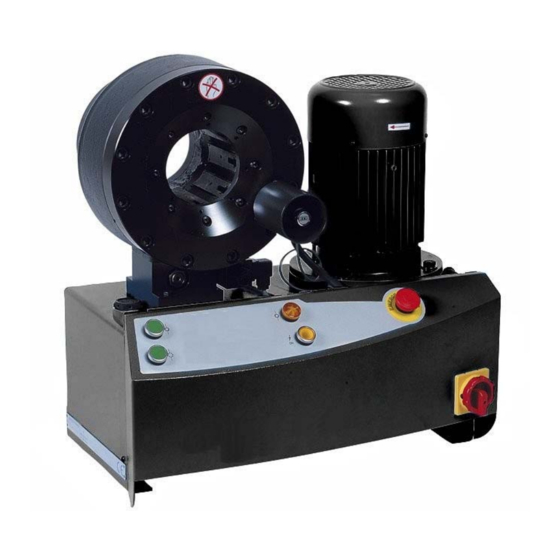
2 - DESCRIPTION 2.1 - GENERAL: You have just acquired a GATES MC3001 powered crimper. It is necessary you adhere to the enclosed instructions for best performance. The MC3001 has been designed specifically for crimping Gates hoses and couplings which are used constantly in today’s industry, agriculture and public works. -
Page 5: Working Principle
USER GUIDE – MC3001 2.3. – WORKING PRINCIPLE: This machine is comprised of 3 main systems: the hydraulic circuit, the crimping head with numerical set stop for crimp adjustment, and the electrical system. 2.3.1. – HYDRAULIC SYSTEM: This supplies the energy necessary to move the dies. - Page 6 USER GUIDE - MC3001 Working principle: In the non-actuated state (such as shown in figure 1), the motor drives the pump which continuously supplies the circuit with oil. The control valve (4) is in position middle (see figure 1). The oil is in a closed circuit and returns to the oil tank (8).
-
Page 7: Electrical System
USER GUIDE - MC3001 2.3.2. - ELECTRICAL SYSTEM: The electrical system supplies the motor and control valve. Note: Spare fuses are attached to the switch cable in the electrical enclosure of the machine. Composition: The electrical system is comprised of (see figure 3):... - Page 9 USER GUIDE - MC3001 Working principle: The bell housing (8) and piston (10) can be compared to a double acting hydraulic ram. Crimping consists in transforming a linear displacement at constant speed, that of the piston (10), into a two speed radial displacement: resulting in a rapid approach speed and a slower crimping speed.
-
Page 10: Instructions For Use
USER GUIDE - MC3001 3 - INSTRUCTIONS FOR USE 3.1 - SAFETY: The machine must be installed on a bench or on a stable base. Do not put your hand in the crimping head during operation. Do not modify technical characteristics of the machine (pressure or others). - Page 11 USER GUIDE – MC3001 1. Crimper flange face Disengage die button 2. Gauge setting mechanism On button 3. Finished crimp indicator light Emergency stop button 4. Engage die button Mains on/off switch Fig 4.a : Identification diagram...
-
Page 12: Operating Instructions
USER GUIDE - MC3001 3.3 - OPERATING INSTRUCTIONS: Ref - fig 4.a 1. Turn the main switch (8) to position 1 and press the ON button (6). 2. Press the disengage die button (5) in order to fully open the die carriers. -
Page 13: Adjustment / Calibration
USER GUIDE – MC3001 3.4. – ADJUSTMENT / CALIBRATION Before delivery each machine is calibrated and should be ready for use upon receipt. However, machine calibration should be checked on a monthly basis and when gauge settings consistently produce diameters outside the crimp diameter tolerance. -
Page 14: Maintenance
To achieve correct lubrication, grease with a 60% concentration of molybdenum di-sulphide must be used (this product is supplied with the machine and can be obtained from GATES, Part No. 7482-19227). Lubricate every 100 crimping operations as follows: - Shake the aerosol can, held upside down, for 1 minute (this amount of time is necessary for such a thick product to be vaporised properly). -
Page 15: Checking And Replacing The Oil
- Tighten the 12 screws with a torque wrench set at 28 MKg. (Tighten opposing screws, spreading the force, thus reducing the possibility of deforming the flange.) This operation can be difficult for an inexperienced mechanic. When in doubt, don’t hesitate to contact your Gates representative. -
Page 16: Spare Parts
USER GUIDE – MC3001 4.2. – SPARE PARTS: Note: Tampering with the machine during the warranty period will render the latter void. All orders for spare parts must state reference, description and quantity required. Example: Reference: MC3000-4622 Description: PISTON Quantity: 4.2.1 –... -
Page 18: Troubleshooting
USER GUIDE - MC3001 4.3 - TROUBLESHOOTING: Problem Probable cause Possible solutions The crimper won’t open or Lubrication error Clean and lubricate the crimper (see does not crimp sections 4.1.1 and 4.1.3). The control valve is not piloted Check the electrical circuit: fuses, plugs and connections, feeding of the control valve bobbin. -
Page 19: Warranty Limitations
Every effort has been made to ensure the accuracy and comprehensiveness of the informations included in this guide. However, Gates cannot be held responsible for errors or omissions and alterations which have occured after release for printing; or if Gates products are used in special or exceptional circumstances without prior consultation with and clearance from a Gates representative for verification of the planned usage.
Need help?
Do you have a question about the MC3001 and is the answer not in the manual?
Questions and answers