
Related Manuals for Corghi Artiglio Master Code


Summary of Contents for Corghi Artiglio Master Code
- Page 1 Artiglio Master Code Cod. 4-118329D - 10/2017 English User Manual Tel. ++39 0522 639.111 - Fax ++39 0522 639.150 www.corghi.com - info@corghi.com...
- Page 2 CORGHI Dear Purchaser Thank you for purchasing your Corghi Tyre Changer. Your Tyre Changer has been designed to provide years of safe and dependable service, as long as it is used and maintained in accordance with the instructions provided in this manual.
- Page 3 WDK procedure Automatic procedures Automatic Size Identification Procedure Machine Use in Automatic Mode Emergency Procedures in Automatic Mode Accessories Instructions for the Correct Use of Accessories Bead Sealing and Seating Instructions for Using Inflatron (optional) Artiglio Master Code User Manual...
- Page 4 Inflation Safety Precautions Lubrication and Removal of Valve Core Bead Sealing and Seating Individuals and Dates Trained _____________________________________________________________________ _____________________________________________________________________ _____________________________________________________________________ _____________________________________________________________________ _____________________________________________________________________ _____________________________________________________________________ _____________________________________________________________________ _____________________________________________________________________ _____________________________________________________________________ _____________________________________________________________________ Artiglio Master Code User Manual...
-
Page 5: Table Of Contents
2. TRANSPORT, STORAGE AND HANDLING ........20 2.1 UNPACKING......................20 3. HOISTING/HANDLING ................21 3.1 INSTALLATION ..................... 22 3.2 INSTALLATION CLEARANCES ................24 4. ARTIGLIO MASTER CODE DESCRIPTION .........24 4.1 OPERATOR POSITION ..................25 4.2 EqUIPMENT COMPONENTS (MAIN WORKING ELEMENTS OF THE MACHINE) 4.3 CONTROLS ......................28 4.3.a. - Page 6 11. INFORMATION AND WARNINGS ABOUT LUBRICATING FLUID FOR TYRES ..................108 12. RECOMMENDED FIRE-EXTINGUISHING EqUIPMENT ....108 13. GLOSSARY ..................109 TABLE FOR USING CENTRING AND CLAMPING ACCESSORIES ACCORDING TO RIM TYPE ..................112 WIRING DIAGRAM ......................121 PNEUMATIC DIAGRAM ....................130 Artiglio Master Code User Manual...
-
Page 7: Getting Started
In addition, so we can contact our customers with any necessary safety information, please ask the new owner to complete and return to Corghi the change of ownership form attached to the previous page of this manual. Alternatively, the new owner can send an email to service@corghi.com. -
Page 8: General Warning And Instructions
For example, never mount a 16.5” tyre on a 16” rim and vice versa. This is very dangerous. A mismatched tyre and rim could explode, resulting in an accident. Artiglio Master Code User Manual... - Page 9 • If an extension cord is necessary, a cord with a current rating equal to or greater than that of the machine must be used. Cords rated for less current than the machine can overheat, resulting in a fire. Artiglio Master Code User Manual...
- Page 10 20. Wear proper back support and employ a proper lifting technique when placing, mov- ing, lifting or removing wheels from the tyre changer. 21. This machine may only be used, maintained or repaired by properly trained employ- Artiglio Master Code User Manual...
-
Page 11: Decal Placement
Repairs should only be performed by qualified personnel. Your CORGHI service representative is the most qualified person. The employer is responsible for determining if an employee is qualified to safely make any repairs to the machine should repair be attempted by users. - Page 12 462778 DECAL, SAFETY INSTRUC- TIONS 461933 DECAL, INFLATING PEDAL 461932 DECAL, TURNTABLE ROTA- TION PEDAL 462080 DECAL, ACOUSTIC AND VISU- AL PROTECTION 461930 DECAL, FOOT CRUSHING HAZARD 425211 DECAL, ELECTRIC HAZARD DECAL, MODEL SERIAL NUM- Artiglio Master Code User Manual...
- Page 13 Artiglio Master Code User Manual...
- Page 14 Artiglio Master Code User Manual...
- Page 15 Only one operator may operate and use the machine. part nr 446442. Danger - pressurised container. part nr 425211A. Risk of electrical shock. part nr 1010283. Caution - laser radiation. Never look at the laser beam. part nr 425083. Earth ground terminal. Artiglio Master Code User Manual...
-
Page 16: Electrical And Pneumatic Connections
8.5 bar to no more than 16 bar and guarantee an air flow rate greater than the average consumption of the machine, which is equal to 160 Nl/min. NOTICE For correct equipment operation, the air produced must be suitably treated (not above 5/4/4 according to IsO 8573-1) Artiglio Master Code User Manual... -
Page 17: Technical Data
The machine is equipped with an internal pressure limiting valve to minimize the risk of over inflating the tyre. DANGER • EXPLOSION HAZARD • Never exceed the tyre pressure recommended by the tyre manufacturer. Never mismatch tyre size and rim size. • Avoid personal injury or death Artiglio Master Code User Manual... -
Page 18: Special Rim/Tyre Considerations
2. The employer shall ensure that each employee demonstrates and maintains the ability to service rim wheels safely, including performance of the following tasks: • Demounting tyres (including deflation). • Inspecting and identifying rim wheel components. • Mounting tyres. Artiglio Master Code User Manual... -
Page 19: Pre-Use Checks
Never allow any bystander to be within 20 feet of the machine during operation. To stop the machine in an emergency: • disconnect the power supply plug; • cut off the compressed air supply network by disconnecting the shut-off valve (snap coupling). Artiglio Master Code User Manual... -
Page 20: Transport, Storage And Handling
2.1. UNPACkING Remove the upper part of the packing and make sure the machine has not been damaged during transportation. Artiglio Master Code User Manual... -
Page 21: Hoisting/Handling
(G Fig. 4) To lift the machine from the pallet, remove the screws from the fixing feet (A Fig. 5) and secure it using the hoisting bracket (B Fig. 6). Artiglio Master Code User Manual... -
Page 22: Installation
(B, Fig. 9); - Assemble the bottom and top rear semi-cover (A, F Figs. 10-11) with the screws and washers (B,G, Figs. 10-11), making sure the cables (C, D, E) are in their proper place; Artiglio Master Code User Manual... - Page 23 12) with the screws and washers (D, Fig. 12). - Assemble the wheel lifter (Fig. 13) with the screws and washers (A, Fig. 13). - Connect the machine to the mains and compressed air supply. Artiglio Master Code User Manual...
-
Page 24: Installation Clearances
ARTIGLIO Master Code is an electropneumatically operated universal tyre changer to change car, off-road and light commercial vehicle tyres. With ARTIGLIO Master Code any type of tyre with a rim from 13” to 32” can easily be broken, mounted and demounted. Further improvements have been made:... -
Page 25: Operator Position
In these conditions, the operator can carry out, monitor and check the outcome of all tyre change operations and take action in the case of any unforeseen events. Artiglio Master Code User Manual... -
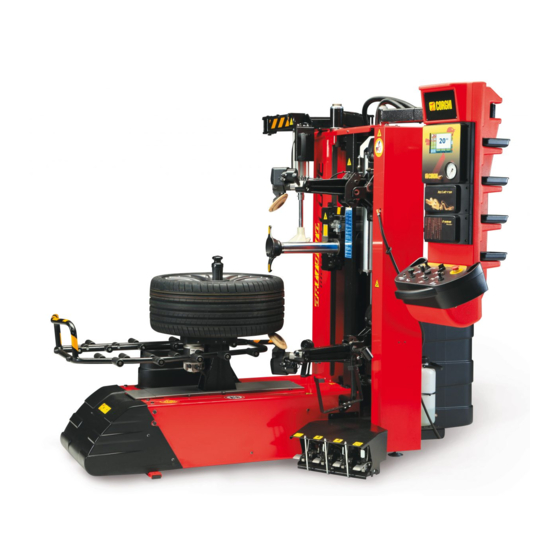
Page 26: Equipment Components (Main Working Elements Of The Machine)
4 Touch screen display for machine func- tions 5 Upper bead breaker disc 6 Lever to unlock the upper bead breaker disc 6a Lever to position the upper bead breaker disc 7 Lower bead breaker disc 8 Fixed tool Artiglio Master Code User Manual... - Page 27 22 Filter Regulator Unit 23 Doyfe inflator chuck 24 Lubricators (optional) 25 Laser measuring sensor 26 USB socket 27 Tyre temperature measuring sensor (optional) 28 Tread thickness measuring sensor (optional) 29 Valve diagnosis measuring sensor (optional) Artiglio Master Code User Manual...
-
Page 28: Controls
For technical characteristics, warnings, maintenance and any other information about the air tank (optional), consult the relevant operator and maintenance manual provided with the accessory documentation. 4.3. CONTROls 4.3.a. MAIN sWITCH (Fig. 18) 4.3.b. OPERATING CONsOlE (Fig. 19) Artiglio Master Code User Manual... - Page 29 8 - Button to operate the movable tool to select the upper bead 9 - Selector to operate the movable tool for upper bead demounting 10 - Head movement control lever Area C – lifter unit functional control 11 - Lifter operating lever Artiglio Master Code User Manual...
-
Page 30: Pedal Unit
4 seconds, rotation gets faster (always anticlockwise). • Pedal in the rest position (stable position): turntable stopped. • Pedal gently pressed downwards (unstable position): slow clockwise rotation. • Pedal pressed entirely downwards (unstable position): fast clockwise rotation. 4.3.d. DIsPlAY (Fig. 21) Artiglio Master Code User Manual... -
Page 31: Pressure Gauge With Deflation Push-Button
Regulated by pedal 2 - Deflation button 4.4. OPTIONAl ACCEssORIEs For a complete list of optional accessories supplied on request, see the document “ORIGI- NAL ACCESSORIES FOR THE ARTIGLIO MASTER CODE TYRE CHANGER”. Artiglio Master Code User Manual... -
Page 32: Basic Procedure - Use
- press the stop button on the push-button panel (1); - press the switch then disconnect the power supply plug (2); - isolate the compressed air line by disconnecting the shutoff valve (quick-release connector) (3). Artiglio Master Code User Manual... -
Page 33: Turning The Machine On
Reset the button to restore normal operating conditions. Notes: during this operation, with the machine/support plate set to 32”, once the reset micro- switch is tripped, the support plate moves back by about 1” before restarting the reset operation. Artiglio Master Code User Manual... -
Page 34: Preliminary Checks
(see the diagram for using cen- tring and clamping accessories per type of rim in this manual). - Insert the handle (a) in the central hole and turn clockwise until it stops (Fig. 26f). Artiglio Master Code User Manual... - Page 35 Alloy rim wheels: some alloy rim wheels have minimal rim wells A or no rim wells at all - Fig. 29a. These rims are not approved by DOT (Department of Transporta- Artiglio Master Code User Manual...
-
Page 36: Deflating The Tire
Approved mounting/demounting procedure for runflat and UHP tyres) NOTICE The TPMs device (optional accessory) can be used to check the proper operation of pressure sensors. 5.3.a DEFlATING THE TIRE Operate the valve to fully deflate the tyre (Fig. 29d). Artiglio Master Code User Manual... -
Page 37: Automatic Work Procedure
TYPEs OF TYREs: NORMAl: commonly used tyres, not lowered and with medium rigidity sides, with not very high mounting/demounting tension. RFT-UHP: Runflat tyres with reinforced sides, self-supporting, high pressure or lowered, with Artiglio Master Code User Manual... -
Page 38: Advanced Automatic Features (7 Sequences)
(Fig. 30a). This command stores only the diameter variations and not the tool position variations. If the wheel dimensions are not identified (Fig. 30c), the operator may proceed as follows: Artiglio Master Code User Manual... - Page 39 - Press the key (Fig. 30c) to store the wheel dimensions. NOTICE Once saving is completed the tool and the bead breakers will make a small move- ment away from the wheel. Artiglio Master Code User Manual...
- Page 40 N.B.: Before beginning bead breaking, position the inflation valve at 3 o’clock (Fig. 31a). During the various work phases the machine automatically directs the position of the valve in order to reduce the risk of damage to the valve itself. Artiglio Master Code User Manual...
- Page 41 6.2. NOTICE Use the mirror or the camera (optional) to verify that the bottom bead breaker disc is correctly positioned above the rim shoulder (Fig. 31d). Alternatively, interrupt the sequence by pressing the stop button. Artiglio Master Code User Manual...
- Page 42 Correct positioning of the bead in the channel (Figs. 31g and 31h). N.B.: During RFT-UHP tyre demounting handling the display indicates use of the bead presser at 6 o’clock in order to facilitate insertion of the bead into the channel (Fig. 31i). Artiglio Master Code User Manual...
- Page 43 That the bead breaker disc has correctly taken the bottom bead above the top edge of the rim (Fig. 31n). d. correct penetration of the disc for extraction of the bottom bead. (Fig. 31n). Artiglio Master Code User Manual...
- Page 44 (Fig. 31r). b. Correct height positioning of the tool based on the type of tyre to be demounted (Fig. 31s). c. Correct positioning of the bead in the channel (Figs. 31t and 31u). Artiglio Master Code User Manual...
- Page 45 (Fig. 31v) or proceed manually. Wheel rotation activates automatically in order to complete extraction of the top bead. NOTICE If necessary, aid unhooking of the bead from the demounting tool (Fig. 31w). Artiglio Master Code User Manual...
- Page 46 Wheel rotation and ascent of the bead breaker disc activates automatically in order to complete extraction of the bottom bead. NOTICE Where necessary, during the bead breaker disc raising phase, hold the tyre up with your hand (Fig. 31x). Artiglio Master Code User Manual...
- Page 47 Check that the tyre is in good condition with no signs of damage. - Carefully lubricate the sides of the tyre along the entire circumference of the bottom and top bead (Fig.32a) Artiglio Master Code User Manual...
- Page 48 (Fig. 32e). WARNING The top bead breaker automatically hooks during the descent phase. Artiglio Master Code User Manual...
- Page 49 - Remove the bead pressing pliers or the bead pressing tool. WARNING Position the bead pressing tool in the correct rest position (Fig. 32h) so that it does not interfere with the work area. Artiglio Master Code User Manual...
-
Page 50: Basic Automatic Features (4 Sequences)
The top bead breaker automatically hooks during the descent phase. PHAsE 1: Press the icon (Fig. 34a) to edit image and automatically acquire and store the size of the wheel or of the rim only. Artiglio Master Code User Manual... - Page 51 N.B.: To obtain more precise positioning press the button located on the top part of the com- mand (see Fig. 34d).- - Act on the bottom bead breaker command to position it as illustrated in Fig. 34e. Artiglio Master Code User Manual...
- Page 52 WARNING The top bead breaker automatically hooks during the descent phase. 1 - Act on the lever and move the disc, taking it to about 5 mm under the rim edge (Fig. 35a). Artiglio Master Code User Manual...
- Page 53 CAUTION When the upper bead breaking unit reaches the upper travel limit, the tilting arm is automatically released upwards (Fig. 35c). Artiglio Master Code User Manual...
- Page 54 14 - Move the lever downward to automatically stop penetration and to withdraw the disc from the work area. DEMOUNTING 1 - Act on the lever to insert the movable tool completely under the bead (Fig. 36a). Artiglio Master Code User Manual...
- Page 55 7 - Ensure that the bead at 180° with respect to the tool is in the channel, otherwise use the bead pressing tool to facilitate positioning (Fig. 36g). Artiglio Master Code User Manual...
- Page 56 13 - Manually position the tyre so that the tool hook is between the lower bead and the rim (Fig. 36l). Artiglio Master Code User Manual...
- Page 57 5 mm above the top edge of the rim. 17 - Press the button to activate penetra- tion of the bottom bead breaker and the pedal to turn the turntable. 18- If necessary, operate the control slightly lift the bottom bead breaker disc. Artiglio Master Code User Manual...
- Page 58 (Figs. 37b - 37c). 4- Press (see Fig. 37d), to enable the se- quence for assembling the first bead. Artiglio Master Code User Manual...
- Page 59 (Fig. 37g). 7 - Use the bead pressing tool (Fig. 37g) and, if necessary, bead pressing pliers (Fig. 37h) on the rim shoulder, ensuring that the top bead is in the channel. Artiglio Master Code User Manual...
- Page 60 (Fig. 37i) so that it does not interfere with the work area. - Take the bead breaker back to the top and bottom extremity (Fig. 37l). - Withdraw the fixed tool from the work area (Fig. 37m). Artiglio Master Code User Manual...
-
Page 61: Manual Work Procedure
Ø by tenths of an inch and make micro-corrections. 5.5.b. BEAD BREAkING See the section on “bead breaking” in the automatic procedure. 5.5.c. DEMOUNTING 1- Press the button to orient the movable tool 1 as shown in Fig. 40. Artiglio Master Code User Manual... - Page 62 (Fig. 40e) - (A Fig. 40f). 6- Make sure the tyre underside is entirely broken, and if not, repeat lower bead breaking. 7- Make sure the bead at 180° to the tool is in the rim Artiglio Master Code User Manual...
- Page 63 13- Manually position the tyre so that the tool hook is between the lower bead and the rim (Fig. 40l). 14- Operate the lever to position the fixed tool at the correct height for removing the second bead (Fig. 40m). Artiglio Master Code User Manual...
-
Page 64: Mounting
1- Thoroughly lubricate the sidewalls of the tyre around the entire circumference of the lower and upper bead (Fig. 41). 2- Operate the control to remove the disc from the work area. 3- The tool is already positioned at the correct Artiglio Master Code User Manual... - Page 65 7- Operate knob P (Fig. 41d) to manually lower the upper bead breaker disc. 8- Operate the lever lowering the tool and manually positioning the tyre (Fig. 41e). 9- Push the tyre below the level of the shoulder (Fig. 41e). Artiglio Master Code User Manual...
- Page 66 Avoid personal injury. Make sure the upper bead is correctly inserted in the rim well, throughout the mounting stage. 12- Remove the bead presser gripper(s) or bead presser. 13- Return the bead breakers to the top and bottom ends (Fig. 41h). Artiglio Master Code User Manual...
-
Page 67: Approved Uhp And Run Flat Tyre Demounting And Mounting Procedure
5.6. APPROVED UHP AND RUN FlAT TYRE DEMOUNTING AND MOUNTING PROCEDURE For this type of tyre please refer to the instructions in the manual prepared by WDK (German Tyre Industry Association). Artiglio Master Code User Manual... -
Page 68: Tyre Inflation
This machine is not intended to be a restraining device for exploding tyres, tubes or rims. 5. Always stand back from the tyre changer when inflating, never lean over. Artiglio Master Code User Manual... -
Page 69: Inflating Tyres
3. Remove the valve stem core if not already done (Fig. 48d). 4. Connect the air hose Doyfe inflator chuck to the valve stem (Fig. 48e). 5. Press to inflate the tyre. The tyre will expand, and the beads will seat. Artiglio Master Code User Manual... -
Page 70: Special Procedure
5. Step down completely on the air inflation pedal and at the same time press the 2 but- tons on the accessory to release a high-pressure air blast through the four jets to assist in seating the beads of the tyre (Fig. 50d). Artiglio Master Code User Manual... - Page 71 Explosion hazard. Do not exceed the manufacturer’s maximum pressure as stated on the sidewall of the tyre when seating beads. WARNING Activate air inflation jets only when sealing the bead. Do not point jets towards people. WARNING Artiglio Master Code User Manual...
-
Page 72: Unclamping And Unloading The Wheel
Move the wheel to the left, until it rests on the frame (Fig. 51d). Continue to operate the Lever until the lifter is on the ground (Fig. 51e). Unload the wheel from the lifter and move it away from the work area. Artiglio Master Code User Manual... -
Page 73: Menu
(Fig. 54a). Press the touch screen in any area while the video is playing to display an operating menu for around 6 seconds (see Fig. 54b) with the following options: “X” to Exit the video Artiglio Master Code User Manual... -
Page 74: Help Online
Password access for the service department. 5.9.f. OPTIONs Select OPTIONS then press the confirm key (Fig. 58). The inflation pressure unit of measurement can be selected from: - bar - PSI - KPa then press the confirm key (Fig. 58a). Artiglio Master Code User Manual... -
Page 75: Date/Time
Select RESTART TPMS then press the confirm key (Fig. 60c). Re-select VERSION TPMS then press the confirm (Fig. 60a). Note the SERIAL ID, FIRMWARE and DATA- BASE AVAILABLE (Fig. 60d). Artiglio Master Code User Manual... - Page 76 Compare the available online version (Fig. 60g - point b) with the version detected for the MASTER CODE TMPS. If the online version is more recent, DOWNLOAD the file (Fig. 60g - point c) to a USB key. Artiglio Master Code User Manual...
- Page 77 - If the system cannot read the USB key, the mes- sage in Fig. 61e will be displayed. Press the confirm key to go back to the previous screen, then repeat the steps from point 1. Artiglio Master Code User Manual...
- Page 78 NOTICE On first-time installation of the machine, and whenever the TMPs board has to be replaced, the board must be registered at www.corghi.com/infoauto and activated. Registration entitles the user to free software updates for 12 months. After this period, a subscription is necessary to update the FW and database.
- Page 79 If the Password is wrong, the message in Fig. 63b will be displayed. If the Password is correct, the message in Fig. 63c will be displayed. 3. Selecting the VERSION TPMS option described Artiglio Master Code User Manual...
- Page 80 To update the database, a subscription is necessary. Contact your dealer for information. 1. Connect by PC to www.corghi.com/infoauto and log in (Fig. 64). 2. Select GENERAL DATA (Fig. 64a - point a) and then REGISTRATION CARDS (Fig. 64a - point b).
- Page 81 1. If you need to reset the TPMS, select RESET TPMS then press the confirm key (Fig. 65). REsTART TPMs 1. If you need to restart the TPMS, select RESTART TPMS then press the confirm key Artiglio Master Code User Manual...
-
Page 82: Calibrate Touch Screen
- SAVE to save calibration - CANCEL to exit calibration without saving - RESTART CALIBRATION to repeat the procedure. 5.9.l. CAlIBRATE lAsER NOTICE This operation must be carried out only if recommended by technical assistance. Artiglio Master Code User Manual... - Page 83 A beeper will sound to indicate when automatic movements are carried out. Do not approach moving parts of the machine. Artiglio Master Code User Manual...
- Page 84 ONCE. Make sure you only move the joystick to the right once, without holding it down (see Fig. 68e). 8. At the end, Fig. 68h will be displayed. If error messages are displayed, check the messages Artiglio Master Code User Manual...
-
Page 85: Diagnostik P3K
UPDATE P3k 1. Insert the key with the updated software into the USB socket (Fig. 70) of the MASTER CODE and wait 10 seconds. 2. Select UPDATE P3K then press the confirm key (Fig. 70a). Artiglio Master Code User Manual... - Page 86 3. After loading, the message in Fig. 70f will be displayed. 4. Remove the USB key. 5. Selecting the RELEASE SOFTWARE VERSION option described previously (section 5.8.d), check the FW P3K version now installed on MASTER CODE (see Fig. 70g). Artiglio Master Code User Manual...
-
Page 87: Optional Accessories
4 INFLATRON exit key 5 Inflation pressure configured 6 Arrow key to increase pressure 7 Arrow key to decrease pressure 8 Overpressure flashing indicator 9 Configured pressure indicator 10 Pressure unit of measurement (bar - PSI - KPa) Artiglio Master Code User Manual... -
Page 88: Inflation
This machine is not intended to be a restraining device for exploding tyres, tubes or rims. 5. Always stand back from the tyre changer when inflating, never lean over. CAUTION During this operation, noise levels assessed at 85 dB(A) may occur. Operators are advised to wear hearing protection devices. WARNING Artiglio Master Code User Manual... - Page 89 At the end of inflation, the set pressure is displayed again in green (Fig. 73d). At this stage, inflation has ended. 8. Disconnect the Doyfe inflator chuck from the wheel. 9. Mount the valve stem core (Fig. 73a). Artiglio Master Code User Manual...
-
Page 90: Possible Error Messages
INFlATRON and go back to the main screen. 6.1.b POssIBlE ERROR MEssAGEs In the event of anomalies, error messages will appear on the display, and all valves will be closed. loss of calibration coefficients. Artiglio Master Code User Manual... -
Page 91: Camera
6.2. CAMERA From the main screen (Fig. 74) press the key The camera is an electronic precision instrument to display all operations carried out on the tyre underside, on a specific screen, guaranteeing Artiglio Master Code User Manual... - Page 92 Cable disconnected on the camera - Connect the cable (Fig. 74c) Camera failure - If the problem persists, contact technical as- sistance. The image is out of focus The optics are not set properly - Contact technical assistance Artiglio Master Code User Manual...
-
Page 93: Tread Thickness Measuring Sensor
- Rest the mobile part of the sensor (cylindrical sensor) in the tyre furrow where the tread thickness is to be measured. Press the sensor so that the flat part adheres to the tread, making the sensor return (see Fig. 75c). Artiglio Master Code User Manual... - Page 94 - If the problem persists, contact technical as- sistance. The sensor does not read correctly Sensor not reset to zero - Reset the sensor (see Resetting procedure) Sensor failure - If the problem persists, contact technical assistance. Artiglio Master Code User Manual...
-
Page 95: Temperature Measuring Sensor
Yellow the tyre is at temperature limits. It is not advisable to carry out operations according to the WDK procedure. The temperature range is 15 - 19 °C and 26 - 30 °C Red the tyre temperature is outside the tempera- Artiglio Master Code User Manual... -
Page 96: Tpms
The TMPS has been designed exclusively to diagnose the correct operation of pressure sensor valves, as described in this manual. Any other use is inappropriate. Technical specifications - Power supply…………………………12Vdc Operation - Press key to enable the TMPS. Artiglio Master Code User Manual... - Page 97 77d). Never position the sensor on the rim side. - Press the button (1, Fig. 77f) to activate the sensor reading (Fig. 77e). - After reading the mask offers screen of Fig. 77f with the sensor data. Artiglio Master Code User Manual...
-
Page 98: Lubricators
Intended operating conditions The lubricator has been designed exclusively to lubri- Artiglio Master Code User Manual... - Page 99 Topping up lubricating fluid To top up fluid, unscrew the cap (1, Fig. 78) and remove the cover underneath. Only use lubricating fluid recommended by CORGHI (contact your authorised dealer). Check the fluid level in the tank. If below the outlet, top up (see Fig. 78a).
-
Page 100: Maintenance
WARNING Before making any adjustments or carrying out maintenance, disconnect the electric- ity and compressed air supplies from the machine and make sure that all moving parts are suitably immobilised. Artiglio Master Code User Manual... - Page 101 When cleaning, take care to avoid creat- ing and raising dust as far as possible. NOTICE CORGHI declines all liability for claims deriving from the use of non-original spares or accessories. sCHEDUlED MAINTENANCE: NOTICE The machine will periodically prompt maintenance to carry out.
- Page 102 The guards must be present, with no breakage or permanent deformation evident. Otherwise, contact technical assistance. To carry out every three months - Check condition of the bead breaker tilting travel limit pad (9, Fig. 79h): No breakage or permanent deformation must be Artiglio Master Code User Manual...
- Page 103 - Contact technical support to have belts and rubber end stops checked correctly: Periodic check by the service network. To carry out every 7000 wheels - Contact technical support for general machine inspection: General periodic check by the service network. To carry out every year Artiglio Master Code User Manual...
-
Page 104: Troubleshooting
Vertical translation motor overload cut-out switch P.: Horizontal-axis encoder time-out S.: Restart machine P.: Vertical-axis encoder time-out S.: Restart machine P.: Incorrect horizontal axis motor rotation S.: Contact technical assistance P.: Tool microswitch rotation S.: Restart machine Artiglio Master Code User Manual... - Page 105 S.: Contact technical assistance E165 P.: Tool carriage height not reach S.: Contact technical assistance E166 P.: Tool horizontal position not reach. S.: Contact technical assistance P.: P3K firmware missing or incorrect S.: Contact technical assistance Artiglio Master Code User Manual...
-
Page 106: Environmental Information
With your help, we can reduce the amount of natural resources used to produce electrical and electronic equipment, minimise the use of landfills to dispose of old products, and improve quality of life by preventing the discharge of potentially hazardous substances into the environment. Artiglio Master Code User Manual... -
Page 107: Information And Warnings About Hydraulic Fluid
- Inhalation: in case of exposure to high concentrations of fumes or mists, take the affected person to the open air and seek medical advice immediately. - Eyes: rinse with plenty of running water and seek medical advice as soon as possible. - Skin: wash with soap and water. Artiglio Master Code User Manual... -
Page 108: Information And Warnings About Lubricating Fluid
Use only if more appropriate extinguishers are not at hand or when the fire is small. CAUTION This table contains general instructions to be used as guidelines for users. All applica- tions of each type of extinguisher must be obtained from the relevant manufacturer. Artiglio Master Code User Manual... -
Page 109: Glossary
4 - Side ring. This is a metal ring comprising several steel strands. The casing plys are secured to the side ring. Artiglio Master Code User Manual... - Page 110 Tubeless tyres. Tubeless tyres consist of a tyre with inner sidewall lined with a thin layer of special impermeable rubber, called liner. This liner helps to maintain air pres- sure in the casing. This kind of tyre must be mounted Artiglio Master Code User Manual...
- Page 111 It is generally used for mounting low profile tyres. Air delivery regulator. Union allowing regulation of the air flow. Bead breaking. Operation that allows the tyre bead to be detached from the rim edge. Artiglio Master Code User Manual...
-
Page 112: According To Rim Type
TABlE FOR UsING CENTRING AND ClAMPING ACCEssORIEs ACCORDING TO RIM TYPE Standard rim Dropped centre hole rim Reversed rim Pick-up rim Closed centre rim Open centre rim Artiglio Master Code User Manual... - Page 113 CLAMPING ACCESSORIES I - Accessori a richiesta GB - Accessories on request F - Accessoires sur demande D - Zubehör auf Anfrage E - Accessorios opcionales Artiglio Master Code User Manual...
- Page 114 STANDARD RIM Artiglio Master Code User Manual...
- Page 115 DROPPED CENTRE HOLE RIM Artiglio Master Code User Manual...
- Page 116 REVERSED RIM Artiglio Master Code User Manual...
- Page 117 PICK-UP RIM Artiglio Master Code User Manual...
- Page 118 CLOSED CENTRE RIM Artiglio Master Code User Manual...
- Page 119 OPEN CENTRE RIM wITH DELICATE HOLE EDGES Artiglio Master Code User Manual...
- Page 120 Notes...
-
Page 121: Wiring Diagram
Reinforced resistors Bead breaker potentiometer Demounting selector Search button Tool head rotation button Stop button Upper penetration button Lower penetration button Upper lubricator button Lower lubricator button Micro-switch speed I (CLOCKWISE) Micro-switch speed II (CLOCKWISE) Artiglio Master Code User Manual... - Page 122 Sq21 Upper bead breaker joystick Sq22 Lower bead breaker joystick Power supply transformer Diode bridge Power supply plug Terminal board Vertical movement DC motor brake Pneumatic solenoid valve unit Vertical movement motor noise disturbance filter Artiglio Master Code User Manual...
- Page 123 Artiglio Master Code User Manual...
- Page 124 Artiglio Master Code User Manual...
- Page 125 Artiglio Master Code User Manual...
- Page 126 Artiglio Master Code User Manual...
- Page 127 Artiglio Master Code User Manual...
- Page 128 Artiglio Master Code User Manual...
- Page 129 Artiglio Master Code User Manual...
-
Page 130: Pneumatic Diagram
18 quick discharge valve 19 Cylinder movement bead search and demounting E – BEAD BREAkER PENETRATION 20 quick discharge valve 21 Cylinder upper bead breaker penetration 22 quick discharge valve 23 Cylinder low bead breaker penetration Artiglio Master Code User Manual... - Page 131 – UPPER BEAD BREAkER ARM CONTROl 28 5/2 mechanically controlled valve 29 Cylinder upper bead breaker arm movement M – BEAD PREssING TOOl 30 5/3 CC mechanically controlled valve 31 Bead pressing tool cylinder Artiglio Master Code User Manual...
- Page 132 13.1 13.2 13.3 13.4 12/14 82/84 INFLATRON nero Ø6x1 OPTIONAL nero Ø8x1 nero Ø8x1 nero Ø8x1 nero Ø8x1 P max = 16 BAR Artiglio Master Code User Manual...
- Page 133 13.5 13.6 13.7 13.8 13.9 12/14 82/84 DOYFE 4-114005A Artiglio Master Code User Manual...
- Page 134 Notes...
- Page 135 Notes...
- Page 136 DE - EG – konformitätserklärung - EU – konformitätserklärung * ES - Declaración EC de conformidad - Declaración UE de conformidad * quale fabbricante dichiara che il prodotto: ARTIGlIO MAsTER CODE al quale questa dichiarazione si riferisce e di cui abbiamo costituito e deteniamo il relativo fascicolo tecnico è...
Need help?
Do you have a question about the Artiglio Master Code and is the answer not in the manual?
Questions and answers
heeft u voor mij een handleiding voor de gorghi em 73 hoe ik de instellingen kan instellen