Table of Contents
Advertisement
Advertisement
Table of Contents
Troubleshooting

Subscribe to Our Youtube Channel
Related Manuals for Yamaha E115M


Summary of Contents for Yamaha E115M
- Page 2 Get your 2(Two) free service coupon from your motorcycle dealers. Sila dapatkan 2(Dua) kupon servis percuma dari pengedar/penjual motosikal anda. 2( )
- Page 3 Welcome to the Yamaha world of motorcycling! As the owner of the JYM110-2, you are benefiting from Yamaha’s vast experience and newest technology regarding the design and manufacture of high-quality products, which have earned Yamaha a reputation for dependability. Please take the time to read this manual thoroughly, so as to enjoy all advantages of your JYM110-2 .
-
Page 4: Important Manual Information
IMPORTANT MANUAL INFORMATION JYM110-2 OWNER’S MANUAL ©2014 by Yamaha Motor Co., Ltd. 1st edition, October 2014 All rights reserved. Any reprinting or unauthorized use without the written permission of Yamaha Motor Co., Ltd is expressly prohibited. Printed in Malaysia... - Page 5 Yamaha continually seeks advancements in product design and quality. Therefore, while this manual contains the most current product information available at the time of printing, there may be minor discrepancies between your motorcycle and this manual. If you have any questions concerning this manual, please consult your Yamaha dealer. WARNING PLEASE READ THIS MANUAL CAREFULLY AND COMPLETELY BEFORE OPERATING THIS MOTORCYCLE.
-
Page 6: Table Of Contents
TABLE OF CONTENTS Safety Information ......1-1 Engine break-in ......5-3 Checking and lubricating the brake Parking ..........5-4 pedal ..........6-18 Description .........2-1 Engine emissions ......5-4 Checking and lubricating the brake Left view ...........2-1 lever ..........6-18 Right view ........2-2 Periodic Maintenance And Minor Checking and lubricating the Controls and instruments ....2-3 Repair ..........6-1... -
Page 7: Safety Information
SAFETY INFORMATION • Be a Responsible Owner Know your skills and limits. Staying This motorcycle is designed to carry within your limits may help you to the operator and a passenger. As the vehicle’s owner, you are respon- avoid an accident. sible for the safe and proper operation of The failure of motorists to detect •... - Page 8 SAFETY INFORMATION • Take care not to spill any gasoline on • Never carry a passenger unless he A passenger should also observe the engine or exhaust when refueling. or she can firmly place both feet on the above precautions. •...
- Page 9 Genuine Yamaha accessories have been motorcycle due to aerodynamic specifically designed, tested, effects. Wind may attempt to lift the approved by Yamaha for use on your motorcycle, or the motorcycle may vehicle. Since Yamaha is not in a position...
-
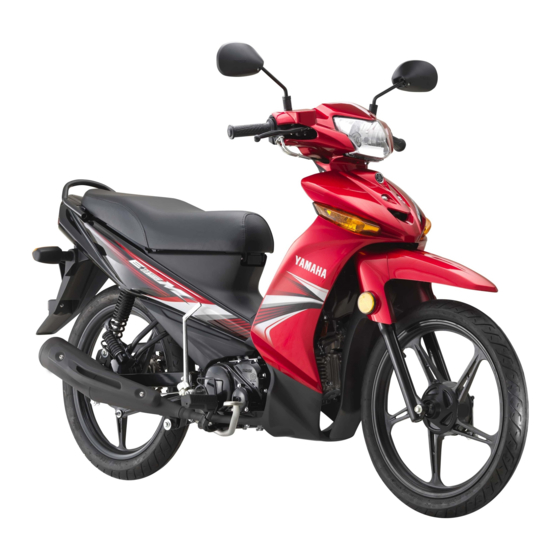
Page 10: Description
DESCRIPTION Left view 1. Front turn signal light (page 6-23) 5. Owner’s tool kit (page 6-1) 2. Headlight / front position lights (page 6-22) 6. Tail light / brake light (page 6-24) 3. Starter (choke) lever (page 3-6) 7. Shift pedal (page 3-4) 4. -
Page 11: Right View
DESCRIPTION Right view 1. Motorcycle rack (page 3-6) 5. Kick starter (page 3-6) 2. Fuel tank cap (page 3-5) 6. Engine oil filler cap (page 6-8) 3. Battery (page 6-20) 7. Brake pedal (page 3-4) 4. Helmet holder (page 3-6) 8. -
Page 12: Controls And Instruments
DESCRIPTION Controls and instruments km/h 5. Right handlebar switches (page 3-3) 1. Left handlebar switches (page 3-3) 6. Throttle grip (page 6-12) 2. Speedometer unit (page 3-2) 3. Fuel meter (page 3-3) 4. Main switch (page 3-1) -
Page 13: Instrument And Control Functions
INSTRUMENT AND CONTROL FUNCTION To unlock the steering Main switch/steering lock All electrical systems are off. The key can be removed. LOCK The steering is locked, and all electrical systems are off. The key can be removed. To lock the steering main switch/steering lock... -
Page 14: Indicator Lights
INSTRUMENT AND CONTROL FUNCTION Indicator lights Gear position indicator lights “1”, Speedometer Unit “2”, “3”, and “4” The respective indicator light comes on when the transmission is in the 1st, 2nd, 3rd or 4th gear position. km/h km/h 0 0 0 0 2 Neutral indicator light “... -
Page 15: Fuel Gauge
INSTRUMENT AND CONTROL FUNCTIONS Handlebar switches Dimmer switch “ ” Fuel gauge Left view Set this switch to “ ” for the high beam and to “ ” for the low beam. Turn signal switch “ ” To signal a right-hand turn, push this switch to “... -
Page 16: Shift Pedal
INSTRUMENT AND CONTROL FUNCTIONS Shift pedal Brake lever Brake pedal 1. Brake lever 1. Brake pedal 1. Shift pedal The shift pedal is located on the left The brake lever is located on the The brake pedal is on the right side of side of the motorcycle. -
Page 17: Fuel Tank Cap
“ ” mark on the cap otherwise it may overflow and tank is aligned. when the fuel warms up and Yamaha motors designed this expands. WARNING motorcycle for use of 93 or above Avoid spilling fuel on the hot unleaded fuel. -
Page 18: Starter (Choke) Lever
INSTRUMENT AND CONTROL FUNCTIONS Catalytic converter Motorcycle rack Starter (choke) lever “ ” This vehicle is equipped with a catalytic converter in the exhaust pipe. WARNING The exhaust pipe will be hot after operation. Make sure that the exhaust pipe is cool down before doing any maintenance work. -
Page 19: Sidestand
INSTRUMENT AND CONTROL FUNCTIONS Sidestand Seat Make sure that the seat is properly The sidestand is located on the left side secured before riding. of the frame. Raise the sidestand or lower it with your foot while holding the vehicle Helmet holders upright. -
Page 20: Pre-Operation Checks
PRE-OPERATION CHECKS The condition of a vehicle is the owner’s responsibility. Vital components can start to deteriorate quickly and unexpectedly, even if the vehicle remains unused (for example, as a result of exposure to the elements). Any damage, fluid leakage or loss of tire air pressure could have serious consequences. -
Page 21: Pre-Operation Check List
PRE-OPERATION CHECKS Pre-operation check list ITEM CHECKS OR REPAIRS PAGE Check the electrolyte and battery water level. • 6-20 Battery Check battery lead connections and voltage. • • Replace battery if necessary. • Check the operating conditions and adjust the brake lever free play. 6-14, 6-15 Front drum brake •... - Page 22 PRE-OPERATION CHECKS ITEM CHECKS OR REPAIRS PAGE Check for abnormal noise. • Exhaust pipe Check for loose bolts and nuts. •...
-
Page 23: Operation And Important Riding Points
Before starting out, make sure that understand, ask your Yamaha dealer. when the engine is running. (See page the sidestand is up to prevent it 3-6). -
Page 24: Shifting
OPERATION AND IMPORTANT RIDING POINTS Shift to gear one. Gear Speed Shifting Increase the throttle grip gradully to increase the accelaration. 4th gear (Max.) 40 km/h ~ When the motorcycle attain a higher speed, close the throttle grip. Deceleration and braking Shift to the second gear. -
Page 25: Tips For Reducing Fuel Consumption
OPERATION AND IMPORTANT RIDING POINTS 0-150 km Tips for reducing fuel consumption 500-1000 km Fuel consumption depends largely on your riding style. Consider the following tips to reduce fuel consumption: Shift up swiftly, and avoid high engine speeds during acceleration. Do not rev the engine while shifting down, and avoid high engine speeds with no load on the engine. -
Page 26: Parking
When in runing mode, do not switch occur during the engine break-in period, off the main switch. Doing so might immediately have a Yamaha dealer cause the motorcycle to crash. check the vehicle. If the motorcycle fuel system or the... -
Page 27: Periodic Maintenance And Minor Repair
If you do not have the tools or experience lubrication will keep your vehicle in the carbon monoxide poisoning, required for a particular job, get a Yamaha safest and most efficient condition possibly leading to death. dealer perform it for you. possible. The most important points of inspection, adjustment, and lubrication are Owner’s tool kit... -
Page 28: Periodic Maintenance And Care Chart
Change engine oil for the first time at 1000 km, thereafter at every 2000 km. Items marked with an asterisk should be performed by a Yamaha dealer as they require special tools, data and technical skills. ODOMETER READING (x 1000km) - Page 29 PERIODIC MAINTENANCE AND MINOR REPAIR ODOMETER READING (x 1000km) After 12000km ITEM CHECK OR MAINTENANCE JOB Every 6000km Every 12000km Or 1 year Or 1/2 year • Check tread depth and for damage. • Replace if necessary. Tires • Check tires air pressure. •...
- Page 30 PERIODIC MAINTENANCE AND MINOR REPAIR ODOMETER READING (x 1000km) After 12000km ITEM CHECK OR MAINTENANCE JOB Every 6000km Every 12000km Or 1 year Or 1/2 year Oil filter element • Clean. Every 2000km Front and rear Check operation. • brake switches Moving parts and Lubricate.
-
Page 31: Removing And Installing The Cowlings And Panel
PERIODIC MAINTENANCE AND MINOR REPAIR Removing installing Removing and installing the panel cowlings and panel The cowling and panels shown need to be removed to perform some of the maintenance jobs described in this chapter. Refer to this section each time the cowling or a panel needs to be 00002 removed and installed. -
Page 32: Checking The Spark Plug
Instead, have a be removed and checked in accordance Yamaha dealer check the vehicle. with the periodic maintenance and lubrication chart. In addition, the condition Check the spark plug for electrode... -
Page 33: Engine Oil
PERIODIC MAINTENANCE AND MINOR REPAIR Engine Oil Remove the engine oil filler cap and The engine oil level should be checked The engine oil should be between the drain bolt to drain the oil, from the before each ride. In addition, the oil must minimum and maximum level marks. - Page 34 PERIODIC MAINTENANCE AND MINOR REPAIR Install the oil filter element cover by NOTICE installing the bolts, then tightening In order to prevent clutch slippage them to the specified torque. (since the engine oil also lubricates the clutch), do not mix any chemical Tightening torque: additives.
-
Page 35: Cleaning The Air Filter Element
PERIODIC MAINTENANCE AND MINOR REPAIR Cleaning the air filter element Lightly tap the air filter element to Install the air filter case cap and install The air filter element should be cleaned at remove most of the dust and dirt, and the screws. -
Page 36: Adjusting The Engine Idling Speed
3. Install the cowling. expertise and experience of a Yamaha The engine should be warm up before dealer. However, as described in the next making this adjustment. section, the owners can perform the following as specified in the periodic maintenance and minor repair. -
Page 37: Tires
To prevent this specified tires. from occurring, the valve clearance must be adjusted by a Yamaha dealer Tire air pressure at the intervals specified in the periodic The tire air pressure should be checked maintenance and lubrication chart. - Page 38 WEI XING/209 nail or glass fragments in it, or if the you lose control of your motorcycle. sidewall is cracked, have a Yamaha Rear tire: Make sure that your passenger, Size: dealer replace the tire immediately.
-
Page 39: Wheel
The replacement of all wheel and the spokes for looseness (for brake related parts, including the spoke wheel). If any damage is tires, should be left to a Yamaha found, have a Yamaha dealer dealer, who has the necessary replace the wheel. Do not attempt... -
Page 40: Adjusting The Brake Pedal Free Play
If proper adjustment cannot be place. To make the brake light come on the adjusting nut in direction (b). obtained as described, have a earlier, turn the adjusting nut in direction Yamaha dealer make this (a). To make the brake light come on adjustment. -
Page 41: Check The Front And Rear Brake Shoes
The front brake is provided with a wear point that the wear indicator reaches indicator, which allows you to check the the wear limit line, have a Yamaha brake shoe wear without having to dealer replace the brake shoes as a disassemble the brake. - Page 42 PERIODIC MAINTENANCE AND MINOR REPAIR To adjust the drive chain slack 4. Tighten both locknuts, and then tighten Loosen the brake pedal free play Using the alignment marks on each the axle nut and brake torque rod nut to adjusting nut , the brake torque rod side of the swingarm, make sure that their specified torque.
-
Page 43: Cleaning And Lubricating The Drive Chain
If a cable is damaged or does maintenance chart. especially when riding in dusty or wet not move smoothly, have a Yamaha areas. Service the drive chain as follows. dealer check or replace it. NOTICE... -
Page 44: Checking And Lubricating The Brake Pedal
Recommeded lubricant: Lithium-soap-based grease Lithium-soap-based grease WARNING (general type lubricant) (general type lubricant) If the centerstand or sidestand does not move up and down smoothly, have a Yamaha dealer check or repair it. Recommeded lubricant: Lithium-soap-based grease (general type lubricant) 6-18... -
Page 45: Lubricating The Swingarm Pivots
If any damage is found or the front fork does not operate smoothly, have WARNING a Yamaha dealer check or repair it. To avoid injury securely support the vehicle so that there is no danger of it falling over. -
Page 46: Checking The Steering
To check the battery fluid level chart. have a Yamaha dealer check the wheel Place the vehicle on a level surface bearings. 1. Place a stand under the engine to and hold it in an upright position. - Page 47 PERIODIC MAINTENANCE AND MINOR REPAIR Batteries produce explosive NOTICE hydrogen gas. Therefore, keep When removing the battery, be sure sparks, flames, cigarettes, etc., the key is turned to “OFF”, then away from the battery and disconect the negative lead before provide sufficient ventilation...
-
Page 48: Replacing The Fuse
Turn the key to “ON” and turn on the electrical circuits to check if the devices operate. If the fuse immediately blows again, have a Yamaha dealer check the electrical system. 1. Spare fuse 1. Headlight holder 2. Front position light holder If the fuse is blown, replace it as follows. -
Page 49: Replacing A Front Turn Signal Light Bulb
Headlight bulbs get very hot. Therefore, NOTICE keep the flammable products away from a lit headlight bulb, and do not Recommend a Yamaha dealer to touch the bulb until it has cooled down. complete this work. 1. Front turn signal light bulb Insert a new bulb into the socket. -
Page 50: Replacing A Rear Turn Signal Light/ Tail Light/Brake Light Bulb
Insert a new light bulb into the WARNING socket, push it in, and then turn it clockwise until it stops. Better give to Yamaha dealer to Install the screw and lampshade. repair the wheel. lampshade cannot To avoid injury, securely support... -
Page 51: Rear Wheel
To remove the rear wheel Lift the wheel up between the fork legs. WARNING Insert the wheel axle and when Better give to Yamaha dealer installing the washer make the repair the wheel. wheel slant slightly out, then install To avoid injury, securely support the axle nut. - Page 52 PERIODIC MAINTENANCE AND MINOR REPAIR To install the rear wheel Remove the brake pedal free play Loosen the brake torque rod nut at the adjusting nut, and then disconnect Install the drive chain onto the rear brake shoe plate. sprocket. the brake rod from the brake Remove the brake torque rod by Insert the wheel axle from righthand...
-
Page 53: Troubleshooting
The following troubleshooting charts represent quick and easy procedures for checking these vital systems yourself. However, should your motorcycle require any repair, take it to a Yamaha dealer, whose skilled technicians have the necessary tools, experience, know-how to service the motorcycle properly. -
Page 54: Troubleshooting Charts
Open the throttle halfway and spark plug gap, or replace the spark plug. operate the electric starter. Remove the spark plug and check the electrodes. Have a Yamaha dealer check the The engine does not start. Check vehicle. the battery. 4. Battery The engine turn The battery is good. -
Page 55: Motorcycle Care And Storage
Be sure to are used. A rusty exhaust pipe may go spray. consult a Yamaha dealer for advice on unnoticed on a motorcycle, however, it Improper cleaning can damage windshields, what products to use before cleaning detracts from the overall appearance of cowlings, panels and other plastic parts. - Page 56 Use spray oil as a universal cleaner to following steps after each ride in the rain, Consult a Yamaha dealer for advice on remove any remaining dirt. near the sea or on salt sprayed roads. Touch up minor paint damage caused what products to use.
-
Page 57: Storage
MOTORCYCLE CARE AND STORAGE Install the spark plug cap onto the it once a month. Do not store the battery Storage spark plug, and then place the in an excessively cold or warm place spark plug on the cylinder head so Short-term [less than 0 °C or more than 30°C]. -
Page 58: Specifications
SPECIFICATIONS Dimensions: Engine oil: Secondary reduction ratio: Overall length: Type: 41/15 1930mm SAE10W-30, SAE10W-40, SAE5W-30 Transmission type: Overall width: Recommended engine oil grade: Constant mesh 4-speed 660mm API quality SF grade or higher Operation: Overall height: Engine oil quantity: Left foot operation 1040mm Periodic oil change 0.80L Gear ratio:... - Page 59 SPECIFICATIONS Manufacturer/model: Front brake: Headlight: WEI XING/210 Type: Bulb type: Drum brake Loading: Incandescent Operation: Maximum load: Bulb voltage, wattage × quantity: Right hand operation 150kg Headlight: Rear brake: Tire air pressure (measured on cold tires): 12V, 35.0W × 1 Type: Loading condition: Tail/brake light:...
-
Page 60: Consumer Information
TIP: ordering spare parts from a Yamaha The vehicle identification number is dealer or for reference in case the vehicle used to identify your vehicle and may is stolen.
Need help?
Do you have a question about the E115M and is the answer not in the manual?
Questions and answers