Invacare Lynx LX-3 Unpacking And Setup Instructions
Hide thumbs
Also See for Lynx LX-3:
- Owners operating & maintenance manual (65 pages) ,
- Owner's operator and maintenance manual (64 pages) ,
- Manual (60 pages)

Related Manuals for Invacare Lynx LX-3


Summary of Contents for Invacare Lynx LX-3
- Page 1 Unpacking/Setup Instructions Instrucciones Para Desempacar y Ensamblar El Escúter Lynx LX-3 Scooter...
-
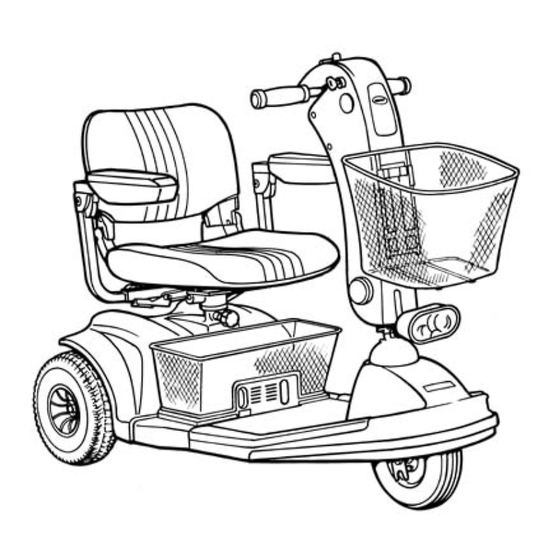
Page 2: Disassembled View
LYNX LX-3 SCOOTER LYNX LX-3 SCOOTER Tiller Seat Front Basket Rear Shroud Headlight Floor Basket On-Board Battery Charger DISASSEMBLED VIEW Front Basket Rear Shroud Rear Sub-Frame Seat Assembly Front Sub-Frame Assembly Batteries... - Page 3 REMOVING THE SCOOTER FROM THE CARTON Congratulations on the purchase of your new LYNX LX-3 Scooter. To ensure safe and proper operation of your scooter, DO NOT attempt to operate your scooter without first reading the Owner's Operator and Maintenance Manual.
-
Page 4: Tiller Assembly
TILLER ASSEMBLY B. TILLER ASSEMBLY (FIGURE 2) WARNING Section B is only to accommodate the removal of the front basket from the floor area of the scooter. DO NOT operate the scooter until the proper tiller adjustment procedure (refer to PROCEDURE 8 of the Owner's Operator and Maintenance manual, part number 1090132) has been performed after comple- tion of these setup instructions. - Page 5 FRONT BASKET INSTALLATION C. FRONT BASKET INSTALLATION (FIGURE 3) Check Box When Completed 1. Remove the front basket from the floor area of the scooter. 2. Remove the packing material that held the basket in place for shipping. 3. Remove the following five (5) items from inside the front basket and set aside for future use: A.
-
Page 6: Battery Installation
BATTERY INSTALLATION D. BATTERY INSTALLATION Preparing The Scooter/Batteries For Installation (FIGURES 4, 5 AND 6) To properly prepare the scooter/batteries for installation, perform the following steps: Check Box When Completed 1. Unscrew and remove the stability knob located under the seat on the front of the frame post (DETAIL "A"... - Page 7 BATTERY INSTALLATION Preparing The Scooter/Batteries For Installation (FIGURES 4, 5 AND 6) - Continued DETAIL "A" DETAIL "B" Battery Wiring Harness Battery Fastening Connector Strap (DO NOT Remove) BLACK Connector Connector Battery Wiring Harness Controller Wiring Battery Lifting Straps Rear Sub BLACK Harness (Remove From Around...
- Page 8 BATTERY INSTALLATION Preparing The Scooter/Batteries For Installation (FIGURES 4, 5 AND 6) - Continued NOTE: DO NOT position the battery in the scooter at this time. 14. Repeat STEPS 7-14 for the other battery. Top, Battery Battery Retaining Rear Lifting Terminal Post Ring Edge...
- Page 9 BATTERY INSTALLATION Connecting The Battery Wiring Harness To The Battery (FIGURES 7 AND 8) - Continued 5. Remove the mounting screw and locknut from the POSITIVE (+) battery terminal post 6. Connect the battery cable with the RED boot to the POSITIVE (+) battery terminal post using the mounting screw and locknut.
- Page 10 BATTERY INSTALLATION Installing The Batteries Into The Scooter (FIGURES 9, 10, 11 AND 12) - Continued Retaining Pin Place Retaining Pin Here Frame Post Front Frame Assembly Rear Frame Assembly FIGURE 10 - INSTALLING THE BATTERIES INTO THE SCOOTER 5. Locate the battery with the BLACK connector at the end of the battery wiring harness. 6.
- Page 11 BATTERY INSTALLATION Installing The Batteries Into The Scooter (FIGURES 9, 10, 11 AND 12) - Continued 11. Reconnect the battery fastening strap by pulling the loose end though the retaining ring and tighten- ing the strap (FIGURE 12). NOTE: Ensure that none of the wiring harnesses are under the strap (between the strap and the battery). Retaining Ring Battery...
- Page 12 ANTI-TIPPER WHEEL ASSEMBLY INSTALLATION E. ANTI-TIPPER WHEEL ASSEMBLY INSTALLATION (FIGURE 14) WARNING DO NOT operate the scooter without the anti-tipper wheel assemblies installed. Anti-tipper wheel as- semblies MUST be attached at all times - otherwise, injury or damage may occur. Check Box When Completed 1.
- Page 13 REASSEMBLY OF THE REAR SHROUD AND SEAT F. REASSEMBLY OF THE REAR SHROUD AND SEAT (FIGURE 15) Check Box When Completed ® 1. Check to ensure the wiring harness in NOT covering the "VELCRO like" strip on TOP of the rear frame assembly.
- Page 14 New batteries MUST be fully charged prior to the initial use of the scooter, otherwise battery life will be reduced. Your LYNX LX-3 Scooter has an on-board battery charger. Refer to CHARGING THE BATTERIES in PROCE- DURE 4 of the Owner's Manual, part number 1090132.
- Page 15 ESCUTER LYNX LX-3 ESCUTER LYNX LX-3 Barra del Timón Asiento Canasta de Enfrente Covertura Trasera Farol Canasta del Piso Cargador de la Batería de Abordo VISTA DESARMADO Canasta de Enfrente Covertura Trasera Subestructura Trasera Asiento Subestructura Delantera Baterías...
- Page 16 REMOVIENDO EL ESCUTER DE LA CAJA Congratulaciones por la compra de su nuevo Escúter LYNX LX-3. Para asegurarse de operar su escúter de manera aporpiada y sin peligros, NO intente operarlo sin antes leer el Manual del Operador y de Mantenimiento..
- Page 17 ENSAMBLE DE LA BARRA DEL TIMON B. ENSAMBLE DE LA BARRA DEL TIMON (FIGURA 2) ADVERTENCIA La Sección B es solamente para hacer lugar para la remoción de la canasta de enfrente, que viene en el area del piso del escúter. NO opere el escúter hasta que el ajuste apropiado de la barra del timón esté...
- Page 18 INSTALACION DE LA CANASTA DE ENFRENTE C. INSTALACION DE LA CANASTA DE ENFRENTE (FIGURA 3) Marque el Espacio Cuando Haya Completado 1. Remueva la canasta de enfrente del area del piso del escúter. 2. Remueva el material de empaque que mantubo la canasta sujeta durante el envío. 3.
- Page 19 INSTALACION DE LAS BATERIAS D. INSTALACION DE LAS BATERIAS Preparando El Escúter y las Baterías Para la Instalación (FIGURAS 4, 5 y 6) Para preparar el escúter y las baterías para la instalación apropiada, siga los pasos siguientes: Marque el Espacio Cuando Haya Completaddo 1.
- Page 20 INSTALACION DE LAS BATERIAS Preparando El Escúter y Las Baterías Para La Instalación (FIGURAS 4, 5 Y 6) - Continuación DETALLE "A" DETALLE "B" Conector Arnés de la Batería Correa de Sujetar ROJO la Batería (NO Conector Remueva) Conector ROJO NEGRO Arnés de la Batería...
- Page 21 INSTALACION DE LAS BATERIAS Preparando El Escúter y las Baterías Para La Instalación (FIGURAS 4, 5 Y 6) - Continuación 13. Haga una prueba para asegurarse que que la batería está bien asegurada para ser levantada y transportada usando las dos (2) manos. ((Una (1) mano debajo de la correa, ARRIBA en la bateria, y la otra para mantener la batería nivelada)) y así...
- Page 22 INSTALACION DE LAS BATERIAS Conectando El Arnés de la Batería A La Batería (FIGURAS 7 Y 8) - Continuación 3. Conecte el cable de la batería con l covertura NEGRA a la terminal NEGATIVA (-) de la batería, usando el tonillo y la tuerca según se muestra en (FIGURA 8).
- Page 23 INSTALACION DE LAS BATERIAS Instalando Las Baterías Al Escúter (FIGURAS 9, 10, 11 Y 12) - Continuación 4. Temporalmente coloque el pasador retenedor dentro del tubo soporte (FIGURA 10). NOTA: NO levante la estructura de adelante o la de atrás cuando el pasador no esté colocado. De otra manera, la estructura de enfrente se separará...
- Page 24 INSTALACION DE LAS BATERIAS Instalando Las Baterías Al Escúter (FIGURAS 9, 10, 11 Y 12) - Continuación NOTA: Las terminales de la batería deben de quedar hacia la parte de atrás del escúter (FIGURA 11). NOTA: NO conecte el arnés de la batería en este momento. 11.
- Page 25 INSTALACION DE LAS RUEDAS ANTIVUELCOS E. INSTALACION DE LAS RUEDAS ANTIVUELCOS (FIGURA 14) ADVERTENCIA NO opere el escúter sin antes instalar las ruedas antivuelcos. Las ruedas antivuelcos DEBEN de estar instaladas todo el tiempo. De otro modo, herida persona o daño pueden ocurrir. Maeque el Espacio Cuando Haya Completado...
- Page 26 REENSAMBLE DE LA COVERTURA TRASERA Y EL ASIENTO F. REENSAMBLE DE LA COVERTURA TRASERA Y EL ASIENTO (FIGURA 15) Marque el Espacio Cuando Haya Completado ® 1. Inspeccione para asegurarse de que el arnés NO está cubriendo el pedazo de "VELCRO "...
- Page 27 ENCUESTA A NUESTROS CLIENTES Aún cuando usted ha completado ahora las instrucciones del ensamble y armado, NO INSERTE LA LLAVE DE LA IGNICION TODAVIA. Las baterías nuevas DEBEN de ser cargadas completamente antes del uso inicial del escúter. De otro modo, la vida de las baterías será...
- Page 28 Invacare Corporation Canada...
Need help?
Do you have a question about the Lynx LX-3 and is the answer not in the manual?
Questions and answers