
Related Manuals for Digifly AIR-SE


Summary of Contents for Digifly AIR-SE
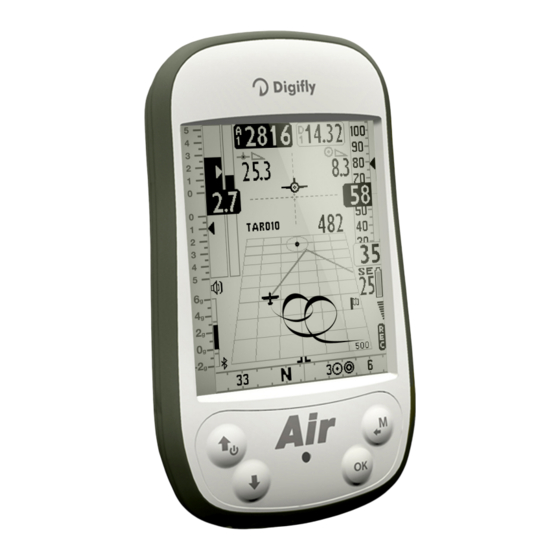
- Page 1 OWNER’s MANUAL DIGIFLY AIR-SE AIR-BT AIR-BT-PITOT Ver. 506a – English - Rev.1 AIR_Manual_506a_ENG_rev_1.pdf Page 1/96...
- Page 2 If your Digifly product is not working correctly or is defective, you must first contact your dealer, in order to avoid unnecessary inconvenience. Please do not send the instrument back before previous approval.
-
Page 3: Table Of Contents
INDEX INDEX ..............................3 GETTING STARTED ..........................7 CONNECTIONS, SENSORS AIR MANAGEMENT SOFTWARE ................7 BATTERY ................................7 2.2.1 BATTERY RECHARGE ........................... 7 2.2.2 EXTERNAL POWER SUPPLY ......................... 8 KEYBOARD - NORMAL OR LONG KEY PRESS ......................8 POWER ON & OFF ..............................8 DISPLAY CONTRAST ADJUSTMENT ........................ - Page 4 AIRSPACE CTR (fourth layer)........................44 6.18 3D AIRSPACE MANAGER (CTR) ........................... 44 6.18.1 UPLOAD AND ENABLE AIRSPACE CTRs TO THE DIGIFLY AIR ..............44 6.18.2 VISUAL AND ACOUSTIC DISTANCE WARNING TO THE CTR ............... 46 6.18.3 CTR’s HORIZONTAL DISTANCE INDICATOR ....................46 6.18.4...
- Page 5 7.1.4 DELETE WAYPOINT ........................... 47 NAVIGATE TO A SINGLE WAYPOINT (GOTO) ..................48 ACTIVATING NAVIGATION TO A WAYPOINT (GOTO) ..................48 8.1.1 NAVIGATION TO WAYPOINT HOME (GOTO HOME) ................. 48 8.1.2 NAVIGATION TO THE NEAREST LANDING ZONE (GOTO LANDING)............48 8.1.3 NAVIGATION TO THE NEAREST WAYPOINT (GOTO NEAREST) ..............
- Page 6 BLUETOOTH “PAIRING” ..........................66 SOFTWARE ............................67 14.1 AIR MANAGEMENT SOFTWARE ........................... 67 14.1.1 DIGIFLY AIRTOOLS SOFTWARE (PC / Mac) ....................67 14.1.2 DIGIFLY AIRPAGES SOFTWARE (PC / Mac) ....................68 14.1.3 GPSDUMP SOFTWARE (PC, Mac, ANDROID) ..................... 71 14.2 DIGIFLY AIRUPDATER SOFTWARE FOR FIRMWARE UPDATE (PC, M ) ...............
-
Page 7: Connections, Sensors And Air Management Software
Main Features : Dual purpose mini USB socket allows the Digifly AIR to be recharged with the supplied Digifly 5v charger and, additionally, to be connected to a personal computer or Mac for configuration & flight data management. Micro SD card slot; use Class 10 cards with 8 to 32GB formatted FAT32. -
Page 8: External Power Supply
150mA is necessary to turn the instrument on; any excess power will be used to charge the internal lithium battery. Proper solar panels are suitable to power the instrument. Important Notice: do not keep your Digifly AIR connected to its USB port in flight or in any situation where the ... -
Page 9: Standard Fields Editing
Variometer). Important: after every firmware update, it is necessary to update the help file containing the help messages as well. The help file update can be performed from your PC/Mac using Digifly AirTools, function: “upload HELP”. 2.8 RESTORE FACTORY SETTINGS To restore the factory settings (default values for all parameters), with the instrument OFF, simultaneously hold ... -
Page 10: Symbols
QUICK REFERENCE GUIDE 3.1 SYMBOLS Battery level Bluetooth activated Static icon = GPS FIX valid (GPS position available) Blinking icon = low GPS signal (GPS position NOT available) Flight recorder on Volume level Direction towards the center of the current Waypoint Direction towards the optimized point of the current WP’s cylinder Direction towards the optimized point of the current WP’s cylinder Last thermal position... -
Page 11: Configurable
3.2 PAGES The Digifly AIR features 13 pages: 12 configurable pages and one main page with GPS info, called the “MASTER INFO GPS PAGE " which, for safety reasons, cannot be changed or disabled. 3.2.1 CONFIGURABLE PAGES There are 12 configurable pages; each one is linked to one of the 12 configurable parameters (from MAIN ... -
Page 12: Manual Page Switching
3.2.2 MANUAL PAGE SWITCHING To manually change the pages, press the key to go forward or the key to go back. You can manually switch pages even if you are in “Intellifly” mode. 3.2.3 AUTOMATIC PAGE SWITCHING (INTELLIFY) The automatic page-switching among the different pages is automatically managed by the Intellifly system, ... -
Page 13: Competition
SETUP\ n. 26 PG01 to MAIN SETUP\ n. 31 PG06) to STD (to display the standard page your Digifly comes with) or on USR (to display the custom pages called “USER” previously uploaded to the Digifly using our free software AirPages). -
Page 14: Page 3 Comp Start (Thermal) And Page 4 Comp Start (Glide)
Time remaining (countdown) to the Start Gate opening time (CS) o Approximate time of arrival to the cylinder line of the Start waypoint l (ES) When the Digifly recognizes a thermal and you make a turn to fly into it, the Digifly will automatically switch to ... -
Page 15: Page 5 Comp Goal (Thermal) And Page 6 Comp Goal (Glide)
Estimated arrival height over the cylinder of the route’s last waypoint (GOAL) (HA) o Distance to the cylinder of the route’s last waypoint (GOAL) (DA) When the Digifly recognizes a thermal and you make a turn to fly into it, the Digifly will automatically switch to ... -
Page 16: Cross Country (Xc)
Distance to the active waypoint (D1) o Estimated height at arrival to the active waypoint’s cylinder (H1) When the Digifly recognizes a thermal and you make a turn to fly into it, the Digifly will automatically switch to ... -
Page 17: Page 7 Xc (Thermal)
3.4.1 PAGE 7 XC (THERMAL) A2 Altimeter A1 Altimeter Wind speed and Thermal Assist direction McCready Distance to the thermal (DT) Analogical vario Analogical anemometer Digital vario Speed to Fly (STF) Analogical vario scale Digital anemometer Equivalent McCready Direction to next WP Compass and navigation GPS Groundspeed Analogical vario average... -
Page 18: Page 8 Xc (Glide)
3.4.2 PAGE 8 XC (GLIDE) Distance to WP cylinder A1 Altimeter Current glide ratio McCready Required glide ratio to WP cylinder Analogical Vario Analogical Airspeed Digital Vario Optimal speed to fly STF Analogical vario scale Digital Airspeed Estimated arrival height McCready equivalent over the WP cylinder WP name... -
Page 19: Page 9 Compass
3.5 PAGE 9 COMPASS Clock Analogical A1 Altimeter Digital A1 Altimeter Chronometer Analogical vario scale Current glide ratio McCready Analogical Airspeed McCready equivalent Optimal speed to fly STF Analogical Vario Digital Airspeed Digital Vario WP name Analogical Average Vario / Net Vario Compass main points Direction to WP icons GPS Ground Speed... -
Page 20: Page 10 Relax
3.6 PAGE 10 RELAX Page 10 "RELAX" displays the most important information in very LARGE font size: A1 barometric altimeter, Variometer , A2 barometric altimeter. 3.7 PAGE 11 AHRS Page 11 "AHRS" displays, from top to bottom, the following parameters: ... - Page 21 3.8 PAGE 12 MAP CTR Airspace Analogical vario average / netto Current Waypoint Analogical Vario scale Last Waypoint Analogical Vario Optimized route McCready Next Waypoint Digital Vario GPS Groundspeed McCready equivalent Wind speed and direction Topographic map Current glide ratio Battery level Bluetooth ON Compass and navigation...
-
Page 22: Page 13 Master Info Gps
3.9 PAGE 13 MASTER INFO GPS PAGE On the MASTER INFO GPS page, all values relative to your GPS position and navigation are visible. While on this page only, you can access the following particular functions: “take me here” (GOTO HOME), “save current position”... -
Page 23: Gps Status Information
Waypoint. Press to cancel. The Digifly AIR also has a shortcut for the “Skip Waypoint” function, from any of the navigation pages. In order to activate it, the "Skip Waypoint Shortcut" parameter (ADVANCED SETUP \ n. 24 SKPW) needs to be activated. -
Page 24: Creating A New Waypoint Using The Current Position (Mark)
3.9.9 CREATING A NEW WAYPOINT USING THE CURRENT POSITION (MARK) "MARK" function: when the GPS acquires a valid position, it is possible to save it in the instrument’s memory. From the GPS INFO page LONG PRESS the key; the message "Save Mark ?" is shown, press the key to confirm or the key to cancel. -
Page 25: Altimeters
MAIN FUNCTIONS 4.1 ALTIMETERS The Digifly AIR features 9 different altimeters: ALT 1, ALT 2, ALT 3, ALT QNE, ALT FL, ALT GPS, ALT H1, ALT HA, and ALT AGL. ALT 1 (A1) : Barometric altimeter ALT 2 (A2) : A2 Altimeter ALT 3 (A3) : Gain during the current thermal ALT QNE (QE) : QNE Standard Pressure Altitude. -
Page 26: Maximum Altitude Alarm
The A2 Altimeter is used for general purposes. To reset it LONG PRESS the key. Note that with the “Skip Waypoint” shortcut parameter activated ADVANCED SETUP \ n. 24 SKPW=ON) the “OK” button will have a different function: it will take you to the next waypoint on your route and will no longer zero the A2 altimeter. ... -
Page 27: Variometers
When the netto vario is being displayed, the icon “NET” will show on the right-hand bar. N.B. In order to use this function, you must have a Digifly AIR with Pitot Tube option and that the tube is ... -
Page 28: Integrated Vario / Net Vario Automatic Switch
To set the reaction time of the Equivalent McCready indicator go to: ADVANCED SETUP \ n. 21 MCRE. N.B. In order to be able to use this function, you must have the Digifly AIR with Pitot Tube and have the tube ... -
Page 29: Total Energy Compensation (With Optional Pitot Tube)
4.2.9 TOTAL ENERGY COMPENSATION (WITH OPTIONAL PITOT TUBE) To use this function, it is necessary to have the optional Pitot tube installed. Generally, a variometer works as follows: it feels the atmospheric pressure change rate considering it as an ... -
Page 30: Acoustic Vario
Remember that when you turn your Digifly AIR on, it checks the volume of the acoustic vario and, if it happens to be turned off, it will immediately turn it up to HIGH. -
Page 31: Airspeed (With Optional Pitot Tube)
(triangle symbol) with the value on the optimal anemometric speed. Speed to fly (STF) indicator N.B. In order to be able to use this function, you must have the Digifly AIR with Optimal STF Pitot Tube and have the tube installed in your instrument; also you need to have position the Polar data programmed (for example, Polar 1: ADVANCED SETUP \ n. -
Page 32: Speed Difference (With Optional Pitot Tube)
4.3.2 SPEED DIFFERENCE (WITH OPTIONAL PITOT TUBE) The “Speed Difference Enable” (ADVANCED SETUP \ n. 2 SDIF) parameter = ON displays the head wind component (=Ground Speed – Anemometric Speed), on the digital indicator on the bottom of the combined speed instrument, instead of the Ground Speed value. A negative value indicates headwind. -
Page 33: Polar (With Optional Pitot Tube)
where you are in B sink; so, your best glide ratio is VB / Sink B. On your Digifly AIR you can insert three different polar curves using the parameters in ADVANCED SETUP \ n. 11 - 19 PxA / PxB / PxC where Px is the polar 1, 2 or 3 and A, B and C are the ka-kb-kc specific values used by the Digifly AIR to define the polar curve. -
Page 34: Barometer
4.5 BAROMETER The barometer displays the atmospheric pressure in millibar. It is possible to adjust its calibration with the ADVANCED SETUP \ n. 5 KBAR parameter. This parameter can only be modified directly using the menu on the AIR instrument and not using the AirTools ... -
Page 35: Magnetic Compass (Heading)
ADVANCED FUNCTIONS 5.1 MAGNETIC COMPASS (HEADING) Magnetic compass (HEADING) shows directions related to the magnetic north. It is made with solid state sensors along the 3 axes, ensuring correct functionality even if not fully leveled. 5.2 G-METER The G-meter is made of solid state G-sensors along the 3 axes; its value (G-METER) shows the number of “G” at ... -
Page 36: Integrated Gps Receiver With 99 Channels
GPS FUNCTIONS 6.1 INTEGRATED GPS RECEIVER WITH 99 CHANNELS Digifly AIR features an extremely sensitive, and state-of-the-art, integrated GPS receiver with 99 channels. 6.2 GPS STATUS INFORMATION The GPS status icon has different meanings: o Fixed GPS icon = GPS FIX valid (GPS position available) o Blinking GPS icon = insufficient signal (GPS position NOT yet AVAILABLE) 6.3 GPS SIGNAL QUALITY (HDOP) -
Page 37: Gps Direction (Trk)
6.10 GPS DIRECTION (TRK) The GPS direction (“TRK”) is the glider’s direction related to the ground. 6.11 GROUND EFFICIENCY (GLIDE RATIO) It shows the efficiency (glide ratio) related to the ground. To set the time over which the average efficiency (glide ratio) is calculated, go to: ADVANCED ... -
Page 38: Last Thermal Position, Distance & Height Information
6.13 LAST THERMAL POSITION, DISTANCE & HEIGHT INFORMATION The data: direction “BRG T”, distance “DST T” and altitude gain “A3” are displayed when a thermal is detected. The thermal’s core position is graphically shown (regarding our current position and in scale) with a “T” inside ... -
Page 39: Plotter
in VARIOMETER SETUP \ n. 16 CRUT); default =15 seconds. When this happens, the plotter cleans up and the zoom is automatically set on the basis of the calculated distance between the current position and the current waypoint so both can be displayed on the plotter at the same time. 6.16 PLOTTER ... -
Page 40: Terrain (First Layer)
Close the AirTools program. o Insert the microSD card into your computer then copy & paste the map file on the microSD. o Remove the microSD from the computer and insert it into your Digifly Air with the instrument turned OFF. AIR_Manual_506a_ENG_rev_1.pdf... - Page 41 Important notes: i) Use only microSD cards formatted FAT32, class 10 with at least 8GB and up to 32GB. ii) Insert the microSD card with the instrument turned OFF then turn it on, holding down the power key, in order to verify that the SD card is working correctly. The possible messages are: “Micro SD: OK / NONE / ERROR!”...
-
Page 42: Nav (Second Layer)
6.17.2 NAV (second layer) To display the NAV Layer (NAVIGATION) on your map, you need to have an active route or navigation to a waypoint. NAV Layer has three different layouts, switchable by button, when looking at the Map tool: ... -
Page 43: Fai-Trangle Assistant (Third Layer)
6.17.3 FAI-TRANGLE ASSISTANT (third layer) The FAI-Triangle Assistant is enabled setting “ON” the parameter MAIN SETUP\ n. 44 FAIT “FAI-Triangle Assistant” (default OFF) Note: If you have a map on the current page (see the standard Pg.12) and the ... -
Page 44: Airspace Ctr (Fourth Layer)
As soon as you pass these set thresholds, an acoustic alarm will sound and your Digifly AIR will post a warning message on your screen. The “3D Airspace manager” is managed using the following three parameters: CTRM, CTRD and CTRH. - Page 45 Online converter with the option of selecting the different classes of CTRs: Converter OpenAir -> GoogleMap http://cunimb.net/openair2map.php b) Using the USB cable supplied, connect your Digifly to the PC/Mac and go to AirTools in the Digifly’s Menu. c) On your computer, open the AirTools program and click on the “AirSpaces” tab d) Click on “Load from file”, set the type of file to “OpenAir (*.txt)”...
-
Page 46: Visual And Acoustic Distance Warning To The Ctr
6.18.2 VISUAL AND ACOUSTIC DISTANCE WARNING TO THE CTR Set the horizontal distance to the airspace, at which your warnings will go off, using the MAIN SETUP\ n. 23 CTRD parameter: 0=disabled, from 1 to 9999 mt=enabled (default 400) Set the horizontal distance to the airspace, at which your warnings will go off, using the MAIN SETUP\ n. -
Page 47: Waypoint Databases: Competition & User
- using a Mac (via USB cable) using AirTools or GpsDump - using an Android Smartphone (via USB OTG cable or Bluetooth) using the GpsDump App - using another Digifly AIR via the micro SD memory card (see 12.1 Micro SD Manager) 7.1.1 MANUALLY CREATING A NEW WAYPOINT On the MENU screen, select the waypoint database where you’d want to save... -
Page 48: Navigate To A Single Waypoint (Goto)
NAVIGATE TO A SINGLE WAYPOINT (GOTO) 8.1 ACTIVATING NAVIGATION TO A WAYPOINT (GOTO) 8.1.1 NAVIGATION TO WAYPOINT HOME (GOTO HOME) Available only when you are on the GPS INFO page; it ensures that the instrument guides us back to the point ... -
Page 49: Navigation To A Generic Waypoint (Goto)
8.1.4 NAVIGATION TO A GENERIC WAYPOINT (GOTO) With a valid GPS position, go to the menu with the key, select a Waypoint database (Competition / User). Scroll the list using the arrow keys and set the cursor on the wished Waypoint, LONG PRESS the ... -
Page 50: Navigation Functions To A Single Waypoint (Goto)
8.2 NAVIGATION FUNCTIONS TO A SINGLE WAYPOINT (GOTO) The following navigation functions are available only if navigation toward a single waypoint (GOTO) is active: 8.2.1 DIRECTION, DISTANCE & HEIGHT TO THE CURRENT WAYPOINT BRG 1 (B1): is the direction to the current Waypoint; it is shown on the compass with the icon ... -
Page 51: Route Management
- using a Mac (via USB cable) using AirTools - using another Digifly AIR via the microSD memory card (see 12.1 MicroSD Manager) On the “Route” page, you will have the total route distance for both the standard and optimized route. When ... -
Page 52: Modify A Waypoint In A Route (Parameter Change)
9.5 MODIFY A WAYPOINT IN A ROUTE (PARAMETER CHANGE) If you want a waypoint to be your "start waypoint/gate" its type must be changed (Type = SSS) and you may even need to adjust : Radius, In/Out, Start Gate Time , Next Gate, N. Gates Press the keys to set the cursor on the desired waypoint’s line that you want to modify. -
Page 53: Delete A Waypoint Of A Route
9.6 DELETE A WAYPOINT OF A ROUTE Using the arrows keys set the cursor on the waypoint to be deleted. Press the key to open the drop down menu containing the possible actions, then select “DELETE”. The message "Delete Wpt ?" is shown, confirm to accept the cancellation of the WP pressing the key, or cancel the procedure using the key. -
Page 54: Route Navigation
10 ROUTE NAVIGATION 10.1 ACTIVATING A ROUTE To activate the navigation of your route, from the main menu, enter in the "ROUTES” sub-menu. The first visualized route is the “Rt 01”, to select other routes LONG PRESS the arrow keys ... -
Page 55: Navigation To A Standard Waypoint
(100mts), the flight recorder rate is automatically set to one data point per second (oversample). Cylinder validation: when you enter a cylinder the Digifly AIR will alert you with a sound and you will see a message of “WPOK” (or “TASK FINISHED” if it is the arrival Waypoint), then the flight recorder rate returns to the setup value (MAIN SETUP \ n.6 RECR). -
Page 56: Compass To The Current Waypoint
BRG 0 (B0): Shows the direction to nearest point of the current waypoint cylinder; also, shown with the icon on the compass. DST 0 (D0): Shows the distance to the nearest point of the current waypoint cylinder. 10.4.2 COMPASS TO THE CURRENT WAYPOINT There are two types of “Compass”... -
Page 57: Required Glide Ratio To Goal
10.4.7 REQUIRED GLIDE RATIO TO GOAL It is the estimated needed glide ratio to reach the goal 's cylinder, along the optimized route. 10.4.8 ARRIVAL TIME & TIME TO GOAL "TIMA (TA)" shows the estimated arrival time to get to the arrival cylinder waypoint along optimized route and ... -
Page 58: Navigation To The Start Waypoint (Gate)
10.5 NAVIGATION TO THE START WAYPOINT (GATE) The current Waypoint is managed as a Start waypoint only if its parameter Type has the value “SSS” (Start of Speed Section - see 9.5). The crossing direction of the Start Waypoint line is established by its parameter In/Out : ... -
Page 59: Starting Time (Tstart)
The “Skip Waypoint” function of a route (no shortcut - from “Info GPS” page) is explained on paragraph 3.9.8 The Digifly AIR also has a shortcut for this function, from any of the navigation pages. In order to activate it, the ... -
Page 60: Operation Checklist Before A Task
Download the waypoints from the competition’s official web site or get them from the scorekeeper. Upload them to the Digifly Air using AirTools via USB cable (PC, Mac) , GPSDump via USB cable (PC, Mac, Android Smartphone) , GPSDump via Bluetooth (Android Smartphone) or with another Digifly AIR using a... -
Page 61: Flight Recorder
11 FLIGHT RECORDER When the Digifly Air starts the flight recorder, it shows the “REC ON” message and the “rec” icon, on the bottom of the display, starts blinking. The following parameters are continuously recorded: Date and time, latitude, longitude, fix status, barometric altimeter QNE , altimeter GPS, number of satellites, GPS ground speed, anemometer, variometer and barometric A1 altimeter. -
Page 62: Recording Rate
11.2 RECORDING RATE The recorder rate can be adjusted from 1 to 60 seconds, go to: MAIN SETUP \ n.6 RECR). Setting 1 data point per second, will record over 30 hours of flight data. Setting 1 data point per minute, will record up to 1800 hours of flight data. ... -
Page 63: Additional Memory Card
12 ADDITIONAL MEMORY CARD On the Digifly AIR’s housing, you will find the microSD Class 10 memory card reader slot, with a capacity ranging from 8GB to 32GB formatted FAT32. To insert a memory card, your instrument must be OFF. Place the card with the label facing the instrument’s ... -
Page 64: Connections & Interfaces
13 CONNECTIONS & INTERFACES It is possible to connect your Digifly AIR-SE and AIR-BT to a PC, Mac, Smartphone, Tablet, PDA, etc. using the provided USB cable. The Digifly AIR-BT allows also the connection via Bluetooth. 13.1 USB CABLE CONNECTION Connecting to an Android Smartphone via USB cable does not require a driver installation;... - Page 65 Take note of the COM port number, to be used later on to manually set the correct port number of third-party software (e.g. GpsDump). Please note that all Digifly software has automatic COM port number detection (Auto-search) and therefore it does not need this setting.
-
Page 66: Bluetooth Connection (Air Bt Only)
TTLiveTrack24 on an Android Smartphone. This means that the Digifly AIR BT is also a Telemeter and in Digifly we call this the Integrated Digi-FlyBox ; other companies call this function an “Info Box / Data Source / Sensor Box”, but none of these will include an anemometer (Pitot Tube System) like our instrument does. -
Page 67: Software
& configure your vario. Important: always run only one program at a time! 14.1.1 DIGIFLY AIRTOOLS SOFTWARE (PC / Mac) The Digifly “AirTools” software is also available for both Windows and Mac, to download for free at ... -
Page 68: Digifly Airpages Software (Pc / Mac)
It gives you the possibility to create and graphically configure the “User Pages”, so that you can then upload them to the 12 configurable pages of the AIR instrument (GPS Info page is not configurable). Connect the Digifly AIR to the PC/Mac with a USB cable and turn both of them on. Claudio.dat ... - Page 69 OFF = the layout view of the page is disabled (the page will be skipped) STD = it will show the corresponding layout of the preset page by Digifly (pgs. 1 - 12) that come with your AIR. USR = it will show the corresponding layout of the page "USER PAGE 1 to 12" created and uploaded by the User with the FREE Digifly AirPages program.
- Page 70 AIR_Manual_506a_ENG_rev_1.pdf Page 70/96...
-
Page 71: Gpsdump Software (Pc, Mac, Android)
COMPETITION waypoint banks. GpsDump for PC/MAC These GpsDump versions will only communicate with your Digifly AIR only via the USB cable and do require the installation of the FTDI USB drivers (see paragraph 13.1). How to use GPSDump: o Press the button (“MENU”... - Page 72 GPS from the “Select GPS type” list. o To download a tracklog from your AIR: click on the “TRK” tab, then on ”READ” and select “Digifly Air” from the “Select GPS type” list. From the flight list, click on the one you want to download and save it in IGC format.
- Page 73 Note: when using Bluetooth communication, it is important to make sure to select “Bluetooth devices” (last item on list) from the “Select GPS type” list and then select your instrument by clicking on “Digifly AirXXX” where “XXX” are the last 3 digits of your AIR’s serial number; for example, "Digifly Air123"...
-
Page 74: Digifly Airupdater Software For Firmware Update (Pc, M Ac )
Mac. This free software can be downloaded from our web site www.digifly.comand allows you to get new functions and improvements on your instrument. The firmware update works only with the USB cable. Note: it is not possible to update the firmware via the ... - Page 75 On the other hand, if the update is underway and stops halfway through, then the firmware has been erased; even though the instrument is completely fine, there is NO DAMAGE, but it will drain the battery fairly quickly. To restore it, you will need to do a different kind of reset using 3 buttons that will reset the AIR and, at the same time, bring it to bootloader mode: o Press and hold the 3 keys together.
- Page 76 AHRS Inertial Platform, GPS Position, etc. 15.1 ACTIVATING THE DIGIFLY’S TELEMETRY DATA OUTPUT Digi-F To activate the Digifly’s telemetry data output you have to select the telemetry data type you want to transmit (parameter ADVANCED SETUP \ n. 25 TELE ) then select USB cable or Bluetooth mode (parameter ADVANCED SETUP \ n.
- Page 77 15.1.1 Digi-F TELEMETRY DATA TYPE SELECTION LYBOX Select the telemetry data type with the ADVANCED SETUP \ n. 25 TELE parameter: TELE=OFF: no data transmitted (default). TELE=CAR: GPS($GPGGA + $GPRMC) sent once per second TELE=FL1: GPS($GPGGA + $GPRMC) sent once per second and $PDGFTL1 sent once per second. ...
- Page 78 $PDGFTL1,2025,2000,250,-14,45,134,28,65,382,153*14<CR><LF> Name Example Units Description Baro Altitude QNE(1013.25) 2025 meters 2025 mt (range -300 … +9160) Baro Altitude QNH 2000 meters 2000 mt (range -300 … +9160) Vario cm/sec +2,50 m/s (range -25,00 … +25,00) Netto Vario dm/sec -1,40 m/s (range -25,00 …...
- Page 79 3) When the AIR receives from the confirmation that it is connected the external device, it automatically exits from the "Telemetry BT" menu, returns to the current page of instruments, turns the Bluetooth icon on and activates the continuous transmission of real-time Digifly telemetry data at high speed. In case of problems, press the key on the AIR to exit and try again.
- Page 80 If everything is correct, the "Monitor" page in LK8000 will display the telemetry data transmitted from the AIR For more info about the LK8000 software please visit their website www.lk8000.it AIR_Manual_506a_ENG_rev_1.pdf Page 80/96...
- Page 81 (see 13.2.1) o To correctly decode the Digifly’s telemetry, it is necessary (only once) to enter in the XCSoar : FLY mode, Menu, Config 1/3, Devices, Edit Device A : Port: Digifly Airnnn (where “nnn” are the last three digits of your instrument’s serial number), Driver: Digifly Leonardo, Close configuration.
- Page 82 AIR_Manual_506a_ENG_rev_1.pdf Page 82/96...
- Page 83 Do a one-time setting of the communication type parameter ADVANCED SETUP \ n. 26 BLUT = OFF. o To correctly decode the Digifly’s telemetry, it is necessary (only once) to enter in the XCTrack : menu, Settings, select the “Sensors” sub-menu, select “use external USB sensor”, select “use external GPS”, select “use external barometric sensor”.
- Page 84 AIR_Manual_506a_ENG_rev_1.pdf Page 84/96...
- Page 85 (see 13.2.1) o To correctly decode the Digifly’s telemetry, it is necessary (only once) to enter in the TopHat : FLY mode, Menu 3/4, Set up TopHat, Devices, Edit Device A : Port: Digifly Airnnn (where “nnn” are the last three digits of your instrument’s serial number), Driver: Digifly Leonardo, Close configuration.
- Page 86 AIR_Manual_506a_ENG_rev_1.pdf Page 86/96...
- Page 87 15.6 Digi-F LIVE TRACK & TELEMETRY TO GPSDUMP LYBOX The free GpsDump software (App Android) running on an external device (e.g. Smartphone, Tablet, etc.) receives the Digi-F Telemetry Data sent in real time at high speed by the AIR-BT via Bluetooth , displays and sends them to the Live Track server (e.g.
- Page 88 (see 13.2.1) o To correctly decode the Digifly’s telemetry, it is necessary (only once) to enter in the GpsDump : LOG Menu, click “Live Tracking” , select “Service” : “LiveTrack24” and fill in the requested fields, press “START”, “Select logger type”...
- Page 89 15.7 Digi-F LIVE TRACK & TELEMETRY TO TTLIVETRACK24 LYBOX The free TTLiveTrack24 software (App Android) running on an external device (e.g. Smartphone, Tablet, etc.) receives the Digi-F Telemetry Data sent in real time at high speed by the AIR-BT via Bluetooth , displays and sends them to the Live Track server (e.g.
- Page 90 To correctly decode the Digifly’s telemetry, it is necessary (only once) to enter in the TTLiveTrack24 : Settings Menu, tick the box next to "Use AIR BT GPS", “Choose Bluetooth GPS” : Digifly Airnnn (where “nnn” are the last three digits of your instrument’s serial number), tick the box next to "LiveTrack24 Enabled” and fill in the requested fields.
-
Page 91: Appendix
16 APPENDIX 16.1 DIGIFLY AIR STANDARD ACCESSORIES The Digifly AIR-SE, AIR-BT and AIR-BT-PITOT are shipped with the following standard accessories: Protective padded bag. Internal rechargeable lithium battery. Battery charger 5V 1000ma (110-220Vca 50-60Hz). USB PC cable for flights download, managing other functions and firmware updates directly from the Internet. -
Page 92: Advanced Functions
13 Graphic screens from which 12 are completely configurable by the user with simple "drag & drop" technique using the graphical free software Digifly AirPages for PC and Mac Free Digifly AirTools vario management software for PC and Mac ... - Page 93 PC, Mac and Android Smartphone USB (AIR SE and BT) and Bluetooth (AIR BT only) data communication High Speed real time Digifly Telemetry data output 10 times per second via USB cable and via Bluetooth Integrated Digi-F (sensor box) with high speed telemetry via USB cable and via Bluetooth to LK8000, ...
-
Page 94: Main Set Up Menu Parameters
16.4 MAIN SET UP MENU PARAMETERS Name Description Range Default Units CTRS display contrast setting 1 - 99 LANG language selection USR/UK/ITA/ESP/DEU/FRA/CZE/HUN/PLN/GRK/TRK RECM recorder mode selection OFF/ALW/AUT ---- R.DS meters variation start autorecorder 0.1 – 5 R.TI seconds variation start autorecorder 1 - 30 RECR recorder rate... -
Page 95: Adv-Setup Parameters Menu (Advanced Setup)
16.5 ADV-SETUP PARAMETERS MENU (ADVANCED SETUP) Name Description Range Default Unit PITO Pitot tube enable OFF/IAS/TAS ---- SDIF Speed difference enable OFF/ON ---- OFSP Pitot tube offset calibration 0 – 4000 ---- KIAS airspeed calibration 50 – 200 % KBAR barometer calibration +/- 10.0 GCAL... - Page 96 Digifly Offices Corporate Headquarters North, Central and South American Headquarters Digifly Europe Srl Digifly USA Bologna St. Augustine, FL Italy Phone : +39 370 1167217 Phone : +1 (240) 343-5987 Web : www.digifly.com Web : www.digiflyusa.com E-mail : info@digifly.com E-mail : flydigifly@gmail.com...
Need help?
Do you have a question about the AIR-SE and is the answer not in the manual?
Questions and answers