Chapters
Table of Contents

Related Manuals for Sun Microsystems x4422a


Summary of Contents for Sun Microsystems x4422a
- Page 1 Dual Gigabit Ethernet and ™ Dual SCSI/P Adapter Installation and User’s Guide Sun Microsystems, Inc. www.sun.com Part No. 817-4339-10 January 2004, Revision A Submit comments about this document at: http://www.sun.com/hwdocs/feedback...
- Page 2 Copyright 2004 Sun Microsystems, Inc., 4150 Network Circle, Santa Clara, California 95054, Etats-Unis. Tous droits réservés. Sun Microsystems, Inc. a les droits de propriété intellectuels relatants à la technologie qui est décrit dans ce document. En particulier, et sans la limitation, ces droits de propriété...
-
Page 3: Regulatory Compliance Statements
Operation of this equipment in a residential area is likely to cause harmful interference, in which case the user will be required to correct the interference at his own expense. Modifications: Any modifications made to this device that are not approved by Sun Microsystems, Inc. may void the authority granted to the user by the FCC to operate this equipment. - Page 4 BSMI Class A Notice The following statement is applicable to products shipped to Taiwan and marked as Class A on the product compliance label. Graphic showing the BSMI Class A Notice for products shipped to Taiwan. Sun Dual Gigabit Ethernet and Dual SCSI/P Adapter Installation and User’s Guide • January 2004...
-
Page 5: Declaration Of Conformity
Dennis P. Symanski DATE Pamela J. Dullaghan DATE Manager, Compliance Engineering Quality Program Manager Sun Microsystems, Inc. Sun Microsystems Scotland, Limited 4150 Network Circle, MPK15-102 Springfield, Linlithgow Santa Clara, CA 95054 U.S.A. West Lothian, EH49 7LR Tel: 650-786-3255 Scotland, United Kingdom... - Page 6 Sun Dual Gigabit Ethernet and Dual SCSI/P Adapter Installation and User’s Guide • January 2004...
-
Page 7: Table Of Contents
Contents Preface xv Product Overview 1 Hardware Overview 1 LED Displays 3 Hardware and Software Requirements 4 Supported Cables 4 Product Features 5 PCI Bus Interface 5 Gigabit Ethernet Interfaces 5 Ultra2 SCSI Interfaces 5 Diagnostic Support 6 Installing the Adapter 7 Installing the Adapter Without Dynamic Reconfiguration 7 To Install the Adapter 7 To Verify the Installation 9... - Page 8 Installing the Adapter With Dynamic Reconfiguration 19 Using the Installation Script 19 To Install the Software Using the Installation Script 20 Example 1: All Requirements Met 21 Example 2: Updates Required 22 Example 3: Packages Missing 24 Configuring the Network Host Files 26 Configuring Driver Parameters 29 GigaSwift Ethernet Driver Parameter Values and Definitions 29 Operational Mode Parameters 31...
- Page 9 To Disable Auto-negotiation Mode 43 Setting Parameters Using the ce.conf File 43 To Set Driver Parameters Using a ce.conf File 44 Usability Enhancements to the Driver 46 GigaSwift Ethernet Driver Operating Statistics 47 Reporting the Link Partner Capabilities 48 To Check Link Partner Settings 51 To Discover Link Partner Capabilities 54 To Discover Link Settings 55 Configuration Checking 55...
- Page 10 To Use the netlbtest 72 Using the OpenBoot PROM FCode Self-Test 73 To Run the FCode Self-Test Diagnostic 73 Index 77 Sun Dual Gigabit Ethernet and Dual SCSI/P Adapter Installation and User’s Guide • January 2004...
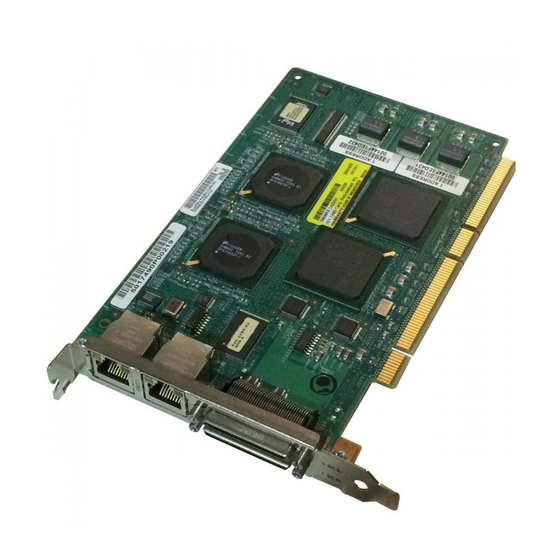
- Page 11 Figures Sun Dual Gigabit Ethernet and Dual SCSI/P Adapter 2 FIGURE 1-1 Sun Dual Gigabit Ethernet and Dual SCSI/P Adapter Backplate 67 FIGURE C-1...
- Page 12 Sun Dual Gigabit Ethernet and Dual SCSI/P Adapter Installation and User’s Guide • January 2004...
- Page 13 Tables Front Panel Display LEDs 3 TABLE 1-1 ce Driver Parameter, Status, and Descriptions 29 TABLE 3-1 Operational Mode Parameters 31 TABLE 3-2 Read-Write Flow Control Keyword Descriptions 32 TABLE 3-3 Forced Mode Parameter 33 TABLE 3-4 Parameters Defining enable_ipg0 and ipg0 34 TABLE 3-5 Read-Write Interpacket Gap Parameter Values and Descriptions 34 TABLE 3-6...
- Page 14 Sun Dual Gigabit Ethernet and Dual SCSI/P Adapter Installation and User’s Guide • January 2004...
-
Page 15: Preface
Preface The Sun Dual Gigabit Ethernet and Dual SCSI/P Adapter Installation and User’s Guide provides installation instructions for the Sun™ Dual Gigabit Ethernet and Dual SCSI/P adapter. This manual also describes how to configure the driver software. These instructions are designed for enterprise system administrators with experience installing network hardware and software. - Page 16 Appendix D, “Diagnostic Software and Troubleshooting Issues,” provides an overview of the SunVTS diagnostic application and instructions for testing the adapter using the onboard FCode selftest. There is also a section outlining some common troubleshooting issues. Using UNIX Commands ® This document may not contain information on basic UNIX commands and procedures such as shutting down the system, booting the system, and configuring...
-
Page 17: Related Documentation
Shell Prompts Shell Prompts TABLE P-2 Shell Prompt C shell machine_name% C shell superuser machine_name# Bourne shell and Korn shell Bourne shell and Korn shell superuser Related Documentation Related Documentation TABLE P-3 Application Title Dynamic Reconfiguration Installation Sun Enterprise 6x00, 5x00, 4x00, and 3x00 Systems Dynamic Reconfiguration User’s Guide Diagnostic Software SunVTS User’s Guide... - Page 18 Sun Welcomes Your Comments Sun is interested in improving its documentation and welcomes your comments and suggestions. You can email your comments to Sun at: docfeedback@sun.com Please include the part number (817-4339-10) of your document in the subject line of your email.
-
Page 19: Product Overview
C H A P T E R Product Overview This chapter provides a description of both the Sun Dual Gigabit Ethernet and Dual SCSI/P adapter hardware and software. This chapter includes the following sections: “Hardware Overview” on page 1 “Hardware and Software Requirements” on page 4 “Product Features”... - Page 20 10 Mbps, half-duplex The Sun Dual Gigabit Ethernet and Dual SCSI/P adapter performs autonegotiation with the remote end of the link (the link partner) to select a common mode of operation. Sun Dual Gigabit Ethernet and Dual SCSI/P adapter also supports a non- autonegotiated mode of operation.
-
Page 21: Led Displays
LED Displays Two Gigabit Ethernet port connectors are on the front panel of the Sun Dual Gigabit Ethernet and Dual SCSI/P adapter. Each port has two LED’s. The explanation of the function of each LED is given in TABLE 1-1 Front Panel Display LEDs TABLE 1-1 Color... -
Page 22: Hardware And Software Requirements
Only standard, Sun-supported cabling to ensure reliable SCSI interface connections SunVTS Version 4.4 and subsequent compatible releases Supported Cables The following cables, which you can order from Sun Microsystems, Inc., are required for this adapter: X1132A 530-2452-02 (CBL,ULTRA SCSI-3/VHDCI,68P.8M) X3832A... -
Page 23: Product Features
Product Features Following is a list of features for the Sun Dual Gigabit Ethernet and Dual SCSI/P adapter: PCI Bus Interface PCI Local Bus Rev 2.2 compliant (6.8-inch x 4.2-inch short card) 33/66-MHz, 32- or 64-bit bus master Universal PCI slot (3.3V and 5V) Hot-plug capable Infinite Burst capable on Ultra III machines Gigabit Ethernet Interfaces... -
Page 24: Diagnostic Support
Diagnostic Support User executable selftest using OpenBoot PROM SunVTS™ diagnostic tool Sun Dual Gigabit Ethernet and Dual SCSI/P Adapter Installation and User’s Guide • January 2004... -
Page 25: Installing The Adapter
C H A P T E R Installing the Adapter This chapter describes how to install the adapter in your system and verify that it has been installed correctly. It then describes how to install the driver software using the automated script. Finally, it describes how to edit the network host files after installing the adapter on your system. - Page 26 4. Attach the adhesive copper strip of the antistatic wrist strap to the metal casing of the power supply. Wrap the other end twice around your wrist, with the adhesive side against your skin. 5. Holding the PCI adapter by the edges, unpack it and place it on an antistatic surface.
-
Page 27: To Verify The Installation
8. Applying even pressure at both corners of the adapter, push the PCI adapter until it is firmly seated in the slot. Caution – Do not use excessive force when installing the adapter into the PCI slot. You may damage the adapter’s PCI connector. If the adapter does not seat properly when you apply even pressure, remove the adapter and carefully reinstall it again. - Page 28 2. Use the show-devs command to list the system devices. You should see PCI adapter output similar to the example below. ok show-devs /pci@2,2000/pci@2 -----> Bridge Chip /pci@2,2000/pci@2/scsi@2,1 -----> SCSI port #2 /pci@2,2000/pci@2/scsi@2 -----> SCSI port #1 /pci@1f,2000/pci@1/network@1 -----> Network #1 /pci@1f,2000/pci@1/network@0 ----->...
- Page 29 4. View the .properties file for a list of device properties. The .properties command displays the specific information about the installed adapter. ok cd /pci@1e,600000/pci@4/scsi@2,1 ok .properties assigned-addresses 81021110 00000000 00001100 00000000 00000100 83021114 00000000 03704000 00000000 00002000 8302111c 00000000 03706000 00000000 00002000 82021130 00000000 03720000 00000000 00010000 device_type scsi-2...
- Page 30 6. Type the following to verify the second SCSI device: ok cd /pci@1e,600000/pci@4/scsi@2 ok .properties assigned-addresses 81021010 00000000 00001000 00000000 00000100 83021014 00000000 03700000 00000000 00002000 8302101c 00000000 03702000 00000000 00002000 82021030 00000000 03710000 00000000 00010000 device_type scsi-2 clock-frequency 02625a00 00021000 00000000 00000000 00000000 00000000 01021010 00000000 00000000 00000000 00000100 03021014 00000000 00000000 00000000 00002000...
- Page 31 8. List the network devices on your system. ok show-nets Use the show-nets command to list the system devices. You should see the full path name of the network devices, similar to the example below. In this example, the network@0 and the network@1 devices are the Sun Dual Gigabit Ethernet and Dual SCSI/P adapter and the network@2 is the onboard Ethernet device.
- Page 32 10. View the .properties file for a list of device properties. The .properties command displays the specific information about the installed adapter. ok cd /pci@1e,600000/pci@4/network@1 ok .properties assigned-addresses 82020810 00000000 03400000 00000000 00200000 82020830 00000000 03600000 00000000 00100000 d-fru-len 00000000 d-fru-off 0000e800 d-fru-dev...
- Page 33 Note – If you are going to set the local-mac-address? variable, note the local MAC address of your device at this time. See “Setting the local-mac-address? Variable” on page 17 for more information. 11. Type the following when you finish looking at the .properties values: ok device-end Chapter 2 Installing the Adapter...
- Page 34 12. Type the following to verify the second Ethernet device: ok cd /pci@1e,600000/pci@4/network@0 ok .properties assigned-addresses 82020010 00000000 03200000 00000000 00200000 82020030 00000000 03100000 00000000 00100000 d-fru-len 00000000 d-fru-off 0000e800 d-fru-dev eeprom s-fru-len 00000800 s-fru-off 0000e000 s-fru-dev eeprom compatible pci100b,35.30 pci100b,35 pciclass,020000 pciclass,0200...
-
Page 35: Setting The Local-Mac-Address? Variable
13. Type the following when you finish looking at the .properties values: ok device-end Setting the local-mac-address? Variable Note – Enabling the local-mac-address? variable is only required if you boot from the network. Every Sun Dual Gigabit Ethernet and Dual SCSI/P adapter comes with two unique media access control (MAC) addresses that represent the 48-bit Ethernet address for that interface. -
Page 36: Rebooting The System
1. List the network devices on your system. ok show-nets a) /pci@1f,2000/pci@1/network@1 b) /pci@1f,2000/pci@1/network@0 c) /pci@1f,4000/network@1,1 q) NO SELECTION Enter Selection, q to quit:q 2. Set the Sun Dual Gigabit Ethernet and Dual SCSI/P adapter device to be your default boot device by typing: ok setenv boot-device /pci@9,600000/pci@1/pci@0/network@0 Note that the command shown in this example sets your boot device to be port 0 on the network portion of the card... -
Page 37: Installing The Adapter With Dynamic Reconfiguration
Installing the Adapter With Dynamic Reconfiguration If you have a Sun Enterprise system that supports dynamic reconfiguration (DR), you do not have to reboot your system after installing the adapter. The process of adding and configuring an adapter with DR involves (1) connecting the attachment point and (2) configuring its occupant. -
Page 38: To Install The Software Using The Installation Script
To Install the Software Using the Installation Script 1. At the system console, become superuser (root). 2. Insert the Sun Dual Gigabit Ethernet Dual SCSI/P Adapter CD into a CD-ROM drive that is connected to your system. If your system is running Sun Enterprise Volume Manager, it should automatically mount the CD-ROM to the /cdrom/cdrom0 directory. -
Page 39: Example 1: All Requirements Met
2 - GigaSwift Ethernet Adapter (copper/fiber) 3 - GigaSwift Ethernet Compact PCI Adapter 4 - Quad GigaSwift Ethernet Adapter Please select the product to install: 1 Dual GigaSwift Ethernet Adapter Driver Installation. Copyright 2004 Sun Microsystems, Inc. All rights reserved. Chapter 2 Installing the Adapter... -
Page 40: Example 2: Updates Required
4 - Quad GigaSwift Ethernet Adapter Please select the product to install: 1 Dual GigaSwift Ethernet Adapter Driver Installation. Copyright 2004 Sun Microsystems, Inc. All rights reserved. Use is subject to license terms. *** Checking for correct version of GigaSwift Ethernet Driver Packages... - Page 41 Script Output When Packages Require Patches (Continued) CODE EXAMPLE 2-2 This script is about to take the following actions: - Install GigaSwift Ethernet Patch: 112817-16. - Install VLAN Ethernet Utility Patch: 114600-02. Press return to continue, or 'Q' followed by a return to quit: *** Installing patch 112817-16 for Solaris 9...
-
Page 42: Example 3: Packages Missing
4 - Quad GigaSwift Ethernet Adapter Please select the product to install: 1 Dual GigaSwift Ethernet Adapter Driver Installation. Copyright 2003 Sun Microsystems, Inc. All rights reserved. Use is subject to license terms. *** Checking for correct version of GigaSwift Ethernet Driver Packages... - Page 43 Use is subject to license terms. Installation of <SUNWceax> was successful. *** Installing Sun VLAN Utility packages... Copyright 2001 Sun Microsystems, Inc. All rights reserved. Installation of <SUNWvld> was successful. Copyright 2001 Sun Microsystems, Inc. All rights reserved. Installation of <SUNWvldx> was successful.
-
Page 44: Configuring The Network Host Files
Configuring the Network Host Files After installing the driver software, you must create a hostname.ce# file (Where # = the instance number of the ce interface.) for the adapter’s Ethernet interface. You must also create both an IP address and a host name for its Ethernet interface in the /etc/hosts file. - Page 45 The host name should be different from any other host name of any other interface, for example: /etc/hostname.ce0 and /etc/hostname.ce1 cannot share the same host name. The following example shows the /etc/hostname.ce# file required for a system called zardoz that has a Sun Dual Gigabit Ethernet and Dual SCSI/P adapter (zardoz-11).
- Page 46 Sun Dual Gigabit Ethernet and Dual SCSI/P Adapter Installation and User’s Guide • January 2004...
-
Page 47: Configuring Driver Parameters
C H A P T E R Configuring Driver Parameters This chapter describes how to configure the driver parameters used by the Sun Dual Gigabit Ethernet and Dual SCSI/P adapter. This chapter contains the following sections: “GigaSwift Ethernet Driver Parameter Values and Definitions” on page 29 “Setting ce Driver Parameters”... - Page 48 ce Driver Parameter, Status, and Descriptions (Continued) TABLE 3-1 Parameter Status Description Read and write Operational mode parameter adv-10hdx-cap Read and write Flow control parameter adv-asmpause-cap Read and write Flow control parameter adv-pause-cap Read and write Gigabit link clock mastership controls master-cfg-enable Read and write Gigabit link clock mastership controls...
-
Page 49: Operational Mode Parameters
Operational Mode Parameters The following parameters determine the transmit and receive speed and duplex. describes the operational mode parameters and their default values TABLE 3-2 Operational Mode Parameters TABLE 3-2 Parameter Description Local interface capability advertised by the hardware adv-autoneg-cap 0 = Forced mode 1 = Autonegotiation (default) Local interface capability advertised by the hardware... -
Page 50: Flow Control Parameters
If all these parameters are set to 1, autonegotiation will use the highest speed possible. If all these parameters are set to 0, you will receive the following error message: NOTICE: Last setting will leave ce0 with no link capabilities. WARNING: ce0: Restoring previous setting. -
Page 51: Gigabit Link Clock Mastership Controls
Gigabit Link Clock Mastership Controls The concept of link clock mastership was introduced with gigabit twisted-pair technology. One side of the link is the master that provides the link clock and the other is the slave that uses the link clock. Once this relationship is established, the link is up, and data can be communicated. -
Page 52: Table 3-6 Read-Write Interpacket Gap Parameter Values And Descriptions
You can add the additional delay by setting the ipg0 parameter from 0 to 255, which is the media byte time delay. defines the enable_ipg0 and ipg0 parameters. TABLE 3-5 Parameters Defining enable_ipg0 and ipg0 TABLE 3-5 Parameter Values Description enable_ipg0 reset enable_ipg0 enable_ipg0 set (Default=8) -
Page 53: Interrupt Parameters
Interrupt Parameters describes the receive interrupt blanking values. TABLE 3-7 RX Blanking Register for Alias Read TABLE 3-7 Field Name Values Description rx_intr_pkts 0 to 511 Interrupt after this number of packets have arrived since the last packet was serviced. A value of zero indicates no packet blanking. -
Page 54: Pci Bus Interface Parameters
RX Random Early Detecting 8-Bit Vectors TABLE 3-8 Field Name Values Description red_dv6to8k 0 to 255 Random early detection and packet drop vectors for when fifo threshold is greater than 6,144 bytes and less than 8,192 bytes. Probability of drop can be programmed on a 12.5 percent granularity. -
Page 55: Jumbo Frames
PCI Bus Interface Parameters TABLE 3-9 Parameter Description Determine the multiplication factor for granting credit to the RX rx_dma_weight side during a weighted round robin arbitration. Values are 0 to 3. (Default=0) allows the infinite burst capability to be utilized. When this is in infinite_burst effect and the system supports infinite burst. -
Page 56: Jumbo Frames With Trunking 1.3
Jumbo Frames with Trunking 1.3 When using Jumbo Frames with Trunking 1.3, you must explicitly enable Jumbo Frames on each link participating in the Trunk. To Configure Jumbo Frames Using ndd 1. Bring down and unplumb the interface before using ndd to set Jumbo Frame. 2. -
Page 57: Setting Ce Driver Parameters
Then the machine is an UltraSPARC III, and you can safely enable the infinit_burst parameter. Setting ce Driver Parameters You can set the ce device driver parameters in two ways: Using the ndd utility Using the ce.conf file If you use the ndd utility, the parameters are valid only until you reboot the system. This method is good for testing parameter settings. -
Page 58: Noninteractive And Interactive Modes
1. Check the /etc/path_to_inst file to identify the instance associated with a particular device. # grep ce /etc/path_to_inst "/pci@1e,600000/pci@4/network@0" 0 "ce" "/pci@1e,600000/pci@4/network@1" 1 "ce" In the example above, the two Gigabit Ethernet instances are from the installed adapter. The instance numbers are in bold italics for clarity. 2. -
Page 59: To Use The Ndd Utility In Interactive Mode
To display the value of a parameter, specify the parameter name and omit the value. When you omit the -set option, a query operation is assumed and the utility queries the named driver instance, retrieves the value associated with the specified parameter, and prints it: # ndd /dev/ce parameter To Use the ndd Utility in Interactive Mode... -
Page 60: Setting The Autonegotiation Mode
To list all the parameters supported by the ce driver, type ndd /dev/ce. (See through for parameter descriptions.) TABLE 3-1 TABLE 3-12 # ndd /dev/ce name to get/set ? ? (read only) instance (read and write) adv_autoneg_cap (read and write) adv_1000fdx_cap (read and write) adv_1000hdx_cap... -
Page 61: To Disable Auto-Negotiation Mode
To Disable Auto-negotiation Mode If your network equipment does not support autonegotiation, or if you want to specify your network speed, you can set autonegotiation to off on the ce device. Note – Disabling auto-negotiation mode can cause collisions. 1. Set the following driver parameters to the values that are described in the documentation that shipped with your link partner (for example, a switch): adv-1000fdx-cap adv-100fdx-cap... -
Page 62: To Set Driver Parameters Using A Ce.conf File
Note – Configuring the parameters by putting ndd commands in rcX.d scripts is not supported. The man pages for prtconf(1M) and driver.conf(4) include additional details. The next procedure shows an example of setting parameters in a ce.conf file. To access any man page, type the man command plus the name of the man page. For example, to access man pages for prtconf(1M), type: % man prtconf To Set Driver Parameters Using a ce.conf File... - Page 63 In the hardware node name, the last component after the last / character and before the @ character is the device name. The path name before the last component is the parent name. The number after the final @ character within quotes is referred to as unit-address. To identify a PCI device unambiguously in the ce.conf file, use the name, parent name, and the unit-address for the device.
-
Page 64: Usability Enhancements To The Driver
Usability Enhancements to the Driver In older Ethernet device drivers, determining the link status for a driver required a two-step process: First, you had to set the instance: # ndd -set /dev/ce instance 2 Then you had to get the link status: # ndd -get /dev/ce link_status Starting in the Solaris 9 operating system, this method of determining the link status is discouraged, and in some cases, it is removed completely as a driver feature. -
Page 65: Gigaswift Ethernet Driver Operating Statistics
GigaSwift Ethernet Driver Operating Statistics These statistics are part of the statistics presented by the netstat -k command. describes the read-only Media Independent Interface (MII) capabilities. TABLE 3-11 These parameters define the capabilities of the hardware. The Gigabit Media Independent Interface (GMII) supports all of the following capabilities. Read-Only ce Device Capabilities TABLE 3-11 Parameter... -
Page 66: Reporting The Link Partner Capabilities
Reporting the Link Partner Capabilities describes the read-only link partner capabilities. TABLE 3-12 Read-Only Link Partner Capabilities TABLE 3-12 Parameter Description 0 = No autonegotiation lp_cap_autoneg 1 = Autonegotiation 0 = No 1000 Mbit/sec full-duplex transmission lp_cap_1000fdx 1 = 1000 Mbit/sec full-duplex 0 = No 1000 Mbit/sec half-duplex transmission lp_cap_1000hdx 1 = 1000 Mbit/sec half-duplex... - Page 67 describes the netstat -k transmit and receive parameters: TABLE 3-13 Transmit and Receive Parameters TABLE 3-13 Parameter Description Number of Physical layer re-initializations every time you change link parameters using NDD this increments. xcvr_inits Revision ID of the GigaSwift Ethernet device useful for recognition rev_id of device being used in the field.
-
Page 68: Table 3-13 Transmit And Receive Parameters
Transmit and Receive Parameters TABLE 3-13 Parameter Description Number of pages that were filled with packets less than 256 bytes rx_new_hdr_pgs that got replaced during reception. Number of pages that were filled with packets greater than 256 rx_new_mtu_pgs bytes and less than 1514 that got replaced during reception. Number of pages that contained packets that were split across rx_new_nxt_pgs pages that got replaced during reception. -
Page 69: To Check Link Partner Settings
To Check Link Partner Settings If you are running the Solaris 8 operating evironment, type the netstat -k command as superuser: # netstat -k ce0 ce0: ipackets 0 ipackets64 0 ierrors 0 opackets 0 opackets64 0 oerrors 0 collisions 0 rbytes 0 rbytes64 0 obytes 0 obytes64 0 multircv 0 multixmt 0 brdcstrcv 0 brdcstxmt 0 norcvbuf 0 noxmtbuf 0 first_collision 0 excessive_collisions 0 late_collisions 0 peak_attempts 0 length_err 0 alignment_err 0 crc_err 0 code_violations 0... - Page 70 Output from the kstat Command (Continued) CODE EXAMPLE 3-1 # kstat ce:0 cap_1000hdx cap_100T4 cap_100fdx cap_100hdx cap_10fdx cap_10hdx cap_asmpause cap_autoneg cap_pause code_violations collisions crc_err crtime 2345.407585961 excessive_collisions first_collision ierrors ifspeed ipackets ipackets64 ipackets_cpu00 ipackets_cpu01 ipackets_cpu02 ipackets_cpu03 late_collisions lb_mode length_err link_T4 link_asmpause link_duplex link_pause...
- Page 71 Output from the kstat Command (Continued) CODE EXAMPLE 3-1 # kstat ce:0 obytes obytes64 oerrors opackets opackets64 pci_bad_ack_err pci_dmarz_err pci_dmawz_err pci_drto_err pci_err pci_parity_err pci_rma_err pci_rta_err peak_attempts promisc qos_mode rbytes rbytes64 rev_id rx_allocb_fail rx_hdr_drops rx_hdr_pkts rx_inits rx_len_mm rx_msgdup_fail rx_mtu_drops rx_mtu_pkts rx_new_hdr_pgs rx_new_mtu_pgs rx_new_nxt_pgs rx_new_pages...
-
Page 72: To Discover Link Partner Capabilities
Output from the kstat Command (Continued) CODE EXAMPLE 3-1 # kstat ce:0 tx_dma_hdr_bind_fail tx_dma_pld_bind_fail tx_dvma_pkts tx_hdr_pkts tx_inits tx_max_desc tx_max_pend tx_msgdup_fail tx_no_desc tx_nocanput tx_queue0 tx_queue1 tx_queue2 tx_queue3 tx_starts tx_uflo xcvr_addr xcvr_id 2121809 xcvr_inits xcvr_inuse To Discover Link Partner Capabilities Use the kstat command to discover link partner capabilities. # kstat ce:0 | grep lp_ lp_cap_1000fdx lp_cap_1000hdx... -
Page 73: To Discover Link Settings
To Discover Link Settings Use the kstat command to discover link settings. # kstat ce:0 | grep link link_T4 link_asmpause link_duplex link_pause link_speed 1000 link_up Configuration Checking The jumbo frame configuration checking occurs at Layer 2 and Layer 3, depending on the configuration methods. - Page 74 Sun Dual Gigabit Ethernet and Dual SCSI/P Adapter Installation and User’s Guide • January 2004...
-
Page 75: Specifications
A P P E N D I X Specifications This appendix lists the specifications for the Sun Dual Gigabit Ethernet and Dual SCSI/P adapter. It contains the following sections: “Physical Characteristics” on page 57 “Performance Specifications” on page 58 “Power Requirements” on page 58 Physical Characteristics Dimension Measurement... -
Page 76: Performance Specifications
Performance Specifications Feature Specification PCI clock 33/66 MHz max. PCI data burst transfer rate 1up to 64-byte bursts SCSI synchronous transfer rate 20 x 80 MBytes/sec. SCSI asynchronous transfer rate Max. 12 MBytes/sec 16-bit Max. 6 MBytes/sec 8-bit Data burst size 4 GByte max. -
Page 77: Installing The Software Manually
A P P E N D I X Installing the Software Manually This appendix describes how to install the driver software manually. It contains the following sections: “Installing the Driver Software Manually” on page 59 “Verifying Patches” on page 62 Installing the Driver Software Manually The Sun Dual Gigabit Ethernet and Dual SCSI/P Adapter CD contains the driver software required to operate the adapter. -
Page 78: Table 3-14 Files And Directories On The Cd-Rom
If your system is not running Volume Manager, mount the CD-ROM as follows: # mkdir /cdrom # mkdir /cdrom/cdrom0 # mount -F hsfs -o ro /dev/dsk/c0t6d0s2 /cdrom/cdrom0 You will see the following files and directories in the /cdrom/sun_gigaswift_ethernet_driver directory or the /cdrom/cdrom0 directory, depending on how you mounted the CD-ROM. - Page 79 If the output of the command is similar to the example in Step 3, skip to Step 6. If nothing is reported back on SUNWced or SUNWcedx, then follow Step 4 and select SUNWcea, SUNWceax, SUNWced.u, SUNWcedx.u, SUNWcedu, and SUNWcem (if present). If nothing is reported back for SUNWvld or SUNWvldx, then follow Step 4 and select SUNWvld, SUNWvldx, SUNWvldu packages.
-
Page 80: Verifying Patches
5. Select the packages you want to install: Press Return or type to accept the default and install all packages (if neither the GigaSwfit Ethernet Driver nor VLAN Utility packages are installed). Type the numbers of all but the optional packages if you prefer not to install them. -
Page 81: To Install Patches
To Install Patches 1. Determine the version of the Solaris operating system your system is running: % cat /etc/release Solaris 9 8/03 s9s_u4wos_08a SPARC Copyright 2003 Sun Microsystems, Inc. All Rights Reserved. Use is subject to license terms. Assembled 13 June 2003 2. -
Page 82: To Install A Sun Vlan Utility Patch
Note – The VLAN Utility is only supported in Solaris 8 and Solaris 9 software. 1. Determine the version of the Solaris operating system your system is running: % cat /etc/release Solaris 9 8/03 s9s_u4wos_08a SPARC Copyright 2003 Sun Microsystems, Inc. All Rights Reserved. Use is subject to license terms. Assembled 13 June 2003... - Page 83 2. Verify patch versions for the VLAN utility software: To verify patches for Solaris 8 Operating Systems, type the following: # showrev -p | grep 112119 The patch version should be -04 or greater. To verify patches for Solaris 9 Operating Systems, type the following: # showrev -p | grep 114600 Verify that the patch version is -02 or higher.
- Page 84 Sun Dual Gigabit Ethernet and Dual SCSI/P Adapter Installation and User’s Guide • January 2004...
-
Page 85: Interface Signals
A P P E N D I X Interface Signals This appendix provides information for both the Ethernet and SCSI interface signals. It includes the following sections: “PCI Adapter Connectors” on page 67 “Single-End SCSI-2 Connector Signals” on page 68 “RJ-45 Connector Signals”... -
Page 86: Single-End Scsi-2 Connector Signals
Single-End SCSI-2 Connector Signals Single-End SCSI-2 Connector Signals TABLE C-1 Signal Signal SCSI_GND SCSI_D<12>_ SCSI_GND SCSI_D<13>_ SCSI_GND SCSI_D<14>_ SCSI_GND SCSI_D<15>_ SCSI_GND SCSI_DATA_PARITY1_ SCSI_GND SCSI_D<0>_ SCSI_GND SCSI_D<1>_ SCSI_GND SCSI_D<2>_ SCSI_GND SCSI_D<3>_ SCSI_GND SCSI_D<4>_ SCSI_GND SCSI_D<5>_ SCSI_GND SCSI_D<6>_ SCSI_GND SCSI_D<7>_ SCSI_GND SCSI_DATA_PARITY0_ SCSI_GND SCSI_GND SCSI_GND... -
Page 87: Rj-45 Connector Signals
Single-End SCSI-2 Connector Signals (Continued) TABLE C-1 Signal Signal SCSI_GND SCSI_SEL_ SCSI_GND SCSI_CD_ SCSI_GND SCSI_REQ_ SCSI_GND SCSI_IO_ SCSI_GND SCSI_D<8>_ SCSI_GND SCSI_D<9>_ SCSI_GND SCSI_D<10>_ SCSI_GND SCSI_D<11>_ RJ-45 Connector Signals RJ-45 Connector Signals TABLE C-2 Signal Transmit+ Transmit- Receive+ No Connection No Connection Receive- No Connection No Connection... - Page 88 Sun Dual Gigabit Ethernet and Dual SCSI/P Adapter Installation and User’s Guide • January 2004...
-
Page 89: Diagnostic Software And Troubleshooting Issues
A P P E N D I X Diagnostic Software and Troubleshooting Issues This appendix provides an overview of the SunVTS diagnostic application and instructions for testing the adapter using the onboard FCode self-test. There is also a section outlining some common troubleshooting issues. This appendix contains the following sections: “SunVTS Diagnostic Software”... -
Page 90: Using The Sunvts Netlbtest
Refer to the SunVTS documentation (listed in ) for instructions on how to TABLE D-1 run and monitor the nettest diagnostic. These SunVTS documents are available on the Solaris on Sun Hardware Collection, which is provided on the Solaris Supplement CD for the Solaris release on your system. -
Page 91: Using The Openboot Prom Fcode Self-Test
Using the OpenBoot PROM FCode Self- Test The Sun Dual Gigabit Ethernet and Dual SCSI/P adapter’s self-test verifies the correct operation of the adapter and identifies any hardware problems with the adapter. The self-test is a suite of tests that reside in the adapter’s FCode PROM. You can only invoke the FCode self-test diagnostics using the OpenBoot PROM test or test-all commands. - Page 92 4. Set the diag-switch? parameter to true in order to see the diagnostic power-on self-test (POST) messages. ok setenv diag-switch? true 5. Reset the system to activate these parameter changes. ok reset-all 6. Use the show-nets command to display the list of network devices on the system.
- Page 93 Note – To test all of the interfaces of the adapter, you will need to execute the test command separately for each SUNW,ce interface. If all of the tests pass, you will see these messages: ok test pci@1e,600000/pci@4/network@1 Testing pci@1e,600000/pci@4/network@1 Register tests: passed Internal loopback test: passed pci@1e,600000/pci@4/network@1: 1000 Mbps full duplex link up...
- Page 94 10. Reset and reboot the system. ok reset-all Refer to the system’s documentation for the correct procedures for bringing up the system. Sun Dual Gigabit Ethernet and Dual SCSI/P Adapter Installation and User’s Guide • January 2004...
-
Page 95: Index
Index SYMBOLS Dynamic Reconfiguration (DR), 19 /etc/hostname.cenumber file, 26 editing the network host files, xv, 7 adapter backplate illustration, 67 assigning an IP address, 26 autonegotiation files and directories on the CD-ROM, 60 setting flow control keywords, 32 disabling, 42 hardware backplate connectors, 67 local transceiver, 1... - Page 96 local-mac-address property, 15, 17 SCSI cable requirements, 4 connector, 68 self-test diagnostics, 73 MAC address, 17 setting ce driver parameters mac-address property, 17 using ndd Media Access Control (MAC), 17 using ce.conf, 39 show-nets command output, 74 SunVTS documentation, 72 SunVTS diagnostic application, 71 ndd utility, 39 SUNW,qfe devices, 74...
Need help?
Do you have a question about the x4422a and is the answer not in the manual?
Questions and answers