
Related Manuals for Audio Technica ATR2500x-USB


Summary of Contents for Audio Technica ATR2500x-USB
-
Page 1: Table Of Contents
ATR2500x-USB Cardioid Condenser USB Microphone User Manual Contents Introduction & features Setting up your microphone with pivot mount & desk stand Preliminary setup with MacOS Mojave Advanced setup with MacOS Mojave Preliminary setup with Windows 10 Advanced setup with Windows 10... -
Page 2: Introduction & Features
The ATR2500x-USB also features a built-in headphone jack with volume control that allows you to directly monitor your microphone’s output during recording. The microphone’s focused pickup pattern delivers excellent off- axis rejection, while its A/D converter with up to 24-bit, 192 kHz sampling rate ensures clear, articulate sound reproduction. -
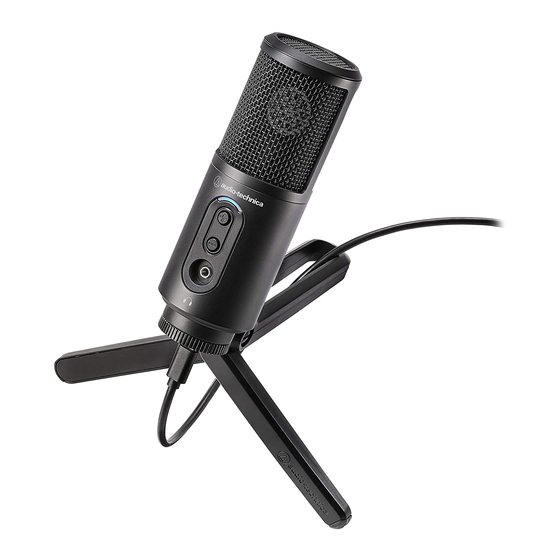
Page 3: Setting Up Your Microphone With Pivot Mount & Desk Stand
ATR2500x-USB Setup Stand clamp Headphone volume USB-A USB-C 3.5 mm (⅛") headphone jack Tripod desk stand For desktop use When connecting the microphone to a USB-C port, Screw the microphone into the threaded portion of you must use a USB On-The-Go (USB OTG) cable the tripod desk stand. -
Page 4: Preliminary Setup With Macos Mojave
If you are using MacOS Mojave, you must enable software access to the microphone, using the security and privacy settings. 1. Connect the ATR2500x-USB microphone to an open USB port on the Mac (Type A or Type C). Open the system preferences by clicking the Apple logo in the upper left corner of the menu bar and selecting System Preferences. - Page 5 If you are using MacOS Mojave, you must enable software access to the microphone, using the security and privacy settings. 1. In order to use the ATR2500x-USB microphone with certain applications you need to verify that the apps are enabled to have access to the microphone.
- Page 6 Preliminary setup with MacOS Mojave (continued) 2. To make changes, you will need to unlock the padlock on the Security and Privacy window by entering your user name and password. Scroll down to make certain the apps you want to use the microphone with are enabled. If not, use the switch slider associated with the App to turn it on.
-
Page 7: Advanced Setup With Macos Mojave
Advanced Sound Settings 1. At this point the Mac is set up to use the ATR2500x-USB microphone as the input device and your selection as the output device. The sample rate is set for the default value (44.1 KHz CD Quality). However, additional settings are available that enable you to change the audio sampling rate and individually adjust left and right input signal levels if you desire. - Page 8 Advanced setup with MacOS Mojave (continued) 3. The ATR2500x-USB is capable of very high-quality recording and supports sample rates of up to 192 KHz. In some situations higher sample rates can provide better results. However, as the sample rate increases, the file size becomes much larger.
-
Page 9: Preliminary Setup With Windows 10
After the first time, you will not see any of these as the computer has already installed the necessary drivers for a USB microphone. When the ATR2500x-USB microphone is connected, Windows 10 will automatically select it as the input and output device. - Page 10 At this point, your computer is set up to use the ATR2500x-USB microphone as the audio input device and whatever you chose as the audio output device. However, in the recent versions of Windows 10, Microsoft has instituted some additional privacy settings, allowing users to control which apps and programs have access to the microphone.
-
Page 11: Advanced Setup With Windows 10
Advanced setup with Windows 10 At this point Windows 10 is set up to use the ATR2500x-USB microphone as the input and output device. The sample rate is set for the Windows default (44.1 KHz CD Quality). However, additional settings are available, including input level and sampling rate. - Page 12 Advanced setup with Windows 10 (continued) 5. The ATR2500x-USB is capable of very high-quality recording and supports sample rates of up to 192 KHz. In some situations higher sample rates can provide better results. However, as the sample rate increases, the file size becomes much larger.
- Page 13 With recent updates to Windows 10, Microsoft has included a privacy setting allowing you to control which apps have access to the microphone. In order to use the ATR2500x-USB microphone with certain applications you need to verify that the apps are enabled to have access to the microphone.
- Page 14 Advanced setup with Windows 10 (continued) 3. Scroll down to make certain the apps you want to use the microphone with are enabled. If not use the switch slider associated with the app to turn it on. 4. Scroll down to the section ”Allow desktop apps to access your microphone” and verify that the switch is turned on.
-
Page 15: Using Headphones
Additional Information Using Headphones " (3.5 mm) headphone jack on the bottom of the microphone allows you to directly monitor your recording with a pair of headphones. When your preliminary setup is completed, and your USB microphone is connected to your computer’s USB port (the microphone’s blue LED is illuminated), plug your headphones into the headphone jack on the bottom of the microphone. -
Page 16: Specifications
ATR2500x-USB Specifications † Element: Condenser Polar Pattern: Cardioid Frequency Response: 30 – 15,000 Hz Power Requirements: USB Power (5V DC) Bit Depth: Up to 24 bit Sample Rate: 44.1 kHz/48 kHz/96 kHz/192 kHz Controls: Headphone volume (up/down) buttons Weight: 366 g (12.9 oz) Dimensions: 155.0 mm (6.10") long, 50.0 mm (1.97") maximum body diameter... -
Page 17: Warranty
ATR2500x-USB U.S. Lifetime Limited Warranty This product is warranted in the U.S.A. by Audio-Technica U.S., Inc. (A.T.U.S.) for the lifetime of the original purchaser. During the warranty period, A.T.U.S. will repair or replace these products, provided they are sent prepaid to the address below, with proof of original purchase and $15.00 for handling and return to a U.S.
Need help?
Do you have a question about the ATR2500x-USB and is the answer not in the manual?
Questions and answers