Table of Contents
Advertisement
WIDOS
Wilhelm Dommer Söhne
GmbH
Working Instructions
Headquarters: D-71254 Ditzingen-Heimerdingen country court Stuttgart HRB 200973 managing director: Jürgen Dommer, Dr. Kai Dombrowski
Einsteinstr. 5
D-71254 Ditzingen-Heimerdingen
Internet: www.widos.de
Translation
Band Saw RS 630-1200
Keep for further use!
Phone ++49 7152 / 9939 0
Fax
++49 7152 / 9939 40
email: info@widos.de
Advertisement
Table of Contents

Related Manuals for widos RS 630

Summary of Contents for widos RS 630
-
Page 1: Working Instructions
Wilhelm Dommer Söhne D-71254 Ditzingen-Heimerdingen ++49 7152 / 9939 40 GmbH Internet: www.widos.de email: info@widos.de Working Instructions Translation Band Saw RS 630-1200 Keep for further use! Headquarters: D-71254 Ditzingen-Heimerdingen country court Stuttgart HRB 200973 managing director: Jürgen Dommer, Dr. Kai Dombrowski... -
Page 2: Product Identification
Address of manufacturer WIDOS W. Dommer Söhne GmbH Einsteinstr. 5 D -71254 Ditzingen-Heimerdingen Phone: ++49 7152 99 39 0 Fax: ++49 7152 99 39 40 E-mail: info@widos.de Website: www.widos.de 22.06.2015 Working instructions WIDOS RS 630 - 1200 Page 2 of 62... - Page 3 6/22/2015 WIDOS W. Dommer Söhne GmbH Einsteinstraße 5 D–71254 Ditzingen–Heimerdingen All rights reserved. Reprinting only allowed with permission of the corporation. Any changes prior to technical innovations. 22.06.2015 Working instructions WIDOS RS 630 - 1200 Page 3 of 62...
-
Page 4: Table Of Contents
Elements at the front side – manual travel....................19 4.3. Control panel (complete equipment) ......................20 4.3.1. Overload release in the control panel (automatic travel) ..................21 4.3.2. Overload release in the control panel (manual travel)..................21 22.06.2015 Working instructions WIDOS RS 630 - 1200 Page 4 of 62... - Page 5 How to remove the cuttings from the saw arm ...................46 6.4. How to adjust the saw arm ...........................46 6.5. How to adjust the saw blade ........................47 6.6. How to exchange the saw blade........................48 22.06.2015 Working instructions WIDOS RS 630 - 1200 Page 5 of 62...
- Page 6 Contents 6.7. Clean / renew the chip bag (optional) ......................49 6.8. Disposal .................................49 PNEUMATIC AND ELECTRIC DIAGRAMS ..................... 50 DECLARATION OF CONFORMITY ......................62 22.06.2015 Working instructions WIDOS RS 630 - 1200 Page 6 of 62...
-
Page 7: Description Of The Product
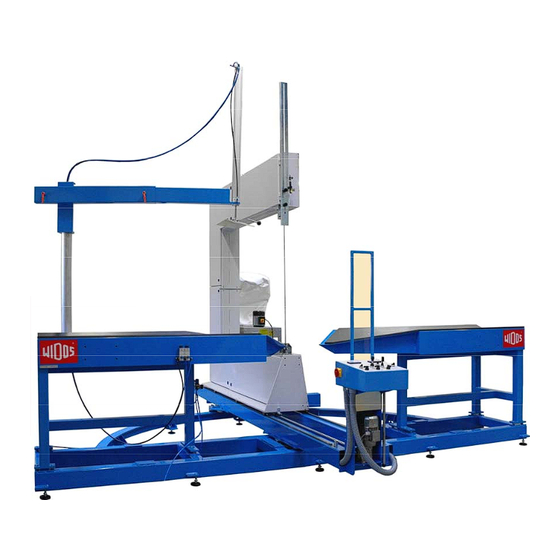
Usage and purpose-oriented use The WIDOS band saw RS 630 / 800 / 1000 / 1200 is a special machinery for straight cutting plastic pipes up to Ø 630 / Ø800 / Ø1000 / Ø 1200 mm , and for cutting angles of max. 45° on both sides, max. 67,5° on one side, in the way described as follows. -
Page 8: Designation Of The Product
RS 1000 1200 mm RS 1200 Cutting speed: 120 m/min Weight: RS 630 appr. 1,2 t RS 800 appr. 2,0 t RS 1000 + RS 1200 appr. 2,3 t 22.06.2015 Working instructions WIDOS RS 630 - 1200 Page 8 of 62... -
Page 9: Technical And Electrical Data Of The Laser
Current: 6,8 A Speed of saw motor/feed motor 93 rpm Voltage feed motor: 3 * 230 V Power 0,37 kW Current: 1,5 A Speed feed motor 280 rpm 22.06.2015 Working instructions WIDOS RS 630 - 1200 Page 9 of 62... -
Page 10: Equipment And Accessories
RS 1000 Saw blade 8540 x 0,9 x 20 mm / 4 KSW 1,8 RS 1200 Saw blade 9340 x 0.9 x 20 mm / 4 KSW 1,8 22.06.2015 Working instructions WIDOS RS 630 - 1200 Page 10 of 62... -
Page 11: Wear Parts List
Ratchet tie down (for clamping branch pipe) J5431 Sliding plate (22,5°) 54414053 RS 630 / 800 Sliding plate (45°) 54414054 2 each Sliding plate (22,5°) 54411053 RS 1000 / 1200 Sliding plate (45°) 54411054 22.06.2015 Working instructions WIDOS RS 630 - 1200 Page 11 of 62... -
Page 12: Safety Rules
T h e r e g u l a t i o n s f o r t h e p r e v e n t i o n o f a c c i d e n t s a r e v a l i d ( U V V ) . 22.06.2015 Working instructions WIDOS RS 630 - 1200 Page 12 of 62... -
Page 13: Obligations Of The Owner
A person who is being trained may only work at the machine under supervision of an experienced person. 22.06.2015 Working instructions WIDOS RS 630 - 1200 Page 13 of 62... -
Page 14: Dangers While Handling The Machine
2.7. Dangers while handling the machine The band saw WIDOS RS 630 / 800 / 1000 / 1200 is constructed according to the latest technical standard and the acknowledged technical safety rules. However, dangers for the operator or other persons standing nearby may occur. Also material damages are possible. -
Page 15: Specific Dangers
- while mounting or dismounting the circular cutting device. Please make sure that the device is secured by a belt against an unintentional swiveling (chapter: 5.6.1 and 5.6.2). 22.06.2015 Working instructions WIDOS RS 630 - 1200 Page 15 of 62... -
Page 16: Danger Of Injury By Noise
Machine parts which are not in a perfect condition are to be replaced immediately. Only use original WIDOS spare and wear parts. In case of purchase orders please always state the machine and version number! 2.13. Warranty and liability Fundamentally our "General Sales and Delivery Conditions"... -
Page 17: Functional Description
Drive the saw blade towards the pipe at a short distance. Switch on the sawing motor and cut the pipe through. When the cutting operation is completed, switch off saw blade motor and move the saw backwards. 22.06.2015 Working instructions WIDOS RS 630 - 1200 Page 17 of 62... -
Page 18: Operating And Indicating Elements
Protective shield Saw blade Vacuum and multi-pole socket for vacuum (optional) Control panel with main switch Hand lever to swivel the saw arm Leveling foot, to adjust the machine 22.06.2015 Working instructions WIDOS RS 630 - 1200 Page 18 of 62... -
Page 19: Elements At The Front Side - Manual Travel
Vacuum and multi-pole socket for vacuum Control panel with main switch Hand lever to swivel the saw arm Leveling foot, to adjust the machine Hand wheel; for the transverse course 22.06.2015 Working instructions WIDOS RS 630 - 1200 Page 19 of 62... -
Page 20: Control Panel (Complete Equipment)
0 (off) / 1 (on) 25 * Turning switch: to switch the detent transverse course: 0 (off) / 1 (on) * Operating elements optional 22.06.2015 Working instructions WIDOS RS 630 - 1200 Page 20 of 62... -
Page 21: Overload Release In The Control Panel (Automatic Travel)
Switch off the main switch, open the control panel, lift the cover carefully and hold it. Turn in the fuse, close the control panel and switch on the main switch again. 22.06.2015 Working instructions WIDOS RS 630 - 1200 Page 21 of 62... -
Page 22: Elements At The Right Side
Rear lower deflection pulley with set screws and eccentric for saw band tension Holder for vacuum (optional) Cylinder for clamping the angle setting Center bolt for angle fixing 0° manual 22.06.2015 Working instructions WIDOS RS 630 - 1200 Page 22 of 62... -
Page 23: Upper Saw Arm With Laser And Saw Blade Cover
The laser is switched on (1) / off (0) over the switch: <Laser> on the control panel. For adjusting the laser exactly, please refer to the attached operating manual of the manufacturer. 22.06.2015 Working instructions WIDOS RS 630 - 1200 Page 23 of 62... -
Page 24: Lower Blade Guiding With Connection For Vacuum (Optional)
The saw blade runs through the saw blade guidings at the upside and at the downside. It is lead through the two rollers for guiding and carbide guides. 22.06.2015 Working instructions WIDOS RS 630 - 1200 Page 24 of 62... -
Page 25: Upper Saw Blade Guiding, Flexible (Optional)
If the saw blade guiding is on the right spot, first tighten the clamping lever and then the star screws again. Upper saw blade guiding Lower saw blade guiding 22.06.2015 Working instructions WIDOS RS 630 - 1200 Page 25 of 62... -
Page 26: Vacuum (Optional)
Always activate the switch at the vacuum motor; evacuating is done via the switch at the operator panel (chapter: 4.3, No. 24). For the operation, maintenance, repair etc. please consult the separately included working instructions for the vacuum. 22.06.2015 Working instructions WIDOS RS 630 - 1200 Page 26 of 62... -
Page 27: Fixing The Position: 0° (Automatic Travel) (Optional)
Then swivel the saw bow slowly into position 0° and the stop bolt – supported by a spring – snaps in the bored hole of the swiveling device. • For cutting angles lift the ring screw again and swing the locking bolt in a different position 22.06.2015 Working instructions WIDOS RS 630 - 1200 Page 27 of 62... -
Page 28: Fixing The Position: „Pipe Center" (Automatic Travel)
Release the joystick. Each time you switch the saw on: Press button: <> on the scale: as long as the display indicates 0,0. Now the saw blade distance is set. 22.06.2015 Working instructions WIDOS RS 630 - 1200 Page 28 of 62... -
Page 29: Stop For Position „Center Of Pipe" (Manual Travel)
For that purpose release the fixing screws, displace the pipe supports in the oblong holes (see arrow) and tighten again the screws. Pipe support Fixing screw (4 pieces) 22.06.2015 Working instructions WIDOS RS 630 - 1200 Page 29 of 62... -
Page 30: Circular Cutting Devices (Optional)
Image of the small circular cutting device: Prism and support, for swivelling to angle 30° + 45° Swivel arm with handle Basic plate for adjusting the cutting radius 22.06.2015 Working instructions WIDOS RS 630 - 1200 Page 30 of 62... -
Page 31: Starting And Operating
Starting For starting the operation, the band saw RS 630 / 800 / 1000 / 1200 has to be adjusted by means of the screws in the machine feet in such a way that the pipe support and the saw blade guiding are horizontal. -
Page 32: How To Adjust The Compressed Air Regulator
Adjust the 0° position of the angle (see chapter: 4.10 or 4.11) And also adjust the saw blade distance if the saw comes with automatic travel. (see chapter: 4.12) 22.06.2015 Working instructions WIDOS RS 630 - 1200 Page 32 of 62... -
Page 33: How To Clamp The Pipes
You may adjust the clamping pressure by the pressure regulator. Make sure that the pipe is clamped tightly but not deformed. Having completed cutting, press <> in order to drive the pipe clamp upwards again. 22.06.2015 Working instructions WIDOS RS 630 - 1200 Page 33 of 62... -
Page 34: How To Clamp With The Clamping Belt (Optional)
Noise exceeding 80 dB (A) may occur; during sawing it is obligatory to wear ear protection! Always swivel the saw by means of the hand lever; never use the control panel or the crank for swiveling the saw! 22.06.2015 Working instructions WIDOS RS 630 - 1200 Page 34 of 62... -
Page 35: How To Saw Pipes With 67,5° - 0° - 45° With Automatic Travel
Shut off the laser by putting the switch to position <0>. Shut off the vacuum by putting the switch to position <0>. Now you can remove the cut pipe pieces. 22.06.2015 Working instructions WIDOS RS 630 - 1200 Page 35 of 62... -
Page 36: How To Saw Pipes With 67,5° - 0° - 45° With Manual Travel
<0>. Shut off the vacuum by putting the switch to position <0>. Unclamp the clamped pipe end. Now the cut pipe parts can be removed. 22.06.2015 Working instructions WIDOS RS 630 - 1200 Page 36 of 62... -
Page 37: Mounting The Circular Cutting Device
pneumatic hose „blue“ from cylinder to rear connector pneumatic hose „black“ from cylinder to front connector pneumatic hose „blue“ from pressure control valve to T-piece of centre connector 22.06.2015 Working instructions WIDOS RS 630 - 1200 Page 37 of 62... -
Page 38: Circular Cutting Device Od 400 (Optional)
Between swiveling arm and trailing edge of the operator panel, there must be a gap of at least 50 mm. 22.06.2015 Working instructions WIDOS RS 630 - 1200 Page 38 of 62... -
Page 39: Circular Cutting Device Od 600 (Optional)
Suspend the lifting belts from the crane in a way that the circular cutting device is hanging parallel to the machine and may be placed into the machine from the right. 22.06.2015 Working instructions WIDOS RS 630 - 1200 Page 39 of 62... - Page 40 Take care that the central lifting belts must have different length so that the circular cutting device is suspended horizontally. Example: Short lifting belts appr. 1100 mm and long lifting belted appr. 1450 mm 22.06.2015 Working instructions WIDOS RS 630 - 1200 Page 40 of 62...
- Page 41 If you remove the circular cutting device, first remove the brackets and don’t put the circular cutting device onto the supports. The brackets are intended for align. 22.06.2015 Working instructions WIDOS RS 630 - 1200 Page 41 of 62...
-
Page 42: How To Adjust The Circular Cutting Device
Swivel the cutting device in a way that the saw blade is alongside the prism center. The gap to the saw blade is recommended to be appr. 15 – 20 mm. 22.06.2015 Working instructions WIDOS RS 630 - 1200 Page 42 of 62... -
Page 43: Adjust Angle For Branch Pipe 45° And 60
For a 45° angle branch the long fixings are mounted, for a 60° angle branch the short ones. Tighten the pipe with the clamping belt in a way that the belt cannot be damaged during the cutting process! 22.06.2015 Working instructions WIDOS RS 630 - 1200 Page 43 of 62... -
Page 44: How To Clamp The Branch Pipe
As soon as you have cut the pipe through, release the joystick: shutting the saw blade motor off. Shut off the vacuum by putting the switch to position <0>. Release the clamping belt. 22.06.2015 Working instructions WIDOS RS 630 - 1200 Page 44 of 62... -
Page 45: Maintenance / Storage / Transport
For machines with a specially high usage percentage the testing cycle should be shortened. The work should be performed at the WIDOS GmbH company or by an authorized partner. The linear guides for heating element and planer must be cleaned every week e.g. with a brush. -
Page 46: How To Remove The Cuttings From The Saw Arm
Then swivel the saw arm manually to check if the rollers run well. Fit screw Set screw Swiveling device Supporting holder Saw arm 22.06.2015 Working instructions WIDOS RS 630 - 1200 Page 46 of 62... -
Page 47: How To Adjust The Saw Blade
Then secure the position of the eccentric by tightening the counternut. The tension is released in the same way (e.g. in order to exchange the saw blade). 22.06.2015 Working instructions WIDOS RS 630 - 1200 Page 47 of 62... -
Page 48: How To Exchange The Saw Blade
Turn the saw blade manually (do wear gloves!) in order to check its constant running; in case the running is not correct, repeat alignment (chapter:6.5). Afterwards, shut the doors of the saw arm. Activate the main switch of the saw. 22.06.2015 Working instructions WIDOS RS 630 - 1200 Page 48 of 62... -
Page 49: Clean / Renew The Chip Bag (Optional)
At the end of their lifetime, the machine and the wear parts have to be disposed of properly and environment-friendly, in accordance with the national laws regulating waste disposal. 22.06.2015 Working instructions WIDOS RS 630 - 1200 Page 49 of 62... -
Page 50: Pneumatic And Electric Diagrams
WIDOS Einsteinstr. 5 Phone ++49 7152 / 9939 0 Wilhelm Dommer Söhne D-71254 Ditzingen-Heimerdingen ++49 7152 / 9939 40 GmbH Internet: www.widos.de email: info@widos.de Pneumatic and electric diagrams 22.06.2015 Working instructions WIDOS RS 630 - 1200 Page 50 of 62... - Page 51 Electric and pneumatic diagrams Chapter 7 22.06.2015 Working instructions WIDOS RS 630 - 1200 Page 51 of 62...
- Page 52 Electric and pneumatic diagrams Chapter 7 22.06.2015 Working instructions WIDOS RS 630 - 1200 Page 52 of 62...
- Page 53 Electric and pneumatic diagrams Chapter 7 22.06.2015 Working instructions WIDOS RS 630 - 1200 Page 53 of 62...
- Page 54 Electric and pneumatic diagrams Chapter 7 22.06.2015 Working instructions WIDOS RS 630 - 1200 Page 54 of 62...
- Page 55 Electric and pneumatic diagrams Chapter 7 22.06.2015 Working instructions WIDOS RS 630 - 1200 Page 55 of 62...
- Page 56 Electric and pneumatic diagrams Chapter 7 22.06.2015 Working instructions WIDOS RS 630 - 1200 Page 56 of 62...
- Page 57 Electric and pneumatic diagrams Chapter 7 22.06.2015 Working instructions WIDOS RS 630 - 1200 Page 57 of 62...
- Page 58 Electric and pneumatic diagrams Chapter 7 22.06.2015 Working instructions WIDOS RS 630 - 1200 Page 58 of 62...
- Page 59 Electric and pneumatic diagrams Chapter 7 22.06.2015 Working instructions WIDOS RS 630 - 1200 Page 59 of 62...
- Page 60 Electric and pneumatic diagrams Chapter 7 22.06.2015 Working instructions WIDOS RS 630 - 1200 Page 60 of 62...
- Page 61 Electric and pneumatic diagrams Chapter 7 22.06.2015 Working instructions WIDOS RS 630 - 1200 Page 61 of 62...
-
Page 62: Declaration Of Conformity
Band Saw WIDOS RS 630 / 800 / 1000/ 1200 to which this declaration refers corresponds to the following norms and normative documents: 1. DIN EN ISO 12100 – 1 and 2 (replacement for DIN EN 292 parts 1 and 2) Safety of machines, basic terminology, general guidelines for design 2.
Need help?
Do you have a question about the RS 630 and is the answer not in the manual?
Questions and answers