Table of Contents
Advertisement
Advertisement
Table of Contents

Related Manuals for PATROLLINE HPS 548N


Summary of Contents for PATROLLINE HPS 548N
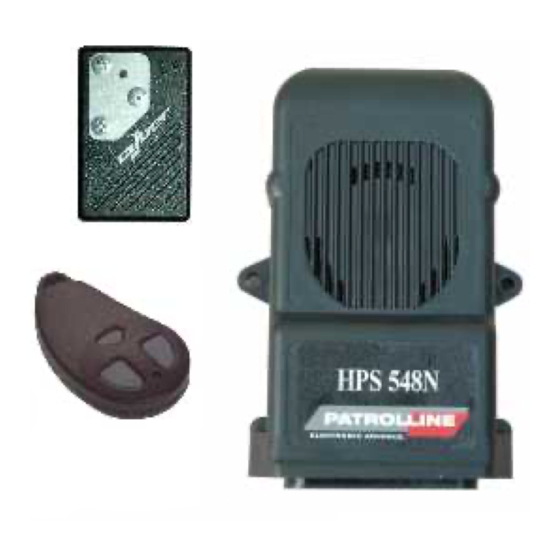
- Page 1 We ask you to read carefully this manual and save it for any future reference. Hps 548N is an alarm that can be used for the protection of mopeds, scooters or motorcycles. 548N 22 GIU 2008...
- Page 2 s ........ 9 x ..................2 t ............12 g ........3 s ......13 l ............. 4 g ..........13 n ............... 5 e ..............14 e ................5 s ............15 m ..................5 g ......16 s ......5 d ............
- Page 3 User’s manual Thank you for choosing one of our products. HPS 548N is an innovative alarm system for motorcycles and scooters endowed with rolling code remote control and with many possibilities of customisation. It has all the “typical” features of the high class models and some extra functions, as: emergency blinkers, “smart” indicator for blinkers on and customisable pin code for release, all programmable directly though remote control.
- Page 4 immobilization. Signalling of alarm memory – when needed (indicator lights and The HPS 548N is endowed with 1 beep). remote control and 1 C YBER EMERGENCY RESET: n case of emergency, due to electromagnetic fields or radio frequency interferences, it is possible to press the button “C”...
- Page 5 During the first 5 seconds of arming (LED fixed), pressing the “button B” of the remote control it is possible to exclude the siren operation. Two acoustic signals will confirm that the siren sound has been excluded. In this case the central unit will signal the alarm state only by the flashing of the indicators lights. Warning: in case the ignition key is turned on or the “button B”...
- Page 6 “beeps” equal to the happened alarms (max 7 signalling). HPS 548N is endowed with buffer batteries that guarantee its operation also in the case the cable that connects the battery to the electric plant of the vehicle is cut. The battery backup is automatically armed when the black connector of the alarm wiring is connected.
- Page 7 If the procedure is not correct, the alarm will emit a beep but it won't turn on the LED of the vehicle and the code of release won't result changed. Hps 548N has the possibility to modify the most common features by following this procedure: With the system disarmed (LED off), compose the “secret code of release” by the ignition key (see paragraph “Use of the Secret Code Of Release”).
- Page 8 A beep will confirm that the modification procedure is started. Depress in the same time the “button A” and the “button B” of the remote control. Maintain the buttons depressed until you get the beeps corresponding to the function you want to modify. Once reached the position that you want to modify, release the buttons of the remote control.
- Page 9 Casual Anti-Aggression Activation BEEPS ISARMED It is possible to verify the state of the 14 functions programmed by the acute or deep sounds given by the alarm. With the system disconnected (LED off), compose the “secret code of release” by the ignition key (see paragraph “Use of the Secret Code Of Release”) At the end, the indicator lights will quickly flash to confirm that the code of release is correct.
- Page 10 Using the vehicle, it can happen to forget an indicator light inserted. In this case, after 32 flashes of the indicator light (right or left indifferently), the alarm will signal this forgetfulness to the driver with a brief acoustic signal. If the indicator light remains activated (e.g.
- Page 11 Disarming the function in phase of activation (LED ON Fixed) is possible with the reception of C signal, by depressing YBER the anti-aggression button or turning ON the ignition key. Accidental Anti-disarming Every time the alarm is disconnected, a timer of 30 seconds starts, signalled by the fixed lighting of the LED on the dashboard, that provides to reactivate the same.
- Page 12 12. Exclusion of arming by C YBER Normally, when we go away from the vehicle, C provides to insert the system. Activating this function, arming the YBER system will be possible exclusively from the remote control. Activating this function, C will be still able to torn off YBER autonomously the anti-aggression, passive arming, automatic arming and automatic rearming functions.
- Page 13 The phase of regulation finishes turning the ignition key in position OFF or after 6 seconds from the last pressure on the buttons of the remote control. In case of lack of feeding, the central unit restores the sensibility set by factory. It is possible to reset all the programmed functions and to bring the alarm in the basic configuration, in the case you are not sure about the programmed functions and you want to cancel all them (as reported in the programming table).
- Page 14 During this time (LED on), depress any key of the new remote control to be combined to the alarm. An acoustic signal and the turning off of the LED will signal that the learning is completed. Note. To learn C it is necessary to do this procedure another time BUT instead of pressing the button “A”...
- Page 15 Warning: these instructions are valid only for generic wirings, for all the models of two wheeled vehicles Function Colour of cable Connection Connect to a cable that always furnishes the positive and that has the section of at least 1 Positive power .
- Page 16 CONNECT BEFORE THE WHITE CONNECTOR AND AFTER THE BLACK CONNECTOR AT THE INSTALLATION END 1 BROWN/WHITE 8 7 6 5 1 GRAY 2 RED 2 RED led 4 3 2 1 3 BROWN/BLACK 4 BLACK 4 GRAY/BLACK Conn. 2 5 BROWN 5 YELLOW/RED Conn.
- Page 17 WARNING: These instructions are valid only for generic wirings, for all the types of two wheeled vehicles. NTRODUCTION In the greatest part of the mopeds today in commerce, the electric block of the engine is done by putting to ground a wire. For consequence, the alarm will block the engine in the same way.
- Page 18 WARNING: These instructions are valid only for generic wirings, for all the types of two wheeled vehicles. NTRODUCTION On the motorbikes and mopeds of new generation, the electric block of the engine is done by interrupting the wire that feeds the coil, the pomp of the gasoline, etc.
- Page 19 WARNING: These instructions are valid only for specific wirings. If is used a generic wiring, see the instructions in the previous chapters. NTRODUCTION The installation with specific wiring allows to facilitate a lot the installer's job because, thanks to this type of shrewdness, the greatest part of the connections is done simply by connecting the wiring interface between the key block and the electric system of the vehicle.
- Page 20 ENTRAL OSITION Locate in the vehicle a good place to install the central unit. This location must protect the device from water but must also allow a good sound of the siren. Once the installation is over, shut with the wrapper the protecting rubber cover of the alarm. LECTRIC ONNECTIONS They must be perfectly performed, otherwise they will provoke, in time, problems to the alarm and the vehicle working.
- Page 21 11 ÷ 15 V ……………………………………………………………………………… OWER TENSION 1,5 mA )……………………….………………… BSORPTION OF THE ALARM ARMED SLEEP MODE 8 A + 8 A ………………………..…………..…… AXIMUM CURRENT OF INDICATOR LIGHTS RELAY ……………………………….………………… AXIMUM CURRENT BLOCK ENGINE RELAY > 5 sec. ………………………………………………………………….…………… EUTRAL TIME 28 sec.
- Page 22 NOTES Programming the ANTI-AGGRESSION function can cause some problems in places with strong electromagnetic interferences or radio transmissions. To avoid these problems, the anti-theft button must be used at the first acoustic signal of alarm (see the anti-aggression paragraph, page 11). For this reason the anti-theft button must be installed on the vehicle in a good position to be reached also when driving.
Need help?
Do you have a question about the HPS 548N and is the answer not in the manual?
Questions and answers