Table of Contents
Advertisement
Advertisement
Table of Contents

Related Manuals for Rigel UniPulse 400


Summary of Contents for Rigel UniPulse 400
- Page 1 Page 1 of 91...
- Page 2 Terms and conditions apply. www.rigelmedical.com/userfiles/form-register-product.php Calibration Statement The UniPulse 400 Analyser is fully calibrated and found to be within the specified performance and accuracy at the time of production. The Seaward Group provides its products through a variety of channels;...
- Page 3 If the UniPulse 400 is used in a manner not specified by the manufacturer, the protection provided by the equipment may be impaired. This product contains a NiMH battery: Do not disassemble, crush, or puncture the battery.
-
Page 4: Table Of Contents
UniPulse 400 USER MANUAL Warnings and Cautions 1.1. User Notes 1.2. Safety Notes Introduction 2.1. Intended use and capabilities of the UniPulse 400 2.2. In the Box 2.3. Getting to Know Your UniPulse 400 2.4. Optional Accessories and Replacement Spare Parts 2.5. - Page 5 RIGEL MEDICAL UniPulse 400 USER MANUAL 7.1. Connecting ECG leads to the UniPulse 400 7.2. Start Asset Option – Saving Test Results 7.3. Simulating an ECG Sinus Waveform 7.4. Simulating an ECG Ventricular Arrhythmia Waveform 7.5. Simulating an ECG Atrial Conduction Waveform 7.6.
- Page 6 RIGEL MEDICAL UniPulse 400 USER MANUAL Specifications 13.1. Technical Specifications 13.2. General Specifications Support 14.1. Contact Us TESTED, TRUSTED…WORLDWIDE Page 6 of 91...
-
Page 7: Warnings And Cautions
This symbol indicates that the operating instructions must be adhered to in order to avoid danger. 1.2. Safety Notes Do not connect the UniPulse 400 to a patient or any devices connected to a patient. Do not use the defibrillator to shock the PACER or ECG terminals When connecting to the DEFIB terminals, 4mm shrouded non- stackable plugs must be used. - Page 8 Do not spray or pour liquid onto the unit. This may result in damaging of the electronics within the unit. Do not use the UniPulse 400 with the 18V PSU attached unless it is connected directly to mains power. Where safe operation of the UniPulse 400 is no longer possible it should be immediately shut down and secured to prevent accidental operation.
-
Page 9: Introduction
The UniPulse 400 is intended to be used in the laboratory environment, outside of the patient care vicinity and is not intended to be used on patients or to test devices while connected to patients. -
Page 10: In The Box
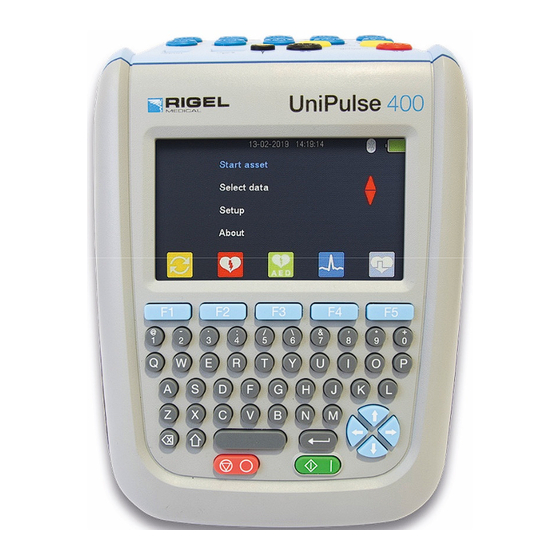
ECG Snap Adapters (pack of 10) Calibration Certificate UniPulse 400 Analyser UniPulse 400 Carry Case UniPulse 400 Quick Start Guide 2.3. Getting to Know Your UniPulse 400 Function keys F1-5 QWERTY keyboard Directional navigation keys Stop/End button Power ON/Start button... -
Page 11: Optional Accessories And Replacement Spare Parts
2.5. Charging the UniPulse 400 Do not use the UniPulse 400 with the 18V PSU attached unless it is connected directly to mains power. Whilst the UniPulse 400 is powered on, you will also see the below symbols on the display. Bulk charging... -
Page 12: Battery Status
To turn the UniPulse 400 ON, press and hold the green ON key until the Rigel Medical splash screen appears. To turn the UniPulse 400 OFF, press and hold the red OFF key until the screen goes black and the unit switches off. -
Page 13: Icons
RIGEL MEDICAL UniPulse 400 USER MANUAL 2.8. Icons To make navigating through the options of the UniPulse 400 an easier and more intuitive experience, the traditional menu format has been replaced by a unique set of easily recognisable icons: Defibrillator... -
Page 14: Setting Up The Unipulse 400
RIGEL MEDICAL UniPulse 400 USER MANUAL 3. Setting up the UniPulse 400 3.1. Setting the Time and Date From the Main Menu, use the arrow keys to highlight Setup and select using the ↵ (return) key. From the Setup Menu, use the arrow keys to highlight Date and time and select using the ↵... -
Page 15: Connecting To A Bluetooth Device
RIGEL MEDICAL UniPulse 400 USER MANUAL Select (F5) to confirm and save the changes, or (F1) to exit without saving. 3.2. Connecting to a Bluetooth Device From the Main Menu, use the arrow keys to highlight Setup and select using the ↵... - Page 16 RIGEL MEDICAL UniPulse 400 USER MANUAL (F1) to exit the Bluetooth pairing setup screen without saving. The search function (F2) can be used to search for Bluetooth devices. Once the devices have been found, use the arrow keys to select a Printer...
-
Page 17: Connecting To The Test N Tag Elite 2 Printer
RIGEL MEDICAL UniPulse 400 USER MANUAL 3.3. Connecting to the Test n Tag Elite 2 printer A list of available Bluetooth devices will be displayed once Bluetooth searching is complete (see connecting a Bluetooth Device). Use the arrow keys to scroll through the list, printers will be shown by the add Printer icon. -
Page 18: Connecting To The Bluetooth Barcode Scanner
RIGEL MEDICAL UniPulse 400 USER MANUAL 3.4. Connecting to the Bluetooth Barcode Scanner A list of available Bluetooth devices will be displayed once Bluetooth searching is complete (see connecting a Bluetooth Device). Use the arrow keys to scroll through the list, barcode scanners will be shown by add Barcode Scanner icon. -
Page 19: Deleting Bluetooth Selections
RIGEL MEDICAL UniPulse 400 USER MANUAL 3.5. Deleting Bluetooth Selections From the Main Menu, use the arrow keys to highlight Setup and select using the ↵ (return) key. From the Setup Menu, use the arrow keys to highlight Bluetooth pairing and select using the ↵... -
Page 20: Local Settings
RIGEL MEDICAL UniPulse 400 USER MANUAL 3.6. Local Settings From the Main Menu, use the arrow keys to highlight Setup and select using the ↵ (return) key. From the Setup Menu, use the arrow keys to highlight Local settings and select using the ↵... -
Page 21: Results Memory
RIGEL MEDICAL UniPulse 400 USER MANUAL 3.7. Results Memory To delete an individual test result, please see “Deleting a Saved Test Result” in the “Handling Data” section of this manual. From the Setup Menu, use the arrow keys to highlight Memory and select using the ↵... -
Page 22: Restoring Factory Settings
(F5). To exit without changing select (F1) or select (F5) to restore factory settings. Note: factory reset will reset the UniPulse 400 settings to the following: Language = English Date Format = dd/mm/yyyy Time Format = 24hr Decimal Separator = . -
Page 23: Displaying Unipulse 400 Information
RIGEL MEDICAL UniPulse 400 USER MANUAL 3.9. Displaying UniPulse 400 Information From the Main Menu, use the arrow keys to highlight About and select using the ↵ (return) key. Use the arrow keys to allow the following screens to be viewed, in turn;... -
Page 24: Getting Started
RIGEL MEDICAL UniPulse 400 USER MANUAL 4. Getting started 4.1. Accessing the UniPulse 400 Tests From the main menu you can access the following test menus using the function keys F1-F5: Main Menu Select: (F1) for Asset Menu. (F2) for Defibrillator Mode. - Page 25 RIGEL MEDICAL UniPulse 400 USER MANUAL (F2) for Defibrillator Mode Use this mode to analyse the Defibrillator Energy Discharge, Defib Charge Time, Defib Synchronisation, Defib Pulse Peak Voltage, Defib Pulse Peak Current or a Defib Pulse Length Measurements. See section 5.0 for more details.
- Page 26 RIGEL MEDICAL UniPulse 400 USER MANUAL (F4) for Electrocardiogram (ECG) Simulation Mode Use this mode to simulate ECG Sinus, ECG Ventricular Arrhythmia, ECG Atrial Conduction Arrhythmia, ECG Atrial Arrhythmia, ECG Pacer and ECG Performance Waveforms. See section 7.0 for more details.
-
Page 27: Analysing Defibrillators
5. Analysing Defibrillators 5.1. Connecting a Defibrillator to the UniPulse 400 The defibrillator or AED under test can be connected directly to the UniPulse 400 using 4mm connectors, or the Paddle Adaptor Box can be used as shown above. Do not use the defibrillator to shock the PACER or ECG terminals... -
Page 28: Start Asset Option - Saving Test Results
RIGEL MEDICAL UniPulse 400 USER MANUAL 5.2. Start Asset Option – Saving Test Results If the tests you are about to perform require the results to be saved then the Start asset option needs to be selected from the Main Menu, using (F1), this displays a new asset option;... -
Page 29: Testing Defibrillator Energy Discharge
RIGEL MEDICAL UniPulse 400 USER MANUAL 5.3. Testing Defibrillator Energy Discharge From the Main Menu select (F2) for Defibrillator mode. To enter the Defibrillator Pulse mode you have to accept the connections warning, using the ↵ (return) key, – the red and black 4mm defibrillator terminals are highlighted with a flashing red / yellow image. - Page 30 50 . For 50 to 200 – suitable resistance should be placed in series with the internal 50 . The measured energy will be displayed on the UniPulse 400 screen as well as the peak voltage, peak current and pulse duration. Use the arrow keys to view the waveform graph and a measurement summary.
-
Page 31: Testing Charge Time
(F3) is selected to begin the timer. Once the energy discharge is registered by the UniPulse 400 the timer will stop. The measured energy will be displayed on the UniPulse 400 screen as well as the peak voltage, peak current and pulse duration. Select the key to view the waveform graph and a measurement summary. -
Page 32: Testing Cardiac Synchronisation
Ensure all safety precautions and safe operating procedures are observed as highlighted in the manufacturer operating instructions for your device. The cardiac synchronisation time will be displayed on the UniPulse 400 screen as well as the measured energy, peak voltage, peak current and pulse duration. -
Page 33: Analysing Automated External Defibrillators (Aed)
(AED) 6.1. Connecting a Defibrillator to the UniPulse 400 The defibrillator or AED under test can be connected direct to the UniPulse 400 using 4mm connectors, or the Paddle Adaptor Box can be used as shown above. Do not use the defibrillator to shock the PACER or ECG terminals... -
Page 34: Start Asset Option - Saving Test Results
RIGEL MEDICAL UniPulse 400 USER MANUAL 6.2. Start Asset Option – Saving Test Results If the tests you are about to perform require the results to be saved then the Start asset option needs to be selected from the Main Menu, using (F1), this displays a new asset option;... -
Page 35: Testing Aed Energy Discharge
Do not use the defibrillator to shock the PACER or ECG terminals If a shock is advised, use the shock/discharge button to safely deliver the electrical energy into the UniPulse 400. Ensure all safety precautions and safe operating procedures are observed as highlighted in the manufacturer operating instructions for your device. - Page 36 – suitable resistance should be placed in series with the internal 50 . Select (F4) to change the output waveform of the UniPulse 400. Use the arrow keys to scroll through the available rhythms: The following AED Waveforms are available:...
- Page 37 Ensure all safety precautions and safe operating procedures are observed as highlighted in the manufacturer operating instructions for your device. The measured energy will be displayed on the UniPulse 400 screen as well as the peak voltage, peak current and pulse duration.
-
Page 38: Simulating Ecg Waveforms
7.1. Connecting ECG leads to the UniPulse 400 Use the supplied ECG snap connectors to connect ECG leads to the 4mm ECG terminals on the rear of the UniPulse 400. The ECG connectors are colour coded as per international standards. -
Page 39: Start Asset Option - Saving Test Results
RIGEL MEDICAL UniPulse 400 USER MANUAL 7.2. Start Asset Option – Saving Test Results If the tests you are about to perform require the results to be saved then the Start asset option needs to be selected from the Main Menu, using (F1), this displays a new asset option;... -
Page 40: Simulating An Ecg Sinus Waveform
RIGEL MEDICAL UniPulse 400 USER MANUAL 7.3. Simulating an ECG Sinus Waveform From the Main Menu select (F4) for ECG simulation and either select (F2), or highlight Sinus using the arrow keys and confirm using the ↵ (return) key or select (F5). - Page 41 RIGEL MEDICAL UniPulse 400 USER MANUAL Note; values can be typed in using the keyboard and either saved using (F5) or cancelled with (F1). Select (F4) to change the Heart rate selection to values between 20 and 300 BPM, where applicable, selecting (F1) confirms this selection.
-
Page 42: Simulating An Ecg Ventricular Arrhythmia Waveform
RIGEL MEDICAL UniPulse 400 USER MANUAL 7.4. Simulating an ECG Ventricular Arrhythmia Waveform From the Main Menu select (F4) for ECG simulation and either select (F3), or highlight Ventricular using the arrow keys and confirm using the ↵ (return) key or select (F5). - Page 43 RIGEL MEDICAL UniPulse 400 USER MANUAL changes are made using the arrow keys, selecting (F1) confirms this selection. Note; values can be typed in using the keyboard and either saved using (F5) or cancelled with (F1). The Heart rate, Amplitude, and Noise settings are displayed on the left hand side of the display.
-
Page 44: Simulating An Ecg Atrial Conduction Waveform
RIGEL MEDICAL UniPulse 400 USER MANUAL 7.5. Simulating an ECG Atrial Conduction Waveform From the Main Menu select (F4) for ECG simulation and highlight Atrial Conduction using the arrow keys and confirm using the ↵ (return) key or select (F5). - Page 45 RIGEL MEDICAL UniPulse 400 USER MANUAL changes are made using the arrow keys, selecting (F1) confirms this selection. Note; values can be typed in using the keyboard and either saved using (F5) or cancelled with (F1). The Heart rate, Amplitude, and Noise settings are displayed on the left hand side of the display.
-
Page 46: Simulating An Ecg Atrial Waveform
RIGEL MEDICAL UniPulse 400 USER MANUAL 7.6. Simulating an ECG Atrial Waveform From the Main Menu select (F4) for ECG simulation and highlight Atrial using the arrow keys and confirm using the ↵ (return) key or select (F5). Use the arrow keys to move between the available simulation waveforms. - Page 47 RIGEL MEDICAL UniPulse 400 USER MANUAL Note; values can be typed in using the keyboard and either saved using (F5) or cancelled with (F1). Where applicable, select (F4) to change the Heart rate selection to values between 20 and 300 BPM, selecting (F1) confirms this selection.
-
Page 48: Simulating An Ecg Pacer Waveform
RIGEL MEDICAL UniPulse 400 USER MANUAL 7.7. Simulating an ECG Pacer Waveform From the Main Menu select (F4) for ECG simulation and highlight Pacer using the arrow keys and confirm using the ↵ (return) key or select (F5). Use the arrow keys to move between the available simulation waveforms. - Page 49 RIGEL MEDICAL UniPulse 400 USER MANUAL If applicable, select (F2) to change the Amplitude selection to a fixed value between 0.5mV to 5.0mV, changes are made using the arrow keys, selecting (F1) confirms this selection. Note; values can be typed in using the keyboard and either saved using...
- Page 50 RIGEL MEDICAL UniPulse 400 USER MANUAL The Heart rate, Amplitude, and Noise settings are displayed on the left hand side of the display. After testing is complete select (F5) to save this under the asset details created earlier. Please note; this option is only available if it has been set up before the test was started.
-
Page 51: Simulating An Ecg Performance Waveform
RIGEL MEDICAL UniPulse 400 USER MANUAL 7.8. Simulating an ECG Performance Waveform From the Main Menu select (F4) for ECG simulation and either select (F4), or highlight Performance using the arrow keys and confirm using the ↵ (return) key or select (F5). - Page 52 RIGEL MEDICAL UniPulse 400 USER MANUAL arrow keys, selecting (F1) confirms this changes are made using selection. Note; values can be typed in using the keyboard and either saved using (F5) or cancelled with (F1). Select (F4) to change the Frequency selection to values between 0.1 and 300Hz, selecting (F1) confirms this selection.
-
Page 53: Analysing Transcutaneous Pacers - Pacer Variable Load Input
UniPulse 400. Use the supplied ECG snap connectors to connect ECG leads to the 4mm ECG terminals on the rear of the UniPulse 400. The ECG connectors are colour coded as per international standards. Do not use the defibrillator to shock the PACER or ECG terminals Ensure all safety precautions and safe operating procedures are observed as highlighted in the manufacturer operating instructions for your device. -
Page 54: Start Asset Option - Saving Test Results
RIGEL MEDICAL UniPulse 400 USER MANUAL 8.2. Start Asset Option – Saving Test Results If the tests you are about to perform require the results to be saved then the Start asset option needs to be selected from the Main Menu, using (F1), this displays a new asset option;... -
Page 55: Testing The Pacer Function
RIGEL MEDICAL UniPulse 400 USER MANUAL 8.3. Testing the Pacer Function From the Main Menu select (F5) for Pacer Mode. The available Pacer Manufacturer waveforms can be changed by highlighting Pacer Model: Default, using the arrow keys, and a waveform selected using the arrow keys. -
Page 56: Testing The Pacer Pulse Mode
RIGEL MEDICAL UniPulse 400 USER MANUAL 8.4. Testing the Pacer Pulse Mode From the Pacer Menu use the arrow keys to highlight Pacer Pulse Mode and confirm using the ↵ (return) key or select (F2). From the Pacer Pulse Mode select (F2) to alter the Load selection. - Page 57 RIGEL MEDICAL UniPulse 400 USER MANUAL The following Waveforms are available: Pacer Pulse Mode Waveforms Normal Sinus Rhythm (NSR) 20 - 300 BPM, Amplitude 1.00mV(±2%) Ventricular Fibrillation - Coarse (VFBC) 240 BPM, Amplitude 1.00mV(±2%) Ventricular Fibrillation - Fine (VFBF) 240 BPM, Amplitude 1.00mV(±2%) Monomorphic Ventricular Tachycardia (MVT) 210 BPM, Amplitude 1.00mV(±2%)
- Page 58 RIGEL MEDICAL UniPulse 400 USER MANUAL The output displayed on the screen can be frozen by selecting (F2), when selected a red padlock is displayed. The BPM can be increased to 115% or decreased to 85% of the set value by selecting (F3).
-
Page 59: Testing The Refractory Mode
RIGEL MEDICAL UniPulse 400 USER MANUAL 8.5. Testing the Refractory Mode From the Pacer Menu use the arrow keys to highlight Refractory Period and confirm using the ↵ (return) key or select (F3). From the Pacer Refractory Period menu select (F2) to alter the Load selection. - Page 60 RIGEL MEDICAL UniPulse 400 USER MANUAL With the EUT pacing, the rate and pulse information are displayed. After testing is complete select (F5) to save this under the asset details created earlier. Please note; this option is only available if it has been set up before the test was started.
-
Page 61: Testing The Pacer Sensitivity
RIGEL MEDICAL UniPulse 400 USER MANUAL 8.6. Testing the Pacer Sensitivity From the Pacer Menu use the arrow keys to highlight Sensitivity and confirm using the ↵ key or select (F4). From the Pacer Sensitivity menu select (F2) to alter the Load selection. - Page 62 RIGEL MEDICAL UniPulse 400 USER MANUAL If no pacer signal is received from the EUT then a red cross appears in the pulse waveform. With the EUT pacing, the rate, polarity and sensitivity are displayed. After testing is complete select (F5) to save this under the asset details created earlier.
-
Page 63: Testing The Pacer Immunity
RIGEL MEDICAL UniPulse 400 USER MANUAL 8.7. Testing the Pacer Immunity From the Pacer Menu use the arrow keys to highlight Pacer Immunity and confirm using the ↵ (return) key or select (F5). From the Pacer Pulse Mode select (F2) to alter the Load selection. - Page 64 RIGEL MEDICAL UniPulse 400 USER MANUAL The following Waveforms are available: Pacer Pulse Mode Waveforms Normal Sinus Rhythm (NSR) 20 - 300 BPM, Amplitude 1.00mV(±2%) Ventricular Fibrillation - Coarse (VFBC) 240 BPM, Amplitude 1.00mV(±2%) Ventricular Fibrillation - Fine (VFBF) 240 BPM, Amplitude 1.00mV(±2%) Monomorphic Ventricular Tachycardia (MVT) 210 BPM, Amplitude 1.00mV(±2%)
- Page 65 RIGEL MEDICAL UniPulse 400 USER MANUAL With the EUT pacing, the rate, noise type and noise level are displayed. The Noise Type can be alternated between 50 or 60Hz using (F3). The waveform can be switched to asystole by selecting (F4).
-
Page 66: Analysing Transcutaneous Pacers - Defibrillator Paddle Input
UniPulse 400. Use the supplied ECG snap connectors to connect ECG leads to the 4mm ECG terminals on the rear of the UniPulse 400. The ECG connectors are colour coded as per international standards. Do not use the defibrillator to shock the PACER or ECG terminals Ensure all safety precautions and safe operating procedures are observed as highlighted in the manufacturer operating instructions for your device. - Page 67 UniPulse 400. Use the supplied ECG snap connectors to connect ECG leads to the 4mm ECG terminals on the rear of the UniPulse 400. The ECG connectors are colour coded as per international standards.
-
Page 68: Start Asset Option - Saving Test Results
RIGEL MEDICAL UniPulse 400 USER MANUAL 9.2. Start Asset Option – Saving Test Results If the tests you are about to perform require the results to be saved then the Start asset option needs to be selected from the Main Menu, using (F1), this displays a new asset option;... -
Page 69: Testing The Pacer Function
RIGEL MEDICAL UniPulse 400 USER MANUAL 9.3. Testing the Pacer Function From the Main Menu select (F5) for Pacer Mode. The available Pacer Manufacturer waveforms can be changed by highlighting Pacer Model: Default, using the arrow keys, and a waveform selected using the arrow keys. -
Page 70: Testing The Pacer Pulse Mode
RIGEL MEDICAL UniPulse 400 USER MANUAL 9.4. Testing the Pacer Pulse Mode From the Pacer Menu use the arrow keys to highlight Pacer Pulse Mode and confirm using the ↵ (return) key or select (F2). From the Pacer Pulse Mode select (F2) to alter the Load selection. - Page 71 RIGEL MEDICAL UniPulse 400 USER MANUAL From the Pacer Pulse Mode select (F4) to alter the simulation waveform selection. Use the arrow keys to move between the available simulation waveforms. The following Waveforms are available: Pacer Pulse Mode Waveforms Normal Sinus Rhythm (NSR) 20 - 300 BPM, Amplitude 1.00mV(±2%)
- Page 72 RIGEL MEDICAL UniPulse 400 USER MANUAL With the EUT pacing, the rate, pulse width, peak current and energy are displayed. The output displayed on the screen can be frozen by selecting (F2), when selected a red padlock is displayed. The BPM can be increased to 115% or decreased to 85% of the set value by selecting (F3).
-
Page 73: Testing The Refractory Mode
RIGEL MEDICAL UniPulse 400 USER MANUAL 9.5. Testing the Refractory Mode From the Pacer Menu use the arrow keys to highlight Refractory Period and confirm using the ↵ (return) key or select (F3). From the Pacer Refractory Period menu select (F2) to alter the Load selection. - Page 74 RIGEL MEDICAL UniPulse 400 USER MANUAL If no pacer signal is received from the EUT then a red cross appears in the pulse waveform. With the EUT pacing, the rate and pulse information are displayed. After testing is complete select (F5) to save this under the asset details created earlier.
-
Page 75: Testing The Pacer Sensitivity
RIGEL MEDICAL UniPulse 400 USER MANUAL 9.6. Testing the Pacer Sensitivity From the Pacer Menu use the arrow keys to highlight Sensitivity and confirm using the ↵ key or select (F4). From the Pacer Sensitivity menu select (F2) to alter the Load selection. - Page 76 RIGEL MEDICAL UniPulse 400 USER MANUAL If no pacer signal is received from the EUT then a red cross appears in the pulse waveform. With the EUT pacing, the rate, polarity and sensitivity are displayed. After testing is complete select (F5) to save this under the asset details created earlier.
-
Page 77: Testing The Pacer Immunity
RIGEL MEDICAL UniPulse 400 USER MANUAL 9.7. Testing the Pacer Immunity From the Pacer Menu use the arrow keys to highlight Pacer Immunity and confirm using the ↵ (return) key or select (F5). From the Pacer Pulse Mode select (F2) to alter the Load selection. - Page 78 RIGEL MEDICAL UniPulse 400 USER MANUAL The following Waveforms are available: Pacer Pulse Mode Waveforms Normal Sinus Rhythm (NSR) 20 - 300 BPM, Amplitude 1.00mV(±2%) Ventricular Fibrillation - Coarse (VFBC) 240 BPM, Amplitude 1.00mV(±2%) Ventricular Fibrillation - Fine (VFBF) 240 BPM, Amplitude 1.00mV(±2%) Monomorphic Ventricular Tachycardia (MVT) 210 BPM, Amplitude 1.00mV(±2%)
- Page 79 RIGEL MEDICAL UniPulse 400 USER MANUAL With the EUT pacing, the rate, noise type and noise level are displayed. The Noise Type can be alternated between 50 or 60Hz using (F3). The waveform can be switched to asystole by selecting (F4).
-
Page 80: Handling Data
RIGEL MEDICAL UniPulse 400 USER MANUAL 10. Handling Data 10.1. Start Asset Option – Saving Test Results If the tests you are about to perform require the results to be saved then the Start asset option needs to be selected from the Main Menu, using (F1), this displays a new asset option;... -
Page 81: Saving A Test Result
RIGEL MEDICAL UniPulse 400 USER MANUAL 10.2. Saving a Test Result Before saving a test result, the Asset ID will need to have been previously set-up (note the symbol will already be displayed). At the end of a test select... - Page 82 Using the arrow keys allows the various test result screens to be viewed on the UniPulse 400. The format of these depends on the original test performed. Selecting (F1) returns to the Search results menu. TESTED, TRUSTED…WORLDWIDE...
-
Page 83: Printing A Saved Test Result
RIGEL MEDICAL UniPulse 400 USER MANUAL 10.4. Printing a Saved Test Result From the Main Menu, use the arrow keys to highlight Select data and select the ↵ (return) key to enter the asset menu. The arrow keys can be used to highlight the item to be used in the search criteria. -
Page 84: Downloading Test Results
(F5). 10.5. Downloading Test Results Note; results can only be downloaded from the UniPulse 400 to Med-eBase version 2.6 (or above) using only a USB lead. From the Main Menu, use the arrow keys to highlight Select data and select the ↵... -
Page 85: Deleting A Saved Test Result
(F1), where available, returns to the Search results menu, without downloading . Select (F5) to send the data from the UniPulse 400 connected to a PC via the USB lead. Once the download is complete a message is displayed confirming this, the Search results menu can be viewed again by selecting (F5). -
Page 86: Environmental Conditions
IEC 61326-1. Operating temperature range of 0°C to +40°C, without moisture condensation. The UniPulse 400 can be stored at any temperature in the range -15°C to +60°C (relative humidity up to 90%). Operating altitude 0 to 2000m. -
Page 87: Maintaining The Rigel Unipulse 400
UniPulse 400 USER MANUAL 12. Maintaining the Rigel UniPulse 400 12.1. Cleaning Clean the external case of the Rigel UniPulse 400 with a clean dry cloth. Avoid using solvents and abrasive scouring agents to clean the external case of the Rigel UniPulse 400. -
Page 88: Specifications
RIGEL MEDICAL UniPulse 400 USER MANUAL 13. Specifications 13.1. Technical Specifications Defib - Energy Measurement Load Resistance 50Ω ± 1% non-inductive Range 0 - 199.9 Joules Accuracy ± 1% of reading ± 0.1 Joule Range (High) 200 - 600 Joules Accuracy ±... - Page 89 RIGEL MEDICAL UniPulse 400 USER MANUAL Right-focal Premature Ventricular Contraction 80 BPM, Amplitude 0.50 - 5.00mV(±2%) (RFPVC) ECG Waveforms – Atrial Conduction Arrhythmias First Degree AV Bock (FAVB) 80 BPM, Amplitude 0.50 - 5.00mV(±2%) Second Degree AV Block - Mobitz I (SAVB_MI) 80 BPM, Amplitude 0.50 - 5.00mV(±2%)
- Page 90 RIGEL MEDICAL UniPulse 400 USER MANUAL Lead I : 60 % Lead II : 100 % Lead III : 40 % V1 : 63 % [ Reference LA ] V2 : 71 % [ Reference LA ] V3 : 68 % [ Reference LA ]...
-
Page 91: General Specifications
RIGEL MEDICAL UniPulse 400 USER MANUAL 13.2. General Specifications Dimensions 220mm x 150mm x 90mm (L x W x H) Weight 1.5kg Operation 9.6V/2400mAh Nickel Metal Hydride battery pack Battery charge time 2.5 hours Battery capacity (fully charged) 12 hours Mains Supply 110/230V AC;...
Need help?
Do you have a question about the UniPulse 400 and is the answer not in the manual?
Questions and answers