Advertisement
Contents
Contents
Before connecting the sensor please read the instructions carefully. You may wish to consult a
qualified electrician before installing the electrical parts.
Contents:
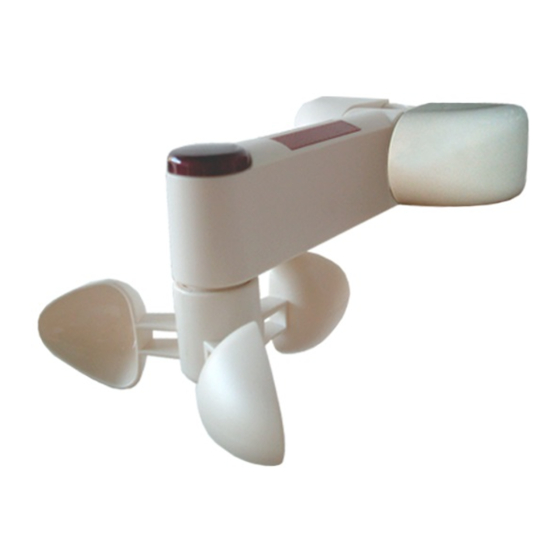
1 x Wind, Sun & Rain Sensor (all 3 sensors are included in one device)
1 x Remote Control Receiver Box
2 x Remote Hand Held "Zappers"
Receiver Box:
-Mains supply: AC200V -AC240V
-Operating temperature: -10 C to 50 C
-Motor control receiver RF 433MHz
-Amp: 10A
Sensor functions:
B: Wind Control
C: Sun Control
D: Rain Control
Primrose Wind, Sun and Rain Sensor Instructions
Primrose Awnings - Wind, Sun & Rain Sensor Instructions
Wind, Sun & Rain Sensor:
-Matched receiver AC230
-Sensor Voltage: DC 12V
-Sensor Working Temp: -40 C to 60 C
Sensor
B
C
D
1
Advertisement
Table of Contents

Related Manuals for Primrose Awnings Wind, Sun & Rain


Summary of Contents for Primrose Awnings Wind, Sun & Rain
- Page 1 Primrose Awnings - Wind, Sun & Rain Sensor Instructions Contents Contents Sensor Before connecting the sensor please read the instructions carefully. You may wish to consult a qualified electrician before installing the electrical parts. Contents: 1 x Wind, Sun & Rain Sensor (all 3 sensors are included in one device) 1 x Remote Control Receiver Box 2 x Remote Hand Held “Zappers”...
-
Page 2: Step 1: Mounting The Sensor
Installation Step 1: Mounting the sensor Mounting of the receiver box: For the sensor to operate effectively the sensor must be positioned in an area that is 1. Install the receiver with the cable entry pointing fully exposed to the wind, sun downwards to avoid water infiltration. - Page 3 Step 2: Connections Wiring Important: Before operating the sensor make sure the flicker switches are in the Motor (Awning):Wires: same position as in the diagram. L=Direction #1 (Brown) R=Direction #2 (Black) Red circuit board E=Earth (Green & Yellow) N=Neutral (Blue) Power Mains: L= AC Live (Brown)
- Page 4 Step 3: Connecting sensor to awning Handheld Zappers The remote control receiver box should be positioned indoors. It is possible to place the receiver box outside as long as its placed in a waterproof box (available on our website, code: AWN5) Before using the handheld zappers: Awning Firstly, ensure that the awning is properly installed...
- Page 5 Step 4: Programming remote zapper Adjustment To operate the awning the remote control zapper must be synchronised with the receiver box. Program Setting: 1. Remove the cover lid of the receiver box. (Before continuing please read steps 2 & 3 as they need to be performed immediately).
-
Page 6: Step 5: Sensor Adjustments
Step 5: Sensor adjustments Adjustment The sensor will detect wind, rain levels and sun levels. The awning can be set to CLOSE in high wind & rain and to OPEN when the sun comes out. The sensitvity settings can be tailored to your requirements. -
Page 7: Troubleshooting - Q & A
Sensor adjustments continued Guarantee Note: This sensor is guaranteed against faulty parts and There will be 10- 20 seconds delay before the signal is actually operated. workmanship for one year from the date of delivery. Faulty parts will be replaced or exchanged within that In order for the sensor to operate properly, the sensor must be positioned in an area that is fully exposed to the wind, period.
Need help?
Do you have a question about the Wind, Sun & Rain and is the answer not in the manual?
Questions and answers