Advertisement
Available languages
Available languages
Quick Links
Download this manual
See also:
Instruction Manual
13
14
15
16
17
18
0-10 KG
19
20
21
22
9-18 KG
23
24
25
26
消費者須知
Consumer Information
如需當地分銷商的資訊,
For local distributors please visit Team-Tex
web site www.nania.com or contact
請造訪 Team-Tex 網站:www.nania.com,
或者透過以下電話聯絡 Team-Tex:
Team-Tex at
+33 (0)4 72 46 98 98
+33 (0)4 72 46 98 98
使用上の注意
Müşteri Bilgileri
Yerel distribütörler için lütfen adresindeki
各地の販売店の情報については、 Team-Tex の
Team-Tex web sitesini ziyaret edin veya
Web サイト (www.nania.com) をご覧いただくか
、 Team-Tex (+33 (0)4 72 46 98 98) までお問い合
+33 (0)4 72 46 98 98 numaralı telefondan
Team-Tex ile irtibat kurun.
わせください。
소비자 정보
지역별 총판 정보는 Team-Tex 웹
사이트(www.nania.com)를 참조하거나
+33 (0)4 72 46 98 98로 전화를 걸어 Team-Tex에
문의하십시오.
消费者须知
有关当地分销商的信息,请访问 Team-Tex
网站:www.nania.com,
或者拨打以下电话联系
Team-Tex:+33 (0)4 72 46 98 98
TM
ECE R44/04 Gr. 0-1
www.fisher-price.com
Advertisement

Subscribe to Our Youtube Channel
Related Manuals for Fisher-Price Safe Voyage FP2000


Summary of Contents for Fisher-Price Safe Voyage FP2000
- Page 1 消費者須知 Consumer Information 如需當地分銷商的資訊, For local distributors please visit Team-Tex web site www.nania.com or contact 請造訪 Team-Tex 網站:www.nania.com, 或者透過以下電話聯絡 Team-Tex: Team-Tex at +33 (0)4 72 46 98 98 +33 (0)4 72 46 98 98 使用上の注意 Müşteri Bilgileri 0-10 KG Yerel distribütörler için lütfen adresindeki 各地の販売店の情報については、...
- Page 2 Safe Voyage Convertible Car Seat Instructions Thank you for purchasing this Group 0-1 convertible car seat. If you are not completely satisfied with the car seat or you would like to change any accessory or obtain any help about the car seat, you can contact our customer services department (details on the back of this guide).
- Page 3 General Safety Instructions Keep these instructions with the car seat in case you need to refer to them again in the future. Failure to follow these instructions may affect your child’s safety. Your car seat must be positioned and installed so that, under normal vehicle usage conditions, no part can become jammed under or between any moveable seat or in the vehicle door.
- Page 4 Preparing your Car Seat for use Before using your new convertible car seat it is important to understand fully how to install your car seat properly, secure your child correctly and familiarize yourself with the features and functions of the seat. Please take the time to read and understand these instructions fully.
- Page 5 WARNING! IN THE REARWARD FACING POSITION YOU MUST ONLY USE THE MOST RECLINED POSITION. After you have released the lever, check it is locked, by pulling the seat shell without operating the lever. Head Support Cushion Your car seat is equipped with a head support cushion (I), which can be used until your child outgrows the seat.
- Page 6 Rearward Facing Harness Adjusting - Group 0 For rearward facing the harness shoulder straps should be fitted only to the lower two sets of slots 1 and 2 (7), with the metal plate secured to slot 3 (7). When adjusting the height of the harness, first peel back the seat cover (4). On the front of the seat surface you will see a metal plate in slot 3 securing the shoulder strap to the seat back.
- Page 7 Pass the child’s arm through each of the shoulder straps whilst bringing together the connectors on the shoulder straps, align them together and insert into the buckle until you hear a click (10) (11) (12). Check that the lap section and shoulder section are not twisted and the connectors can fit together correctly before inserting the connectors into the buckle.
-
Page 8: Final Checklist
Extract the adult seat belt until fully extended. Then, holding the adult seat belt connector, feed the belt through the space between the seat shell and base . Insert the adult seat belt connector into the adult buckle until you hear a click. Ensure the seat belt is not twisted or obstructed in any way. - Page 9 WARNING! THE BUCKLE OF THE VEHICLE BELT MUST NOT COME ABOVE THE LAP BELT GUIDE OF THE CHILD SEAT. IF THIS IS THE CASE, TRY ANOTHER SEAT OR CONTACT OUR CUSTOMER SERVICE DEPARTMENT IN CASE OF DOUBT. Extract the adult seat belt until fully extended. Then, holding the connector feed the belt through the space between the seat shell and base.
- Page 10 Maintenance Cover Removing and Cleaning To remove the cover you will need to remove the harness buckle and shoulder straps. Remove the harness shoulder straps with shoulder pads from the seat, the cover and head support cushion, refer to ‘harness setting and adjustment’. Remove crotch strap from the seat base and cover by turning the metal plate on the underside of the seat and feeding it through the slot in the seat shell.
-
Page 11: Additional Information
Additional Information This car seat is not approved for use on aircraft. For more information contact the airline. To dispose of your car seat safely always remove the harness and render the seat unusable. NOTICE This car seat is a “Universal” child restraint system. It has been approved in accordance with regulation N°44/04, and is suitable for general use in vehicles and is compatible with the majority of vehicle seats. - Page 12 Güvenli Yolculuk Çevrilebilir Araba Koltuğu Talimatları Bu Grup 0-1 çevrilebilir araba koltuğunu satın aldığınız için teşekkür ederiz. Araba koltuğundan tamamen memnun kalmazsanız, herhangi bir aksesuarı değiştirmek veya araba koltuğuyla ilgili yardım almak isterseniz, müşteri hizmetleri departmanımızla irtibat kurabilirsiniz (ayrıntılar bu kılavuzun arka kısmındadır).
- Page 13 Genel Güvenlik Talimatları Gelecekte tekrar başvurmanız gerekebileceğini göz önünde bulundurarak, bu talimatları araba koltuğuyla birlikte taşıyın. Bu talimatlara uymamanız çocuğunuzun güvenliğini etkileyebilir. Araba koltuğunuz, normal araç kullanma koşullarında, hiçbir parça hareket edebilir koltukların altına veya arasına ya da araç kapısına sıkışmayacak şekilde yerleştirilmeli ve takılmalıdır. Çevrilebilir araba koltuğunu, herhangi bir kazadan sonra görülmeyen hasarlara karşı...
- Page 14 Araba Koltuğunuzu kullanıma hazırlama Yeni çevrilebilir araba koltuğunuzu kullanmadan önce, araba koltuğunuzu düzgün şekilde nasıl takacağınızı ve çocuğunuzu doğru şekilde nasıl yerleştireceğinizi tamamen anlamanız, koltuğun özellik ve fonksiyonları hakkında bilgi edinmeniz önemlidir. Lütfen zamanınızı ayırarak bu talimatları tamamen okuyup öğrenin. Bunu en iyi şekilde koltuğa bakarak yapabilirsiniz.
- Page 15 UYARI! ARKAYA DÖNÜK KONUMUNDA, YALNIZCA SONUNA KADAR YATIRILMIŞ KONUMDA KULLANMANIZ GEREKIR. Kolu serbest bıraktıktan sonra, koltuğun dış kısmını kolu çalıştırmadan çekerek kolun kilitlenip kilitlenmediğini kontrol edin. Kafa Destek Yastığı Araba koltuğunuz, koltuk çocuğunuz için küçük gelinceye kadar kullanabileceğiniz bir kafa destek yastığı...
- Page 16 Arkaya Dönük Emniyet Kemeri Ayarlama - Grup 0 Arkaya dönük konumu için, emniyet kemeri omuz askıları yalnızca alttaki iki yuva grubuna, 1. ve 2. yuvalara takılmalı (7) ve metal plaka 3. yuvaya sabitlenmelidir (7). Emniyet kemerinin yüksekliğini ayarlarken, öncelikle koltuk kılıfını sıyırın (4). Koltuk yüzeyinin ön kısmında, 3.
- Page 17 Bir yandan omuz askılarındaki bağlayıcıları bir araya getirin, hizalayın ve tık sesini duyuncaya kadar tokanın içine yerleştirin, diğer yandan da çocuğun kolunu her omuz askısından geçirin (10) (11) (12). Bağlayıcıları tokaya yerleştirmeden önce, kucak ve omuz bölümünün bükülmediğinden ve bağlayıcıların düzgün şekilde birbirine geçtiklerinden emin olun. Alt kucak askılarının, pelvisi korumak için mümkün olduğunca altta olduğundan emin olun.
- Page 18 Yetişkin koltuk kemerini, tamamen açılıncaya kadar çekin. Ardından, yetişkin koltuk kemeri bağlayıcıyı tutarak kemeri koltuğun dış kısmıyla tabanı arasındaki boşluktan içeri sokun. Yetişkin koltuk kemeri bağlayıcıyı, yetişkin koltuk kemeri tokasına tık sesini duyuncaya kadar yerleştirin. Koltuk kemerinin hiçbir şekilde bükülmediğinden veya engellenmediğinden emin olun.
- Page 19 UYARI! ARAÇ KEMERININ TOKASI, ÇOCUK KOLTUĞUNUN KUCAK KEMERI KILAVUZUNUN ÜZERINE ÇIKMAMALIDIR. BÖYLE BIR DURUM SÖZ KONUSUYSA, BAŞKA BIR KOLTUK DENEYIN VEYA HERHANGI BIR ENDIŞENIZ OLMASI DURUMUNDA MÜŞTERI HIZMETLERI DEPARTMANIMIZLA IRTIBAT KURUN. Yetişkin koltuk kemerini, tamamen açılıncaya kadar çekin. Ardından, bağlayıcıyı tutarak kemeri koltuğun dış...
- Page 20 Bakım Kılıfı Çıkarma ve Temizleme Kılıfı çıkarmak için emniyet kemeri tokasını ve omuz askılarını çıkarmanız gerekir. Emniyet kemeri omuz askılarını koltuktan, kılıftan ve kafa destek yastığından omuz pedleriyle çıkarın. Bkz. ‘emniyet kemerini ayarlama’. Bacak arası askısını, koltuğun alt kısmındaki metal plakayı döndürüp koltuğun dış kısmındaki yuvadan içeri geçirerek koltuk tabanından ve kılıftan çıkarın.
- Page 21 Ek Bilgiler Bu araba koltuğunun hava taşıtlarında kullanımı onaylanmamıştır. Daha fazla bilgi için havayolu şirketine başvurun. Araba koltuğunuzu güvenle atmak için, her zaman emniyet kemerini çıkarın ve koltuğu kullanılmayacak duruma getirin. DİKKAT Bu araba koltuğu “uluslararası” bir çocuk koruma sistemidir. N°44/04 düzenlemesi uyarınca onaylanmıştır, araçlarda genel kullanıma uygundur ve araç...
- Page 32 安全旅行系列可调式汽车安全座椅使用说明 感谢您购买此款 Group 0-1(约 0 至 4 周岁)可调式汽车安全座椅。 如果您对此款安全座椅不是完全满意,或者您希望更换任何配件, 或者需要获取与此安全座椅有关的任何帮助,请与我们的客户服务部联系 (详情请见本指南的封底)。 注意:此款汽车安全座椅仅适合在已安装通过 ECE R16 或相当标准认证的 3 点伸缩式安全带的汽车上使用。 用户指南的存放 本说明书应始终存放在汽车安全座椅内,这一点非常重要。您可以将本说明书存放在 Group 0-1 汽车安全座椅 (3) 的兜袋中。 消费者须知 警告! 警告! 在后向位置,只能使用最大后仰位置。 安全气囊可能会造成伤害。 请勿在装有正面安全气囊的乘客座位上 使用此儿童座椅。 警告! 警告! 汽车成人安全带的带扣不能在儿童座椅 为保护孩子的安全, 腰带导带器上方。否则, 正确调节座椅自带安全带非常重要。 请尝试将儿童座椅安装在其他座位上, 自带安全带与孩子之间的间隙不得超过 如有疑问,请与我们的客户服务部联系。 一指宽。...
- Page 33 一般安全说明 本说明书应始终存放在汽车安全座椅内,以备日后参考之用。 未按照本说明书进行操作可能会影响孩子的安全。 汽车安全座椅安放位置必须正确,安装必须牢固,以确保在正常的汽车使用条件下, 不会有任何零部件卡在任何可移动安全座椅下面或之间,或者卡在车门里。 汽车发生任何事故之后,均应立即更换此可调式汽车安全座椅, 以防存在任何无法察觉的损坏。 未经相应主管部门或制造商的许可, 不得以任何方式改装汽车安全座椅或加装零部件,否则将导致所有保修条款失效。 请遮住汽车安全座椅避开阳光,以免发热部件灼伤孩子。 切勿让孩子单独留在安全座椅和车内。 确保汽车安全座椅周围没有松散的行李或其他大型物品,发生事故时, 这些行李或物品可能会给孩子造成伤害,也可能会伤害到其他乘客。 始终要紧固松动的零部件。 切勿使用没有座套的汽车安全座椅。 切勿更换使用非本产品制造商推荐的座套,这会直接影响汽车安全座椅的安全性。 在安装汽车安全座椅后,务必立即紧固汽车的成人安全带。 任何时候都应使用成人安全带紧固安全座椅,即使不使用安全座椅时也须如此。 汽车发生碰撞时,紧固不牢的汽车安全座椅可能会给乘客造成伤害。 始终检查并确保自带安全带带扣中没有食物碎屑或其他此类物质。 这些物质可能会影响带扣正常发挥作用。 在寒冷的冬季,应注意确保在孩子换穿衣服后, 不会影响汽车安全座椅自带安全带的拉力和有效性。...
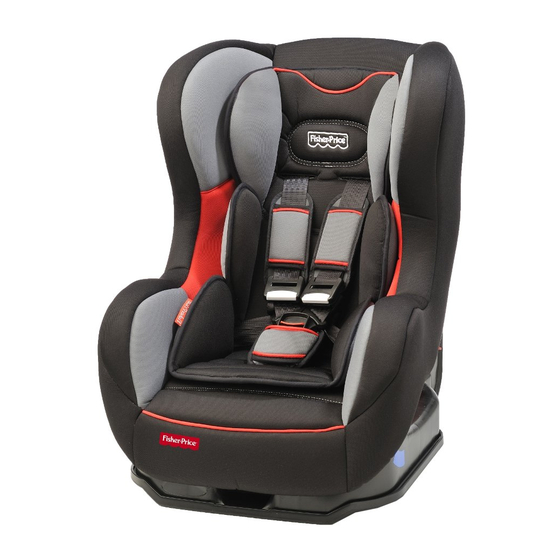
- Page 34 汽车安全座椅使用前准备 在使用新的可调式汽车安全座椅之前,必须充分了解如何正确安装汽车安全座椅、 如何替孩子正确系好安全带并熟悉安全座椅的特性和功能,这一点非常重要。 请花点时间仔细阅读并深入理解本说明书。最好是面对汽车安全座椅, 对照实物阅读本说明书。 请务必阅读安全警告。 在汽车中使用此安全座椅之前,请务必正确设置自带安全带,为您的孩子准备好座椅。 无论您的孩子多大,无论安全座椅是后向还是正向,这一点都适用。 Group 0-1 汽车安全座椅特性指南 (2) 头部支撑垫 座椅外壳 成人安全带斜挎肩带上导带器 肩垫(2 片) (仅用于后向安装)(2 个) 自带安全带的调节器 (x2) 用于斜挎肩带的红色安全带锁 (仅用于前向安装)(2 个) 自带安全带紧固调节带(2 条) 成人安全带腰带导带器 (仅用于前向安装)(2 个) 自带安全带带扣 成人安全带腰带导带器 椅座 (仅用于后向安装)(2 个) 蓝色成人安全带锁夹 座椅后倾操纵杆 (仅用于后向式安装) 成人安全带带扣 抱婴腰带 成人安全带接头 座椅后倾...
- Page 35 警告! 在后向位置,只能使用最大后仰位置。 释放操纵杆后,直接拉座椅(不要使用操纵杆),检查操纵杆是否锁定。 头部支撑垫 此汽车安全座椅配备有头部支撑垫 (I),可以一直用到孩子长大到不再需要安全座椅。 抱婴腰带 此汽车安全座椅配备有抱婴腰带 (H),可以更好地支撑住孩子。 我们建议抱婴腰带仅使用到孩子 6 个月大。 拆卸抱婴腰带 不再需要抱婴腰带时,可以将其拆下。您必须按照下面的操作说明来拆卸抱婴腰带。 完全后倾座椅,请参阅“座椅后倾”一节。手伸到座椅外壳下方找到扣带末端的金属片。 要拆下胯部约束带,先将金属片穿过穿孔,然后穿过座套和抱婴腰带 (H)。 拆下抱婴腰带。 要重新安装自带安全带,只需反向执行上述步骤即可。 确保重新安装自带安全带胯部约束带时, 金属片完全穿过汽车安全座椅椅座底部的穿孔,并平贴在座椅上。 自带安全带的设置与调节 汽车安全座椅自带安全带的设置必须适合孩子的体形。 自带安全带有一个四点腰肩式安全带和一个带安全带带扣的胯部约束带。 肩带配有独立的肩垫 (B)。 自带安全带的肩带可以插入到座椅背面四组插口中的任意一组中, 且必须穿过插口束到孩子的肩上。...
- Page 36 后向安全带的调节 - Group 0 对于后向安装,自带安全带的肩带仅应安装到较低的第 1 和第 2 两组插口 (7) 中, 并要将肩带末端的金属片固定到插口 3 (7)。 调节自带安全带的高度时,首先要卷起座套 (4)。 在座椅表面的前部,您可以看到插口 3 中有一个金属片将肩带固定到椅背上。 要拆下肩带,先将金属片通过穿孔从前面穿到后面, 然后再通过安装自带安全带肩带的穿孔 (5)。 重要提示!检查孩子的肩膀是否位于两组插口之间,如果是, 则始终使用与孩子肩膀平齐或低于肩膀的第一组可用插口。 重新将肩带安装到适当的插口中时,要确保金属片牢牢固定在插口 3 中, 并平贴在座椅外壳的前表面上 (6) (7)。 确保肩带没有卷曲缠绕或交叉。 确保肩垫后面的摩擦面贴着肩膀。 前向安全带的调节 - Group 1 对于前向安装,自带安全带的肩带仅应安装到上部的第 3 和第 4 组插口中 (7)。 调节自带安全带的高度时,...
- Page 37 将两跟肩带穿过孩子的胳膊套在肩膀上,同时将两根肩带上的接头拉到一起, 对齐插入带扣直到听到咔嗒的咬合声 (10) (11) (12)。 检查并确保腰带和肩带没有卷曲缠绕,接头可以正确合在一起, 然后再将接头插入到带扣中。 确保尽量放低下面的腰带,以固定住髋部。 警告! 为保护孩子的安全, 正确调节座椅自带安全带非常重要。 自带安全带与孩子之间的间隙不得超过 一指宽。 将儿童座椅安装到汽车中 此款汽车安全座椅经检验符合 Group 0 规格,适用于从出生至体重 10 公斤 (约从出生至 9 个月)的孩子 - 后向位置。 此款汽车安全座椅经检验符合 Group 1 规格,适用于体重在 9 至 18 公斤之间 (约 9 个月 - 4 周岁)的孩子 - 前向位置。 如果孩子的体重未达...
- Page 38 拉出成人安全带,直到安全带完全伸展。然后,握住成人安全带接头, 将安全带穿过座椅外壳和椅座之间的空隙。将成人安全带接头插入成人安全带带扣, 直到听到咔嗒的咬合声。确保成人安全带没有卷曲缠绕或造成任何妨碍。 使腰带与椅座上的导带器紧密啮合,椅座上有一些蓝色标记, 可按照其指示在椅座前部附近找到腰带导带器 (19)。 现在,将斜挎肩带与腰带分开,并将斜挎肩带放置到两侧的上导带器中, 导带器可在座椅外壳背面红色安全带锁上方找到 (20)。 再次确保成人安全带没有卷曲缠绕的情况。 现在紧固成人安全带。首先,按照座椅带扣 一侧所示的方向拉成人安全带的腰带部分,以将其拉紧。然后, 拉成人安全带的斜挎肩带部分,以确保斜挎肩带已绷紧 (21)。现在, 汽车安全座椅应该已安装牢固。再次检查并确保成人安全带没有卷曲打结的情况, 也不松垮。 现在,使用蓝色安全带锁夹将成人安全带的斜挎肩带和腰带 一起锁在成人安全带接头旁边 (22)。使用绳子将蓝色安全带锁夹系牢在座椅上, 以防丢失。将锁夹穿过座椅外壳和椅座之间,直达成人安全带接头, 并确保绳子不会过紧。 进行后向安装时,请勿使用红色安全带锁。 最后检查清单 无论儿童座椅有多么安全,结构多么完善, 您孩子的安全性仍取决于每次旅行之前您是否执行了以下检查。 自带安全带的设置是否正确,高度是否合适 (4) (5) (6) (7)。 确保座椅自带安全带没有卷曲缠绕。 检查并确保座椅自带安全带的松紧度适合孩子穿着的衣物,不会松垮(14)。 检查并确保座椅自带安全带与带扣扣紧,肩带接头锁在一起, 安全带松紧度合适 (10) (11) (12) (14)。 检查并确保汽车安全座椅在汽车中朝后放置(请参阅“后向位置”)。 检查并确保成人安全带已使用椅座上的成人安全带导带器及座椅外壳后面的上导 带器正确安装...
- Page 39 警告! 汽车成人安全带的带扣不能在儿童座椅腰带导带器上方。 否则,请尝试将儿童座椅安装在其他座位上,如有疑问, 请与我们的客户服务部联系。 拉出成人安全带,直到安全带完全伸展。然后,握住成人安全带接头, 将安全带穿过座椅外壳和椅座之间的空隙。将成人安全带接头插入成人安全带带扣, 直到听到咔嗒的咬合声 (23)。 确保成人安全带没有卷曲缠绕或造成任何妨碍。 现在,将成人安全带腰带部分放置到成人腰带导带器中, 导带器可在椅座上的红色安全带锁正下方找到 (L)。 向下按压操纵杆,打开汽车安全座椅成人安全带带扣一侧的红色安全带锁。 提起安全带锁的前部,并插入安全带的斜挎肩带部分 (24)。 现在紧固成人安全带。首先, 按照座椅带扣一侧所示的方向拉成人安全带的腰带部分,以将其拉紧。然后, 拉成人安全带的斜挎肩带部分,以确保斜挎肩带也已绷紧 (25), 然后锁上红色安全带锁 (26)。 现在,汽车安全座椅应该已安装牢固。 再次检查并确保成人安全带没有卷曲缠绕的情况,也不松垮。 最后检查清单 无论儿童座椅有多么安全,结构多么完善, 您孩子的安全性仍取决于每次旅行之前您是否执行了以下检查。 自带安全带的设置是否正确,高度是否合适 (7) (8) (9)。 确保座椅自带安全带没有卷曲缠绕。 检查并确保座椅自带安全带的松紧度适合孩子穿着的衣物,不会松垮(14)。 检查并确保座椅自带安全带与带扣扣紧,肩带接头锁在一起, 安全带松紧度合适 (10) (11) (12) (14)。 检查并确保汽车安全座椅在汽车中朝前放置,即与行驶方向一致 (请参阅前向位置)。 检查并确保自带安全带已使用腰带导带器正确安装,...
- Page 40 保养 座套的拆卸及清洁 要拆下座套,您需要先拆下自带安全带的带扣和肩带。 从座椅上拆下自带安全带的肩带及肩垫、座套及头部支撑垫, 请参阅“自带安全带的设置与调节”。 转动座椅底部的金属片并将其穿过座椅外壳的插口, 从椅座和座套上拆下胯部约束带。现在,拆下座套, 同时小心地将肩带穿过座套一侧的穿孔。 重新安装自带安全带及座套,只需反向执行上述步骤即可。 重新安装自带安全带及座套时,应检查并确保安全带没有卷曲缠绕或交叉, 且金属片平贴在座椅表面上。 此款汽车安全座椅的座套可以拆卸。若有轻度斑污,可使用湿布或肥皂水进行清洁。 可以将座套整个拆卸下来,用最高 30°C 的温水进行手洗。 警告! 有毒洗涤剂可引发疾病。 对座套切勿使用漂白剂清洗,不得熨烫、 机洗或使用滚筒式烘干机烘干, 这可能会损坏座套,导致需要更换座套。 带扣的拆卸及清洁 如有必要,可按自带安全带带扣中间的红色按钮,打开安全带带扣。 转动座椅底部的金属片并将其穿过座椅外壳的插口,从椅座上拆下胯部约束带。 使用温水将带扣彻底冲洗干净。让带扣自然晾干。 将肩带接头插入带扣时,留意是否听到咔嗒的咬合声。若未听到咔嗒声, 请重新扣紧。将带扣重新装配到座椅上之前,要先让其自然晾干。 警告! 切勿用油润滑带扣的任何部分。 始终检查并确保自带安全带带扣中没有食物碎屑或其他此类物质。...
- Page 41 其他注意事项 此款汽车安全座椅未经检验是否适合在飞机上使用。有关更多信息, 请联系航空公司。 为安全处置您的汽车安全座椅,请始终拆下自带安全带, 并采取相应措施使座椅不可再用。 注意 此款汽车安全座椅属于“通用”型儿童安全约束系统, 已经过检验符合法规 N°44/04 规定的标准,适合一般性的汽车应用, 可与大多数汽车座位配套。 如果汽车制造商声明其汽车使用许可中注明适合在该汽车上使用“通用”型儿童 安全约束系统,则可以选择在上面安装此款儿童安全约束系统。 按照最严格的审批标准,此安全约束系统属于“通用”类型, 而较早的型号并不符合这些新标准规定。 此安全约束系统仅能安装在配有 3 点固定式或伸缩式成人安全带且已通过 UN/ECE N°16 或其他相当标准认证的汽车中。 若存有疑问,请联系此安全约束系统的制造商或零售商。...
- Page 42 安全旅行系列可調式汽車安全座椅使用說明 感謝您購買此款 Group 0-1(約 0 至 4 周歲)可調式汽車安全座椅。 如果您對此款安全座椅不是完全滿意,或者您希望更換任何配件, 或者需要獲取與此安全座椅有關的任何幫助,請與我們的客戶服務部聯絡 (詳細資料請見本指南的封底)。 注意:此款汽車安全座椅僅適合在已安裝通過 ECE R16 或相當標準認證的 3 點伸縮式安全帶的汽車上使用。 用戶指南的存放 本說明書應始終存放在汽車安全座椅內,這一點非常重要。您可以將本說明書存放在 Group 0-1 汽車安全座椅 (3) 的兜袋中。 消費者須知 警告! 警告! 在後向位置,只能使用最大後仰位置。 安全氣囊可能會造成傷害。 請勿在裝有正面安全氣囊的乘客座位 上使用此兒童座椅。 警告! 警告! 汽車成人安全帶的帶扣不能在兒童座椅 為保護孩子的安全, 正確調節座椅自帶安全帶非常重要。 腰帶導帶器上方。否則, 請嘗試將兒童座椅安裝在其他座位上, 自帶安全帶與孩子之間的間隙不得超過 如有疑問,請與我們的客戶服務部聯絡。 一指寬。...
- Page 43 一般安全說明 本說明書應始終存放在汽車安全座椅內,以備日後參考之用。 未按照本說明書進行操作可能會影響孩子的安全。 汽車安全座椅安放位置必須正確,安裝必須牢固,以確保在正常的汽車使用條件下, 不會有任何零配件卡在任何可移動安全座椅下面或之間,或者卡在車門中。 汽車發生任何事故之後,均應立即更換此可調式汽車安全座椅, 以防存在任何無法察覺的損壞。 未經相應主管當局或製造商的許可, 不得以任何方式改裝汽車安全座椅或加裝零配件,否則將導致所有擔保條款失效。 請遮住汽車安全座椅以避開陽光,以免發熱部件灼傷孩子。 切勿將孩子單獨留在安全座椅上和車中。 確保汽車安全座椅周圍沒有鬆散的行李或其他大型物件,發生事故時, 這些行李或物件可能會給孩子造成傷害,也可能會使其他乘客受傷。 始終要緊固鬆動的零配件。 切勿使用沒有座套的汽車安全座椅。 切勿更換使用非本產品製造商建議使用的座套, 否則會直接影響汽車安全座椅的安全性。 在安裝汽車安全座椅後,務必立即緊固汽車的成人安全帶。 任何時候都應使用成人安全帶緊固安全座椅,即使不使用安全座椅時也須如此。 汽車發生碰撞時,緊固不牢的汽車安全座椅可能會給乘客造成傷害。 始終檢查並確保自帶安全帶帶扣中沒有食物碎屑或其他此類物質。 這些物質可能會影響帶扣正常發揮作用。 在寒冷的冬季,應注意確保在孩子換穿衣服後, 不會影響汽車安全座椅自帶安全帶的拉力和有效性。...
- Page 44 汽車安全座椅使用前準備 在使用新的可調式汽車安全座椅之前,必須充分瞭解如何正確安裝汽車安全座椅、 如何為孩子正確繫好安全帶並熟悉安全座椅的特性和功能,這一點非常重要。 請花點時間仔細閱讀並深入理解本說明書。最好是面對汽車安全座椅, 對照實物閱讀本說明書。 請務必閱讀安全警告。 在汽車中使用此安全座椅之前,請務必正確設置自帶安全帶,為您的孩子準備好座椅。 無論您的孩子多大,無論安全座椅是後向還是正向,這一點都適用。 Group 0-1 汽車安全座椅特性指南 (2) 頭部支撐墊 座椅外殼 成人安全帶斜挎肩帶上導帶器 肩墊(2 片) (僅用於後向安裝)(2 個) 自帶安全帶的調節器(2 個) 用於斜挎肩帶的紅色安全帶鎖 自帶安全帶緊固調節帶(2 條) (僅用於前向安裝)(2 個) 成人安全帶腰帶導帶器 自帶安全帶帶扣 (僅用於前向安裝)(2 個) 椅座 成人安全帶腰帶導帶器 (僅用於後向安裝)(2 個) 藍色成人安全帶鎖夾 (僅用於後向式安裝) 座椅後傾操縱桿 抱嬰腰帶 成人安全帶帶扣 成人安全帶連接器 座椅後傾...
- Page 45 警告! 在後向位置,只能使用最大後仰位置。 釋放操縱桿後,直接拉座椅(不要使用操縱桿),檢查操縱桿是否鎖定。 頭部支撐墊 此汽車安全座椅配備有頭部支撐墊 (I), 可以一直使用到孩子長大到不再需要安全座椅。 抱嬰腰帶 此汽車安全座椅配備有抱嬰腰帶 (H),可以更好地支撐住孩子。 我們建議抱嬰腰帶僅使用到孩子 6 個月大。 拆卸抱嬰腰帶 不再需要抱嬰腰帶時,可以將其拆下。您必須按照下面的操作說明來拆卸抱嬰腰帶。 完全後傾座椅,請參閱「座椅後傾」一節。 將手伸到座椅外殼下方以找到扣帶末端的金屬片。 要拆下胯部約束帶,先將金屬片穿過穿孔,然後穿過座套和抱嬰腰帶 (H)。 拆下抱嬰腰帶。 要重新安裝自帶安全帶,只需反向執行上述步驟即可。 確保重新安裝自帶安全帶胯部約束帶時, 金屬片完全穿過汽車安全座椅椅座底部的穿孔,並平貼在座椅上。 自帶安全帶的設置與調節 汽車安全座椅自帶安全帶的設置必須適合孩子的體形。 自帶安全帶有一個四點腰肩式安全帶和一個帶安全帶帶扣的胯部約束帶。 肩帶配有獨立的肩墊 (B)。 自帶安全帶的肩帶可以插入到座椅背面四組插口中的任意一組中, 且必須穿過插口束到孩子的肩上。...
- Page 46 後向安全帶的調節 - Group 0 對於後向安裝,自帶安全帶的肩帶僅應安裝到較低的第 1 和第 2 兩組插口 (7) 中, 並要將肩帶末端的金屬片固定到插口 3 (7)。 調節自帶安全帶的高度時,首先要捲起座套 (4)。 在座椅表面的前部,您可以看到插口 3 中有一個金屬片將肩帶固定到椅背上。 要拆下肩帶,先將金屬片通過穿孔從前面穿到後面, 然後再通過安裝自帶安全帶肩帶的穿孔 (5)。 重要提示!檢查孩子的肩膀是否位於兩組插口之間,如果是, 則始終使用與孩子肩膀平齊或低於肩膀的第一組可用插口。 重新將肩帶安裝到適當的插口中時,要確保金屬片牢牢固定在插口 3 中, 並平貼在座椅外殼的前表面上 (6) (7)。 確保肩帶沒有捲曲纏繞或交叉。 確保肩墊後面的摩擦面貼著肩膀。 前向安全帶的調節 - Group 1 對於前向安裝,自帶安全帶的肩帶僅應安裝到上部的第 3 和第 4 組插口中 (7)。 調節自帶安全帶的高度時,要先將座椅外殼後部的金屬片通過穿孔從後面穿到前面,...
- Page 47 將兩跟肩帶穿過孩子的胳膊套在肩膀上,同時將兩根肩帶上的連接器拉到一起, 對齊插入帶扣直至聽到哢嗒的咬合聲 (10) (11) (12)。 檢查並確保腰帶和肩帶沒有捲曲纏繞,連接器可以正確合在一起, 然後再將連接器插入到帶扣中。 確保儘量放低下面的腰帶,以固定住髖部。 警告! 為保護孩子的安全, 正確調節座椅自帶安全帶非常重要。 自帶安全帶與孩子之間的間隙不得超過 一指寬。 將兒童座椅安裝到汽車中 此款汽車安全座椅經檢驗符合 Group 0 規格,適用於從出生至體重 10 公斤 (約從出生至 9 個月大)的孩子 - 後向位置。 此款汽車安全座椅經檢驗符合 Group 1 規格,適用於體重在 9 至 18 公斤之間 (約 9 個月 - 4 周歲)的孩子 - 前向位置。 如果孩子的體重未達...
- Page 48 拉出成人安全帶,直到安全帶完全伸展。然後,握住成人安全帶連接器, 將安全帶穿過座椅外殼和椅座之間的空隙。 將成人安全帶連接器插入成人安全帶帶扣,直至聽到哢嗒的咬合聲。 確保成人安全帶沒有捲曲纏繞或造成任何妨礙。 使腰帶與椅座上的導帶器緊密嚙合,椅座上有一些藍色標記, 可按照其指示在椅座前部附近找到腰帶導帶器 (19)。 現在,將斜挎肩帶與腰帶分開,並將斜挎肩帶放置到兩側的上導帶器中, 導帶器可在座椅外殼背面紅色安全帶鎖上方找到 (20)。 再次確保成人安全帶沒有捲曲纏繞的情況。 現在緊固成人安全帶。首先, 按照座椅帶扣一側所示的方向拉成人安全帶的腰帶部分,以將其拉緊。然後, 拉成人安全帶的斜挎肩帶部分,以確保斜挎肩帶已繃緊 (21)。現在, 汽車安全座椅應該已安裝牢固。再次檢查並確保成人安全帶沒有捲曲打結的情況, 也不鬆垮。 現在,使用藍色安全帶鎖夾將成人安全帶的斜挎肩帶和腰帶 一起鎖在成人安全帶連接器旁邊 (22)。使用繩子將藍色安全帶鎖夾繫牢在座椅上, 以防遺失。將鎖夾穿過座椅外殼和椅座之間,直達成人安全帶連接器, 並確保繩子不會過緊。 進行後向安裝時,請勿使用紅色安全帶鎖。 最後檢查清單 無論兒童座椅有多麼安全,結構多麼完善, 您孩子的安全性仍取決於每次旅行之前您是否執行了以下檢查。 自帶安全帶的設置是否正確,高度是否合適 (4) (5) (6) (7)。 確保座椅自帶安全帶沒有捲曲纏繞。 檢查並確保座椅自帶安全帶的鬆緊度適合孩子穿著的衣物,不會鬆垮 (14)。 檢查並確保座椅自帶安全帶與帶扣扣緊,肩帶連接器鎖在一起, 安全帶鬆緊度合適 (10) (11) (12) (14)。 檢查並確保汽車安全座椅在汽車中朝後放置(請參閱「後向位置」)。...
- Page 49 警告! 汽車成人安全帶的帶扣不能在兒童座椅腰帶導帶器上方。 否則,請嘗試將兒童座椅安裝在其他座位上,如有疑問, 請與我們的客戶服務部聯絡。 拉出成人安全帶,直到安全帶完全伸展。然後,握住成人安全帶連接器, 將安全帶穿過座椅外殼和椅座之間的空隙。 將成人安全帶連接器插入成人安全帶帶扣,直至聽到哢嗒的咬合聲 (23)。 確保成人安全帶沒有捲曲纏繞或造成任何妨礙。 現在,將成人安全帶腰帶部分放置到成人腰帶導帶器中, 導帶器可在椅座上的紅色安全帶鎖正下方找到 (L)。 向下按壓操縱桿,打開汽車安全座椅成人安全帶帶扣一側的紅色安全帶鎖。 提起安全帶鎖的前部,並插入安全帶的斜挎肩帶部分 (24)。 現在緊固成人安全帶。首先, 按照座椅帶扣一側所示的方向拉成人安全帶的腰帶部分,以將其拉緊。然後, 拉成人安全帶的斜挎肩帶部分,以確保斜挎肩帶也已繃緊 (25), 然後鎖上紅色安全帶鎖 (26)。 現在,汽車安全座椅應該已安裝牢固。 再次檢查並確保成人安全帶沒有捲曲纏繞的情況,也不鬆垮。 最後檢查清單 無論兒童座椅有多麼安全,結構多麼完善, 您孩子的安全性仍取決於每次旅行之前您是否執行了以下檢查。 自帶安全帶的設置是否正確,高度是否合適 (7) (8) (9)。 確保座椅自帶安全帶沒有捲曲纏繞。 檢查並確保座椅自帶安全帶的鬆緊度適合孩子穿著的衣物,不會鬆垮 (14)。 檢查並確保座椅自帶安全帶與帶扣扣緊,肩帶連接器鎖在一起, 安全帶鬆緊度合適 (10) (11) (12) (14)。 檢查並確保汽車安全座椅在汽車中朝前放置, 即與行駛方向一致(請參閱「前向位置」)。...
- Page 50 保養 座套的拆卸及清潔 要拆下座套,您需要先拆下自帶安全帶的帶扣和肩帶。 從座椅上拆下自帶安全帶的肩帶及肩墊、座套及頭部支撐墊, 請參閱「自帶安全帶的設置與調節」。 轉動座椅底部的金屬片並將其穿過座椅外殼的插口, 從椅座和座套上拆下胯部約束帶。現在,拆下座套, 同時小心地將肩帶穿過座套一側的穿孔。 重新安裝自帶安全帶及座套,只需反向執行上述步驟即可。 重新安裝自帶安全帶及座套時,應檢查並確保安全帶沒有捲曲纏繞或交叉, 且金屬片平貼在座椅表面上。 此款汽車安全座椅的座套可以拆卸。若有輕度斑污,可使用濕布或肥皂水進行清潔。 可以將座套整個拆卸下來,用最高 30°C 的溫水進行手洗。 警告! 有毒的清潔液可引發疾病。 對座套切勿使用漂白劑清洗,不得熨燙、 機洗或轉籠乾燥,這可能會損壞座套, 導致需要更換座套。 帶扣的拆卸及清潔 如有必要,可按自帶安全帶帶扣中間的紅色按鈕,以打開安全帶帶扣。 轉動座椅底部的金屬片並將其穿過座椅外殼的插口,從椅座上拆下胯部約束帶。 使用溫水將帶扣徹底沖洗乾淨。讓帶扣自然晾乾。 將肩帶連接器插入帶扣時,留意是否聽到哢嗒的咬合聲。若未聽到哢嗒聲, 請重新扣緊。將帶扣重新裝配到座椅上之前,要先讓其自然晾乾。 警告! 切勿用油潤滑帶扣的任何部分。 始終檢查並確保自帶安全帶帶扣中沒有 食物碎屑或其他此類物質。...
- Page 51 其他注意事項 此款汽車安全座椅未經檢驗是否適合在飛機上使用。如需更多資訊, 請與航空公司聯絡。 為安全處置您的汽車安全座椅,請始終拆下自帶安全帶, 並採取相應措施使座椅不可再用。 注意 此款汽車安全座椅屬於「通用」型兒童安全約束系統,已經過檢驗符合法規 N°44/04 規定的標準,適合一般性的汽車應用,可與大多數汽車座位配套。 如果汽車製造商聲明其汽車使用認可中註明適合在該汽車上使用「通用」 型兒童安全約束系統,則可以選擇在上面安裝此款兒童安全約束系統。 按照最嚴格的認可標準,此安全約束系統屬於「通用」類型, 而較早的型號並不符合這些新標準規定。 此安全約束系統僅能安裝在配有 3 點固定式或伸縮式成人安全帶且已通過 UN/ECE N°16 或其他相當標準認證的汽車中。 若有疑問,請與此安全約束系統的製造商或零售商聯絡。...
- Page 52 Safe Voyage コンバーチブルチャイルドシート取扱説明書 当社のグループ 0-1 コンバーチブルチャイルドシートをお買い上げいただき、 ありがとうございました。本製品についてお気付きの点やご不明な点がある場合、 または付属品の交換をご希望の場合は、巻末に記載のお客様相談窓口までご連絡 ください。 注意 : 本製品は、ECE R16 または同等の基準で承認された 3 点式シートベルトを 装備した車での使用にのみ適合しています。 取扱説明書の保管 本説明書は、座席に必ず常備してください。グループ 0-1 チャイルドシートのカバ ーに、本説明書を格納できるポケットがあります (3)。 使用上の注意 警告 ! 警告 ! 後ろ向きで使用する場合は、 本チャイルドシートは、 必ずリクライニングを最も寝かせた 前面にエアバッグがある助手席では 状態にしてください。 使用しないでください。エアバッグが 作動した場合、 傷害を及ぼすおそれがあります。 警告 ! 警告 ! 車のシートベルトのバックルが、...
- Page 53 安全にお使いいただくために 必要なときにいつでも読めるよう、本説明書を座席に常備しておいてください。 本説明書の内容を守らなかった場合、 お子さまを安全に保護できないおそれがあります。 チャイルドシートの設置位置は、車を通常使用する状況下で、 座席の可動部やドアに挟まれない位置にする必要があります。 事故があった場合、チャイルドシートの使用を取りやめてください。 見えない箇所が破損している可能性があります。 関係当局または製造元の許可なく、 チャイルドシートに改造を加えないでください。改造を行った場合、 保証は無効となります。 チャイルドシートに直射日光が当たらないように注意してください。 本体や部品が熱くなり、お子さまがケガややけどを負うおそれがあります。 お子さまをチャイルドシート上や車内に 1 人で残さないでください。 かばんなど、事故の発生時に傷害の原因となり得る大きな荷物が、 未固定の状態で車内に置かれていないか確認してください。 同乗者に傷害を及ぼすおそれがあります。 動く可能性のある荷物は必ず固定しておいてください。 チャイルドシートの使用時は、シートカバーを必ず装着してください。 製造元が定めるシートカバー以外は使用しないでください。 チャイルドシートの安全性に直接影響します。 チャイルドシートを設置した後で、 車の座席のシートベルトをきちんと装着したかどうかを常に確認してください。 お子さまを乗せていないときも含めて、 チャイルドシートは車のシートベルトで常に固定しておいてください。 正しく固定していないと、事故の際に傷害の原因となるおそれがあります。 ハーネスのバックルに食べ物のかけらなどの異物が入っていないか、 常に確認してください。バックルが正しく機能しなくなる可能性があります。 冬で気温が低いときには、 衣服を変えたことでチャイルドシートのハーネスの締め付けや効果が弱 まっていないか注意してください。...
- Page 54 チャイルドシートの設置準備 チャイルドシートをお使いになる前に、シートの正しい設置方法、 お子さまの安全を守る方法、 およびシートの機能について十分に把握しておくことが重要です。 本説明書をよくお読みになり、内容を十分にご理解ください。 実際にシートを目の前に置いてお読みになることをお勧めします。 使用上の注意は毎回お読みください。 車でチャイルドシートをお使いになる前に、シートをお子さまに合わせるために、 ハーネスを正しく調整する必要があります。これは、お子さまの年齢と、 シートが前向きか後ろ向きかに応じて変わります。 グループ 0-1 チャイルドシートの構成 (2) 頭部サポートクッション シート本体 車の肩ベルトのベルトガイド 肩ベルトパッド (左右) (後ろ向きの場合のみ使用) (2 つ) ハーネスの肩ベルトの調節ボタン (2 つ) 赤色の肩ベルトロック (前向きの場合のみ使用) (2 つ) ハーネスの締め付けの調節ベルト 車の腰ベルトのベルトガイド (2 つ) (前向きの場合のみ使用) (2 つ) ハーネスのバックル 車の腰ベルトのベルトガイド (後ろ向きの場合のみ使用) (2 つ) 台座...
- Page 55 警告 ! 後ろ向きで使用する場合は、 必ずリクライニングを最も寝かせた 状態にしてください。 レバーを離した後で、レバーを操作せずにシート本体を動かしてみて、 きちんとロックされたことを確認してください。 頭部サポートクッション 本チャイルドシートには、頭部サポートクッション (I) が付属しています。 お子さまがこのシートに適合する間は使用できます。 新生児用インナークッション 本チャイルドシートには、新生児のお子さまをサポートするインナークッション (H) が付属しています。新生児用インナークッションは、 6 か月未満のお子さまにのみ使用することをお勧めします。 新生児用インナークッションの取り外し 新生児用インナークッションは、不要になった場合は取り外すことができます。 以下の説明に従ってください。 リクライニングを最も寝かせた状態にします (「リクライニング」を参照)。 シート本体の下に手を置きます。 バックルのベルトの端にメタルプレートがあります。 股ベルトを取り外すには、メタルプレートを穴に入れ、 カバーと新生児用インナークッションに通します (H)。 新生児用インナークッションを取り外します。 ハーネスを再度取り付けるには、上記の手順の逆を行います。このとき、 ハーネスの股ベルトのメタルプレートはシートの台座の穴に完全に通し、 シートに対して平らにします。 ハーネスの装着と調整 チャイルドシートのハーネスは、 お子さまの体格に合わせて位置を調整する必要があります。 ハーネスは、4 点式の肩および腰ベルトと、 バックルが付いた股ベルトで構成されています。 肩ベルトにはそれぞれパッドが付いています (B)。 肩ベルトは、シート背面の...
- Page 56 後ろ向きの場合のハーネスの調整 - グループ 0 後ろ向きの場合は、ハーネスの肩ベルトは通し穴 1 と 2 (下側の 2 組の通し穴) (7) のいずれかに取り付け、メタルプレートは通し穴 3 (7) に固定します。 ハーネスの高さを調整するには、まずシートカバーを外します (4)。 シート表側の前面を見ると、通し穴 3 で肩ベルトがメタルプレー トによってシート裏側に向かって保持されているのがわかります。 肩ベルトを取り外すには、穴にメタルプレートを入れて前面から裏面に通し、 肩ベルトが止まっている穴に再度通します (5)。 重要 : お子さまの肩の高さが、2 組の通し穴の高さの中間にあたる場合は、 肩の高さより下にある通し穴のうちで一番高いものを使用してください。 肩ベルトを適切な通し穴に再度取り付けます。 メタルプレートは通し穴 3 に固定し、 シート本体の表面に対して平らにします (6) (7)。 肩ベルトにねじれや交差がないかどうか確認します。 パッドの裏側の摩擦面が肩と接していることを確認します。 前向きの場合のハーネスの調整 – グループ 1 後ろ向きの場合は、ハーネスの肩ベルトは通し穴...
- Page 57 お子さまの腕を左右それぞれの肩ベルトに通す形で、 肩ベルトのコネクターを重ね合わせてバックルに入れ、「カチッ」 と音がするまで差し込みます (10) (11) (12)。 コネクターをバックルに差し込む前に、 ベルトの腰部分と肩部分がねじれていないこと、 およびコネクターの形状が合うことを確認してください。 骨盤を保持できるよう、腰部分のストラップはできるだけ低くしてください。 警告 ! お子さまを保護するためには、 ハーネスを正しく調整することが不可欠です。 ハーネスと体の間に指 1 本分以上のすき間が 空かないようにしてください。 車へのシートの設置 本チャイルドシートは、新生児~体重 10 kg (出生~年齢 9 か月頃) のお子さま用のグループ 0 として承認されています。 この場合は後ろ向きで使用します。 本シートは、体重 9 kg ~ 18 kg (年齢 9 か月頃~ 4 歳頃) のお子さま用のグループ 1 としても承認されています。この場合は前向きで使用します。...
- Page 58 車のシートベルトを完全に引き出します。次に、車のシートベルトのコネクター を持ちながら、シート本体と台座の間のすき間にベルトを通します。 車のシートベルトのコネクターをバックルに入れ、「カチッ」 と音がするまで差し込みます。 シートベルトにねじれや引っかかりがないことを確認してください。 車の腰ベルトの部分を、台座のベルトガイドに通します。 腰ベルトのベルトガイドは、台座の前面付近で青色の印がある部分です (19)。 次に、肩ベルトの部分を腰ベルトの部分から離し、左右のベルトガイドに通 します。このベルトガイドは、シート本体裏側の赤色のシートベルトロックの上 にあります (20)。 ここでも、ベルトにねじれがないかどうか確認します。 次にベルトを締めます。まず、車のシートベルトのバックル側に示された方向に、 腰ベルト部分を引きます。次に肩ベルト部分を引いて、きつく締まっていることを 確認します (21)。 これでチャイルドシートはきちんと固定されます。 ベルトにねじれやからみがないか再度確認します。 車のシートベルトのコネクターの横で、青色の固定用クリップを使って、 肩ベルト部分と腰ベルト部分をロックします (22)。 クリップは紛失防止のためにひもでシートにつながっています。 シート本体と台座の間でコネクターに届くようにクリップを通します。その際、 ひもがあまり張らないようにします。 後ろ向きの設置では、赤色のロックは使用しないでください。 完了時のチェック項目 チャイルドシート自体の安全性や構造がいくら万全でも、シートを正しく設置 しなくては、お子さまを安全に保護できません。毎回の使用のたびに、 以下のチェック項目を確認してください。 ハーネスを正しく装着しましたか。肩ベルトの高さは合っていますか (4) (5) (6) (7)。 ハーネスにねじれはありませんか。 ハーネスが衣服に密着し、ゆるみはありませんか (14)。 ハーネスの肩ベルトのコネクターを合わせてバックルにきちんと差し込み、 固定しましたか。ハーネスの締め具合は適切ですか (10) (11) (12) (14)。 チャイルドシートを後ろ向きに設置しましたか...
- Page 59 警告 ! 車のシートベルトのバックルが、 チャイルドシート側の腰ベルト固定ガイドより上にある状態では使用できません。 その場合は、別の座席で設置をお試しください。ご不明な点がある場合は、 お客様相談窓口にお問い合わせください。 車のシートベルトを完全に引き出します。次に、 車のシートベルトのコネクターを持ちながら、 シート本体と台座の間のすき間にベルトを通します。 車のシートベルトのコネクターをバックルに入れ、「カチッ」 と音がするまで差し込みます (23)。 シートベルトにねじれや引っかかりがないことを確認してください。 次に、車のシートベルトの腰ベルト部分をベルトガイドに通します。 腰ベルトのベルトガイドは、 台座の赤色のシートベルトロックのすぐ下にあります (L)。 チャイルドシートのレバー (車のバックル側にあるレバー) を下に動かして、 赤色のシートベルトロックを開けます。ロックの前面部分を持ち上げ、 車のシートベルトの肩ベルト部分を入れます (24)。 次にベルトを締めます。まず、車のシートベルトのバックル側に示された方向に、 腰ベルト部分を引きます。次に肩ベルト部分を引いて、 きつく締まっていることを確認します (25)。次に、 赤色のシートベルトロックをロックします (26)。 これでチャイルドシートはきちんと固定されます。 ベルトにねじれや緩みがないか再度確認します。 完了時のチェック項目 チャイルドシート自体の安全性や構造がいくら万全でも、 シートを正しく設置しなくては、お子さまを安全に保護できません。 毎回の使用のたびに、以下のチェック項目を確認してください。 ハーネスを正しく装着しましたか。高さは合っていますか (7) (8) (9)。 ハーネスにねじれはありませんか。 ハーネスが衣服に密着し、ゆるみはありませんか...
- Page 60 お手入れの方法 カバーの取り外しと洗浄 カバーを取り外すには、 ハーネスのバックルと肩ベルトを取り外す必要があります。 ハーネスの肩ベルトと肩ベルトパッドを、シート、カバー、 頭部サポートクッションから取り外します。 「ハーネスの装着と調整」を参照してください。 台座およびカバーから股ベルトを取り外します。それには、 シート下面のメタルプレートの向きを変え、シート本体の通し穴に通します。 次にカバーを取り外します。 このとき、カバー横の穴を肩ベルトが通るように注意します。 ハーネスとカバーを再度取り付けるには、この手順の逆を行います。 その際は、ベルトにねじれや交差がないかどうか、 およびメタルプレートがシート表面に対して平らになっているかどうかを確認 してください。 シートカバーは着脱式です。軽い汚れは、湿らせた布か石鹸水で拭いてください。 カバーを完全に取り外して、30 ℃以下の水かぬるま湯で手洗いすることもできます。 警告 ! 毒性のある洗剤液は疾病の原因となるおそれがあります。 漂白剤、アイロン、洗濯機、乾燥機は使用しないでください。 カバーが損傷し、交換が必要になる可能性があります。 バックルの取り外しと洗浄 ハーネスのバックルの中央にある赤いボタンを押してバックルを開きます。 台座から股ベルトを取り外します。それには、 シート下面のメタルプレートの向きを変え、シート本体の通し穴に通します。 ぬるま湯でバックルをよくゆすぎ、自然乾燥させます。 肩ベルトのコネクターをバックルに差し込んだときに「カチッ」 という音がすることを確認します。音がしない場合は、 上記の手順を繰り返します。バックルは乾いてからシートに取り付けてください。 警告 ! バックルには油を一切差さないでください。 ハーネスのバックルに食べ物のかけらなどの 異物が入っていないか、常に確認してください。...
- Page 61 補足情報 本チャイルドシートは航空機での使用は承認されておりません。 詳しくは航空会社にお問い合わせください。 本チャイルドシートを廃棄する場合は、安全のために、必ずハーネスを取り外し、 シートを再利用できない状態にしたうえで廃棄してください。 告知 本チャイルドシートは「汎用 (ユニバーサル)」の CRS (年少者拘束装置) です。 N°44/04 の基準で承認を受けています。 自動車での汎用的な使用に適合しており、大半の自動車の座席に使用できます。 本チャイルドシートは、自動車メーカーが仕様で「汎用 (ユニバーサル)」 の CRS (年少者拘束装置) 対応としている車種に一般的に適合します。 本チャイルドシートは、最も厳密な承認基準にのっとって「汎用 (ユニバーサル)」と分類されています。従来のモデルは、 これらの新しい規定には準じていません。 本製品は、UN/ECE N°16 または同等の基準に準拠しているとして 承認を受けた 3 点式の固定型または収納型シートベルトを装備した車にのみ 設置できます。 ご不明な点がある場合は、 チャイルドシートの製造元または販売店にお問い合わせください。...
- Page 62 Safe Voyage 컨버터블 카시트 지침 본 그룹 0-1 컨버터블 카시트를 구입해 주셔서 감사합니다. 본 카시트에 대한 불만 사항이 있거나, 액세서리를 교체해야 하거나 카시트와 관련하여 도움이 필요할 경우 고객 서비스 부서(본 설명서 뒷면에 자세한 정보 참조)에 문의할 수 있습니다. 참고: ECE R16이나 이에 상응하는 표준에 따라 승인된 3점 접이식 안전 벨트가 장착된...
- Page 63 일반 안전 지침 본 사용 설명서는 나중에 다시 참조할 수 있도록 항상 카시트와 함께 보관하십시오. 본 사용 설명서를 따르지 않을 경우 어린이의 안전을 보장할 수 없습니다. 카시트를 장착하고 설치할 때는 정상적으로 자동차를 사용할 경우 부품이 이동식 시트 아래 또는 사이나 자동차 문에 끼지 않도록 해야 합니다. 사고...
- Page 64 카시트 사용 준비 신제품 컨버터블 카시트를 사용하려면 먼저 카시트의 올바른 설치 방법 및 어린이를 안전하게 앉히는 방법을 완벽하게 이해하고 시트의 특징 및 기능을 충분히 숙지해야 합니다. 시간을 내어 본 사용 설명서를 자세히 읽고 완전히 이해하시기 바랍니다. 카시트를 앞에 두고 본 사용 설명서를 읽어보는 것이 가장 좋습니다. 안전...
- Page 65 경고! 뒤보기 위치에서는 가장 많이 기울어진 위치만 사용해야 합니다. 레버를 놓은 다음에는 레버를 작동하지 않고 시트 셸을 당겨 레버가 잠겼는지 확인하십시오. 머리 받침대 쿠션 본 카시트에는 머리 받침대 쿠션(I)이 있어 어린이가 시트보다 더 크게 자랄 때까지 사용할 수 있습니다. 신생아용 보호 패드 본...
- Page 66 뒤보기 하네스 조절 - 그룹 0 뒤보기인 경우에는 하네스 어깨 벨트를 아래쪽 두 개의 투입구 1과 2(7)에만 끼워야 하며 금속 판을 투입구 3(7)에 고정해야 합니다. 하네스의 높이를 조절할 때는 먼저 시트 커버를 벗기십시오(4). 시트 표면 앞쪽의 투입구 3에는 어깨 벨트를 뒷좌석에 고정하는 금속 판이 보입니다.
- Page 67 어린이의 팔이 각 어깨 벨트를 통과하도록 하고 어깨 벨트의 연결 장치를 모아 정렬하고 딸깍 소리가 날 때까지 버클에 끼웁니다(10) (11) (12). 무릎 부분과 어깨 부분이 꼬이지 않았는지 확인하고 연결 장치를 버클에 끼우기 전에 연결 장치를 올바로 끼울 수 있는지 확인하십시오. 골반을...
- Page 68 완전히 늘어날 때까지 안전 벨트를 잡아 당깁니다. 그런 다음 안전 벨트 연결 장치를 잡고 시트 셸과 베이스 사이의 공간으로 벨트를 넣습니다. 안전 벨트 연결 장치를 딸깍 소리가 날 때까지 버클에 끼웁니다. 안전 벨트가 꼬이거나 장애물이 없는지 확인합니다. 베이스의 가이드로 무릎 벨트 부분을 연결합니다. 베이스 앞쪽 부근에 있는 무릎 벨트...
- Page 69 경고! 차량 안전 벨트 버클이 어린이용 시트의 무릎 벨트 가이드 위로 올라가서는 안 됩니다. 이런 경우 다른 좌석에 설치하거나 고객 서비스 부서에 문의하십시오. 완전히 늘어날 때까지 안전 벨트를 잡아 당깁니다. 그런 다음 연결 장치를 잡고 시트 셸과 베이스 사이의 공간으로 벨트를 넣습니다. 안전 벨트 연결 장치를 딸깍 소리가 날...
- Page 70 유지 관리 커버 분리 및 세탁 커버를 분리하려면 하네스 버클 및 어깨 벨트를 분리해야 합니다. 시트, 커버 및 머리 받침대 쿠션에서 어깨 패드와 함께 하네스 어깨 벨트를 분리합니다. '하네스 장착 및 조절'을 참조하십시오. 시트 바닥에 있는 금속 판을 돌리고 시트 셸의 투입구로 넣어서 시트 베이스 및 커버로부터...
- Page 71 추가 정보 본 카시트는 비행기에서 사용하도록 승인되지 않았습니다. 자세한 내용은 항공사에 문의하십시오. 카시트를 안전하게 폐기하려면 항상 하네스를 분리하고 시트를 사용할 수 없게 만드 십시오. 고지 사항 본 카시트는 "범용" 어린이 보호 장비입니다. 본 제품은 N°44/04 규정에 따라 승인을 받았으며 자동차에서 일반적으로 사용하는 데 적합하고 대부분의 자동차 시트에서...
Need help?
Do you have a question about the Safe Voyage FP2000 and is the answer not in the manual?
Questions and answers