Advertisement
Table of Contents
- 1 Section One: Install the Junction Box
- 2 Section Two: Prepare and Install the Center Feed Power Connector
- 3 Section Three: Install the LED Soft Strip with B90 Connectors (Side Mount)
- 4 Section Four: Install the Standard LED Soft Strip with Solderless Snap & Light Connector (LC-SLC) (Side Mount)
- 5 Section Five: Install LED Soft Strip on the Bottom of Channel
- 6 Section Six: Alternate LED Soft Strip Installation on Bottom of Channel
- 7 Section Seven: Lenses
- Download this manual
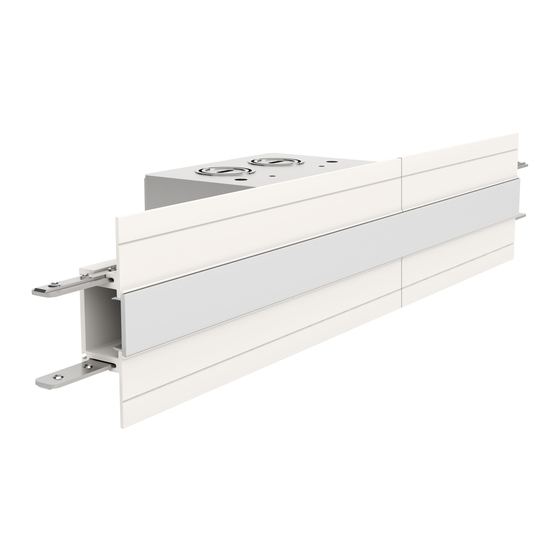
Installation Instructions for TruLine 1A Center Feed Power Channel Connector
IMPORTANT INFORMATION
- This instruction must be used concurrently with other
TruLine 1A BIY installation instructions.
- This product is wall or ceiling mount.
- This instruction shows a typical installation.
SAVE THESE INSTRUCTIONS!
Section One: Install the Junction Box
A
JUNCTION
BOX
3: Remove the two #4-40 screws from the junction box using
a 1/16" Allen wrench to remove the Center Feed Power
Connector assembly.
C
ADJUSTABLE
MOUNTING BAR
PHILLIPS
SCREW
4: Mount each adjustable mounting bar to one side of the junction box and secure them with the mounting brackets and two
Phillips screws provided.
D
STUD
ADJUSTABLE
MOUNTING BAR
6
CONDUIT W/
LOW-VOLTAGE WIRES
TRAP
DOOR
#4-40
SCREW
2
1
LENS
HORIZONTAL ORIENTATION
JUNCTION
BOX
MOUNTING
4
BRACKET
#8 SCREW
5
JUNCTION
BOX
1718 W. Fullerton Chicago, IL 60614
Ph: 773.770.1195 ● Fax: 773.935.5613
www.PureEdgeLighting.com ● info@PureEdgeLighting.com
© 2016 PureEdge Lighting. All Rights Reserved.
1: Remove the lens from the Center Feed Power connector.
2: Remove the #4-40 screw from the junction box using a 1/16"
Allen wrench to remove the trap door from the assembly.
B
JUNCTION
BOX
ADJUSTABLE
MOUNTING BAR
PHILLIPS
SCREW
NOTE:
The adjustable mounting bars mount to studs that are
spaced 13" to 24" apart.
5: Place the lips on the adjustable mounting bars against the
studs. Secure the adjustable bars to the studs with the #8
screws.
6: Install conduit(s) (if required by local electrical code) and
run low voltage wires to the junction box.
Doc # 902-TL1A-CFP_04
CENTER FEED
POWER CONNECTOR
3
3
#4-40 SCREW
VERTICAL ORIENTATION
4
JUNCTION
BOX
MOUNTING
BRACKET
1
Advertisement
Table of Contents

Related Manuals for PureEdge Lighting TruLine 1A

Summary of Contents for PureEdge Lighting TruLine 1A
-
Page 1: Section One: Install The Junction Box
Ph: 773.770.1195 ● Fax: 773.935.5613 www.PureEdgeLighting.com ● info@PureEdgeLighting.com © 2016 PureEdge Lighting. All Rights Reserved. Installation Instructions for TruLine 1A Center Feed Power Channel Connector IMPORTANT INFORMATION - This instruction must be used concurrently with other TruLine 1A BIY installation instructions. -
Page 2: Section Two: Prepare And Install The Center Feed Power Connector
LED strip loosely back into the reel. Section Two: Prepare and Install the Center Feed Power Connector 1: Refer to Section One in the TruLine 1A Channel and Lens instructions to measure and cut the channel and lens before continuing. -
Page 3: Section Three: Install The Led Soft Strip With B90 Connectors (Side Mount)
4: Attach the assembled trap door frame to the junction box using the #4-40 screws. NOTE: Refer to Section Three in the TruLine 1A Channel and Lens instructions to plaster before continuing. #4-40 TRAP DOOR SCREW FRAME Section Three: Install the LED Soft Strip with B90 Connectors (side mount) -
Page 4: Section Four: Install The Standard Led Soft Strip With Solderless Snap & Light Connector (Lc-Slc) (Side Mount)
Section Four: Install the Standard LED Soft Strip with Solderless Snap & Light Connector (LC-SLC) (side mount) SNAP & LIGHT LED STRIP CONNECTOR LED STRIP SNAP & LIGHT CONNECTOR SIDE SIDE MOUNT MOUNT 1: Place the Snap & Light connector into the channel where the LED soft strip will be installed. 2: Insert the LED strip into the Snap &... - Page 5 BOTTOM BOTTOM MOUNT MOUNT LED STRIP B90 POWER SNAP & LIGHT CONNECTOR CONNECTOR 3: If using two B90 connectors, line up the red wire side of the power connector with the "+24VDC" marking on the LED strip. Push the male connector of the LED strip into the female connector of the power connector. If necessary, repeat for the other LED strip.
-
Page 6: Section Six: Alternate Led Soft Strip Installation On Bottom Of Channel
Section Six: Alternate LED Soft Strip Installation on Bottom of Channel 1: Attach the bent trap door to the Center Feed Power Connector with the provided screw. TRAP DOOR LED STRIP 2: Route excess LED strips from other power feeds into the BOTTOM junction box.
Need help?
Do you have a question about the TruLine 1A and is the answer not in the manual?
Questions and answers