
Related Manuals for Rondo Econom Series


Summary of Contents for Rondo Econom Series
- Page 1 Operating manual Econom STM513 SSO514 Edition BD411402 03.2014 Technical specification subject to change without notice www.rondo-online.com...
- Page 3 Fuli Yingli Bulding, No. 3 Fax +39 0445 575 317 Hua Qiang Road sales@it.rondo-online.com Guangzou P.R.C. 510623 China RONDO GmbH & Co. KG Tel. +86 20 838 822 11 D-57299 Burbach Fax +86 20 838 886 01 Hoorwaldstrasse 44 info@cn.rondo-online.com Tel.
-
Page 7: Table Of Contents
Index Safety information 1.1 Explanation of symbols 1.2 Explanation of warning signs 1.3 Safety elements 1.3.1 Safety guards 1.4 Safety instructions and information which must be followed Transporting, setting up, connecting, dismounting, storing 2.1 Machine delivery 2.2 Transportation 2.3 Unpacking the machine 2.4 Setting up the machine 2.4.1 Installing the machine tables (SSO) 2.4.2 Mounting the forked supports (SSO) - Page 8 Index Putting the machine into operation 4.1 Preparing for operational readiness 4.2 Starting/stopping the machine Operation 5.1 Operating instructions 5.1.1 Sheeting 5.2 Sources of errors in the sheeting process Cleaning 6.1 Cleaning 6.1.1 General information 6.1.2 Care Maintenance 7.1 General information on maintenance of the machine 7.2 Maintenance list 7.3 Replacement parts list Trouble shooting...
-
Page 9: Safety Information
Safety information Safety information Explanation of symbols All the sections in this operating manual containing safety instructions which absolutely must be observed are marked with this symbol and with a number. All the sections in this operating manual containing information which absolutely must be observed are marked with this symbol. -
Page 10: Safety Instructions And Information Which Must Be Followed
Before putting the machine into operation the operating manual must be read! The machine of RONDO is exclusively built for sheeting, booking and final sheeting of dough or marzipan sheets for the food industry. However, the machine is not suitable for the processing of other prod- ucts (e.g. - Page 11 Operation of the machine when any of the safety devices is out of order is prohibited. Defective safety devices must be replaced immediately with new origi- nal parts from RONDO. Machine parts located in the area in which the dough is being pro- cessed, and whose surface coating becomes worn (e.g. chrome plate worn off) must be replaced.
- Page 12 Safety information The machine may only be operated with the machine tables mounted! Ensure that conveyor belt tension is correctly adjusted! Do not deposit any loose objects such as knives, tools, articles of cloth- ing, etc. in the area where the dough is located. Table models (STM) must be placed so as to rest properly over the whole work table! Check to ensure that there are no loose screws in the area where the...
- Page 13 30 cm, interference with active implants (e.g. pacemakers, defibrilla- tors) can be excluded with a high degree of probability. RONDO will not accept liability when any of the above safety in- structions / notes have not been complied with! Edition BD411402...
-
Page 14: Transporting, Setting Up, Connecting, Dismounting, Storing
Transporting, setting up, connecting, dismounting, storing Transporting, setting up, connecting, dismounting, storing Machine delivery The machine is delivered in its original packaging. • Report any claims for damage caused as a result of transportation directly to the freight handlers (see the packaging: The delivery documentation is found on the outside of the packaging) Transportation When transporting the machine must be packed in the original packag-... -
Page 15: Setting Up The Machine
Transporting, setting up, connecting, dismounting, storing Setting up the machine Two people are required to set up the machine. 2.4.1 Installing the machine tables (SSO) • Unscrew the screws (1) using a hexagon socket screw key • Dismount the front and rear lateral bracket (2) on the machine table •... -
Page 16: Mounting The Forked Supports (Sso)
Transporting, setting up, connecting, dismounting, storing front side rear side • Mount the lateral brackets (2), tighten the screws (1) using a hexagon socket screw key Lifting the machine tables 1. Bring the safety guard in the lower position. 2. Lift the machine table until the plastic material supports (22) (front and rear) lock on the safety guard. - Page 17 Transporting, setting up, connecting, dismounting, storing • Push forked support (9) into the support guide (10) 11 11a • Insert catch plug (11) of the forked support, with fitted washer (11a), into one side of the table • Bend up the forked support (9) and secure it to the opposite side of the table (washer fitted on the catch plug) •...
-
Page 18: Installing The Machine Tables (Stm)
Transporting, setting up, connecting, dismounting, storing Position of the forked support (9) when the machine table is hinged down. 2.4.3 Installing the machine tables (STM) • Set the machine on a level work table (Make sure that the working height for the operator is correctly set) •... -
Page 19: Tensioning The Conveyor Belts
Transporting, setting up, connecting, dismounting, storing 2.4.4 Tensioning the conveyor belts Tense the conveyor belts only enough so that the heaviest pieces of dough (max. 4 kg) can still be moved along the belt without the con- veyor belt dragging. Proceed as follows: "X"... -
Page 20: Requirements For Putting The Machine Into Operation
Transporting, setting up, connecting, dismounting, storing Requirements for putting the machine into operation Power supply and frequency at the mains circuit to which the machine is connected must be in accordance with specifications contained on the sign “Electrical connected loads” (This sign is found on the cable lead-through on the machine base). -
Page 21: Moving Direction Test
Transporting, setting up, connecting, dismounting, storing Moving direction test Monitor to ensure that the belts are properly tensioned. • Press the start (19) (only impulse) The conveyor belts must move from left to right. If the belts are moving in the wrong direction: •... -
Page 22: General Data About The Machine
3.1.1 Authorized use of the machine The machine of RONDO is exclusively built for sheeting, booking and final sheeting of dough or marzipan sheets for the food industry. However, the machine is not suitable for the processing of other prod- ucts (e.g. -
Page 23: Temperatures
General data about the machine 3.1.3 Temperatures The ambient temperatures permissible for the machine: +5 ºC to +40 ºC Permissible temperatures for storage of the machine: -25 ºC to +55 ºC, for brief periods of time up to +70 ºC 3.1.4 Ambient humidity The ambient humidity permissible for the machine lies in the area of... -
Page 24: Maschine Models
General data about the machine Maschine models 3.2.1 STM 513 Table model (see 9.1 Technical data Econom) 3.2.2 SSO 514 Socle model (see 9.1 Technical data Econom) Prerequisites In order for the dough to be sheeted by the machine, the following pre- requisites must be fulfilled: •... -
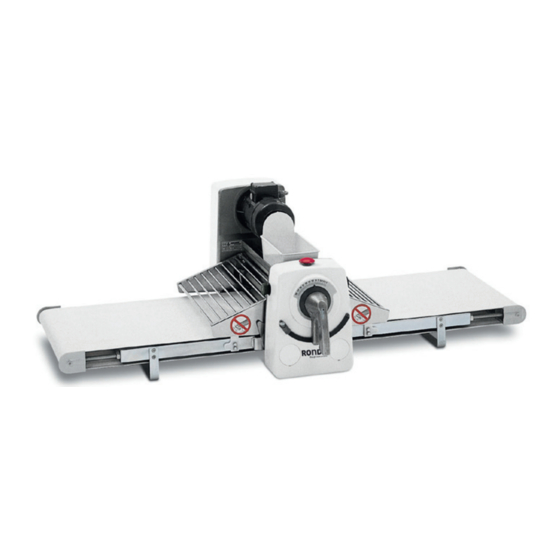
Page 25: Complete View Of The Machine
General data about the machine Complete view of the machine 1 Rear housing 2 Motor 3 Flour container 4 Front housing 5 Roller gap adjusting mechanism 6 Roller gap limit stop 7 Safety guard 8 Conveyor belt 9 Forked support 10 Idle roller 11 Cover 12 Start push-button... -
Page 26: Operating Elements
General data about the machine Operating elements 3.5.1 Safety guards The safety guards (7) protect the operator against inadvertent contact with the rollers. By raising the safety guards (7) the machine can also be stopped. 3.5.2 Roller gap adjusting mechanism The desired roller gap is set using the roller gap adjusting mechanism (5) (see also 5.1.1 Sheeting). -
Page 27: Putting The Machine Into Operation
Putting the machine into operation Putting the machine into operation Prior to the first starting-up, the complete machine must be thoroughly cleaned. Preparing for operational readiness • Close both safety guards (1) (see 3.5.1 Safety guards) On the SSO model. •... -
Page 28: Operation
Operation Operation Operating instructions Reaching under the closed safety guard is prohibited! 5.1.1 Sheeting The machine is designed to accommodate dough pieces with a maximum weight of 4 kg! Never leave loose objects such as knives, tools, articles of cloth- ing, etc. -
Page 29: Sources Of Errors In The Sheeting Process
Operation Once the dough piece has fully cleared the rollers: • Press the stop push-button (5) The machine will stop • Manually set the next roller gap (depending on type of dough being processed) (see 5.1.1 Sheeting) • Release lever (1) Lever (1) must lock into place •... -
Page 30: Cleaning
Cleaning Cleaning Cleaning Before cleaning the machine, pull out the mains plug. The machine must never be cleaned using spray water, high-pressure cleaners or a steam-cleaning machine. 6.1.1 General information Dismounting the scraper • Open rollers fully • Lock the safety guard into the upper position •... - Page 31 Cleaning Exchange of scraper blades Required tool: Allen key No. 4 Exchange of scraper blades: • disassemble the spring clamp (3) on the left or right hand side • slide the scraper blade off Attention For protection of the fingers, please use a cloth. The edges of the blades are sharp and there is danger of cutting oneself.
- Page 32 Cleaning Dismounting machine tables/conveyor belts In order to dismount the machine tables and conveyor belts, proceed as follows: • Pull out the mains plug • Lift up the safety guards • Loosen the tension nuts (4) parallel, in order to retighten the conveyor belt •...
-
Page 33: Care
Cleaning Mounting the machine tables and conveyor belts Make absolutely sure that you do not confuse the left and right driving rollers or the left and right machine tables! • Remount machine table and conveyor belts by proceeding in reverse order of the instructions for dismounting them 6.1.2 Care daily... -
Page 34: Maintenance
Maintenance Maintenance General information on maintenance of the machine Any defects on the machine must be repaired by an authorized customer service representative! Maintenance list daily working time daily working daily working What / part Activity less than 4 h time 4 - 8 h time more than 8 h Conveyor belts... -
Page 35: Replacement Parts List
Maintenance Replacement parts list The use of conveyor belts not supplied by RONDO can lead to premature wear or destruction on machine parts (coupling, drive rollers). Item-no. Description Dimensions Application 122773T02 Scraper complete STM513, SSO514 122775T02 Scraper blade STM513, SSO514... -
Page 36: Trouble Shooting
Trouble shooting Trouble shooting Fault finding Cause / defect Remedy / to remove 1. Machine stands still Main switch not/not correctly Plug in the main switch. after assembly. plugged in. Safety guard not closed. Close safety guard. Right or left start push-button not Press the desired start push-button. - Page 37 Hang washed conveyor belt over a rod and weigh it down below with approx. 10 kg. 11. All other faults/falling outs. Inform nearest «RONDO» after-sales service giving as much information as possible. Edition BD411402 Econom Operating manual...
-
Page 38: Technical Data
Technical data Technical data Technical data Econom STM 513 SSO 514 Technical data Econom Econom Machine base No (table model) Socle Belt width 475 mm 475 mm Table width 487 mm 487 mm Total table length 1590 mm 2055 mm Req floor-space: in working position 940 x 1590 mm... -
Page 39: Additional Information
Technical data Additional information All sheeters from RONDO have the following quality features: • The conveyor belts made of plastic material: All plastic coated conveyor belts used on our machines are approved for coming into contact with food stuff and correspond with the requirements of the FDA (Food and Drug Administration, USA).
Need help?
Do you have a question about the Econom Series and is the answer not in the manual?
Questions and answers
How to clean sheeter
Before cleaning the Rondo Econom Series sheeter, pull out the mains plug. Do not use spray water, high-pressure cleaners, or steam-cleaning machines.
To clean the scraper:
1. Open the rollers fully.
2. Lock the safety guard in the upper position.
3. Push the front and rear scraper blade downwards using the thumb.
4. Lift the scraper out of the scraper mounting.
5. Pull out the scraper.
6. Clean the scraper as per care instructions.
For exchanging scraper blades:
1. Use an Allen key No. 4.
2. Disassemble the spring clamp on the left or right side.
3. Slide the scraper blade off, using a cloth to protect fingers from sharp edges.
This answer is automatically generated
Can I get a demonstration video