
Subscribe to Our Youtube Channel
Related Manuals for Van Guard 1200CM Series


Summary of Contents for Van Guard 1200CM Series
- Page 1 Operation Manual 1200CM Series Covering Models: 1210CM, 1211CM, 1220CM, 1221CM, 1222CM, 1223CM, 1230CM, 1231CM, 1232CM, & 1233CM...
-
Page 2: Table Of Contents
We recommend you read this entire manual carefully before setting up and using the instrument. 1200CM Series Compound Microscopes VanGuard 1200CM Series Compound Microscopes Table of Contents provide the necessary specifications for diagnostic and educational use in medical/veterinary clinics, universities, and industrial laboratories. -
Page 3: Parts & Accessories
Parts & Accessories Included Parts All microscopes listed below are shipped with a dust cover (1 ea.), instruction manual (1 ea.), warranty card (1 ea.), spare halogen bulb (1 ea.), and a spare fuse (1 ea.). Model 1210CM Model 1220CM Model 1230CM Monocular Head (1 ea.) Binocular Head (1 ea.) -
Page 4: Optional Accessories
Parts & Accessories Optional Accessories: Digital Camera Systems: Part Number: Description: 1400-CDPC-10: USB Digital Camera System, 10 Megapixels - for 1210- and 1220-series 1200-CDPC-10: USB DIgital Camera System, 10 Megapixels - for 1230-series 1400-CDPC-5: USB Digital Camera System, 5 Megapixels - for 1210- and 1220-series 1200-CDPC-5: USB DIgital Camera System, 5 Megapixels - for 1230-series 1400-CDPC-3:... -
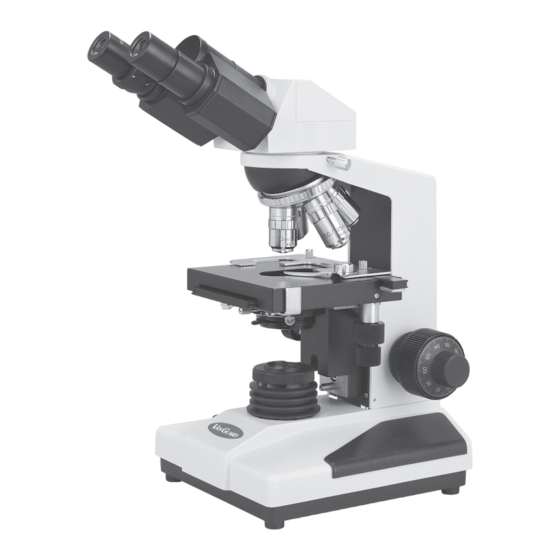
Page 5: Microscope Diagrams
Parts & Accessories Camera Port Dust Cover (Trinoc only) Eyepieces Camera Port Dust Cover Set Screw (Trinoc only) Camera Port (Trinoc only) Head Assembly Prism Slider (Trinoc only) Diopter Head Set Screw Adjustment Mechanism Stand Nosepiece Interpupillary Adjustment Objectives Mechanism Slide Slide Holder Holder... - Page 6 Parts & Accessories Power Cord Light Bulb Access Door Substage Up-Stop Adjustment Control Knob Fuse Light Bulb Holder Model 1233CM Shown (Phase-Contrast) Access Door Lock Knob Phase Condenser Centering Set Screws (2 shown only) Light Bulb Phase Annuli Centering Centering Mechanism Knobs Phase Contrast...
-
Page 7: Setup
Assembly All Models The next three pages are dedicated to assembling a working microscope. The following section “Using your 1200CM Series Microscope” (starting on page 10) explains the various features of the microscope and how to use them. After removing the microscope parts from the protective foam and plastic packaging and checking it over for all components and accessories (see list on page 3), you can begin assembly. -
Page 8: Centering The Condenser
Setup Assembly All Models (cont.) Gently slide the condenser up through the silver ring of the condenser mount until it will go no further (see figure 5). Make sure that the condenser is oriented as shown in figure 5. If the condenser will not slide freely through the silver ring (and you’ve checked that the condenser set screw is backed out far enough), do not force, simply wiggle the condenser while lightly pushing up. -
Page 9: Centering The Illuminator
Reinstall the substage collector. If you purchased a brightfield model this completes your setup. Skip ahead to page 10, “Using your 1200CM Series Microscope”. If you purchased a phase contrast model, continue below. Aligning the Phase Contrast Annulus Rings Phase Contrast Models Once the phase contrast condenser assembly has been centered, the phase contrast annulus rings must be centered for the objectives. -
Page 10: Using Your 1200Cm Microscope
Using your 1200CM Series Microscope Variable Lighting Control/Power Switch All Models VanGuard 1200CM Microscopes are equipped with a rheostat controlled variable lighting control, which allows the user to set the lighting anywhere between off and full brightness. The variable lighting control is located on the left side of the microscope in front of the power switch. -
Page 11: Interpupillary & Diopter Adjustments
Using your 1200CM Series Microscope Interpupillary and Diopter Adjustment All Models Interpupillary adjustment (the distance between eyepieces) is made through a “folding” action. The Seidentopf design allows for a folding adjustment which is quickly and easily done for each user (see figure 11). -
Page 12: Using The Camera Port
Using your 1200CM Series Microscope Using the Camera Port Trinocular Models Only Assemble the adapters and connect to the camera using the instructions provided with the camera/adapter kit. Note: Camera kit is not included with this microscope. Please see page 3 for available camera kits. -
Page 13: Oil Immersion Objectives
Using your 1200CM Series Microscope Oil Immersion Objectives All Models The 100X objective which comes with this microscope must be used with immersion oil in order to maintain image quality. After use, the objective tip needs to be wiped clean so that no oil residue remains. -
Page 14: Maintenance
Maintenance Replacing the Light Bulb All Models Before attempting to replace or remove the light bulb, UNPLUG THE MICROSCOPE FROM ANY POWER SOURCE AND ALLOW THE BULB TO COOL COMPLETELY. Carefully lay the microscope on its side to locate the light bulb access door on the bottom of the microscope (see Figure 15). -
Page 15: Caring For Your 1200Cm Microscope
Maintenance Caring for your 1200CM Microscope All Models The eyepieces and objectives on VanGuard Microscopes are coated. They should never be wiped while dry as any dirt or dust will scratch the coating. The surfaces should either be blown off with an air canister, or blown and cleaned with an air-bulb and camel-hair brush. -
Page 16: Troubleshooting
Troubleshooting This chart may help resolve some of the more common problems associated with using a compound microscope. Simply follow the steps until your problem is resolved. As always, you can contact your dealer or VanGuard Microscopes if you ever need help. I can’t get any light Step # Possible Cause... - Page 17 Troubleshooting I can’t see anything through the eyepieces/camera Step # Possible Cause How to Check Result Solution For More Info Turned on Go to next step Light not turned on Visually inspect Not turned on Turn on light Page 10 Not set too low Go to next step VLC set too low...
-
Page 18: Specifications
Specifications Viewing Head: Trinocular/Binocular/Monocular Viewing Head Type: Seidentopf [Trinocular/Binocular Models] Head Rotation: 360° Head Inclination: 30° Sliding Prism: 100/100 Split [Trinocular Models] Interpupillary Adjustment: 55-75mm Dioptric Adjustment: -5 to +5 Eyepiece Magnification: 10X Widefield Eyepiece Field Diameter: 18mm Optional Eyepieces: 16X [Field Diameter: 11mm] 20X [Field Diameter: 11mm] Nosepiece:... -
Page 19: Notes
Notes... - Page 20 Printed in the USA No. VGMNL070319-1200CM...
Need help?
Do you have a question about the 1200CM Series and is the answer not in the manual?
Questions and answers