Table of Contents
Advertisement
Quick Links
Advertisement
Table of Contents

Related Manuals for Rubbermaid M40


Summary of Contents for Rubbermaid M40
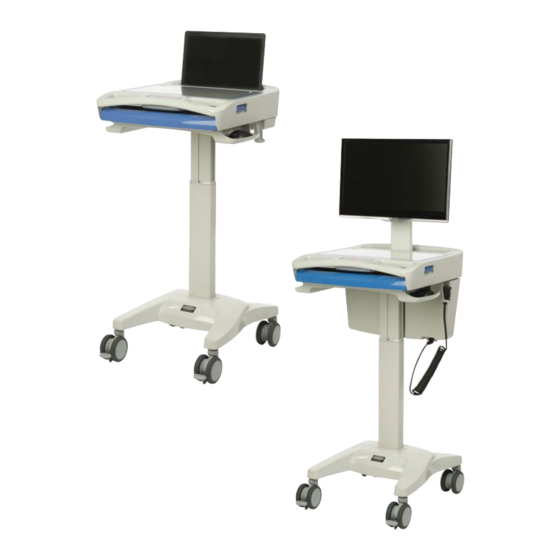
- Page 1 M40 Computer Cart User Manual...
-
Page 2: Warnings
Warnings IMPORTANT – Indicates a situation that does not present any hazard but is very important in maintaining a well functioning workstation. ATTENTION – Consult manual to avoid a potentially hazardous situation which may result in minor or moderate injury. ELECTRICAL –... -
Page 3: Table Of Contents
Cleaning ................18 Service Service Request ..............19 Service Level Commitment ........... 19 Warranty Limited Warranty for M40 Computer Carts ......19 Service Details ..............19 Statement of Use and Compliance Maintain GMP Compliance Keep this manual with the Cart... -
Page 4: Box Contents
Box Contents Laptop Cart M40 Computer Cart Security Keys Taped to mouse holder Power Cord Monitor Support Mounting Screws Laptop Cart with Power Cord Kit Taped to mouse holder LCD & CPU Cart Taped to mouse holder 6 x M6 x 10 Machine Screws... -
Page 5: Assembly
Assembly INSTALL THE POWER CORD 1. Plug the power cord into the computer cart. 2. Position the bale to secure the power cord. 3. Stow the plug in the holder. INSTALL THE MONITOR SUPPORT 1. Install the monitor support with four screws as shown. -
Page 6: Integration
Integration COMPONENT SCHEMATIC Laptop Cart Laptop Laptop Work Surface Keyboard Power Supply Drawer Enclosure Plug Holder Mouse Holder Power Cord Lock Power Inlet Power Cord LCD & CPU Cart Document Cover Monitor Keyboard Keyboard Cable Clamp Drawer Monitor Monitor Support Tech Box Mousing Surface... -
Page 7: Specifications
Integration SPECIFICATIONS Common Specifi cations Base Size 17” x 19” (43 cm x 48 cm) Weight Confi gurations starting at 53 lb (28.6 kg) Height Adjustment 16” (40.5 cm) Laptop/Storage Tray 16“ x 12“ x 1.5" Accommodates up to 17” laptop or tablet computer Work Surface 20”... -
Page 8: Open The Work Surface
Integration OPEN THE WORK SURFACE 1. Press the two latches to release the work surface. 2. Pull the work surface forward to expose the locks. 1. Unlock the work surface as shown. 2. Lift the rear of the work surface as shown to expose the Storage/Laptop Tray. -
Page 9: Install The Keyboard Mouse And Data Cable
Integration INSTALL THE KEYBOARD MOUSE AND DATA CABLE 1. Open the keyboard drawer. 2. Place the keyboard in keyboard drawer. Place the mouse in the mouse holder. 1. Route keyboard cable to the Tech Box/Laptop Tray. 2. Route the mouse cable to the Tech Box/Laptop Tray. -
Page 10: Install The Laptop Power Supply
Integration INSTALL THE LAPTOP POWER SUPPLY M40 Laptop Cart with Power Cord Kit • Place the power supply in the power supply enclosure. • Route the computer power cable to the laptop tray. • Plug the power supply into the power strip. -
Page 11: Install The Laptop
Integration INSTALL THE LAPTOP • Place the laptop computer in the laptop tray. • Make the necessary cable and electrical connections. Note: The task light must be plugged into a powered USB port or it will not work. (See your computer documentation for the location of the powered USB ports.) -
Page 12: Install The Monitor
Integration INSTALL THE MONITOR M40 Cart with LCD & CPU Mounts • Mount the monitor to the M40 Cart. Use the mounting screws supplied with the monitor. • Route the monitor power and video cable to the tech box. INSTALL THE CPU 1. - Page 13 Integration INSTALL THE CPU 1. Unlock the security door. 2. Open the security door. • Place the CPU in the tech box. • Make the necessary electrical and cable connections. • Close and lock the security door. • Close the tech box. •...
-
Page 14: Operation
Operation OPERATING PROCEDURE 1. Move the M40 Cart into position. 2. Lock the casters 3. Adjust the height of the Work Surface. 4. Plug in the power cord; plug in the network cable if you are using a wired network. -
Page 15: Height Adjustment
Operation HEIGHT ADJUSTMENT 1. Hold the work surface steady and lift up and hold the height adjustment handle. 2. Raise or lower the work surface, then release the handle. TASK LIGHT • Press the button to turn the task light on. •... -
Page 16: Laptop/Storage Tray
Operation LAPTOP/STORAGE TRAY 1. Press the two latches to release the work surface. 2. Pull the work surface forward to expose the laptop computer power switch, and work surface locks. Note: If The laptop power switch is inaccessible, you will have unlock and open the work surface. -
Page 17: Tech Box
Operation TECH BOX Open the Tech Box 1. Press the two latches to release the tech box door. 2. Lower the door. Close the Tech Box Raise the door until it is latched on both sides. -
Page 18: Troubleshooting
In these cases, immediately fl ow into the computer cart. contact Rubbermaid Customer Service for • NEVER use steel wool or other abrasive more information: 1-888-859-8294. material as these could damage the surface Cables: Always keep the cables neatly fi nish. -
Page 19: Service
Warranty LIMITED WARRANTY FOR M40 COMPUTER CARTS Rubbermaid Healthcare is pleased to offer a three-year warranty on durable components and a two-year warranty on electronic components. If during the warranty period this Rubbermaid Healthcare product proves defective in materials or workmanship under normal use by the original purchaser, please contact Rubbermaid Healthcare technical support at www.rubbermaidhealthcare.com/service (please be sure to... -
Page 20: Statement Of Use And Compliance
Statement of Use and Compliance M40 mobile carts are designed for safe use in general patient areas for the purpose of clinical data entry and retrieval. These carts have no potential electromagnetic or other interference risks when operated according to guidelines covered in this instruction manual. - Page 21 Notes...
- Page 22 Notes...
- Page 23 Notes Revision Date Description of Changes 12/2011 Initial Release 2/2013 Change logos and references to Rubbermaid Healthcare Add TOC level subheading to Transport and Storage section Add Revision History p23 Add Commpliance Information p20 Add 3 pages for pagination...
- Page 24 1-888-859-8294 www.RubbermaidHealthcare.com 12/2011 Part # 1810638 RevB M40 USER MANUAL © Rubbermaid Healthcare Solutions Huntersville, NC 28078...
Need help?
Do you have a question about the M40 and is the answer not in the manual?
Questions and answers