
Related Manuals for Rubbermaid M38


Summary of Contents for Rubbermaid M38
- Page 1 M38 Carts User Manual For Models with Manual Lift Increasing the Capacity to Care ™ www.rubbermaidhealthcare.com...
-
Page 2: Warnings
Electric current may try to fl ow through you between the M38 system and the other point of contact as it seeks the easiest path to ground. -
Page 3: Table Of Contents
The Keyboard Light ............21 Single Locking Drawer ............22 The Casters ..............24 Power On/Power Off the M38 cart ........24 AC Power Expansion Rubbermaid User Interface (RUI) ..25 Power on/Power off AC Powered Carts ......25 DC Power Expansion User Interface (RUI) ......26... - Page 4 Remove and Replace the Battery Power Fuse ....35 Change the Drawer Lock Combination ......36 Troubleshooting Cleaning Service Service Request ...............43 Service Level Commitment ..........43 Warranty Limited Warranty for M38 Computer Cart ......43 Service Details ..............43 Transport/Storage/Disposal Transport/Storage.............44 Cart/Battery Disposal ............44 Standards Compliance...
-
Page 5: Introduction
Introduction BOX CONTENTS M38 Cart Security Keys Power Cord M38 User Manual Accessory Kit M38 Carts User Manual For Models with Manual Lift Power Cord Clip Increasing the Capacity to Care ™ www.rubbermaidhealthcare.com Mouse/Keyboard Cord Clips Security Bit Kit †... -
Page 6: Specifications
Our goal is to increase the capacity to care by improving productivity, ergonomics, and compliance while enhancing your facility image. • The M38 Mobile Computer Cart is a mobile computing workstation cart designed for safe use in general patient areas for the purpose of clinical data entry and retrieval, and medication delivery. -
Page 7: Introduction
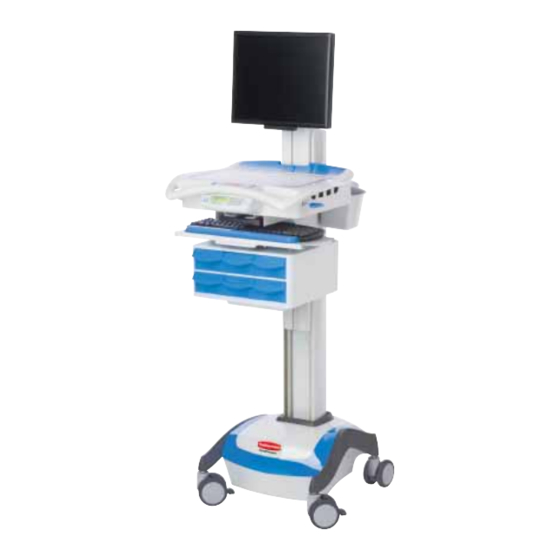
Manual Height Handle Storage Bin Manual Drawer Power Lock Overide Cord Screen Clamp Document Cover Non-Locking Locking Power Caster Caster Inlet Mouse Pad Mouse Holder Rubbermaid User Intereface ( Drawer models ) Drawer Module Laptop Cart ( some models ) Configuration... -
Page 8: Get Started
1. Plug in the power cord. 2. Leave the cart plugged in for approximately 8 hours. Note: The initial RUI (Rubbermaid User Interface) charge indicator reading may be incorrect. Charge the cart for 8 hours to ensure that battery is... - Page 9 Setup THIS PAGE HAS BEEN PURPOSELY LEFT BLANK...
-
Page 10: Setup
8. Replace the work surface and storage bins. 9. Adjust lift mechanism preload on carts equipped with the manual surface lift. The M38 cart is ready for use. To fully shut down (de-energize) a DC powered cart for service or cleaning you must: 1. -
Page 11: Remove The Work Surface
Setup REMOVE THE WORK SURFACE 1. Insert the security key in the lock as shown. 2. Turn counter clockwise to unlock the work surface. 1. Pull the latch to unlock the work surface. 2. Grasp a front handle, and grasp the opposite side of the of the work surface. -
Page 12: Install Keyboard And Mouse
Setup INSTALL KEYBOARD AND MOUSE 1. Grasp the front edge of the keyboard tray and pull it toward you to extend the keyboard tray. 2. Place the keyboard and mouse on the keyboard tray. Use self adhesive hook and loop material to keep the keyboard in position. -
Page 13: Install The Monitor
Note: If mounting screws are not provided, refer to the monitor documentation for the correct mounting screw size. Note: It may be easier to connect the monitor cables while the monitor is off the M38. -
Page 14: Install The Monitor
Note: To monitor the power supply, connect the beige USB cable to the computer. Note: A small form-factor computer may be mounted to the rear column. Contact Rubbermaid Healthcare at customer.service@ rubbermaidhealthcare.com or 888-859-8294 for more information. -
Page 15: Install A Laptop Computer
Setup INSTALL A LAPTOP COMPUTER 1. Place the laptop on the wire-form platform. • Connect the cables to the laptop. • Plug the power supply into the power strip. Note: Use self-adhesive hook and loop material to anchor the laptop to the platform Note: to operate the task light on a... -
Page 16: Install The Work Surface
Setup INSTALL THE WORK SURFACE 1. Align the work surface rear latches with the latch pins on the technology tray as shown. 2. Lower the front of the work surface and engage the latches at the front of the technology tray. 1. -
Page 17: Adjust The Manual Work Surface Lift Preload
Setup ADJUST THE MANUAL WORK SURFACE LIFT PRELOAD On models equipped with the manual work surface lift, it may be necessary to adjust the lift preload to compensate for the weight of the technology components added during setup. Adjust the lift preload as follows: 1. -
Page 18: Configure The Control System (Rx/Xp Medpak Expansion)
Setup CONFIGURE THE CONTROL SYSTEM (RX/XP MEDPAK EXPANSION) The electronic drawer control system offers a number of confi gurable advanced features which aid cart and fl eet management. Cart interface confi guration software application and drivers are available for download at –... -
Page 19: Operation
QUICK START PROCEDURE Good practice for starting the M38 cart is as follows: 1. Turn on the cart (see "Power On the M38 Cart" p24-28) 2. Note the condition of the battery (the cart may need to be plugged in p30-31) 3. -
Page 20: The Keyboard Tray
Operation THE KEYBOARD TRAY To extend the keyboard tray, pull the key board tray toward you until it stops. To retract the keyboard tray, push in on the keyboard tray until it stops. To extend the mouse pads, grasp the edge of the mouse pad and twist it to the open position. -
Page 21: Single Locking Drawer
Operation SINGLE LOCKING DRAWER Unlock the Drawer Enter the combination. Note: The factory preset combination is as follows: 1. Press and release buttons 2 and 4 simultaneously. 2. Then press and release button 3. Turn the control knob to the right (clock wise). - Page 22 Operation SINGLE LOCKING DRAWER Lock the Drawer With the drawer unlocked, Close the drawer. Turn the control knob to the left (counter clockwise) until it stops, then release. Try to open the drawer. If the drawer is not locked repeat steps 1-3.
-
Page 23: The Casters
POWER ON/POWER OFF THE M38 CART Note: The M38 cart should only be powered off for the following conditions: • The audible alarm cannot be muted. • When the cart will not be used for an extended period (the cart is placed in storage.) -
Page 24: Ac Power Expansion Rubbermaid User Interface (Rui)
Operation AC POWER EXPANSION RUBBERMAID USER INTERFACE (RUI) The LED RUI is included on M38 computer carts confi gured with the AC Power Expansion but without drawer expansions. The LED RUI controls the AC power supply and monitors the condition of the cart power battery. -
Page 25: Dc Power Expansion User Interface (Rui)
Operation DC POWER EXPANSION USER INTERFACE (RUI) The DC RUI is included on M38 computer carts confi gured with the DC Power Expansion but without drawer expansions. The DC RUI controls the dc power supply and monitors the condition of the cart power battery. -
Page 26: Battery Cutoff Switch (Non-Powered W/Drawer Expansion)
New M38 carts are shipped in the de-energized state, with the cutout switch off. The cutout switch must be switched on as shown in order to power-on the cart. -
Page 27: Lcd Rubbermaid User Interface (Rui)
Operation LCD RUBBERMAID USER INTERFACE (RUI) M38 powered and non-powered carts confi gured with the electronic locking RX or XP drawer expansion are equipped with the Rubbermaid User Interface (RUI). The RUI controls the low battery alarm, keyboard light, drawer control system, power supply, and PIN entry to unlock the drawers. -
Page 28: The Mute Button
Operation THE MUTE BUTTON The Mute Button is used to silence the power system audible alarm. To mute the audible alarm, press and hold down the mute button until the alarm is silenced. Note: When the battery is at 10% (1/8) charge or less, the audible alarm will sound after again a minute when the mute button is... -
Page 29: Battery Charge Indicators (Powered Carts)
Operation BATTERY CHARGE INDICATORS (POWERED CARTS) M38 cart power expansions are equipped with a battery gauge that displays the level of battery charge. Powered carts without powered drawer expansions are equipped with LED battery gauges. The RUI for powered carts equipped with powered drawer expansions has an LCD battery gauge. -
Page 30: Battery Charge Indicator (Continued)
Operation BATTERY CHARGE INDICATOR (CONTINUED) DC Power LED User Interface The DC power LED RUI battery gauge uses 17 LEDs arrayed in a straight line pattern along the gauge area of the RUI. Charge level is indicated on the scale one illuminated LED at a time. -
Page 31: Unlock And Lock The Drawer Modules
Operation UNLOCK AND LOCK THE DRAWER MODULES Drawer Locks The drawers are accessible when a valid personal identifi cation number (PIN) is entered into the controller. A user may lock the drawers by either pressing the Lock button or by waiting until the drawer lock timer counts down. The electronic drawer lock will not function when the battery is dead, conditioning, or if the cart is electrically de- energized. -
Page 32: The Drawer Modules (Continued)
Operation THE DRAWER MODULES (CONTINUED) Manual Drawer Lock Use the manual drawer lock override as follows: 1. Insert the lock override key into the lock located on the rear of the drawer module. The Drawers are locked, the key may be removed from the lock. -
Page 33: Maintenance
Maintenance REMOVE AND REPLACE THE BATTERY Power down the M38 cart and remove the rear cover: 1. Unplug the M38 cart from the wall outlet. 2. Press and hold down the power button (approximately 2 seconds) to turn off the M38 cart. -
Page 34: Remove And Replace The Input Power Fuses
Power down the M38 cart, remove the rear cover, remove the battery, remove and replace the fuses. 1. Power down the M38 cart and remove the rear cover as directed on page 34 of this manual. 2. Remove the battery as directed on page 34 of this manual. -
Page 35: Change The Drawer Lock Combination
Maintenance CHANGE THE DRAWER LOCK COMBINATION Never close the drawer to test a new combination. If the combination fails, you will need a service call to get the drawer open. Use the current combination to open the drawer. Note: The factory preset combination is as follows: 1. - Page 36 Maintenance CHANGE THE DRAWER LOCK COMBINATION (CONTINUED) Turn the control knob to the left (counter clockwise) to the stop position, then release. This clears previously used buttons. Enter the existing combination. Press on the combination change lever (located at the rear of the lock) until you hear and feel a detent.
- Page 37 Maintenance CHANGE THE DRAWER LOCK COMBINATION (CONTINUED) Turn the control knob to the left (counter clockwise) to the stop position, then release. This clears previously used buttons. Enter the new combination. Note: Any of the buttons may be used in the new combination, either pressed simultaneously or individually.
- Page 38 Maintenance CHANGE THE DRAWER LOCK COMBINATION (CONTINUED) 1. Slide the lock cover into position. 2. Install the 2 screws on the cover. 3. Close and lock the drawer.
-
Page 39: Troubleshooting
Troubleshooting Cart Will Not Power Up: • Plug power cord into a working hospital grade outlet • Check to ensure power cord is plugged securely into back of cart • Check to see if the Power System Interfaces (PSI) is charging when plugged in. •... - Page 40 Troubleshooting Keyboard Tray will Not Raise or Lower: • Check for cable obstructions. • Adjust the keyboard arm tray arm knob counter-clockwise to loose • Adjust the keyboard arm tray arm knob clockwise to tighten Keyboard Light Does Not Work for Non-Powered Version: •...
-
Page 41: Cleaning
Cleaning CAUTION: Because of the close proximity of electrical power and equipment, fl ammable cleaners should never be used on the cart! • Verify that your cart is powered down and unplugged from the wall outlet before cleaning. • Allow your cart to dry completely before plugging the power cord into a wall outlet. •... -
Page 42: Service
Rubbermaid Healthcare will determine, at its sole discretion, how to best address your warranty issue, which may include sending you a replacement part covered under warranty or for sale. Rubbermaid Healthcare reserves the right to require proof-of-purchase prior to honoring any warranty request. This warranty does not cover product abuse, modifi cation, failure to adhere to product instructions, or improper operation/misuse. -
Page 43: Transport/Storage/Disposal
Transport/Storage/Disposal TRANSPORT/STORAGE • The shipping weight of the M38 cart is approximately 105-160 lbs (50-72 kg). Use proper lifting techniques to prevent injury. • Care should be taken to transport and store this system within a temperature range of 32º F to 90º F (0º C to 32º C); Humidity 20% RH to 95% RH non-condensing. -
Page 44: Standards Compliance
Standards Compliance Tested to comply with: • NRTL certifi ed to: o UL 60601-1:2003 o CAN/CSA-C22.2 No.601.1-M90 o IEC 60601-1/A2:1995 o EN 60602-1/A2:1995 Standard for Safety Medical Electrical Equipment, Part 1: General Requirements for Safety - Collateral Standard: Safety Requirements for Medical Electrical Systems •... - Page 45 REVISION HISTORY Revision Date Description of Changes Draft 12/2013 Initial Release...
- Page 46 1-888-859-8294 www.RubbermaidHealthcare.com 12/2013 Part # 1905684 Rev A M38 Cart w/Manual Lift User Manual © Rubbermaid Healthcare Huntersville, NC 28078...
Need help?
Do you have a question about the M38 and is the answer not in the manual?
Questions and answers