Table of Contents
Advertisement
Quick Links
Advertisement
Table of Contents

Related Manuals for Alu Rehab Netti 4U comfort FA


Summary of Contents for Alu Rehab Netti 4U comfort FA
- Page 1 u s e r m a n u a l Netti 4U comfort|FA...
-
Page 2: Table Of Contents
COnTenTs 1. INTRODUCTION 1.1 areas of use/indications 1.2 Contraindications 1.3 Quality and durability 1.4 The environment and waste disposal 1.5 Information for re-use 1.6 about this manual 1.7 Vital measures 2. QUICK REFERENCE 3. DESCRIPTION 4. FEATURES OF NETTI 4U COMFORT | FA 5. - Page 3 7. ADAPTION & ADJUSTMENT 7.1 adjustment of seat width 7.2 adjusting the back rest cushion 7.3 adjusting the seat cushion 8. MANOEUVERING THE WHEELCHAIR 8.1 General about driving and parking 8.2 Driving techniques - step up 8.3 Driving techniques - step down 8.4 Driving techniques - slope 8.5 Driving techniques - up stairs 8.6 Driving techniques - Down stairs...
-
Page 4: Introduction
It is tested to DIN EN 12183:2009. The tests were carried out by TÜV SÜD Product Service GmbH in Germany. In alu rehab we believe that wheelchairs should be chosen based on a thorough assessment focusing on the needs of the user and demands from the environment. -
Page 5: Areas Of Use/Indications
• limited movement range waste disposal • lacking or limited trunk and body stability • hemiplegia • rheumatic-type disorders alu rehab and its suppliers wish to • craniocerebral injuries protect the environment. • amputations • other neurological or geriatric disorders This means: •... -
Page 6: Information For Re-Use
1.5 Information for re-use 1.6 About this manual all products from alu rehab are designed I n order to avoid damages while using the to give years of maintenance-free service. netti 4u comfort | Fa wheelchair, please all products can be adapted for re-use by read this manual carefully before starting an authorised dealer. -
Page 7: Vital Measures
1.7 Vital measures Model Weight netti 4u comfort|Fa is a comfort wheelchair designed for both outdoor and indoor use. 35 - 44 cm 33,5kg 44 - 53 cm 34,5kg Specifications varies between countries. Total weight: 34,5 Kg specification min. max. (440 mm width chair) Overall length with foot 1130 mm... -
Page 8: Quick Reference
2. QuICK reFerenCe Drive carefully! The content of this page is a summary Be aware that friction against push of the whole manual. It gives a brief rims can create a warm surface. introduction to the use and care of the netti 4u comfort|Fa wheelchair. -
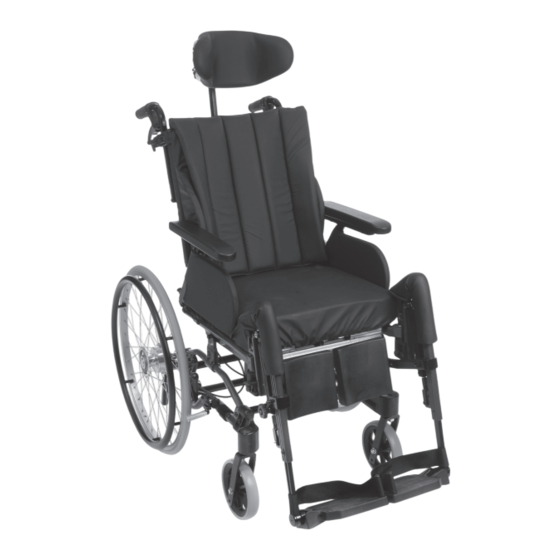
Page 9: Description
REPLACED FOR REPLACED This drawing is Alu Rehab A.S property and should not be copied or delivered to other rms or agents without our permission. Language: English Model: Netti 4U comfort|FA Version: November 2010 Language: English Model: Netti 4U comfort|FA Version: November 2010... -
Page 10: Features Of Netti 4U Comfort | Fa
4. FEATURES OF NETTI 4U COMFORT | FA Standard Accessories SEAT SEAT • Trays & reading stand for trays (See chapter 5) • Width adjustable seat and cushion • Hip belts (See chapter 5) • Tilt -5° to +20° WHEELS WHEELS •... -
Page 11: Accessories
5. Accessories Hemi cushion an accommodating Belts support for hemiplegic several variants: users. Hip belt and H-Belts with or without Head support uphoplstery and with support C large. plastic lock or car lock support a side support (see chapter 5.1 for support B small mounting) Side support Correction... -
Page 12: Mounting Of Hip-Belt
5.1 Assembling of hip belt 5.2 Assembling Illustration 5.2.1 Illustration 5.1.1 • Remove the push handles, and pull the • Pull the belt through the hole in the hip H-belt attachment bar onto the push belt bracket. handles from the lower end. Ill. -
Page 13: Assembling And Adjustment
6. ASSEMBLING AND ADJUSTMENT Netti 4U comfort |FA has various adjustment and positioning possibilties. See chapter 7 for individual adjustment. Main wheels, front castors and arm supports are pre-mounted from the factory. To check that the main wheel is properly attached to the hub, remove 6.1 Unpacking the finger from the central knob and 1. -
Page 14: Seat Height Adjustment
6.4. Seat height adjustment The seat height at the rear depends on: • Size of main wheel. • Position of main wheel. • Using 24” main wheels in the upper hole, the seat height is 49.7 cm from the floor to the seating plate. -
Page 15: Seat Depth General
• Lock the back rest by pushing the locking bolt through the plastic bracket and gas spring locking head (Ill. 6.5.2.) Ill. 6.5.3 • Netti 4U comfort | FA is delivered with two locking head. an extra locking head is Ill. -
Page 16: Seat Depth Adjustment At The Rear
6.8 Seat depth adjustment • The back rest hinge has 6 holes (Ill. 6.5.4) and the chairs are delivered with two in front locking heads. What hole that should be It is possible to adjust the seat depth with used together with what locking head up to 10 cm in front. -
Page 17: Foot Support
Adjusting the height of the anti tip Mounting of foot support The anti tip can be adjusted in two fixed • Grip the foot support in the hinge point. positions. The short position is for 12” & 16” Hold it in an angle of app. 20° to the side main wheels and 24”... - Page 18 Adjusting the length of the foot support • To lock the foot plates pull the plastic • Untighten the screw (A) to make the lock on the right foot plate and place the adjustment tube move lock over the bolt on the left foot plate. •...
-
Page 19: Head Support
a - lever for depth adjustment 10 mm open-end spanner B - Wheel for angle adjustment C - lever for height adjustment D - Head support bracket To adjust in depth, the calf pad is removed from the bracket by using an •... -
Page 20: Arm Support
Adjusting the head support in depth: After fitting the head support fix it • Release the locking lever on top of the properly by tightening the little set vertical bar (a). screw in the centre on top of the • Adjust the head support and fix it in head support bracket using an required position. -
Page 21: Adjusting The Brakes
Ill. 6.12.1 Ill. 6.12.3 Mounting the arm support • Grip the arm support (ill. 6.12.1) and Adjusting the height of the arm support place the rear end of the arm support • Untighten the screw on the arm support onto the plastic bracket of the back (Ill. - Page 22 • To activate the brake, push the handle forward. (Ill. 6.13.1). Ill. 6.13.3 • For fine adjustment, loosen the screw on the inside of the brakes (Ill. 6.13.4) • Adjust the brake position and tighten the screw. Ill.6.13.1 • To release the brake, pull the handle rearwards (Ill.
- Page 23 Drum brake Operating and applying the brake The wheelbase in drum brake is fitted with hand operated hub brakes to allow regulation of speed on hills and whilst travelling along. These are located on the push handles. If the brake doesn’t brake properly: To adjust the wire on one or both sides, adjust the foot screw 2-4 rounds out.
-
Page 24: Push Handles
The release handles have the following 6.14 Push handles label Adjustment of push handles: • Release the lever on the side and lift the handle all the way up. • Turn the handles into required position. • Adjust height. • Lock the handle in required position by tightening the lever. - Page 25 2. Take the seat cushion out 5. remove the plastic hand grips 3. Take the back rest cushion out. 6. release the two screws on each side using an allen key. 4. release the velcro straps on the back of the back rest 7.
- Page 26 11. Pull the chair out, one side at a time, to 8. use a measuring tape for correct the required width adjustment of width on top of the back rest 9. release the two screws under the seat plate at the front on both sides using an allen key.
-
Page 27: Adjusting The Back Rest Cushion
7.2 Adjusting the back rest • The seat cushion consist of three parts. separate the wedges to the same width cushion as the seat plate. Place the wide foam layer on top of the wedges and mount the outer cover. after to have loosen the back rest cushion and taken it out of the chair. -
Page 28: Driving Techniques - Step Up
Companion: Companions, drive up a step backwards: If the user is left alone in the wheelchair, • Check that the anti tip is turned up always lock the brakes and check that the • Pull the chair backwards next to the anti tips are turned down. -
Page 29: Driving Techniques - Slope
8.4 Driving techniques With assistance, backwards. • Check that the anti tip is turned up, - Slope - • Pull the wheelchair backwards to the Important advise for driving down and first step of the stairs. up hill avoiding the risk of tipping. •... -
Page 30: Transfer
With assistance, forwards • Lock the brakes. • Check that the anti tip is turned up • Remove foot support and arm • Drive the wheelchair forward to the support on the side of the transfer. first step of the stair. •... -
Page 31: Lifting The Wheelchair
8.9 Push rim netti 4u comfort|Fa is delivered with aluminium push rims as standard. The material and distance to the main wheel influences the ability of the user to grip. Contact your dealer to get information about push rims that fit your chair. Never stand on the foot plates without making sure that they are touching the ground due to the risk... -
Page 32: Transport
9. TRANSPORT developed by unwin safety systems. For further information: Netti 4U comfort|FA is tested and www.unwin-safety.com approved to crash test ISO 7176-19. 9.1 Folding for transport When wheelchair is unoccupied, fold as described below. Put wheelchair in trunk or back seat. -
Page 33: Maintenance
These * as a rule of thumb, use oil on movable parts can, if needed, also be removed and parts and all bearings. alu rehab sent to manufacutrer/distributor upon recommends use of ordinary bicycle oil request. -
Page 34: Troubleshooting
We recommend washing the wheelchair in washing chamber at >85 For small damages to the surface, original surface paint can be ordered from the manufacturer. 11. TROUBLESHOOTING Symptom Reason/Action Reference in manual The wheelchair • The main wheel hubs might be incorrectly mounted is going askew •... -
Page 35: Tests & Warranty
12.2 Guarantee • Claim are to be forwarded as soon as a defect is discovered. alu rehab is providing you with a 5-year guarantee on all frame components and on Normal wear, incorrect use or the cross-tube assembly. There is a 2-year... -
Page 36: Spare Part Guarantee
12.4 Spare part guarantee 12.6 Combinations with other products • Alu Rehab offers a 5-year guarantee (as a minimum) for spare parts. The periode of Combinations of netti and other products guarantee is defined as beginning at the not manufactured by alu rehab a.s... -
Page 37: Measures & Weight
13. MEASURES & WEIGHT Seat Seat depth (3 pos.)** Seat height *** Back height **** Total width width* 35 - 44 cm 39-41,5-44-46,5-49-51.5 cm 52 cm 59.5 cm 53-62 cm 44 - 53 cm 39-41,5-44-46,5-49-52,5 cm 52 cm 59.5 cm 62-71 cm measured between edges of seat plate. - Page 40 a u T H O r I z e D D e a l e r s Bedriftsvegen 23 NO-4353 Klepp Stasjon, NORWAY Tel. +47 51 78 62 20 Fax +47 51 78 62 21 E-mail: post@alurehab.com www.alurehab.com...
Need help?
Do you have a question about the Netti 4U comfort FA and is the answer not in the manual?
Questions and answers