Table of Contents
Advertisement
1/17/2020
How to setup a VC MIPI OV9281 on a Raspberry PI Model 3B+
Hardware and Software Setup
Revision: 0.2
Date: 2019-04-05
Copyright: 2019 Vision Components GmbH Ettlingen, Germany
Author: VC Support
Foreword and Disclaimer
This documentation has been prepared with most possible care. However Vision Components GmbH does not take any liability for possible errors. In the interest of progress,
Vision Components GmbH reserves the right to perform technical changes without further notice.
Please notify
support@vision-components.com
This manual is intended for information of Vision Component's customers only. Any publication of this document or parts thereof requires written permission by Vision
Components GmbH.
Image symbols used in this document
Symbol
Trademarks
Linux, Debian, the Tux logo, Vivado, Xilinx and Zynq, ARM, Cortex, Windows XP, Total Commander, Tera Term, Motorola, HALCON, Vision Components are registered
Trademarks. All trademarks are the property of their respective owners.
Raspberry Pi and Raspbian are also registered Trademarks.
ESD sensitivity
Warning
The components are very sensitive to electrostatic discharge (ESD)! Please take all the precautions necessary to avoid ESD!
ESD
The electronic components and circuits are sensitive to ElectroStatic Discharge (ESD). When handling any circuit board assemblies, it is necessary that ESD safety
precautions be observed.
ESD safe best practices include, but are not limited to:
Leaving circuit boards in their antistatic packaging until they are ready to be installed.
Using a grounded wrist strap when handling circuit boards.
Working on a grounded ESD table mat.
Only handling circuit boards in ESD safe areas, which may include ESD floor and table mats, wrist strap stations and ESD safe lab coats.
Avoiding handling circuit boards in carpeted areas.
Try to handle the board by the edges, avoiding contact with components.
This note is not an exhaustive information about the protection against electrostatic discharge (ESD).
https://www.vision-components.com/fileadmin/external/documentation/hardware/VC_MIPI_OV9281_Raspberry_PI_Model_3BPlus/index.html
How to setup a VC MIPI OV9281 on a Raspberry PI Model 3B+
if you become aware of any errors in this manual or if a certain topic requires more detailed documentation.
Meaning
The Light bulb highlights hints and ideas that may be helpful for a development.
This warning sign alerts of possible pitfalls to avoid. Please pay careful attention to sections marked with this sign.
This is a sign for an example.
1/13
Advertisement
Table of Contents

Related Manuals for VC MIPI OV9281


Summary of Contents for VC MIPI OV9281
- Page 1 1/17/2020 How to setup a VC MIPI OV9281 on a Raspberry PI Model 3B+ How to setup a VC MIPI OV9281 on a Raspberry PI Model 3B+ Hardware and Software Setup Revision: 0.2 Date: 2019-04-05 Copyright: 2019 Vision Components GmbH Ettlingen, Germany Author: VC Support Foreword and Disclaimer This documentation has been prepared with most possible care.
-
Page 2: Table Of Contents
1/17/2020 How to setup a VC MIPI OV9281 on a Raspberry PI Model 3B+ Table of Contents 1 Overview 2 Hardware Setup 2.1 Hardware Pre-Check: Install Raspbian 2.2 Connect the MIPI module 3 Software Setup 3.1 Install necessary Raspbian packages 3.2 Get the driver and demo code... -
Page 3: Overview
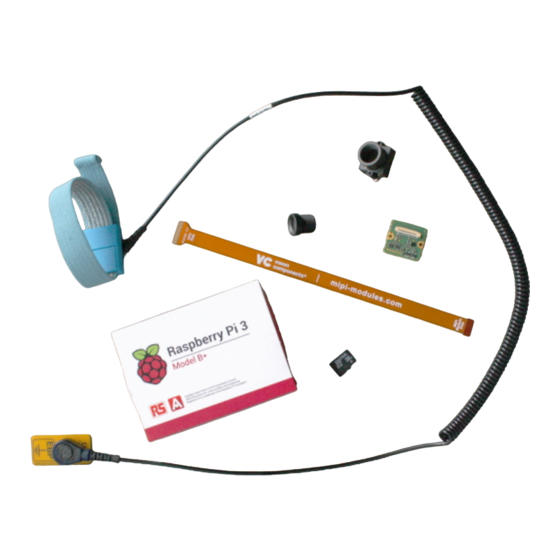
1/17/2020 How to setup a VC MIPI OV9281 on a Raspberry PI Model 3B+ 1 Overview Overview of relevant components excluding power supply, monitor, USB keyboard, cables The power supply must at least provide 2.5A at 5V. 2 Hardware Setup 2.1 Hardware Pre-Check: Install Raspbian... -
Page 4: Connect The Mipi Module
1/17/2020 How to setup a VC MIPI OV9281 on a Raspberry PI Model 3B+ (Original site looks different) Install Raspbian by following the instructions provided there The display shows a login prompt after successful installation. If this is not the case, you have to check your Raspbian installation. The most relevant information to succeed can be found at the Raspbian website or at the web. - Page 5 1/17/2020 How to setup a VC MIPI OV9281 on a Raspberry PI Model 3B+ Always disconnect other cables before connecting or disconnecting the MIPI module! Warning Always disconnect all cables before connecting or disconnecting the MIPI module! The ends of the MIPI module connector cable is marked with the hardware to connect to. Open the socket connectors first by raising their lid, insert the cable and press their lid back when mounted correctly.
- Page 6 /boot/config.txt, but test first without connecting it to the Raspberry PI to be sure everything works so far: disable_touchscreen=1 Don't connect the SDA/SCK of the 7 inch display since this would connect the I²C bus VC from the socket named DISPLAY with the I²C bus ARM at the pinout! Reconnect the other peripherials to the Raspberry Pi.
-
Page 7: Software Setup
1/17/2020 How to setup a VC MIPI OV9281 on a Raspberry PI Model 3B+ Connection setup for the first image acquisition test. You should have the login prompt back after switching the system on. Raspbian showing login screen (user is usually pi with password raspberry) 3 Software Setup 3.1 Install necessary Raspbian packages... -
Page 8: Get The Driver And Demo Code
1/17/2020 How to setup a VC MIPI OV9281 on a Raspberry PI Model 3B+ 2. Reboot. 3. Install the raspberrypi-kernel-headers and device-tree-compiler package by using the following command: sudo apt-get install raspberrypi-kernel-headers device-tree-compiler 4. Test if the version of the running kernel matches the version of the kernel headers, the following command should show the directory for compiling the sensor module kernel module driver: ls "/usr/src/linux-headers-$(uname -r)"... -
Page 9: Running The Demo
1/17/2020 How to setup a VC MIPI OV9281 on a Raspberry PI Model 3B+ 3.5 Running the Demo The demo itself is a program named vcmipidemo and its source code is mainly at the file vcmipidemo.c. However more programs are provided, namely the vcimgnetsrv, a network image server, and its counterpart vcimgnetclient.py. -
Page 10: Troubleshooting And Background Information
1/17/2020 How to setup a VC MIPI OV9281 on a Raspberry PI Model 3B+ 4 Troubleshooting and Background Information 4.1 Q/A Problem: Running make fails with an error: ⋮ ⋮ make[1]: *** /lib/modules/4.14.79-v7+/build: No such file or directory. Stop. Solution: The system needs the build tools of the kernel to build the sensor driver (which itself is a kernel module). -
Page 11: Set Up The I²C Bus For Driver-Sensor Communication
A deeper insight into the device tree overlays and parameters can be found at https://www.raspberrypi.org/documentation/configuration/device-tree.md 4.2.2 Set up the I²C bus for driver-sensor communication The sensor driver needs to communicate via the I²C Bus named VC. To be able to access it, assigning it to the CPU is mandatory. https://www.vision-components.com/fileadmin/external/documentation/hardware/VC_MIPI_OV9281_Raspberry_PI_Model_3BPlus/index.html 11/13... -
Page 12: Providing The Sensor Driver As Kernel Module
Note Some hardware like the touch display demands exclusiveness over the I²C Bus VC or their drivers assume the I²C Bus VC is connected to the RTOS. Since the sensor driver must communicate with the sensor module connected to the MIPI socket, neither the exclusiveness nor the RTOS connectedness is given. So the I²C bus VC cannot be used for other purposes when the sensor is attached. - Page 13 1/17/2020 How to setup a VC MIPI OV9281 on a Raspberry PI Model 3B+ To reserve 128MByte of memory for capturing images, edit the file named /boot/cmdline.txt and append the following key-value-pair to the current line: cma=128M After reboot the kernel message line beginning with Memory: will show an additional entry:...
Need help?
Do you have a question about the MIPI OV9281 and is the answer not in the manual?
Questions and answers