Table of Contents
Advertisement
Product Specifications
Input Power
Standby Power
Main Unit Consumption Power
Battery
Size
Height
Weight
Speed
Charging Time
Suction Power Level 1
Usage Time
Suction Power Level 2
(General Floor Standard)
Suction Power Level 3
33, Harmony-ro, 187 beon-gil, Yeonsu-gu, Incheon, Republic of Korea
en.yujinrobot.com
100~240 V
Below 0.6 W
53 W
Lithium Ion
13.9 x 13.6 in
3.4 in
7.1 lbs
350 mm/s (Max)
240 min.
120 min.
90 min.
70 min.
2103306230
iOMN.w.En.V0
User Manual
iCLEBO O5
■ Please read "Precautions for Safety" carefully before use and use correctly.
■ The user manual includes the product warranty.
■ Product appearance and specifications are subject to change for product
improvement without notice.
en.yujinrobot.com
Advertisement
Table of Contents

Subscribe to Our Youtube Channel
Related Manuals for Yujin Robot iCLEBO O5


Summary of Contents for Yujin Robot iCLEBO O5
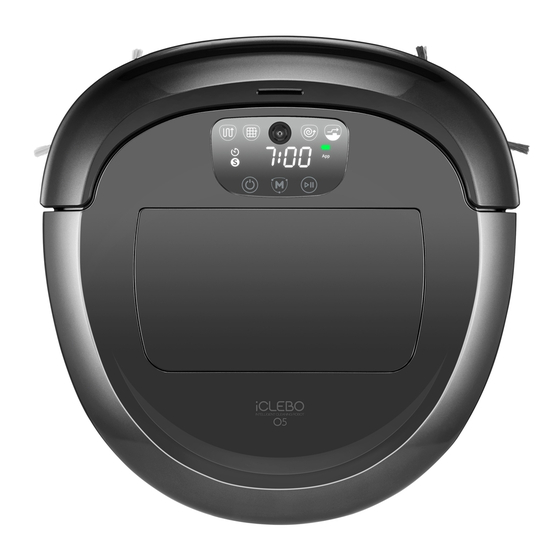
- Page 1 Product Specifications User Manual Input Power 100~240 V iCLEBO O5 Below 0.6 W Standby Power Main Unit Consumption Power 53 W Battery Lithium Ion Size 13.9 x 13.6 in Height 3.4 in Weight 7.1 lbs 350 mm/s (Max) Speed Charging Time 240 min.
-
Page 2: Table Of Contents
Contents Precautions for Safety Power Related Issues Preparation Before Use Using the Cleaning Robot Maintenance After Use Product Composition Components Specific Names for Each Part Preparation for Use Side Brush Installation Battery Station Installation Initial Power Switch On/Off Charging Using the Cleaning Robot To Start/Stop Cleaning Choosing Cleaning Mode Choosing Cleaning Option... -
Page 3: Precautions For Safety
Precautions for Safety This is for the user's safety and to prevent property damage. Please read the following carefully and use safely. We recommend keeping this manual for future reference. Warning Caution Reference Failure to follow these Failure to follow the Failure to follow the instructions could result in instructions may result in... -
Page 4: Preparation Before Use
Preparation Before Use Please read carefully for the safe and correct use of the product. Entry Prevention Tape Attach about 5 cm away More than 4 cm Remove fragile and small objects in advance. If there is any water, oil, or animal waste on the floor, clean it before using the product. Do not place the product near a heating device (such as a heater and electric pot). - Page 5 Using the Cleaning Robot Please read carefully for the safe and correct use of the product. Be careful to not let foreign objects such as plastic bags, blades, tackles, and the like get inside the cleaning robot. If the inlet is clogged by vinyl or the like, please remove the blockage immediately. Be careful that the cleaning robot does not touch or ingest volatile substances.
-
Page 6: Maintenance After Use
Maintenance After Use Please be aware that there is a risk of electric shock and fire in cases of carelessness. Do not disassemble or modify the cleaning robot. Do not allow metal objects to come into contact with the product or the charging terminal. When cleaning or managing the product, turn off... -
Page 7: Product Composition
Product Composition Components User Manual iCLEBO O5 ■ Please read "Precautions for Safety" carefully before use and use correctly. ■ The user manual includes the product warranty. ■ Product appearance and specifications are subject to change for product improvement without notice. -
Page 8: Charging Station
Charging Station Dust Bin Handle Inductive Charging Sensor Charging Terminal Charging Jack Adapter Anti-slip Jack EPA filter Mesh Filter Dust Bin Display Window Navi Camera Spot Mode Mode Mode Threshold Mode Status Time Display Display Battery Reservation Display Section App Connection Display Smart Turbo Mode Button Section... -
Page 9: Side Brush Installation
Prepare for Use Side Brush Installation ㆍYou can reduce the scratching on the top plate by laying a soft cloth on the floor. ㆍIf the side brush is not fully seated in the groove, it may come off during cleaning. Side Brush Fixing Pin Side Brush Groove Align the side brush marked L towards the groove with the same marking (L). -
Page 10: Charging
Charging Initial Charging ㆍCharge fully before using the product. 1. Make sure that the switch on the side of the product is turned on. Refer to P8 <Initial Power Switch On/Off> 2. Start charging the battery by aligning the charging pin on the bottom of the main unit with the terminal of the charging station. -
Page 11: Using The Cleaning Robot
Using the Cleaning Robot To Start/Stop Cleaning Press the corresponding button on the robot or the remote control to start cleaning. Please do the same to stop cleaning. ▶ ▶ Robot Remote Control... -
Page 12: Cleaning Mode
Choosing the Cleaning Mode ㆍThe “Navigation” mode is set by default if there is no other operation input. Press the MODE button on the robot or the remote control to select the desired cleaning mode. Robot Remote Control Mode Types Display Window Explanation Navi Mode... -
Page 13: Choosing Cleaning Option
Choosing Cleaning Option Option Display Window Setting Method Explanation Used in carpet or covered environments Threshold Press the CLIMB (climbs up to 15mm). ) button on the remote control ※Threshold mode is automatically released when the to set and cancel mop plate is mounted. -
Page 14: Moving/Manual Cleaning
Moving/Manual Cleaning ㆍIf you press the control button during cleaning, you can perform manual cleaning. ㆍWhen the control button is pressed in the standby mode, the cleaning robot simply moves. You can use the control buttons on the remote control to move the cleaning robot to a desired location. -
Page 15: Automatic Charging
Automatic Charging If you want to charge while in use, press the BASE (charge) button on the remote control. Charge Button Remote Control ㆍWhen cleaning is complete, it automatically returns to the charging station. ㆍIf the remaining battery power is low during cleaning, it automatically returns to the charging station and after charging, returns to the remaining cleaning area to clean again. -
Page 16: Entry Prevention Tape Installation
Mop Cleaning ㆍBy attaching a mop, you can both vacuum clean and mop at the same time. ㆍIf you install the mop plate, it cannot cross thresholds. 1. Attach the mop to the mop plate. Mop Plate 2. After turning the product over, push the mop plate in the direction of the arrow and attach it. -
Page 17: Empty Dustbin And Change Filter
Care and Maintenance ㆍPlacing a soft cloth on the floor while managing the cleaning robot reduces scratches on the product. ㆍTurn off the power switch on the side of the robot for safety while managing the cleaning robot. Empty Dustbin and Change the Filter 1. -
Page 18: Main Blade Care
Main Blade Care 1. Place the cleaning robot so that the bottom side is facing up and take out the side brush. 2. Unlock the fixing clip of the main blade cover and take out the cover. 3. Take out the main blade and remove foreign materials. -
Page 19: Sensor Care
Sensor Care Use a cotton swab or a soft cloth to wipe the front and bottom sensor areas of the cleaning robot. Front Wheel Care 1.Place the cleaning robot so the bottom side is facing up. 2. Press the front wheel fixing cover with both hands and pull it up to remove it. -
Page 20: Mop Care
Mop Care After cleaning with a mop, wash the mop and dry it completely It may smell if it is not completely dry. If you leave the wet mop on the floor for a long time, it may soak the floor. Storage If the robot is not used for a long time, turn off... -
Page 21: Reset Settings
Reset Settings ㆍThe cleaning robot needs to reset its settings when the Wi-Fi information near the cleaning robot changes. 1. Press and hold the M (Mode) button on the cleaning robot display window for about 5 to 6 seconds. Press for about 5-6 seconds. 2. -
Page 22: Resolving Inspection Messages
Troubleshoot Resolving Inspection Messages Please refer to the causes and solutions according to the check message on the display when an error occurs. After resolving the problem, press the start/stop button ) to continue cleaning. Check Message Cause Solution Lifted Wheel If the wheel is caught on the materials such as the threshold or the veranda, please move the cleaning robot to a flat location. -
Page 23: Items To Check Before Reporting A Problem
Items to Check Before Reporting a Problem ㆍ The table below describes the most common "malfunctions" during use. ㆍ If you can not resolve the problem using the information described below, please feel free to contact with our distributor of your country. Symptom Cause Solution... - Page 24 A replacement of product is solely determined by Yujin Robot’s own diagnostic results. In cases where an exchange is authorized and no exact same model is available, our official distributor of your country will always replace with equal or better unit.
- Page 25 Open source software A part of this product’s software component includes open source code. Yujinrobot Co., Ltd provides a complete copy of the corresponding open source code. Visit www.iclebo.com to obtain source code. Menu Customer Service -> Select Open Source Download...
Need help?
Do you have a question about the iCLEBO O5 and is the answer not in the manual?
Questions and answers