Table of Contents
Advertisement
Quick Links
Advertisement
Table of Contents

Related Manuals for mangOH Yellow


Summary of Contents for mangOH Yellow
- Page 1 Yellow User Guide 41113427 Rev 2 Contents subject to change...
- Page 2 © October 21, 2019 Sierra Wireless. Licensed under the Creative Commons Attribution 4.0 license, http://creativecommons.org/licenses/by/4.0/ Disclaimer Indicate any modifications made to the original document. Trademarks ® mangOH and the mangOH logo are trademarks of Sierra Wireless. Other trademarks are the property of their respective owners. Rev 2 10/21/19 41113427...
- Page 3 Revision History Revision Release date Changes number September 2019 Document created 1.01 September 2019 Document formatting changes October 2019 Minor formatting corrections Added topic 2.2 (Windows only) Install Module Drivers Standardized references to "Power/Network/Cloud" LED Added notes to use battery in 2G situations Updated 3.5.3 Expansion Connector interfaces description Updated LED descriptions (Table 3-3) Corrected various schematic component reference numbers...
-
Page 4: Table Of Contents
Introduction ............. . . 6 mangOH Yellow Components and Accessories ....... . . 6 Setup and Installation . - Page 5 Console Access............28 Rev 2 10/21/19 41113427...
-
Page 6: Introduction
1.1 mangOH Yellow Components and Accessories Table 1-1 details the required and optional components needed to begin using the mangOH Yellow in your development environment. Some of these components are available in mangOH Yellow development kits (kit contents are supplier-dependent). -
Page 7: Setup And Installation
Standoff holes (4 corners) Figure 2-1: Module Standoff Placement 2.2 (Windows only) Install Module Drivers Windows systems require drivers for the mangOH Yellow’s CF3 module. To download the drivers: 1. Go to https://mangoh.io/mangoh-yellow-resources-software. 2. Click Download Drivers to download the driver installation file. -
Page 8: Initial Setup
Yellow User Guide 2.3 Initial Setup To begin using the mangOH Yellow, set up your hardware and software: 1. Verify the SW403 dip switch block pins are set correctly: a. Remove the protective film from the dip switch block:... - Page 9 5. Power up the mangOH Yellow: a. Connect the selected power supply—Use a micro-USB cable to connect the mangOH Yellow USB connector to your computer or AC adapter, or use a 15-pin cable to connect the expansion connector to an external device that will provide power.
- Page 10 • Make sure the power switch is in the ON position (toward the center of the board. Important: If LTE-M coverage is not available, the mangOH Yellow’s WP7702 module will fall back to 2G, which consumes up to 2 A of current for short bursts. In this case, USB power is insufficient (500 mA) and the module may repeatedly brown out and reboot.
- Page 11 Minimum = 0ms, Maximum = 2ms, Average = 1ms 9. Optionally, use a mini-USB cable to connect the remaining mangOH Yellow’s "CON" USB connector to your computer. (This enables you to display diagnostic messages in one terminal window and work in another, as...
-
Page 12: Hardware Setup And Features
How to configure and control features using connectors and switches 3.1 Power Supply Sources The mangOH Yellow is powered via the board’s USB (CN802) micro-USB connector, the expansion connector, or an optional external backup battery. The micro-USB connector can connect to a computer’s USB port or, if greater power is required, to an AC adapter. -
Page 13: Select Power Supply
3.1.1 Select Power Supply To select the primary power supply: 1. Place the mangOH Yellow with the dip switch block facing up (module facing down) and locate the power select (PWR SEL) jumper pins (CN801). USB power (jumper on pins... -
Page 14: Connect Battery Backup
Important: If LTE-M coverage is not available, the mangOH Yellow’s WP7702 module will fall back to 2G, which consumes up to 2 A of current for short bursts. In this case, USB power is insufficient (500 mA) and the module may repeatedly brown out and reboot. -
Page 15: Connect External Antenna(S)
Disabled by default. (Default is integrated antenna (ANT301).) a. U.FL connectors Note: The mangOH Yellow also includes an three integrated antennas—main (used by default), Wi-Fi/BT/GPS, and NFC. To connect an external antenna to the Main antenna connector: 1. Place the mangOH Yellow with the dip switch block facing up. -
Page 16: Sim, Sd, And Iot Expansion Cards
Test SIM card for use with a call box (for example, an Agilent 8960 or Rohde & Schwarz CMU200) To install a SIM card: 1. Place the mangOH Yellow with the dip switch block facing up (as shown). micro-SD (CN602—top) micro-SIM (CN602—bottom) -
Page 17: Inserting A Microsd Card
3.4: Inserting a microSD Card 3.4 Inserting a microSD Card To install a microSD card: 1. Place the mangOH Yellow with the dip switch block facing up (as shown). micro-SD (CN602—top) micro-SIM (CN602—bottom) Figure 3-9: SIM Connector and micro-SD Locations 2. - Page 18 To install an IoT Expansion Card: 1. Turn off the mangOH Yellow’s power—slide the power switch toward the edge of the board. Note: You must turn off the power because IoT Expansion Cards are not hot-swappable—the card will be recognized when power is turned back on.
-
Page 19: Audio Connection
The mangOH Yellow includes a 3.5 mm audio jack (CN701) for use with audio-enabled CF3 modules. If supported by the CF3 module, the jack can be used to make a voice call. By default, the audio jack is connected to the onboard mangOH codec, and is configured for use with a CTIA/ AHJ-compatible headset. -
Page 20: Usb Connector
The connector supports several interfaces for communication between the external device and the mangOH Yellow’s WP7702 module (ADC, GPIO, I2C, SPI, UART). The connector also includes power pins that allow the mangOH Yellow to provide power to the external device, or for the external device to provide power to the mangOH Yellow. -
Page 21: Led Indicators
1—Power/Network/Cloud Yellow—Power on + Cellular radio on • White—Power on + Cellular radio is transmitting/receiving • Note: D401 only appears as Green, Yellow (Green+Red), or White (Green+Red+Blue). 2—Generic green D402—Mono-color (Green), software-controllable D500—Tri-color (RGB) software-controllable 3—Generic tri-color Note: All color combinations can be used. (i.e. B, G, R, BG, BR, GR, BGR) D401—Power/Network/Cloud... -
Page 22: Physical Switches/Buttons/Headers
The mangOH Yellow includes one generic button (SW500) for user-defined purposes. SW500—Generic button Figure 3-19: Generic Button 3.7.3 Power Switch The mangOH Yellow includes a power switch (SW1002) that turns the mangOH Yellow on/off, regardless of which power source is being used. To turn the power: ·... -
Page 23: Power Source Selector
3.7.4: Power Source Selector Power switch Figure 3-20: Power Switch 3.7.4 Power Source Selector The mangOH Yellow uses a 3-pin header as the primary power source selector. Table 3-4: CN801—Board Power Select Jump Jump Power supply selection 1–2 2–3 "USB" micro-USB connector (CN802) Expansion connector (CN805) a. - Page 24 IoT card, not both. The interface will not work if both are inserted. Additional peripheral interfaces (UART, See the mangOH Yellow Hardware Architecture Guide for details. SPI, I2C, etc.) Audio connector (CN701) connected to onboard Supports CTIA/AHJ-compatible headset...
-
Page 25: Module Signals Control
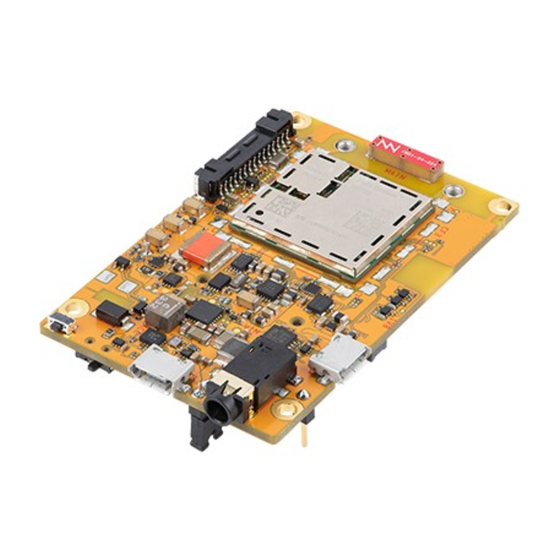
3.9: Module Signals Control 3.9 Module Signals Control The mangOH Yellow uses a multi-function switch (SW403) to control specific signals. Table 3-6: SW403—Module Signals Control Signal Dip switch position / State Module type installed: HL78_MODE_ON ON—HL78 (Note: HL78 UART0 signals carried on CF3 socket’s UIM2 pins.) •... - Page 26 19—Tricolor LED User-controlled (D500) 9—Battery connector (CN1000) 20—Digital microphone (U704) 10—uSIM/uSD connector (CN602) 21—Green LED User-defined (D402) 11—Multi-function switch (SW403) 22—Tricolor LED Power/Network/Cloud (D401) Figure 3-21: mangOH Yellow—Top Side Switches/Connectors Note: For reference only. For latest schematic, visit mangoh.io/mangoh-yellow-resources-hardware. Rev 2 10/21/19 41113427...
- Page 27 3—Expansion connector (CN805) 9—Client USB connector (CN802) 4—Buzzer (U406) 10—3.5 mm audio jack (CN701) 5—Reset button (SW401) 11—Console USB connector (CN800) 6—RTC (U701) Figure 3-22: mangOH Yellow—Bottom Side Switches/Connectors Note: For reference only. For latest schematics, visit mangoh.io/mangoh-yellow-resources-hardware. Rev 2 10/21/19 41113427...
- Page 28 A: Console Access If you have two USB ports on your dev machine, you can use one of them to display the mangOH Yellow’s diagnostic messages when the device boots, when certain commands are run, etc. To set up a window to display diagnostic messages: 1.
- Page 29 · Connection type = Serial · Serial line = [USB Serial port COM port] · Speed = 115200 iv. Click Open. The window will remain empty until you power up the mangOH Yellow in the next step. Rev 10/21/19...
- Page 30 Note: Only one console connection can be opened at any time since it locks the USB serial port. Example If you open the console terminal window before you connect power to the mangOH Yellow, you will see the messages that are generated during the module boot process: 0.275753] cpu cpu0: dev_pm_opp_get_opp_count: device OPP not found (-19)
Need help?
Do you have a question about the Yellow and is the answer not in the manual?
Questions and answers