Table of Contents
Advertisement
Quick Links
Advertisement
Table of Contents

Related Manuals for UNI-T UT253A


Summary of Contents for UNI-T UT253A
- Page 1 P/N:110401103625 DATE:2018.06.26 REV.3...
-
Page 2: Table Of Contents
Contents TITLE PAGE Warnings I. Introduction II. Model Comparison III. Electrical Symbols IV. T echnical Specifications V. Meter Description VI. Operating Instructions 1. Power On/Off 2. Backlight Control 3. Data Hold and Save 4. Data Access and Exit 5. Data Transmission to PC 6. -
Page 3: Warnings
Warning Thank you for purchasing UNIT large jaw leakage current clamp meter In order to use the product properly, please follow instructions below: Read user's manual carefully. Strictly observe safety rules and notes mentioned in this manual. -
Page 4: Introduction
Range Model Resolution Jaw Size construction, metrology, R&D institutes, mining, ect. UT253A 0.00mA 1200A 0.01mA 80mm 80mm This kind of meter is designed with clamp iron core made with special alloy UT253B 0.0mA 2000A... -
Page 5: Electrical Symbols
III. Electric Symbols IV. Technical Specifications to measure leakage current, current and three-phase Extreme danger! To avoid personal injury or accidents due to electric Functions AC voltage shock, observe safety rules strictly. 6V DC(LR6 4 Alkaline dry battery,12 hours of battery Danger To avoid personal injury or accidents due to electric shock, Power life) - Page 6 0.00mA 300A: 1.5% 3dgt Overload Display Out of range indicated by OL icon Measuring Accuracy 300A 1200A: 2% 3dgt Automatically 15minutes later after power on, to Auto Power Off RH, conductor located conserve power energy 1200A 2000A: 3% 3dgt at the center of jaw 0.00V 600V 1.5% 3dgt Low battery icon displays with battery voltage...
-
Page 7: Meter Description
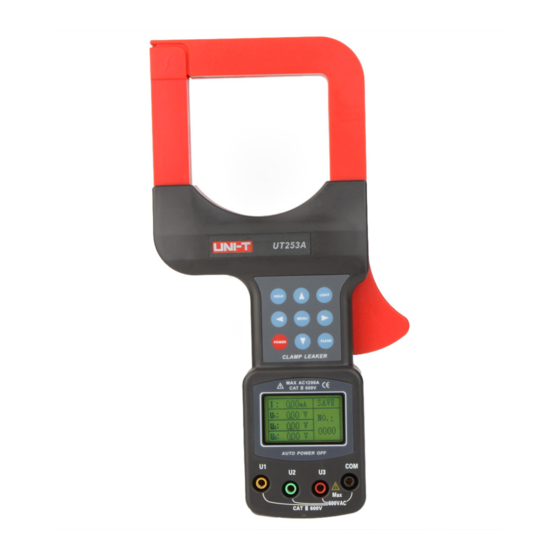
V. Meter Description 1. Clamp Jaw 2. Function Buttons 3. LCD Display 4. Voltage Input Terminal 5. Jaw Opening Trigger 6. RS232 port (to transfer data to PC) 7. Screws (to connect upper and lower covers, 6pcs) 8. Battery Cover 9. -
Page 8: Operating Instructions
will automatically number current data at the time of saving, indicated by VI. Operating Instructions group number such as SAVE NO. 001 . Maximum data storage is 200 sets and is achieved when FULL icon shows 1. Power on/off Press POWER button to power on, display LCD and enter into measuring 4. -
Page 9: Data Delete
6. Data Delete Please keep the jaw clean and regularly maintained after finishing Press CLEAR button to select data clearing option under data access measurement. mode, then use Left or Right button to move the cursor for selecting Ensure correct wire connection to avoid short-circuit problem during YES or NO , finally press MENU button to confirm the operation or voltage measurement return to the measuring mode. - Page 10 Measuring Reference Figure: Measuring Leakage Current of Built-in Cable Measuring Tank Measuring Instrument Leakage Current Measuring Total Leakage Measuring Ground Leakage Current Measuring Current and Voltage Phase Angles Grounding Line...
-
Page 11: Battery Replacement
VII. Battery Replacement VIII. Packing List Warning ! The Meter To avoid potential risks do not measure when battery cover is not well Carrying case placed. Data transmission software CD Please ensure right battery polarity, otherwise it will damage the meter. RS232 exclusive communication line Change batteries timely when low battery icon displays.
Need help?
Do you have a question about the UT253A and is the answer not in the manual?
Questions and answers