Diplomat ADEPT DA 370 Product Information
Dental unit
Hide thumbs
Also See for ADEPT DA 370:
- User manual (12 pages) ,
- Instructions for use manual (67 pages)

Subscribe to Our Youtube Channel
Related Manuals for Diplomat ADEPT DA 370


Summary of Contents for Diplomat ADEPT DA 370
-
Page 1: Product Information
DIPLOMAT DENTAL s.r.o. Vrbovská cesta 17 921 01 Piešťany SLOVENSKO PRODUCT INFORMATION DENTAL UNIT DIPLOMAT ADEPT DA 370 DIPLOMAT ADEPT DA 380... -
Page 2: Table Of Contents
INSTRUCTIONS FOR USE DA 370, DA 380 CONTENTS 1. ABOUT ..................................3 DA 380 CART ................................3 2. PRODUCT DESCRIPTION ..........................4 3. TECHNICAL DATA ............................... 4 4. GENERAL DESCRIPTION AND DIMENSIONS OF DA 370 DENTAL UNIT ..........5 GENERAL DESCRIPTION AND DIMENSIONS OF DA 380 DENTAL UNIT ..........6 GENERAL DESCRIPTION AND DIMENSIONS OF DA 380 CART .............. -
Page 3: About
These Instructions for Use are intended to provide you with a necessary information about DIPLOMAT ADEPT DA 370 and DA 380 dental units. Please, familiarize yourself with information provided in this handout before operating the unit. It is expected, that dental unit... -
Page 4: Product Description
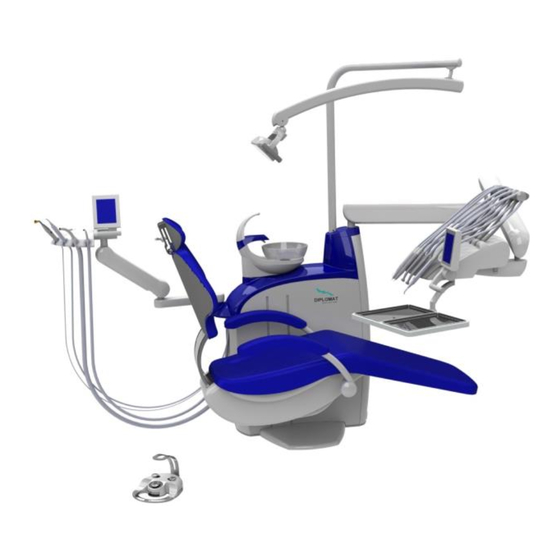
DA 370, DA 380 2. PRODUCT DESCRIPTION Diplomat Adept DA 370 and DA 380 are floor mounted dental units with an integrated patient’s chair. The DA 370 model has an overhead delivery system and DA 380 model has bottom-led instrument hoses. Diplomat Adept DA 380 dental unit is also available in a Cart Version. -
Page 5: General Description And Dimensions Of Da 370 Dental Unit
INSTRUCTIONS FOR USE DA 370, DA 380 Caution To eliminate the risk of electric shock, equipment must be connected to the mains supply with a reliable connection to protective earth. Operation mode is continuous with intermittent loading, common to the dental practice. Operating mode ratio for the chair is 1:16, meaning, e.g. -
Page 6: General Description And Dimensions Of Da 380 Dental Unit
INSTRUCTIONS FOR USE DA 370, DA 380 GENERAL DESCRIPTION AND DIMENSIONS OF DA 380 DENTAL UNIT 1.Spittoon block with assistant‘s console 2.Control panel 3.Foot controller 4.Control panel’s console 5.Dental light 6.Dental light‘s console 7.Dental chair 6/55 gb_da370-da380_2014_06... -
Page 7: General Description And Dimensions Of Da 380 Cart
INSTRUCTIONS FOR USE DA 370, DA 380 GENERAL DESCRIPTION AND DIMENSIONS OF DA 380 CART 1.Spittoon block with assistant‘s console 2.Control panel 3.Foot controller 4.Cart 5.Dental light 6.Dental light‘s console 7.Dental chair 7/55 gb_da370-da380_2014_06... -
Page 8: Unit Plate
INSTRUCTIONS FOR USE DA 370, DA 380 4.1 Unit plate 1 – designation of the unit type 2 – basic electrical parameters 0434 3 – serial number 4 – production date mode of operation of the chair 5. PRE-INSTALLATION REQUIREMENTS 5.1 Environmental conditions Do not install in the premises with a potential explosion hazard! 5.2 Utilities... -
Page 9: Floor Surface
All of the pre-installation and installation operations must be performed in accordance with the applicable standards of the particular country and in coherence with the valid product documentation, which any of the authorized representatives of Diplomat possess. Important note If the installation of amalgam separator is required by the local regulations, then the cuspidor block without such must be connected to an external amalgam separator. -
Page 10: Environment
INSTRUCTIONS FOR USE DA 370, DA 380 5.4 Environment from +10° C to +40° C Environment temperature range Relative humidity range from 30% to 75 % Atmospheric pressure range from 700 hPa to 1060 hPa 6. ASSEMBLY AND INSTALLATION Unpacking the unit and inspecting the delivery Examine the package for any outside indication of damage. - Page 11 INSTRUCTIONS FOR USE DA 370, DA 380 The main switch LED lights up and the following data is displayed: DA 370 08:58 The following indicates that the system is ready to operate. The unit is connected to the water and air distribution. Three short beeps conform that the unit is ready for work. It is necessary to wait for approx.
-
Page 12: Operating The Unit
INSTRUCTIONS FOR USE DA 370, DA 380 8. OPERATING THE UNIT 8.1Control panel and instrumentation The touch screen display is readable from any working position. 8.1.1 Symbol description DA 370 08:58 Magnetic clamp for X- ray films Turning the X-Ray viewer On/Off Use this key to increase display brightness. - Page 13 INSTRUCTIONS FOR USE DA 370, DA 380 Do not activate bowl swivelling while the dental chair is in motion! Bowl rinse Press and hold this key for more then 1,5 sec. to activate bowl rinse function. Rinsing cycle duration will be saved automatically. Use this key to start the bowl rinsing cycle for the preset duration.
- Page 14 INSTRUCTIONS FOR USE DA 370, DA 380 Chair base up Chair base down Backrest down Backrest up Toeboard up Toeboard down Saving customized settings/quick key for preset positions. Use the program key to save your settings or to recall the preset positions. Saving customized chair position: Adjust the chair to the desired position using the controls and press the following keys subsequently:...
- Page 15 INSTRUCTIONS FOR USE DA 370, DA 380 beeps. This sound signal indicates that the programming mode is now active and you can now continue chair programming. Please, follow these instructions to ensure that your new settings will be saved properly. As every setting is saved, you will hear one long and two short confirmation beeps.
- Page 16 INSTRUCTIONS FOR USE DA 370, DA 380 becomes inactive and should be pressed again. Before lifting the chair (or adjusting its position when already elevated to the upper track) make sure, the spittoon bowl is in its home position. If the bowl is positioned in such a way that it obstructs the chair motion the chair motion will be blocked automatically and the following error message will be displayed E10-BOWL.
- Page 17 INSTRUCTIONS FOR USE DA 370, DA 380 disable countdown press the key again. Foot control battery status This status bar is shown on the display when using wireless foot controller and displays the current battery percentage: battery is empty - 33% full - 66% full - 100% full Setup menu...
- Page 18 INSTRUCTIONS FOR USE DA 370, DA 380 Info / SW version number individual modules/ Programming the Left (L) lever of the foot controller. Setup Chipblower is On Prog L Chipbl Setup Instrument cooling is On/Off Prog L On/Off Reverse mode for micromotors/ENDO Setup mode for scaler Prog L...
-
Page 19: Control Panel Brake Button
INSTRUCTIONS FOR USE DA 370, DA 380 Programming the Right (R) lever of the foot controller. (Program the Right lever as instructed above for the Left lever) Setup Chipblower is On Prog R Chipbl Parameter Adjustment instructions: Press the icon of the desired parameter on the display. Choose the desired value or function using keys . -
Page 20: Setting The Tray - Table
INSTRUCTIONS FOR USE DA 370, DA 380 Use the break button located on the handle to unblock the control panel. Move the control panel vertically untill the desired position is reached. Release the break button. The control panel is now fixed in the chosen working position. 8.1.3. - Page 21 INSTRUCTIONS FOR USE DA 370, DA 380 DC Micromotor Display for DC micromotors DC Motor 1 Prog 0 P = 50% max T = 100% Water = 60% !Oil! reverse lighting Motor activates automatically after withdrawal from the holder. The setup menu/current settings will appear on the display.
- Page 22 INSTRUCTIONS FOR USE DA 370, DA 380 Water = 60 % - amount of water coolant. Use 60 % key along with < / > + keys to adjust to the desired value. To save the adjusted value: press OK to confirm the changes and then press key to save the settings.
- Page 23 INSTRUCTIONS FOR USE DA 370, DA 380 To turn micromotor off release the pedal/lever and bring it to the zero-position. It is recommended to run CHIPBLOWER function after each use. Use - < / > + keys to adjust the output value in a range of 0-100% when the micromotor is withdrawn and idle (the foot controller lever/pedal has to be in its max.
- Page 24 INSTRUCTIONS FOR USE DA 370, DA 380 Speed ratio: 1:5; 1:4; 1:2; 1:1; 2:1; 7:1; 10:1; 20:1; 30:1; 100:1; 128:1. RPM and torque values convert according to the chosen ratio automatically. RPM = 40000 – rotations per minute value Use 40000 key along with <...
- Page 25 INSTRUCTIONS FOR USE DA 370, DA 380 Water coolant – water coolant is active, subsequent pressing will activate another cooling mode: Spray = xx % - spray coolant is active Use xx % key along with < / > + keys to adjust handpiece water coolant amount. To save the adjusted value: press OK to confirm the changes and then press key to save the settings.
- Page 26 INSTRUCTIONS FOR USE DA 370, DA 380 handpiece is in use, the output value can also be adjusted from 0 to maximum by pressing the lever/pedal of the foot controller in the Analog mode. The message !Oil! and sound signal indicate that it is necessary to lubricate the micromotor. Press the "Oil"...
- Page 27 INSTRUCTIONS FOR USE DA 370, DA 380 1 : 1 – rotation transmission ratio Use 1:1 key along with < / > + keys to adjust to the desired value. To save the adjusted value: press OK to confirm the changes and then press key to save the settings.
- Page 28 INSTRUCTIONS FOR USE DA 370, DA 380 The parameter changes for 5000 when motor is in ARev or AFor modes (1:1 ratio). Water = 60 % - amount of water coolant. Use 60 % key along with < / > + keys to adjust to the desired value. To save the adjusted value: press OK to confirm the changes and then press key to save the settings.
- Page 29 INSTRUCTIONS FOR USE DA 370, DA 380 controller to the right/press the pedal of the multi-functional foot controller. To turn micromotor off release the pedal/lever and bring it to the zero-position. It is recommended to run CHIPBLOWER function after each use. Use - < / > + keys to adjust the output value in a range of 0-100% when the micromotor is withdrawn and idle (the foot controller lever/pedal has to be in its max.
- Page 30 INSTRUCTIONS FOR USE DA 370, DA 380 Select a number (0-9) you wish to assign for that setting and then adjust the desired parameters for the setting. To save the settings into the unit's internal memory: press OK to confirm the changes and then press key to save the settings.
- Page 31 INSTRUCTIONS FOR USE DA 370, DA 380 off release the pedal/lever and bring it to the zero-position. It is recommended to run CHIPBLOWER function after each use. The output value of the turbine cannot be adjusted! The message !Oil! and sound signal indicate that it is necessary to lubricate the turbine. Press the "Oil"...
- Page 32 INSTRUCTIONS FOR USE DA 370, DA 380 30% / 100% - use this key to toggle between output settings Working mode SP 4055: scaler – normal mode endo - endo mode paro – paro mode To confirm and save the working mode: press the desired mode key, then press OK to confirm the changes and key to save the settings.
- Page 33 INSTRUCTIONS FOR USE DA 370, DA 380 Cauter Display for Cauter Cauter P = 100% max Activate the Cauter by withdrawing from the holder. The setup menu will appear on the display. P = 100 % max – maximum cauter output Use 100 % key along with <...
- Page 34 INSTRUCTIONS FOR USE DA 370, DA 380 Polisher Display for polisher Leštička Leštička Voda = 60% Voda = 60% Typ NSK Typ LM The setup menu will appear on the display after the polisher is taken from the holder. Symbols on the menu depend upon the polisher model. ...
- Page 35 INSTRUCTIONS FOR USE DA 370, DA 380 Polymerizing lamp Display for polymerizing lamp After withdrawal from the holder the polymerizing lamp is active and the corresponding icon is displayed. The lamp does not have adjustment options and has control button on its handle.
- Page 36 INSTRUCTIONS FOR USE DA 370, DA 380 Use ENTRY-EXIT POSITION, CHAIR PROGRAMMING and JOYSTICK buttons to control the dental chair. Note, that this function is disabled if any handpiece controlled with a foot controller is active. The chair control is blocked if a handpiece is in use. Chair programming/mouth wash button has two functions: If the handpieces are in the holders - Chair programming function is enabled.
- Page 37 INSTRUCTIONS FOR USE DA 370, DA 380 status. The foot control can still be operated for a couple of hours after the first warning. However, batteries should be charged as soon as possible. Connect the foot controller to the dental unit using the cable to recharge the batteries. Synchronizing the foot controller with the unit while charging: 1.
-
Page 38: Spittoon Block
INSTRUCTIONS FOR USE DA 370, DA 380 So the controller can be left charging, for example, overnight to replenish the battery charge. Foot controller has a self-control function that runs every time the battery is turned on. If there is any defect in the transmitting element, then the transmitter is not sending data (the green LED is not blinking when pressing buttons on the foot controller). - Page 39 INSTRUCTIONS FOR USE DA 370, DA 380 The distilled water bottle is located inside the cuspidor block and can be accessed after the side door of the spittoon block was opened. Distilled water from the bottle supplies the micromotor, turbine, ultrasonic scaler, syringe and polisher on the dentist‘s panel and syringe on the assistant‘s panel.
-
Page 40: Assistant's Instrumentation
INSTRUCTIONS FOR USE DA 370, DA 380 8.3.1 Assistant’s Instrumentation Keyboard Assistant’s panel with keyboard Description Description Description Remote Door Hygiene Main light control opener (if installed) Handpiece Suction disinfection (if decontamination Spittoon bowl swivel Hygiene system is (If Hygiene system (if installed) installed) is installed) -
Page 41: Assistant's Panel With Touch Screen
INSTRUCTIONS FOR USE DA 370, DA 380 8.3.2 Assistant’s panel with Touch Screen Auxiliary holder/module With a handle on the other side. Assistant’s panel with Touch Screen Auxiliary extension modules (for syringe, polymerizing lamp or intraoral camera) can be mounted on assistant's panel upon request. DA 370 12:56 Hygiene... - Page 42 INSTRUCTIONS FOR USE DA 370, DA 380 Symbol Description Main light control Use this button to control the main light and toggle between 3 modes: - low intensity, high intensity and off modes; you need to hold the button for some time until the light turns off (see 8.1.1).
-
Page 43: Assistant's Instrumentation
INSTRUCTIONS FOR USE DA 370, DA 380 Water supply for handpieces. Status icons. - distilled water in is use: bottle is not empty - distilled water is in use: empty bottle - water from central distribution is in use - bottle is depressurized (the unit is not connected to any water source) 8.3.3 Assistant’s instrumentation Saliva ejector Lift a saliva ejector from a holder for activation. - Page 44 INSTRUCTIONS FOR USE DA 370, DA 380 camera Intraoral camera DP7 controlled from the foot controller After the camera has been taken out of the holder, the foot controller is switched automatically to the mode for camera control with the following meaning of the controls: Cross controller upwards = Image capture button on the camera Cross controller downwards = L/M (Life/Memory) button on the camera Cross controller to the right = MODE button on the camera...
-
Page 45: Dental Light
INSTRUCTIONS FOR USE DA 370, DA 380 symbol displayed instead of the “Cooling” key and the sound signal indicate the insufficient water amount in the water bottle (when a handpiece is withdrawn). 8.5 Dental light Basic unit equipment includes XENOS dental light. Xenos dental light is controlled from a control panel. - Page 46 INSTRUCTIONS FOR USE DA 370, DA 380 Socket for the connection of the foot controller to the CART For the foot controller to function correctly during charging by means of the interconnecting cable, it is necessary to disconnect (by unplugging from the connector) the receiver from the dental unit.
-
Page 47: Hygiene
When the unit is not equipped with a hygiene system, the corresponding icons on the assistant's screen are crossed out. For more detailed information, please, refer to the "Diplomat ADEPT DA 370/DA 380 Hygiene System". -
Page 48: Before Leaving Your Workplace
INSTRUCTIONS FOR USE DA 370, DA 380 Position no.1 CLICK Position no.4 Position no.3 -Grasp the armrest and rotate it toward the toe from position no.1 to position no.4 -To bring the armrest back into standard position lower it from the position no.4 into position no.3 and lift it up until you hear "click"... -
Page 49: Product Maintenance
INSTRUCTIONS FOR USE DA 370, DA 380 9. PRODUCT MAINTENANCE For appropriate handpieces and instruments maintenance, please, reference the manufacturer's instructions that came with them. If the cuspidor block is connected to the central distribution system, check the cleanliness of the strainer and the water hardness treatment system condition (please, follow the manufacturer's guidelines). -
Page 50: Cleaning, Disinfection And Decontamination
INSTRUCTIONS FOR USE DA 370, DA 380 10. CLEANING, DISINFECTION AND DECONTAMINATION 10.1 Disinfecting the internal handpiece tubings It is recommended to use Alpron cleaning agent. A 1% Alpron solution with distilled water is poured into reservoir for distilled water and can be used continuously. The 1% concentration is harmless to the patient. - Page 51 INSTRUCTIONS FOR USE DA 370, DA 380 Detail A) Large and small aspirators‘ sieve location 1 – large aspirator’s sieve 2 – small aspirator’s sieve Saliva ejector’s sieve location SIEVE Clean the following parts at least once a day (depending upon model): aspirators’...
-
Page 52: Cleaning And Disinfecting And Other Parts Of The Unit
INSTRUCTIONS FOR USE DA 370, DA 380 If the unit is equipped with suction system, use the cleaning agent recommended for the particular separator type. For Cattani separators it is recommended to use PULI - JET PLUS cleaning agent. If the dental unit is configured with Metasys amalgam separator use GREEN &... -
Page 53: Repair Service
INSTRUCTIONS FOR USE DA 370, DA 380 The manufacturer will take no responsibility for the damage resulted from using inappropriate cleaning agents. 11. EQUIPMENT DISPOSAL Element Basic material Recyclable Storable Hazardous material material material Metal Steel Aluminum Plastic PA, ABS Laminated glass Other plastics Rubber... -
Page 54: Warranty
INSTRUCTIONS FOR USE DA 370, DA 380 Spittoon bowl Dental light console Dental light Foot controller Tray table Rightside armrest (upon request) Side table (upon request) Monitor holder (upon request) Monitor (upon request) Intraoral camera (upon request) Bottom holder/handle for dental light Instruments/handpieces, accessories, small parts and completion sheet, sealed in cardboard Accompanying documentation:... -
Page 55: Assembly Plans
INSTRUCTIONS FOR USE DA 370, DA 380 ASSEMBLY PLANS 55/55 gb_da370-da380_2014_06...
Need help?
Do you have a question about the ADEPT DA 370 and is the answer not in the manual?
Questions and answers