
Related Manuals for Diplomat ADEPT DA 170

Summary of Contents for Diplomat ADEPT DA 170
- Page 1 DIPLOMAT DENTAL s.r.o. Vrbovská cesta 17 921 01 Piešťany SLOVAKIA INSTRUCTIONS FOR USE Dental units DIPLOMAT ADEPT DA 170 DIPLOMAT ADEPT DA 130...
-
Page 2: Table Of Contents
INSTRUCTIONS FOR USE DA 170, DA 130 CONTENTS 1 PURPOSE AND USE ............................3 2 PRODUCT DESCRIPTION ..........................4 3 TECHNICAL DATA ............................5 3.1 Used Symbols..............................5 4 GENERAL DESCRIPTION OF THE DENTAL UNIT DA 170 ..................7 4.1 Label of dental unit ............................9 5 PRE-INSTALLATION REQUIREMENTS ...................... -
Page 3: Purpose And Use
DA 170, DA 130 1 PURPOSE AND USE These Instructions for use are intended to provide you with necessary information about using DIPLOMAT ADEPT DA 170, DA 130. Intended purpose of use of dental unit: Equipment, used alone or with instrumentation, intended for prevention, treatment or alleviation of illness in the area of oral cavity of the patient. -
Page 4: Product Description
2 PRODUCT DESCRIPTION Diplomat DA 170 and DA 130 are stationary dental units with built-in chair. The pantographs of a control panel and of operating light are mounted on the spittoon block. The instruments and handpieces, except for syringe, saliva ejector, large and small aspirators and polymerizing lamp, are controlled with the foot controller. -
Page 5: Technical Data
Operation mode is continuous with intermittent loading, common to the dental practice. Detailed descriptions, schematics, parts list and instructions for servicing are available to each authorized service specialist who was trained in DIPLOMAT DENTAL. 3.1 Used Symbols Symbol... - Page 6 INSTRUCTIONS FOR USE DA 170, DA 130 This way up Stacking limit by mass Stacking limit by number Fragile, handle with care Keep away from rain Temperature limit Humidity limitation Atmospheric pressure limitation Type B applied part Fuse Equipotential terminal Protective earth;...
-
Page 7: General Description Of The Dental Unit Da 170
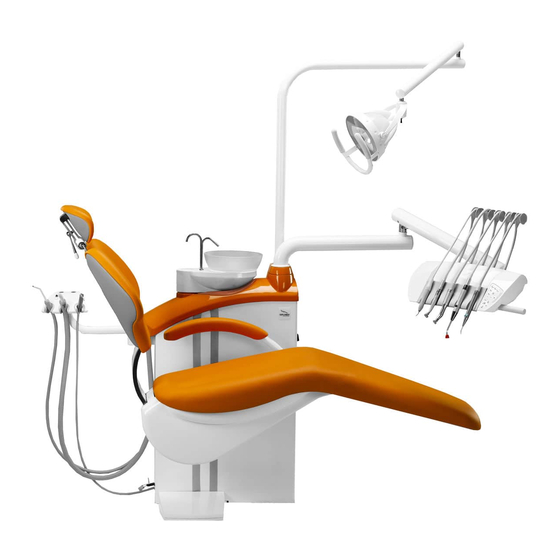
INSTRUCTIONS FOR USE DA 170, DA 130 4 GENERAL DESCRIPTION OF THE DENTAL UNIT DA 170 1. Spittoon block 5. Dental light pantograph 2. Control panel 6. Operating light 3. Foot controller 7. Dental chair 4. Control panel console GENERAL DESCRIPTION OF THE DENTAL UNIT DA 130 7 / 37 UM_EN_DA170_DA130_2018-09_ver2.6... - Page 8 INSTRUCTIONS FOR USE DA 170, DA 130 1. Spittoon block 5. Dental light pantograph 2. Control panel 6. Operating light 3. Foot controller 7. Dental chair 4. Control panel console 8 / 37 UM_EN_DA170_DA130_2018-09_ver2.6...
-
Page 9: Label Of Dental Unit
Pre-installation and installation must be performed according to the applicable standards of the particular country and in accordance with the valid documentation of the manufacturer, which is owned by each authorized representative of DIPLOMAT DENTAL s.r.o. Caution To avoid the risk of electric shock, device must be connected to the power supply with a protective earthing Do not modify this device without prior authorization of the manufacturer. -
Page 10: Floor Surface
INSTRUCTIONS FOR USE DA 170, DA 130 1 - Input water from an external water supply 2 - Mount point of inlet water 3 - Mount point for taking the samples of the input water 4 - Filter of water particles 5 - Manual shut-off valve Oil-free, clean and dry air, with a minimum flow of 55 l/min and a pressure of 0,45 to 0,8 MPa. -
Page 11: Assembly And Installation
INSTRUCTIONS FOR USE DA 170, DA 130 6 ASSEMBLY AND INSTALLATION The installation must be done by the certified service technician only; otherwise no possible future warranty claims will be accepted. The Registration form must be filled out and sent to the manufacturer or the seller. Unpacking the unit and inspecting the delivery Examine the package for any outside indication of damage. -
Page 12: Putting The Unit Into Operation
INSTRUCTIONS FOR USE DA 170, DA 130 7 PUTTING THE UNIT INTO OPERATION Warning – disinfection of new dental unit before its first use Before putting the unit into operation, your technician must carry out disinfection of waterlines of instruments, according to instructions in Installation manual. switch on the compressor and let it get pressurized open the central water supply turn on the suction unit (for cuspidor block configuration with large and small aspirators) -
Page 13: Product Operation
INSTRUCTIONS FOR USE DA 170, DA 130 8 PRODUCT OPERATION 8.1 Dentist’s Control panel Error Indicator Output power indication Button Description Button Description Increasing output power (RPM) Move chair up Decreasing output power (RPM) Move chair down Reverse rotation of the Move backrest forward micromotor/ENDO with indication Handpiece lighting with indication... -
Page 14: Button Functions Description
INSTRUCTIONS FOR USE DA 170, DA 130 8.1.1 Button functions description Reversing rotations of the micromotor Pressing this button will reverse the micromotor rotation or enable the ENDO function for the scaler. The indicator next to the button shows the status (lit when on). Handpiece lighting Pressing this button will turn on the lighting of the rotary instruments (turbine, micromotors) and scaler on or off. -
Page 15: Saving The Customized Settings
INSTRUCTIONS FOR USE DA 170, DA 130 Rinsing position Moving to rinsing position: Press the button => 1x beep & chair moves to the rinsing position & bowl is rinsed & cup is filled Returning from rinsing position: Keep pressed the button in time interval from 0,6 seconds to 2 secs => 2x beep &... -
Page 16: Operation Of Individual Instruments
INSTRUCTIONS FOR USE DA 170, DA 130 8.1.5 Operation of individual instruments Control panel In addition to below listed instructions, please, follow the instructions given by the manufacturer of a specific product. Whips Position Locking If control panel (with upper hoses delivery) is equipped with whips locking system, proceed the following way: TO LOCK THE WHIP WHIP UNLOCKING Grasp the instrument and pull the hose towards you. - Page 17 INSTRUCTIONS FOR USE DA 170, DA 130 Micromotor Activate the micromotor by withdrawing it from the holder and press a foot controller pedal. To turn the micromotor off, release the pedal. It is recommended to run CHIPBLOWER function after use. (Only possible with UNO or NOK foot controllers).
-
Page 18: Assistant's Control Panel
INSTRUCTIONS FOR USE DA 170, DA 130 8.2 Assistant’s Control Panel Button Description Automatic entry/exit chair position Move chair up Move chair down Move backrest forward Move backrest backward Saving settings/quick key for programmed positions (valid only for the chairs with programming) Cup fill Spittoon bowl rinse... -
Page 19: Foot Controller
INSTRUCTIONS FOR USE DA 170, DA 130 8.3 Foot controller MARQUARDT lever (pedal) chair programming chipblower entry-exit position spray (reverse/endo) joystick for controlling the chair The CHIPBLOWER function sets a jet of a cooling air through the micromotor and turbine handpieces. Press "Chipblower"... -
Page 20: Spittoon Block
INSTRUCTIONS FOR USE DA 170, DA 130 8.4 Spittoon block Possible spittoon configuration (depending upon request): • swiveling or fixed spittoon bowl • spittoon bowl flush and cup fill • Cattani miniseparator system • Cattani Mechanical amalgam trap • saliva ejector •... -
Page 21: Saliva Ejector
INSTRUCTIONS FOR USE DA 170, DA 130 8.4.4 Saliva ejector Saliva ejector is activated automatically after withdrawal from a holder. If the output is insufficient, check and clean the sieve. See Chapter 10. Cleaning and Disinfecting for details. 8.4.5 Spittoon block configuration Large and small aspirators Aspirator activates immediately after withdrawal from the holder. -
Page 22: Programming Of Sit-In (Entry/Exit) Position
INSTRUCTIONS FOR USE DA 170, DA 130 8.6.2 Programming of Sit-in (Entry/Exit) position Move the chair to the desired operating position using these keys: Power off the chair, wait for approx. 10 seconds, and then press key. Turn on the chair, wait for approx. 15 seconds, and release the key. -
Page 23: Blocking Of The Chair When Collision With Barrier
INSTRUCTIONS FOR USE DA 170, DA 130 8.6.6 Blocking of the chair when collision with barrier Sometimes it may come to a chair emergency stop: 1. If any object presses against the chair's safety switch as the chair is lowered, the chair motion will be reversed automatically to prevent a damage and a warning sound signal will sound (three beeps). -
Page 24: Dental Operating Light
INSTRUCTIONS FOR USE DA 170, DA 130 To tilt the armrest forward (move no.1) • Grasp the armrest and rotate it toward the toe from position no.1 to position no.4 • To bring the armrest back into standard position lower it from the position no.4 into position no.3 and lift it up until you hear "click"... -
Page 25: Product Maintenance
INSTRUCTIONS FOR USE DA 170, DA 130 9 PRODUCT MAINTENANCE For appropriate handpieces and instruments maintenance, please, follow the instructions given by the manufacturer. If the cuspidor block is connected to the central distribution system, check the cleanliness of the strainer and the water hardness treatment system condition (in reference to the manufacturer's instructions). -
Page 26: Cleaning, Disinfection And Decontamination
INSTRUCTIONS FOR USE DA 170, DA 130 10 CLEANING, DISINFECTION AND DECONTAMINATION 10.1 Disinfecting the internal distilled water tubings It is recommended to use Alpron or Sanosil S003 alternatively Dentosept P cleaning agent. A 1% solution with distilled water is poured into reservoir for distilled water and can be used continuously. The 1% concentration is harmless to the patient. - Page 27 INSTRUCTIONS FOR USE DA 170, DA 130 Disinfection Procedure Preparation of Disinfection Position of the • Prepare a bottle for disinfecting solution (A), fill it with the disinfecting solution (B) switch to pressurize • the bottle Open the door of the spittoon block •...
- Page 28 INSTRUCTIONS FOR USE DA 170, DA 130 After several seconds the LED bargraph indicator starts blinking between 50% and 100%. This means that you are in the mode of reaction of disinfecting solution Note Due to the fact that syringe is controlled by autonomous valve, you have to perform filling of its hose manually: Put the tip of the syringe to the tools holder, press the left button and hold until the disinfection solution flows out from the tip.
-
Page 29: Cleaning And Decontaminating The Saliva Ejector
INSTRUCTIONS FOR USE DA 170, DA 130 10.3 Cleaning and decontaminating the saliva ejector It is required to perform a decontamination of the saliva ejector at least once a day (e.g. after finishing the work). Prepare at least 1 dcl of a 1% SAVO Prim solution and suck in this solution with the tip of a saliva ejector. Rinse ejector's hose with min. -
Page 30: Cleaning And Disinfection Of Dürr Spittoon Valve On Wet Suction System (Optional)
10.6 Cleaning and Disinfection of Dürr spittoon valve on wet suction system (optional) If DIPLOMAT unit is equipped with Dürr spittoon valve, the following are required for disinfection/cleaning: Material-compatible, non-foaming disinfection/cleaning agents that have been approved by Dürr Dental, e.g. Orotol plus or Orotol Ultra. -
Page 31: Decontaminating The Cuspidor Bowl
INSTRUCTIONS FOR USE DA 170, DA 130 10.7 Decontaminating the cuspidor bowl 1. It is recommended to use SAVO Prim cleaning agent, if the dental unit is configured with saliva ejector only. Decontamination of the cuspidor bowl should be performed at least once a day (e.g. after finishing the work). Pour at least 200ml of a 1% SAVO Prim solution into the cuspidor bowl. -
Page 32: Cleaning, Disinfection And Decontamination Of Other Parts Of The Dental Unit
INSTRUCTIONS FOR USE DA 170, DA 130 10.8 Cleaning, disinfection and decontamination of other parts of the dental unit • Clean the unit’s external surfaces and the chair upholstery with a wet cloth • Manufacturer recommends to use Incidin™ Foam - spray (HENKEL - ECOLAB) •... -
Page 33: Equipment Disposal
INSTRUCTIONS FOR USE DA 170, DA 130 11 EQUIPMENT DISPOSAL Part Basic material Recyclable Storable material Hazardous material material Metal Steel Aluminum Plastic PA, ABS Laminated glass Other plastic Rubber Ceramics (glass) Instruments Electronics Cables Copper Transformer Amalgam Filters separator Collecting vessel with amalgam Package... -
Page 34: Contents Of The Packaging/Package Check List
INSTRUCTIONS FOR USE DA 170, DA 130 14 CONTENTS OF THE PACKAGING/PACKAGE CHECK LIST Standard configuration: DA 170, DA 130 Control panel pantograph with the control panel 1 pc Spittoon block with chair 1 pc Head arm rest 1 pc Seat 1 pc Base cover... -
Page 35: Requirements On Electromagnetic Compatibility According To En 60601-1-2
INSTRUCTIONS FOR USE DA 170, DA 130 17 REQUIREMENTS ON ELECTROMAGNETIC COMPATIBILITY ACCORDING TO EN 60601-1-2 Caution The use of accessories other that those stated in the Instructions for Use of the dental unit may result in increased electromagnetic emissions or decrease electromagnetic immunity and invoke disfunction of the dental unit. Portable RF communications equipment must not be used at the distance of less than 30 cm from any part of the dental unit. - Page 36 INSTRUCTIONS FOR USE DA 170, DA 130 17.3 Electromagnetic immunity The dental unit is intended for use in the electromagnetic environment meeting the requirements in Table 17.3. The customer or the user must assure that the dental unit is used in such an environment. Table 17.3 EN 60601 Immunity test...
- Page 37 INSTRUCTIONS FOR USE DA 170, DA 130 17.4 Recommended separation distances between portable and mobile RF communications equipment and the dental unit The dental unit is intended for use in an electromagnetic environment in which radiated RF disturbances are controlled. The customer or the user of the dental unit can help prevent electromagnetic interference by maintaining minimum distances between portable and mobile RF communications equipment and the dental unit according to Table 17.4.
Need help?
Do you have a question about the ADEPT DA 170 and is the answer not in the manual?
Questions and answers