Table of Contents
Advertisement
LASER WELDER
L0F102HZ- L0F102HN- L0F200HZ - L0F200HN
This device has been designed in compliance with IEC EN 61010-1 and IEC EN 60825-1 safety standards to prevent injury to the
operator if used correctly and properly. However, no engineering design can make this device safe if it is not used and maintained
properly and in compliance with safety standards. This manual should be read carefully and in its entirety before performing any
operation. Failure to follow instructions and safety standards may cause injury to the operator and the device.
MAN00030-09-EN
Advertisement
Table of Contents

Related Manuals for OROTIG Revo S Series


Summary of Contents for OROTIG Revo S Series
- Page 1 LASER WELDER L0F102HZ- L0F102HN- L0F200HZ - L0F200HN This device has been designed in compliance with IEC EN 61010-1 and IEC EN 60825-1 safety standards to prevent injury to the operator if used correctly and properly. However, no engineering design can make this device safe if it is not used and maintained properly and in compliance with safety standards.
-
Page 2: Table Of Contents
Contents General Information ..............................................4 Identification ................................................4 Safety information ..............................................5 General safety rules ............................................. 5 Safeguards ................................................7 Interlock ................................................7 Leather curtains ............................................. 7 Resonator shutter ............................................7 Infrared microscope filter ..........................................8 Infrared welding chamber filter ........................................8 Emergency button ............................................ - Page 3 Operator's manual Accessory functions ............................................21 Use of the air dispenser/shielding gas ....................................21 Maintenance ................................................21 Regular inspections ............................................21 Checking the coolants ..........................................22 Checking the filters ............................................. 22 Checking the resin filters ........................................... 22 Checking the protective glass slide ......................................22 Routine Maintenance ............................................
-
Page 4: General Information
Manufacturer: OROTIG Srl Via XXV Aprile 47 37014 – Cavalcaselle di Castelnuovo del Garda Ph.: +39 045 6400865, FAX +39 045 6401104 E-mail: info@orotig.com – web: www.orotig.com Device: L0F102HZ LASER WELDER MOD. LDT REVO-S, SPOT 0,15 C/W. CAMERA. L0F102HN LASER WELDER MOD. LDT REVO-S PLUS, SPOT 0,2 C/W. CAMERA. -
Page 5: Safety Information
Stop operations immediately if an unforeseen problem arises. Stop the device immediately in the event a problem involving a burning smell, abnormal noise, abnormally hot parts, smoke, etc. occurs. There is a risk of electric shock or fire. Contact OROTIG Srl immediately. - Page 6 Operator's manual Welding processes produce fumes and gas. Breathing these can be hazardous to your health. Keep your head out of the fumes. Do not breathe fumes. Do not cover the vents on the device. Carefully read the instructions concerning the various types of metals, detergents and shielding gas. The device should optimally be installed in a large, specially dedicated room.
-
Page 7: Safeguards
Operator's manual Safeguards Safeguards include all safety measures that employ the use of specific technical means (guards, safety devices) to protect people from dangers that can not be reasonably limited by design. Tampering with the safeguards or any modification of the device may cause risks to users and other exposed persons. Interlock Description The interlock is a normally closed switch that should be placed on the access door(s) to the room where the... -
Page 8: Infrared Microscope Filter
Operator's manual Infrared microscope filter Description This filter is a 1.064 nm optical glass that is opaque to laser radiation. It appears clear and transparent grey to our eyes. It is located inside the microscope. Purpose The purpose of this filter is to protect the operator's eyes from laser radiation leaks along the optical path of the microscope. -
Page 9: Precautions For Packaging Material
Operator's manual Risk or Danger PPE available Crushing of the hands or limbs Work gloves, protective overalls Abrasion, cuts Work gloves Eye damage due to projected material Protective eyewear and overalls Precautions for packaging material Keep the original packaging for future use. Always pack the device during transport and/or movement. -
Page 10: Installation
Operator's manual Installation Transport The information in this section must be followed when the machine is in one of the transport phases below: Equipment storage; Initial installation; Relocation; The machine is normally supplied complete with special packaging that allows for easy transport and handling. In the event the aforementioned packaging has not been provided, the machine must be moved using a forklift capable of lifting the machine mass (refer to the plate located on the machine), with the lifting forks positioned under the plate at the base of the device. -
Page 11: Electrical Connections
Operator's manual Electrical connections Make sure that the power outlet is appropriate before connecting the power cable. Check the information on the plate located on the back of the machine for more information. Make sure that the electrical outlet of the mains supply has a Schuko socket; the welder absorbs 10A at 230Vac for the L0T00F11 and L0T0F11N models, and 16A for the L0T00F12 and L0T0F12N models. -
Page 12: Device Specifications
Operator's manual Device specifications Technical specifications Model L0F102HZ L0F102HN L0F200HZ L0F200HN Operating voltage 230 Vac ± 10% 50/60Hz, single phase 10A 230 Vac ± 10% 50/60Hz, single phase 16A Weight 65kg 75kg Noise dBA < 70 LwA Operating temperature 10 – 40° C (50 – 104 °F) Storage temperature 0 –... -
Page 13: Intended Use
"Improper use". The shielding gas recommended for the welding process is Argon. Use only genuine parts and consumable materials from Orotig S.r.l. For technical assistance, please contact Orotig S.r.l. Consumable materials should be replaced after use. Follow all regulations and safety instructions in this manual. - Page 14 Operator's manual Laser product classification label (ETI00131): LASER RADIATION AVOID EYE OR SKIN EXPOSURE TO DIRECT OR SCATTERED RADIATION. CLASS 4 LASER PRODUCT: This label indicates the dangers that might arise if the laser system is used improperly. In fact, the energy level of the laser generator used in this device is Class 4. Enabling Key Safety devices on equipment are adopted: LASER radiation protection glass KG3, under microscope...
-
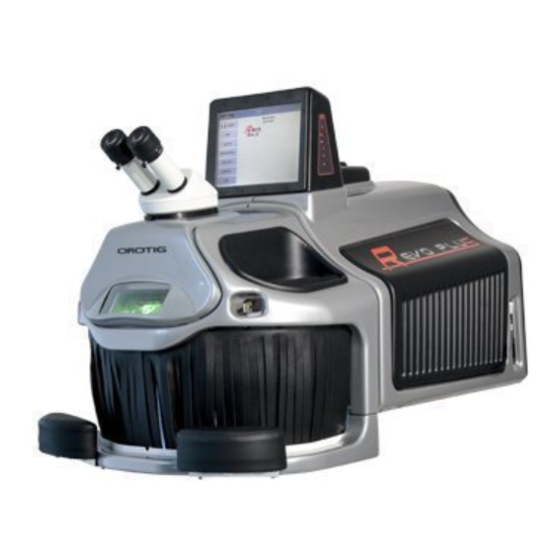
Page 15: Operator Interface
Operator's manual Operator interface Parts of the welder and function of controls Stereo microscope. Liquid cooling racks; do not cover the grill, leave at least 5 2) Inspection window with filter for LASER beams at 1064 nm. cm of space between the grid and the wall. 3) Entrance hands welding Chamber. -
Page 16: Inside Welding Chamber
Operator's manual Inside welding chamber LED lamps with adjustable intensity Exit radiator cover/shielding gases Encoder User/welding parameters. Air/gas tap Exhaust smoke grid Please read the Safety Information section before using the device. Recommendations Before beginning regular use of the device it is recommended checking to ensure that it is in suitable working condition and that there are no defective or worn parts. -
Page 17: Removing The Bottom Of The Welding Chamber
Operator's manual Removing the bottom of the welding chamber It is possible to remove the bottom of the welding chamber in order to work on particularly large objects. To do this, and to ensure compliance with safety regulations, a "controlled" laser operation area, or secure work area with restricted access must be created that is properly defined and marked with signs (Warning: Laser radiation), that may only be accessed by personnel wearing protective eyewear. -
Page 18: Turning On The Device
Operator's manual - Brightness: adjusts the brightness - Contrast: adjusts the contrast - H position: adjusts the horizontal hold of the image - V position: adjusts the vertical hold of the image - Color: adjusts the color percentage - Tint: compensates for tint errors with NTSC signals - Sharpness: adjusts the definition Advanced Menu - Sharpness: adjusts the image definition... -
Page 19: Operation Menu
Operator's manual Firmware Update This allows the user to update the laser's firmware using the USB key. Remove the USB key from the connector and insert it into a PC to copy the update files. DO NOT open OR edit these files for no reason! Put the key back in the laser and select the Firmware Update button Press the Upgrade button and follow the instructions that appear on the screen. - Page 20 Operator's manual Machine status bar: Provides information about the machine's status. Power: Indicates the laser pulse power from a minimum of 0.5kW up to 5.2kW for single-lamp versions (L0T00F11/L0T0F11N), or 10kW for dual lamp versions (L0T00F12/L0T0F12N). Time: Indicates the laser pulse duration from a minimum of 0.5ms up to 25ms for single-lamp versions (L0T00F11/L0T0F11N), or 20ms for dual lamp versions (L0T00F12/L0T0F12N).
-
Page 21: Accessory Functions
Operator's manual Using the "SAVE" button allows the user to overwrite a memory cell with the parameters currently in use. Press the SAVE button once and select the memory cell to overwrite, then press the SAVE button again to confirm. Accessory functions Use of the air dispenser/shielding gas All devices are equipped with:... -
Page 22: Checking The Coolants
The maintenance operations indicated in this manual are authorized by OROTIG S.r.l. and do not involve changes to the general conditions of warranty. Removal of the liquid Remove the back panel of the unit by removing the screws shown in the illustration, open the cap on the rear tank of the device. -
Page 23: Checking/Cleaning Of Rear Filters
Operator's manual Checking/Cleaning of rear filters At the back of the machine a compartment is located which contains mesh filters to stop impurities present in the water. Check the condition of these at least once every 12 months. Completely remove the liquid present in the reservoir. Remove the two screws locking the compartment, paying careful attention to the O-RING. -
Page 24: Replacement Of Lateral Filters
Operator's manual Replacement of lateral filters Remove the lateral panels, releasing the hooks from the bottom towards the top. Remove the filter (1), clean by blowing with compressed air. Replace the filter when it is dirty or damaged, replace with the same type of filter (Code RIC00251). If necessary, clean the radiator (2) by aspirating the dust deposits. -
Page 25: Checking Alignment
Repairs Repairs should only be made in the event of an anomaly, see the chapter Diagnostics for more information. Repairs should only be performed by OROTIG Srl. personnel only or it has authorized. Recommendations The following recommendations will optimize the efficiency of the device: The device should be stored in a location that is not too hot and away from heat sources;... -
Page 26: Diagnostics
Operator's manual Diagnostics Errors and Warnings In the event one of these messages appears on the display, take the action described in the "Solution" section of the message. ERROR: Cod. 1 Flux 1 Problem: The flow sensor of the first hydraulic circuit does not detect any liquid. Solution: Check that the liquid level is correct. - Page 27 Operator's manual ERROR: Cod. 11 Vcap low 1 Problem: The voltage on the first bank of capacitors has not reached the required value or is not charged. Solution: Check the electrical system. Ensure the correct operating voltage. Contact technical support. ...
- Page 28 Operator's manual © 2016 Orotig Srl All rights reserved Revision: Issue date Published by: Approved by 12/06/2012 R.G. R.C. 01/RM566 19/07/2013 R.G. R.C. 02/RM567 21/08/2013 R.G. R.C. 03/RM573 01/10/2013 R.G. R.C. Last integrated RM571 21/11/2013 R.G. R.C. Err. Cod 21 Sync 02/04/2014 R.G.
Need help?
Do you have a question about the Revo S Series and is the answer not in the manual?
Questions and answers