Table of Contents
Advertisement
Quick Links
Advertisement
Chapters
Table of Contents

Related Manuals for Kortho GraphicJet X Series


Summary of Contents for Kortho GraphicJet X Series
- Page 1 MANUAL GraphicJet X-series English Edition: H550 AE Rev.: 007...
- Page 2 In light of continuous development and improvement, Korthofah BV reserves the right to modify the specifications without prior notice. The figures printed in this manual may slightly differ from the Kortho GraphicJet. Information in this document is subject to change without notice.
-
Page 3: Preface
The statements above are notes for your safety. Beware: A notice with useful information for the user in relation to the product. It attends the user to possible problems. kortho H550 AE KGJ X-series Rev.: 007... - Page 4 In this manual, the substrate the printer prints on, e.g. a box, package etc. Sensor: A product detection device connected to the control unit, usually a photocell. Substrate: This is the material of a product to print on, e.g. cardboard, wood, paper, and packaging foil. kortho KGJ X-series H550 AE Rev.: 007...
-
Page 5: Table Of Contents
Menu structure ....................3-9 SAFETY General ..........................4-1 Control unit......................... 4-1 4.2.1 General information ..................4-1 4.2.2 Power supply ....................4-2 4.2.3 Precautions before power-up ................4-2 4.2.4 Precautions when opening the control unit ............4-3 kortho H550 AE KGJ X-series Rev.: 007... - Page 6 Changing the print direction and mirroring the label......... 7-9 7.4.3 Setting the print request parameters ..............7-9 Spit parameter settings ....................7-10 7.5.1 Setting the spit parameters ................7-10 7.5.2 Setting the ink low and ink out outputs ............7-12 kortho KGJ X-series H550 AE Rev.: 007...
- Page 7 Coding unit ..................... 9-24 9.3.3 Print request sensor ..................9-26 9.3.4 Encoder ......................9-26 Error/warning messages ....................9-27 Poor print quality ......................9-27 9.5.1 General issues ....................9-27 9.5.2 Often seen print results .................. 9-29 MAINTENANCE kortho H550 AE KGJ X-series Rev.: 007...
- Page 8 The automation feature ..................L-1 Appendix M Selecting and updating a label over TCP/IP ............ M-1 Appendix N Remapping inputs & outputs ................N-1 Appendix O EC Declaration of conformity ................O-1 kortho viii KGJ X-series H550 AE Rev.: 007...
-
Page 9: Introduction
Ensure the control unit of the printer is switched off. Please read the SAFETY section and the SDS of the ink used for more information. The SDS can be downloaded from the Kortho website (www.kortho.com). Intended Use The GraphicJet X-series are industrial printers and are designed to print directly on substrates e.g. -
Page 10: Specifications
The ambient temperature must be between 5 °C and 40 °C, with a relative humidity between 10% and 90% (non-condensing). Use only Kortho GJ inks and cleaners for this printer. Make sure the ink and cleaner used match. kortho KGJ X-series H550 AE Rev.: 007... -
Page 11: Control Unit
The electrical requirements for the power supply of a controller TcC20-Duo in combination with two coding units X18/X18+/X18si/X54/X72 are: • Voltage rating: 100-240 VAC; • Frequency rating: 50 / 60Hz; • Current rating: 0,85A / 0,45A • Power rating: 85VAmax. • Fuse rating: 2x T2,5A 250VAC (slow acting). kortho H550 AE KGJ X-series Rev.: 007... -
Page 12: Ink
(non-condensing). 1.4.3 Ink The Kortho inks have been developed for use in conjunction with the GraphicJet X-series printhead to print onto a range of substrates. The inks are either oil based, used on porous substrates like cardboard, or solvent based, used on non-porous substrates like PVC water pipes. -
Page 13: Life Span
The printer should be installed on a low vibration location. It is recommended that the coding unit is protected from shock and vibration, as this will have severe impact on the printed label quality and printhead life. kortho H550 AE KGJ X-series... - Page 14 INTRODUCTION kortho KGJ X-series H550 AE Rev.: 007...
-
Page 15: Technical Description
After printing a label the printer is in stand-by mode again and awaiting the next print request signal. After receiving the next print request signal the time and date items will be updated after which the system will print the completely updated label. kortho H550 AE KGJ X-series... -
Page 16: Coding Unit
Ink reservoir, parts Front plate Printhead nozzle plate Mounting clamp Support shaft Support clamp Support pole Flexible conduit to ink reservoir Power/data cable Printhead housing Support mounting block Fig. 2.4 Printhead housing & bracket parts kortho KGJ X-series H550 AE Rev.: 007... -
Page 17: Control Unit
Control unit CAUTION: Do not use an extension cable for connecting the USB thumbdrive to the controller, but place the USB thumbdrive directly in the controller. Using an extension cable can cause EMC interference. kortho H550 AE KGJ X-series Rev.: 007... - Page 18 Input/Output (X03) Printhead A (X02) Encoder (X01) NOT USED LAN connector Mains power switch (including main fuses) RS232 (X05 ) Printhead B (X06) BCD connector (X07) Prodcut detect (X08) Fig. 2.7 Control unit, connections kortho KGJ X-series H550 AE Rev.: 007...
-
Page 19: Sensors
The encoder for the X18 and X54 are the same. The X72 requires a different encoder and measuring wheel. The interface of the encoders are the same, so no damage will occur if these are interchanged. The printed label will however not be printed correctly. (stretched or compressed) kortho H550 AE KGJ X-series... -
Page 20: Label Design
PC, like NiceLabel. 2.5.2 NiceLabel Labels can also be created by using NiceLabel or any other windows based program using the Kortho printer driver for NiceLabel. When using this driver in combination with the NiceLabel software one can use the full options this software program offers including variable text and data field. -
Page 21: Print Process Description
The way in which the wall bends due to the applied voltage is known as 'shear mode'. Two channels share the wall, and hence the term shared wall. kortho H550 AE KGJ X-series... -
Page 22: Ink System
The disadvantage of using the spitting timer is waste of ink and probably the need of a device that collects the ink while spitting. Refer to chapter 7.5.1 Setting the spit parameters for further information. kortho KGJ X-series H550 AE... -
Page 23: User Interface
(are) ready to print (green) or not (orange). E.g. when there is not enough ink present in the inksystem the LED indicator will turn orange and a low ink message will be shown on screen. kortho H550 AE KGJ X-series Rev.: 007... -
Page 24: Keyboard
Fig. 3.5. Fig. 3.5 Arabic keyboard To use the keyboards superscript alphanumerics: Touch and hold the desired key. Drag your finger to the left or right to select the character of choice. kortho KGJ X-series H550 AE Rev.: 007... - Page 25 To enter this screen either swipe over the round indicators at the bottom of the screen or touch the special functions button in the first screen to enter the fourth screen and touch FX. kortho H550 AE KGJ X-series Rev.: 007...
- Page 26 The text in a button can be deleted or modified later on. A text placed by using the third keyboard screen will be treated as normal text, so the text can be deleted or modified if required. kortho KGJ X-series H550 AE...
- Page 27 Fourth keyboard screen, edit text and use cursor controls To return to the first screen touch the aBc button. To return to the second screen touch the 12? button. To return to the third screen touch the FX button. kortho H550 AE KGJ X-series Rev.: 007...
-
Page 28: System Information
Numeric keyboard 3.5.4 System information The firmware versions installed on the control unit can be displayed on screen by pressing System Info in the Information menu. Fig. 3.13 Entering the System information screen kortho KGJ X-series H550 AE Rev.: 007... -
Page 29: Menu Structure
PRINT PROCESS DESCRIPTION 3.5.5 Menu structure Fig. 3.14 Standard menu structure Refer to Appendix F for a full-scale sheet of the menu structure. kortho H550 AE KGJ X-series Rev.: 007... - Page 30 PRINT PROCESS DESCRIPTION This page was left intentionally blank. kortho 3-10 KGJ X-series H550 AE Rev.: 007...
-
Page 31: Safety
The inks and cleaners used with the printer come with a SDS. When accidents involving inks and/or cleaners occure, please refer to the corresponding SDS for appropriate actions to be taken. The SDS can be downloaded from the Kortho website (www.kortho.com). When working with chemicals in general: •... -
Page 32: Power Supply
The encoder cable (X01). (option) The LAN cable (LAN) (option) The USB connection (USB, 2x) (option) The BCD cable (X07) (option) The RS232 communication cable (X05). (option) 10. The BCD product detect cable (X08) (option) kortho KGJ X-series H550 AE Rev.: 007... -
Page 33: Precautions When Opening The Control Unit
(ESD) precautions being taken. The ESD precautions involve the use of a grounded wrist strap and/or antistatic work mat. During installation, servicing and handling of a printed circuit board it must be protected from electrostatic discharges. kortho H550 AE KGJ X-series Rev.: 007... -
Page 34: Ink And Cleaner
Use only the Kortho GJ ink type that is noted on the ink reservoir (Fig. 4.4), this because other ink is probably not chemical compatible with the materials used in the GraphicJet X-series and the ink that is already present in the ink reservoir. -
Page 35: Transport & Storage
Avoid shocks and vibrations during the transport to reduce the risk of generating air bubbles in the printhead or in the ink tubing. In this case, you have to prime the printhead and ink tubes at the new location. kortho H550 AE KGJ X-series... -
Page 36: Pre-Storage Procedure
6. Extract or prime the remaining cleaner from the ink reservoir (same as instruction 1 but read cleaner instead of ink). 7. Verify whether the ink reservoir is empty. 8. Place a dust cover or bag over the coding unit. kortho KGJ X-series H550 AE Rev.: 007... - Page 37 When using solvent based inks, it is important to flush the filter and printhead with the cleaner for the specific solvent based ink used before reconnecting the ink tube from the reservoir to the filter. kortho H550 AE KGJ X-series...
-
Page 38: Ink And Cleaner
Refer to the latest Safety Datasheet for more detailed and accurate information. Keep the ink bottle and cleaner bottle tightly closed in a dry place, between 5 °C and 40 °C, and away from strong, oxidizing agents. This is valid for all kind of transport. kortho KGJ X-series H550 AE... -
Page 39: Installation
Extra support parts: shaft, clamp, pole and mounting block. ▪ Photocell to generate print request. ▪ Photocell to detect the product in case of BCD label selection. ▪ Ethernet cable. ▪ Serial, RS232, cable. ▪ BCD cable. kortho H550 AE KGJ X-series Rev.: 007... -
Page 40: Unpacking
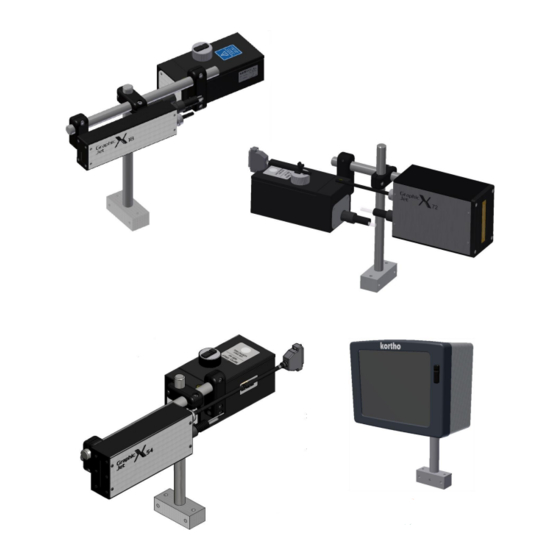
The coding unit consist of three main parts, the Inksystem that holds the ink used for printing, the printhead that makes the actual print and the support set. Ink system Printhead Support set Fig. 6.2 Coding units X-series kortho KGJ X-series H550 AE Rev.: 007... -
Page 41: Control Unit
Support set (optional) Fig. 6.3 Control unit TsC20 6.2.3 Encoder (Optional) The encoder is used for measuring the line speed and controlling the print speed accordingly. Encoder support Encoder Fig. 6.4 Encoder with support kortho H550 AE KGJ X-series Rev.: 007... -
Page 42: Ink Set
INSTALLATION 6.2.4 Ink set The standard ink set consists of: ▪ For oil based inks: two (2) bottles with 200ml Kortho ink. ▪ For solvent based inks: four (4) bottles with 100ml Kortho ink. ▪ Five (5) pair protection gloves. -
Page 43: Ink Reservoir
The ink reservoir mounting-clamp can be fixed in two orientations, so that the ink reservoir is placed parallel or perpendicular to the support shaft. This is not possible for reservoir position III. Fig. 6.7 Parallel reservoir Fig. 6.8 Perpendiculair reservoir kortho H550 AE KGJ X-series Rev.: 007... -
Page 44: Printhead Rotation [X54] [X72]
6.3.5 Radial printhead rotation The figures Fig. 6.10 to Fig. 6.12 shows some examples with a radial rotation of the printhead. To change the position of the ink reservoir, refer to subsection 6.3.2. kortho KGJ X-series H550 AE Rev.: 007... - Page 45 INSTALLATION Fig. 6.10 Printhead radial rotation 0°, standard support, clamp down, reservoir position I Fig. 6.11 Printhead radial rotation 45°, standard support, clamp down, reservoir position III kortho H550 AE KGJ X-series Rev.: 007...
- Page 46 -12,0 -14,0 -16,0 -18,0 -20,0 -22,0 -24,0 -26,0 -28,0 -30,0 -32,0 -34,0 -36,0 -38,0 -40,0 -42,0 -44,0 -46,0 -48,0 -50,0 -52,0 -54,0 -56,0 -58,0 -60,0 β [°] Fig. 6.13 Printhead radial rotation graph kortho KGJ X-series H550 AE Rev.: 007...
-
Page 47: Axial Printhead Rotation [X54] [X72]
(=10mm in Fig. 6.14). Look at the curves in the graph Fig. 6.16 for a height-AB at a given axial rotation angle. Every curve in the graph Fig. 6.16 have their own values. clamp kortho H550 AE KGJ X-series Rev.: 007... - Page 48 -90 -85 -80 -75 -70 -65 -60 -55 -50 -45 -40 -35 -30 -25 -20 -15 -10 Rotation Angle [degrees] Fig. 6.16 Printhead axial rotation graph Example [4]: Axial rotation of 0°, clamp down, = 10 mm, height-AB = -41.0 mm kortho 6-10 KGJ X-series H550 AE Rev.: 007...
-
Page 49: Radial And Axial Printhead Rotation [X54] [X72]
5. Mark the position of the ink reservoir. 6. Mount the ink reservoir at the marked position. Use, if necessary, extra clamps, poles or shafts. 7. Check whether the ink reservoir is levelled. kortho 6-11 H550 AE KGJ X-series... -
Page 50: Positioning The Sensors
See appendix H for the exact operation of the BCD option and see appendix D for the connection of a photocell (or other sensor) to put the BCD code for the relevant product kortho 6-12... -
Page 51: Encoder (Optional)
Encoder adjustment 3. Take precautions that the product cannot damage the encoder. Beware: Mount the encoder as close as possible to the location of the printhead. This will give the best print results. kortho 6-13 H550 AE KGJ X-series Rev.: 007... -
Page 52: Mounting The Control Unit
10. Connect the LAN cable (LAN - optional). 11. Connect the BCD cable (X07 – optional). 12. Connect the RS232 cable (X05 – optional). 13. Connect the Product detect cable (X08 – optional) 14. Connect the mains supply (X09). kortho 6-14 KGJ X-series H550 AE Rev.: 007... -
Page 53: Commissioning
5. Set the parameters in the Printer submenu, refer to section 8.6.2. 6. Set the parameters in the Signal submenu, refer to section 8.6.3. 7. Set the parameters in the Network submenu, refer to section 8.6.4. kortho H550 AE KGJ X-series... -
Page 54: Filling The Ink System
5. Take an ink bottle and cut off the end, which is indicated with a ring, of the spout top (Fig. 7.4). CAUTION: Use ONLY Kortho GJ inks in 200 ml bottles [X18 / X18+ / X54 / X72] or 100ml bottles [X18si], see also the indicator on the reservoir. - Page 55 6. Open the ink reservoir by unscrewing the screw cap (Fig. 7.5) counter clockwise. 7. Put the screw cap aside at a clean place. Fig. 7.5 Ink reservoir opened. 8. Place, without spilling ink, the ink bottle upside-down into the ink reservoir fill opening. kortho H550 AE KGJ X-series Rev.: 007...
- Page 56 10. Remove the empty ink bottle and avoid spilling ink. Clean the reservoir opening with a clean paper tissue. 11. Close the ink reservoir by screwing the screw cap (Fig. 7.7 ) back on. Hand tight is sufficient. kortho KGJ X-series H550 AE...
-
Page 57: Tuning The Speed Related Parameters
Proceed with this section only if the instructions of the sections 7.1 and 7.2 are carried out successfully. 7.3.1 Preparing for the first test print 1. Switch on the control unit. 2. Touch the Settings icon 3. Touch the Signal button (Fig. 7.8). kortho H550 AE KGJ X-series Rev.: 007... - Page 58 Beware: If there are two coding units connected to the control unit one has to select the test label for each individual printhead. 9. Touch Test in the second column (third one down). kortho KGJ X-series H550 AE Rev.: 007...
-
Page 59: Tuning The Test Print With The Encoder Disabled
If the overall length of the test print is longer than 100 mm (175mm for X72), increase the speed parameter. If the end of the test print is missing, decrease the delay parameter or use a longer sample product. kortho H550 AE KGJ X-series Rev.: 007... -
Page 60: Tuning The Test Print With The Encoder Enabled
1234567890 Sample G r a phic Jet X18 15:45 23-03-2004 ww w.kortho.com < > copyright © 2002 Fig. 7.11 Test label printed at correct speed setting (X18) 10. Repeat the instructions 8 and 9 until the test label is printed on the correct position of the product with a length of 100 mm (175mm for X72). -
Page 61: Changing The Print Direction And Mirroring The Label
Note: At a continuous print request setting, the delay parameter can be used to define the distance between each print. kortho H550 AE KGJ X-series Rev.: 007... -
Page 62: Spit Parameter Settings
(spitting) at predefined intervals. The disadvantages of using printhead spitting are: ▪ Pollution of the direct surroundings. ▪ Waste of ink. kortho 7-10 KGJ X-series H550 AE Rev.: 007... - Page 63 The first pixel-column will be spitted directly after the print cycle has finished. To avoid these pixel-columns being printed on the product, use the option Spit delay to set a time, which the printer will take into account before the pixel-column will be spit. kortho 7-11 H550 AE KGJ X-series Rev.: 007...
-
Page 64: Setting The Ink Low And Ink Out Outputs
Alternatively create a Report file, see section 9.2.5 and store it in a place where it can be found when needed e.g. the main label folder on the label design PC. Keep the values nearby, when calling the helpdesk of your local distributor. kortho 7-12 KGJ X-series H550 AE Rev.: 007... - Page 65 Coding unit B, serial number Production plant Production line Type of substrate (product) / Ribbon type Production / print rate Cycles / min Ambient temperature (min, max) °C (min) / °C (max) Fig. 7.17 Printer information kortho 7-13 H550 AE KGJ X-series Rev.: 007...
- Page 66 COMMISSION kortho 7-14 KGJ X-series H550 AE Rev.: 007...
-
Page 67: Operation
Main menu 5. Check whether the printer is ready to print, the LED indicator on screen should show a green light. 6. Access the desired menu function by pressing the appropriate function icon or button. kortho H550 AE KGJ X-series... -
Page 68: Operational
Labels can contain operator input fields which are defined during the label design process. These operator input fiels should be filled out by the operator at the start of the print session. Refer to subsection 3.5.3 for the available keyboard options. kortho KGJ X-series H550 AE... -
Page 69: Text Item Input Menu
4. To delete characters, select the characters that need to be deleted and touch Backspace. Alternatively, place the cursor behind the characters that need to be deleted and touch Backspace to remove character by character. 5. Touch Enter to confirm the Operator input. kortho H550 AE KGJ X-series Rev.: 007... -
Page 70: Date Advance Input Menu
The number displayed on screen is the last value entered on the system by the operator. The very first time the label is selected, it will show the start value entered in the label design software. Note: Operator input for number items is on available when using a label design program. kortho KGJ X-series H550 AE Rev.: 007... -
Page 71: Label Management
To select a label from the label memory: 1. Touch the Print icon. 2. Touch the Select label button. The contents of the label memory is displayed and a further two buttons will appear, Select and Cancel. kortho H550 AE KGJ X-series Rev.: 007... -
Page 72: List Labels (Local Files)
(button with * on it) or deselect all labels (empty button). Two extra buttons will appear in the second column, Copy and Cancel. Press cancel to abort the complete copy procedure and return to the main menu. kortho KGJ X-series H550 AE... - Page 73 8. Select the Paste button. The selected USB thumbdrive labels will now be copied to the controller. 9. If a label name already exists in the label memory the Overwrite label message will appear on screen. kortho H550 AE KGJ X-series...
-
Page 74: Moving A Label
There is a so-called 'check mark' in it when the label is selected. With the blue buttons at the top right of the screen (2 and 3) all labels can be deselected / selected at once. 4. Touch Move, the following screen will appear. kortho KGJ X-series H550 AE... -
Page 75: Deleting A Label
A checkmark indicates the file / folder is selected. With the blue buttons in the top right, one can select (3) or deselect (2) all labels / folders 4. Touch Delete, the following screen will appear. kortho H550 AE KGJ X-series... -
Page 76: Editing A Label
Select the label that needs to be edited in the lower window. Fig. 8.14 Select a label for editing Touch the Select Button and the Create label menu will open showing the selected label. kortho 8-10 KGJ X-series H550 AE... -
Page 77: Creating A Label
There is a Create label function available to make it possible to create a label on the control unit. Touch the Print icon. Touch the Create label button, the Create label screen will appear on screen. kortho 8-11 H550 AE KGJ X-series Rev.: 007... - Page 78 When Enabled one can also enter an operator hint which refers to the offset value he has to enter. Enter the required text through the keyboard. kortho 8-12 KGJ X-series H550 AE...
- Page 79 10. To zoom in or out: Touch the Zoom out or Zoom in icon. 11. To save the label: Touch the Save icon. b. Enter the label name. Touch Ok to save the label. kortho 8-13 H550 AE KGJ X-series Rev.: 007...
- Page 80 If items overlap, it’s possible that the contents are partially overwritten by other items. The grey rectangles give a good indication of how far the items can actually overlap each other. kortho 8-14 KGJ X-series H550 AE Rev.: 007...
-
Page 81: Showing A Preview
5. Touch Preview again to show a 1:1 picture. 6. Touch Preview again to show the 1:8 picture again. When the label is larger than the screen, one can use the scrollbar to drag the preview around. kortho 8-15 H550 AE KGJ X-series Rev.: 007... -
Page 82: Re-Filling The Ink Reservoir
4. Take an ink bottle and cut off the end, which is indicated with a ring, of the spout top (Fig. 8.19). CAUTION: Use ONLY Kortho GJ inks in 200 ml bottles [X18 / X18+ / X54 / X72] or 100ml bottles [X18si], see also the indicator on the reservoir. -
Page 83: Purging The Printhead
Touch the Test menu. Hold paper tissues in front of the printhead to collect ink. Touch the Test button behind Purge ink to start the purge process. Keep the button activated to continue purging. kortho 8-17 H550 AE KGJ X-series... -
Page 84: Priming The Printhead
3. Rotate, if necessary, the printhead housing to the horizontal position (Fig. 8.23). Fig. 8.23 Printhead housing at horizontal position 4. Fit the prime bulb to the opening of the vent knob (Fig. 8.24) of the ink reservoir. kortho 8-18 KGJ X-series H550 AE... -
Page 85: Adjusting Printer Settings
If there are two coding units connected to one controller, some parameters should be set for each individual coding unit, see section 8.7. 1. Touch the Settings icon. The following status screen is shown. kortho 8-19 H550 AE KGJ X-series... -
Page 86: System Settings
1. Touch the blue button that shows Time. Fig. 8.27 Setting the time 2. Rotate the left hand part to set the hour and the right hand part to set the minutes. kortho 8-20 KGJ X-series H550 AE Rev.: 007... - Page 87 4. Touch a language button to select another language. Note: When there are more languages than fit on screen, on can touch the screen and drag up and downwards to select the required language. kortho 8-21 H550 AE KGJ X-series...
- Page 88 When No is selected the printer will start in run mode. The printer will immediately make a print when the print processor is ready to start the print process and a print request signal is applied. kortho 8-22 KGJ X-series H550 AE Rev.: 007...
- Page 89 Touch the blue button System in BCD mode to change the setting from No to Yes or from Yes to No The default setting is No. This means that BCD mode is NOT activated. Fig. 8.32 Messages when activating / deactivating of the BCD mode kortho 8-23 H550 AE KGJ X-series...
- Page 90 The default setting is Off, which means that screen saver is never activated. For example, if the screen saver has to be activated after 10 minutes not touching the screen, the screen saver must be set to 10 min. The screen saver is deactivated by touching the screen. kortho 8-24 KGJ X-series H550 AE Rev.: 007...
-
Page 91: Printer Settings
To change selectable settings: 1. Touch the button and the setting will change (toggle function), or 2. When touching the button a list of choices will appear from which the required setting can be selected. kortho 8-25 H550 AE KGJ X-series... - Page 92 The rank voltage is the voltage for the printhead, at which the printhead is functioning optimally at 25 ° C. The rank voltage can be different for every X72 printhead and is written on a sticker which is applied on the X72 printhead. kortho 8-26 KGJ X-series H550 AE Rev.: 007...
- Page 93 Note: When there are more menus than fit on the screen you can touch the screen, and drag up and down to select the desired menu. kortho 8-27 H550 AE KGJ X-series...
-
Page 94: Signal Settings
This message can be set to Error or Warning. When this is set to Error, missing a print will stop the printing process, an error message will appear on the screen and the general alarm output will become kortho 8-28... - Page 95 This signal can be set to be active High or active Low. By default, this output pair is linked to the Busy signal. kortho 8-29 H550 AE KGJ X-series...
- Page 96 High or active Low, but only active High will work, since active low would be meaningless here. By default, this output pair is linked to the Ready signal. kortho 8-30 KGJ X-series H550 AE...
- Page 97 Inhibit, Trigger, Spare 0 or Spare 1 when touching the first blue button. Using the second blue button next to it, set the required input level on which the input is active. This signal can be set to be active High or active Low. By default, this input is linked to the Trigger signal kortho 8-31 H550 AE KGJ X-series Rev.: 007...
-
Page 98: Network Settings
To make sure the settings will match the network settings, always ask the network administrator for help while integrating the printer into the company network. To change the network settings of the printer touch the Network button. Fig. 8.37 Network settings menu kortho 8-32 KGJ X-series H550 AE Rev.: 007... - Page 99 The new settings will be active within 15 seconds. UDP Port This setting determines the UDP port on which the system listens to the "broadcasts" which Kortho Control Center sends to determine which printers are connected to the network. In Kortho Control Center, the same UDP port must be selected so that the printers can be found.
- Page 100 2. Enter the desired value (do not forget to enter the decimal points). 3. Confirm using Enter. Automation Port Touch the blue button behind Automation Port and the following screen appears. Fig. 8.41 Network settings, Automation Port Enter the desired value. Confirm using Enter. kortho 8-34 KGJ X-series H550 AE Rev.: 007...
-
Page 101: Label Settings
Mirror flips the printed label along the width of the print head. 180 rotates the label 180 degrees around the º centre of the print head. Mirror / 180 combines the other two rotations. Normal Mirror 180º Mirror + 180º Fig. 8.44 Orientation setting kortho 8-35 H550 AE KGJ X-series Rev.: 007... - Page 102 Label Settings; Add BCD Code 2. Enter the BCD Code that needs to be entered at the end of the list. 3. Confirm using Enter. Show BCD list The BCD list will be shown. kortho 8-36 KGJ X-series H550 AE Rev.: 007...
-
Page 103: Print Settings
Fig. 8.47 Print settings menu Changing the print settings To change numeric settings: 4. Touch the + / - buttons, or 5. Touch the value shown to enter it from the numerical keyboard. kortho 8-37 H550 AE KGJ X-series Rev.: 007... - Page 104 The spit interval is switched off when set to zero. See also chapter 7.5.1. Spit lines The amount of pixel columns that will be spitted every set interval. The amount of lines can be set between 1 and 5. See also chapter 7.5.1. kortho 8-38 KGJ X-series H550 AE...
-
Page 105: Specific Settings For The Tsc20-Duo
• Spit lines All other parameters are global parameters. Whether coding unit A or B is selected does not matter, once they are changed they will have effect on both coding units at the same time. kortho 8-39 H550 AE KGJ X-series Rev.: 007... - Page 106 OPERATION kortho 8-40 KGJ X-series H550 AE Rev.: 007...
-
Page 107: Diagnostics / Troubleshooting
Test label menu 2. Touch the Load button to load the test label. This label contains items like text, date, number and barcode. 3. The Test label loaded message will be displayed on screen. kortho H550 AE KGJ X-series Rev.: 007... -
Page 108: Fonts
Fig. 9.4 Font menu List fonts This function provides a list of all fonts added to the system by the user. These can also be removed, unlike the standard fonts. The standard fonts cannot be removed. kortho KGJ X-series H550 AE Rev.: 007... - Page 109 Fig. 9.6 Delete fonts menu Note: The printer is supplied with a set of pre-installed fonts. The pre-installed fonts cannot be removed from the printer and are not shown on the screen shown above. kortho H550 AE KGJ X-series Rev.: 007...
- Page 110 This function makes it possible to add fonts to the printer. 1. Mount a USB thumbdrive containing the true type (TTF) font files. 2. Touch the Add fonts button. The content of the USB thumbdrive will be shown. kortho KGJ X-series H550 AE...
- Page 111 7. Press Ok to leave the screen and to return to the Copy menu. 8. Another font can be copied or alternatively touch Cancel to return to the Print, Local files menu. Note: The copied font can be used without restarting the system. kortho H550 AE KGJ X-series Rev.: 007...
-
Page 112: Test
This function can be used to make test prints to verify and to optimize the print quality. This can be done with the current label but it is better to use a Test label, see section 9.1.1. Touch Test to enter the menu that contains the print test functions. Fig. 9.11 Test menu kortho KGJ X-series H550 AE Rev.: 007... - Page 113 Touch +/- to alter the print speed. Alternatively touch the value shown and enter the Speed value through the numerical keyboard. At the right print speed the Kortho test label has a length of 100mm (X18 / X54) or 175mm (X72).
-
Page 114: Printer
48V PSU – indicates the voltage supplied by the 48V power supply. Ink temperature [X72] – temperature of the ink measured inside the X72 printhead Printhead temperature [X72] – temperature of the X72 printhead. Touch the Ok button to return to the Service-Diagnostics-Printer menu. kortho KGJ X-series H550 AE Rev.: 007... - Page 115 Speed – the speed at which the system will make a print (without encoder). IP Address/Subnet/Gateway – the set network settings of the control unit. Touch the Ok button to return to the Service – Diagnostics - Printer menu. kortho H550 AE KGJ X-series...
-
Page 116: Diagnostics
Touch Diagnostics to enter the diagnostics menu in which various system checks can be performed. Beware: System Diagnostics should only be run when the system is paused. Only a trained service engineer should run these tests. kortho 9-10 KGJ X-series H550 AE... - Page 117 Output X03-15A-6B – The output is activated for 2 seconds. This can be used to test whether this output is functioning. The output can be monitored on the host machine or a separate service tool. By default, this is the Ink low output. kortho 9-11 H550 AE KGJ X-series Rev.: 007...
-
Page 118: Graphics
This function lists all graphics currently installed in the printer. These graphics are available to be used in the on-board label editor. 1. Druk op de afbeelding om het voorbeeld onder in het scherm te zien. Fig. 9.20 Graphic preview kortho 9-12 KGJ X-series H550 AE... - Page 119 6. Another graphic can be deleted or alternatively touch Cancel to return to the Print – Local files menu. Note: Adding Graphics to a label will copy the contents of the graphic in the label design. Deleting a Graphic has no impact on the labels containing the graphics. kortho 9-13 H550 AE KGJ X-series...
- Page 120 6. After copying is complete, a graphic can be added / copied immediately, or alternatively, press Cancel to return to the main menu Print - Local files. Cancel Touch Cancel to return to the Print – Locale files menu. kortho 9-14 KGJ X-series H550 AE...
-
Page 121: Information
BCD Folder – the name of the folder from which the labels to print are selected from when the BCD mode is active Touch the Ok button to return to the Information menu. kortho 9-15 H550 AE KGJ X-series... -
Page 122: Health
2. Touch the Backup button. 3. Enter a suitable name for the backup folder. (at least two characters) Fig. 9.27 Enter Backup name 4. Touch the Enter button to save the backup. kortho 9-16 KGJ X-series H550 AE Rev.: 007... - Page 123 6. While creating the backup folder and backing up the labels a timer icon will be shown on screen. Fig. 9.29 Backup in progress 7. Wait until the message “Backup completed successfully” appears on screen. kortho 9-17 H550 AE KGJ X-series...
-
Page 124: System Info
DHCP IP address – if DHCP is activated, the IP address assigned by the DHCP server. Barcode SDK version – version of the SDK software for the barcode engine Touch the Ok button to return to the Information menu. kortho 9-18 KGJ X-series H550 AE Rev.: 007... -
Page 125: Report
4. Touch the Enter button to save the report. 5. If the file name already exists a file overwrite message will be displayed. Touch Yes and the report files will be overwritten. Touch No and the report operation will be cancelled. kortho 9-19 H550 AE KGJ X-series Rev.: 007... - Page 126 9. Remove the USB thumbdrive, it will contain a file with the name "KorthoReport_DDMMYYYY- HHMM_xxxx. DDMMYYY is the date on which the report was made, HHMM the time the report was made and xxxx is the name one entered. kortho 9-20 KGJ X-series H550 AE Rev.: 007...
-
Page 127: Upgrade
USB thumbdrive. Otherwise there is a chance that the wrong version will be installed. 2. Touch the Upgrade button, the following screen will be displayed. Fig. 9.36 Upgrade files detected screen 3. Touch the Yes button to start the upgrade process. kortho 9-21 H550 AE KGJ X-series Rev.: 007... - Page 128 Ok during the firmware upgrade of the coding unit. Switch off and on again after 10 seconds to activate the new firmware in the coding unit. Beware: Do not switch of the controller during the upgrade process. kortho 9-22 KGJ X-series H550 AE...
-
Page 129: Fault Finding
PC/laptop. Re-create the PRN file and try again. Alternatively create the complete label again and try to download it again. If the problem remains contact technical support. kortho 9-23 H550 AE KGJ X-series Rev.: 007... -
Page 130: Coding Unit
Check whether a print signal has been received by the control unit (counter should be updated after a print signal has been applied). Check whether the photocell detects the substrate (LED on kortho 9-24 KGJ X-series H550 AE Rev.: 007... - Page 131 Check whether the ink level in the ink system is not too low, if print is missing so, refill the ink system. Check whether the ink reservoir is at the right level. kortho 9-25 H550 AE KGJ X-series Rev.: 007...
-
Page 132: Print Request Sensor
Printout not at the tension. wheel slips. correct length. Check whether the encoder mounting bracket is securely Vertical white lines mounted. in the printout. Check whether the O-rings are in good working condition. kortho 9-26 KGJ X-series H550 AE Rev.: 007... -
Page 133: Error/Warning Messages
The actual speed is fluctuating too much. Make sure the substrate is moving at a relative stable speed. kortho 9-27 H550 AE KGJ X-series... - Page 134 The actual speed is fluctuating too much. Make sure the substrate is moving at a relative stable speed. kortho 9-28 KGJ X-series H550 AE...
-
Page 135: Often Seen Print Results
DIAGNOSTICS / TROUBLESHOOTING 9.5.2 Often seen print results Correct print result kortho 1234567890 Sample G r a phic Jet X18 15:45 23-03-2004 ww w.kortho.com < > copyright © 2002 Fig. 9.40 Print result is correct Ink starvation kortho 1234567890 Sample... - Page 136 Test image printed too slow, length > 100 mm (X72 > 175mm) Remedy: increase the speed parameter or use an encoder. kortho G r a phic J et X18 ww w.kortho.com copyright © 2002 Fig. 9.45 Test image printed with variable product speed The product speed was at period A too slow and at period B too fast.
-
Page 137: Maintenance
In order to avoid potential damage to the printhead and printed circuit boards (PCB) please ensure anti- static precautions are observed throughout the installation procedure. Korthofah cannot be held responsible for damage to the printhead and PCB’s caused by mishandling. kortho 10-1 H550 AE KGJ X-series Rev.: 007... -
Page 138: Open The Printhead Housing
▪ Use only Kortho GJ ink as this is ink is 100% compatible with all materials used in the coding unit. ▪... -
Page 139: Close The Printhead Housing
Connect the data cable and low ink connector to the PIB. Close the printhead housing. Refer to subsection 10.4.3. 10. Prime excessive air from the system. 11. The printer is now ready to print. kortho 10-3 H550 AE KGJ X-series... -
Page 140: Replacing The Printhead Pcb [X54]
Connect the low ink connector, the data cable and the printhead cable to the PIB. Close the printhead housing. Refer to subsection 10.4.3. Prime excessive air from the system. 10. The printer is now ready to print. kortho 10-4 KGJ X-series H550 AE... -
Page 141: Replacing The Printhead Pcb [X72]
17. Connect the ink tube on the filter. Make sure it is tightened properly. 18. Prime the head to make sure all air is out of the ink tubing and printhead 19. Place the lid and the screw the four screws back in. kortho 10-5 H550 AE KGJ X-series Rev.: 007... -
Page 142: Replacing The Piezo Printhead [X18, X18Si, X18+]
Open the printhead housing. Refer to subsection 10.4.2. Disconnect the printhead cable (3 in Fig. 10.3) from the PIB. Loosen the three printhead screws (7 in Fig. 10.3). Take the printhead (8 in Fig. 10.3) out of the printhead housing. kortho 10-6 KGJ X-series H550 AE... -
Page 143: Replacing The Piezo Printhead [X72]
12. Place the front plate and front plate screws and tighten them 13. Reconnect the ink tube to the printhead. 14. Prime excessive air from the system. 15. Close the printhead housing. Refer to subsection 10.4.3. and 10.4.6 kortho 10-7 H550 AE KGJ X-series... -
Page 144: Replacing The Ink Filter
Prime excessive air from the system, refer to subsection 10.4.4. The printer is now ready to print. 10.5 Updating firmware and software The firmware and software can be updated, see paragraph 9.2.6. kortho 10-8 KGJ X-series H550 AE Rev.: 007... -
Page 145: Dismantling & Disposal
Treat the printed circuit boards, the touch screen, the net-entree and the power supplies as electronic waste. 11.1.5 Sensor devices 1. Treat the photocell as electronic waste. 2. Treat the encoder as electronic waste. kortho 11-1 H550 AE KGJ X-series Rev.: 007... -
Page 146: Ink And Cleaner
The ink and cleaner should be treated separately according to the method as mentioned in the most recent SDS. The remaining materials must also be delivered to waste recycling companies. kortho 11-2 KGJ X-series H550 AE Rev.: 007... -
Page 147: Index
19, 8-26, 9-24, 9-24, 9-25, 9-26, 9-27, 11-1 interface 1-4, 3-2, 3-3, 4-2, 6-1, 6-14, 9-9, 9-18, 9-22, 9-23, 9-25 maintenance 1-1, 1-2, 1-5, 4-1, 5-2, 5-3, 6-4, 10-1, 10-2 memory 1-5, 3-1, 7-12, 8-8 kortho H550 AE KGJ X-series Rev.: 007... - Page 148 1-4, 1-5, 2-1, 2-5, 3-1, 6-6, 6-11, 6-13, 7-7, 7-10, 8-26, 8-29, 8-31, 8-38, 9-23, 9-24, 9-25, 9-26, 9-27 symbol caution note 2-6, 6-1, 7-9, 8-1, 8-2, 8-4, 8-7, 8-10, 8-11, 8-15, 8-21, 8-29, 9-3, 9-4, 9-5, 9-10, 9-13, 9-20 kortho KGJ X-series H550 AE Rev.: 007...
- Page 149 Printhead radial rotation 90°, standard support, clamp down, reservoir position II ..... 6-8 Fig. 6.13 Printhead radial rotation graph ....................... 6-8 Fig. 6.14 Printhead axial rotation 0°, 45° and 90°, clamp down, reservoir position I, ..6-9 kortho H550 AE KGJ X-series Rev.: 007...
- Page 150 Network settings, IP address ....................... 8-33 Fig. 8.39 Network settings, UDP Port ........... Fout! Bladwijzer niet gedefinieerd. Fig. 8.40 Network settings, Automation IP address ................... 8-34 Fig. 8.41 Network settings, Automation Port ....................8-34 kortho KGJ X-series H550 AE Rev.: 007...
- Page 151 Fig. 10.1 Removing the printhead cover ..................... 10-2 Fig. 10.2 Replace printhead parts [X18, X18si, X18+] ................10-3 Fig. 10.3 Replace printhead parts [X54] ..................... 10-4 Fig. 10.4 Replace printhead parts [X72] ..................... 10-5 kortho H550 AE KGJ X-series Rev.: 007...
- Page 152 INDEX kortho KGJ X-series H550 AE Rev.: 007...
- Page 153 480 mm Weight 3,35 kg Print area Height 53,7mm Length 500mm Print speed 0 – 60 m/min Print head 180 dpi Environment Temperature 5 °C – 38 °C Relative humidity 10% – 90% (non-condensing) kortho H550 AE KGJ X-series Rev.: 007...
- Page 154 (undefined) outputs Ink and cleaner Operational Temperature (recommended) 5 °C – 38°C (10 °C -30 °C) Transport and storage Temperature 10°C - 30 °C Precautions store in original packaging away from direct sunlight kortho KGJ X-series H550 AE Rev.: 007...
- Page 155 Text, start value of a counter/number, offset of a date. Label download: Through Ethernet or a USB thumbdrive. Storage capacity: 40MB (approximately 400 labels). This memory can be used for storage of: Labels b. Graphics Fonts kortho H550 AE KGJ X-series Rev.: 007...
- Page 156 APPENDIX A, SPECIFICATIONS kortho KGJ X-series H550 AE Rev.: 007...
- Page 157 Coding unit X18, X18*+ and X18si and Bracket ............... B-2 Coding unit X54 and Bracket ..................... B-3 Coding unit X72 and Bracket ..................... B-3 Control unit ..........................B-4 Control unit and Bracket ......................B-6 kortho H550 AE KGJ X-series Rev.: 007...
-
Page 158: Appendix B Dimensions
APPENDIX B, DIMENSIONS Coding unit X18, X18*+ and X18si and Bracket Dimensions are metric [mm] kortho KGJ X-series H550 AE Rev.: 007... -
Page 159: Coding Unit X54 And Bracket
APPENDIX B, DIMENSIONS Coding unit X54 and Bracket Dimensions are metric [mm] kortho H550 AE KGJ X-series Rev.: 007... -
Page 160: Coding Unit X72 And Bracket
APPENDIX B, DIMENSIONS Coding unit X72 and Bracket Dimensions are metric [mm] kortho KGJ X-series H550 AE Rev.: 007... -
Page 161: Control Unit
APPENDIX B, DIMENSIONS Control unit Dimensions are metric [mm] kortho H550 AE KGJ X-series Rev.: 007... -
Page 162: Control Unit And Bracket
APPENDIX B, DIMENSIONS Control unit and Bracket Dimensions are metric [mm] kortho KGJ X-series H550 AE Rev.: 007... -
Page 163: Appendix C Part Lists & Illustrations
Appendix C Part lists & illustrations Coding unit X18, X18+ and X18si ..................... C-2 Coding unit X54 ......................... C-4 Coding unit X72 ......................... C-6 Standard bracket control unit TsC20 ..................C-10 kortho H550 AE KGJ X-series Rev.: 007... - Page 164 817469 Cover filling system X18si 168531 Cable tie 2,5x11, blue 817584 Head PCB X18 167144 M. ink tube 5/3,0 transparant 817765 Cross clamp D=20 X18 317504 Base support 817778 Cable alimentation X18 - 3M 317517 Bracket shaft kortho KGJ X-series H550 AE Rev.: 007...
- Page 165 APPENDIX C, PARTS & ILLUSTRATIONS Coding unit X18, X18+ and X18si kortho H550 AE KGJ X-series Rev.: 007...
- Page 166 817765 Cross clamp D=20 X18 325987 Cap printhead X54 817778 Cable alimentation X18 - 3M 326044 Gasket printhead X54 818239 PCB printhead X54 326114 Foam Gasket PH X54 818338 Cover filling system X-series 317504 Base support kortho KGJ X-series H550 AE Rev.: 007...
- Page 167 APPENDIX C, PARTS & ILLUSTRATIONS Coding unit X54 kortho H550 AE KGJ X-series Rev.: 007...
- Page 168 164048 Hose socket 32, bus 817778 Power & signal cable X18 - 3M 169269 Connection set PH-X72, oil, 3 parts 169244 PCB printhead X72 326982 Cap printhead X72 818338 Cover filling system X-series 818704 Standard vertical support kortho KGJ X-series H550 AE Rev.: 007...
- Page 169 APPENDIX C, PARTS & ILLUSTRATIONS Coding unit X72 kortho H550 AE KGJ X-series Rev.: 007...
- Page 170 168458 Cable touchscreen TscC20, 8 pins 818032 Cable safety earth TsC20 168461 Cable touchscreen TsC20, 40 pins 818045 Cable power/CPU board TsC20 323132 Flap USB TsC26 818061 Cable USB connector, L=152 326419 Cover TsC20 kortho KGJ X-series H550 AE Rev.: 007...
- Page 171 APPENDIX C, PARTS & ILLUSTRATIONS kortho H550 AE KGJ X-series Rev.: 007...
- Page 172 APPENDIX C, PARTS & ILLUSTRATIONS Standard bracket control unit TsC20 818115 Standard bracket controller TsC20 Line Part no. Description Line Part no. Description 326492 Bracket shaft TsC20 326505 Base support TsC20 kortho C-10 KGJ X-series H550 AE Rev.: 007...
- Page 173 APPENDIX C, PARTS & ILLUSTRATIONS Standard bracket control unit TsC20 kortho C-11 H550 AE KGJ X-series Rev.: 007...
- Page 174 APPENDIX C, PARTS & ILLUSTRATIONS kortho C-12 KGJ X-series H550 AE Rev.: 007...
- Page 175 Control unit Connector Plate ...................... D-2 X3 Schematic diagram (input) ....................D-3 X3 Schematic diagram (output) ....................D-4 X3 Circuit diagram (input) ......................D-5 X3 Circuit diagram (output) ......................D-6 X3 Schematics diagram User ....................D-7 kortho H550 AE KGJ X-series Rev.: 007...
-
Page 176: Appendix D Connections
DB 25-ways, socket BCD connector DB 15-ways, socket Sensor input product detect to add BCD code to print list DB 9-ways, socket Mains power switch with 2 fuses 2,5A (s) LAN connector RJ45, socket kortho KGJ X-series H550 AE Rev.: 007... -
Page 177: X3 Schematic Diagram (Input
APPENDIX D , CONNECTIONS X3 Schematic diagram (input) kortho H550 AE KGJ X-series Rev.: 007... -
Page 178: X3 Schematic Diagram (Output
APPENDIX D , CONNECTIONS X3 Schematic diagram (output) kortho KGJ X-series H550 AE Rev.: 007... -
Page 179: X3 Circuit Diagram (Input
APPENDIX D , CONNECTIONS X3 Circuit diagram (input) kortho H550 AE KGJ X-series Rev.: 007... -
Page 180: X3 Circuit Diagram (Output
APPENDIX D , CONNECTIONS X3 Circuit diagram (output) kortho KGJ X-series H550 AE Rev.: 007... -
Page 181: X3 Schematics Diagram User
APPENDIX D , CONNECTIONS X3 Schematics diagram User This diagram can be used to note the specific user settings. kortho H550 AE KGJ X-series Rev.: 007... - Page 182 APPENDIX D , CONNECTIONS X07 BCD-input connections kortho KGJ X-series H550 AE Rev.: 007...
- Page 183 APPENDIX D , CONNECTIONS X07 BCD input schematics kortho H550 AE KGJ X-series Rev.: 007...
- Page 184 APPENDIX D , CONNECTIONS X07 BCD user diagram kortho D-10 KGJ X-series H550 AE Rev.: 007...
- Page 185 Installation of the driver ......................E-9 Download a label through USB ..................E-10 Sending a label on a network ....................E-11 Introduction ........................E-11 Installation of the driver ...................... E-11 Sending a label on a network .................... E-11 kortho H550 AE KGJ X-series Rev.: 007...
-
Page 186: Appendix E Nicelabel Driver Tutorials
This appendix is based on the general description for the installation and configuration of the driver. The procedures are based on the Kortho GraphicJet X18. It speaks for itself that if one like to perform the procedures for the other models of the GraphicJet X-series, one should select the desired printer model instead of the Kortho GraphicJet X18. -
Page 187: Installation Of The Driver
To install the driver: 1. Unzip the downloaded file. 2. Start the installation by executing the program PrnInst.exe. 3. Click Next. 4. Accept the conditions and click Next. 5. Select the desired printer and click Next. kortho H550 AE KGJ X-series Rev.: 007... - Page 188 Optionally enter a Name for the port (So that the port is easily recognized, for example: X18_line). Enter the Port number (With a Kortho printer this is always 14322, this is the control unit’s fixed number). Click OK (A printer port will be created).
- Page 189 11. Open the printer configuration screen in Windows. This is found in Windows “Start” or in “Start > Configuration screen”. The printer is added as shown below: 12. Right click on the printer and select Printer properties. kortho H550 AE KGJ X-series...
-
Page 190: Configuration Of The Driver
1. Open the printer configuration screen in Windows. This is found in Windows “Start” or in “Start>Configuration screen”. 2. Right click on the printer and select Properties. 3. Select the tab Etik. Type. 4. Click New (Nieuw). kortho KGJ X-series H550 AE Rev.: 007... - Page 191 10. Click New (Nieuw) again to add another label definition or click OK to close the screen. When designing a label in a designing program one can select t the printer “Kortho X18_Line 1” and after that “X18 Label” as a label/tag/paper size (name depends on the label design program). The program will take the printers parameters of the selected label/tag/paper size into consideration.
-
Page 192: Summary
Summary The Kortho GraphicJet X18 can be installed on any Windows PC/Laptop in the same way a “normal” desktop printer is installed. After installation the printer can be chosen amongst the other (desktop) printers currently in use on the PC/Laptop. -
Page 193: Downloading A Label Through Usb
5. Select the desired printer and click Next. 6. Select FILE:, change the printer name (optional) and click Complete (Voltooien). The driver is now installed on your PC/laptop and can be used to generate Printfiles. kortho H550 AE KGJ X-series... -
Page 194: Download A Label Through Usb
3. Save the new label design. 4. Insert a USB thumbdrive into the PC/laptop. 5. Select File – Print to print the label. 6. Choose the location of the USB thumbdrive to save the Printfile. kortho E-10 KGJ X-series H550 AE... -
Page 195: Sending A Label On A Network
To guarantee a good print result it is important that the label is designed for the printer to which one would like to download the label. 5. Select the amount of prints that need to be made. kortho E-11 H550 AE KGJ X-series Rev.: 007... - Page 196 APPENDIX E, NICELABEL DRIVER TUTORIALS 6. Select Print and the printer will start printing the selected label. kortho E-12 KGJ X-series H550 AE Rev.: 007...
-
Page 197: Appendix F Quick Reference Menu Structure
Appendix F Quick reference menu structure kortho H550 AE KGJ X-series Rev.: 007... - Page 198 APPENDIX F, QUICK REFERENCE MENU STRUCTURE kortho KGJ X-series H550 AE Rev.: 007...
-
Page 199: Appendix G Error List
There is a problem with the font. Check Windows whether the font is correct. A print is missed. The print request signal was received while printing. A timeout occurred for the print-encoder. Security disabled. kortho H550 AE KGJ X-series Rev.: 007... - Page 200 Print stopped. Print quantity has been reached. Barcode incorrect characters or codepage. Barcode incorrect number of characters. Barcode incorrect check digit or bad data format. Barcode problem. See log for more detail. RAM problem. kortho KGJ X-series H550 AE Rev.: 007...
- Page 201 LAN Connection lost USB Serial port detection failure. Please restart system Ink data not correct for connected head Printhead ink temperature too high Error numbers which are not mentioned are reserved for other coding units. kortho H550 AE KGJ X-series Rev.: 007...
- Page 202 APPENDIX G, ERROR LIST kortho KGJ X-series H550 AE Rev.: 007...
-
Page 203: Appendix H Using The Bcd Label Selection
Using BCD codes to select a label for printing has been around for quite a while and according to the questions we as Kortho have received from distributors, it is still actively used e.g. in the tile and wood industry. - Page 204 Selected on the controller (X18, X54, X72, PRN, PNL or QDL) Send down by Nicelabel over LAN, Send by Kortho Control Center over LAN Selected by a BCD code. To select labels using a BCD code, the system needs to be put in the so-called BCD-mode. In this mode, the system will prevent selection of labels on the controller.
- Page 205 Required connections for BCD label selection All the connections of the I/O can be found in Appendix D. Below the locations of X07, BCD input, and X08, Product detect, which are requires inputs for BCD operation. kortho H550 AE KGJ X-series...
- Page 206 BCD code caused the error. If more than one BCD codes are not found, only the first BCD code is displayed on screen. The process doesn’t stop on this message. So, the next BCD code in the kortho KGJ X-series H550 AE Rev.: 007...
- Page 207 In run mode (green button is activated) the TsC20 will add the BCD codes to the list and will process them. If the control unit is set to pause mode (red button is activated) by the operator, the TsC20 will not store BCD codes to the list nor will it remove BCD codes from the list. kortho H550 AE KGJ X-series...
- Page 208 APPENDIX H, USING THE BCD LABEL SELECTION kortho KGJ X-series H550 AE Rev.: 007...
-
Page 209: Appendix I Using Variables In Labels
Once the requirements for the label have been defined, go to the controller and create it (Later in 2018, we will also introduce Kortho Control Center, a Windows software package that will also allow you to create and manage labels on a Windows 10 PC / laptop / tablet for each X-series printer in a network) - Page 210 The variables selected to make up the composite text item are shown in the right hand column. It is possible to use a variable multiple times in the composite text item. One could define a separator that can be used multiple times for instance. kortho KGJ X-series H550 AE...
- Page 211 The height of the QR-code and Data Matrix depend on content and Module Width setting. • Font; the font type to be used for the Human Readable if supported by the barcode symbology. kortho H550 AE KGJ X-series Rev.: 007...
- Page 212 There is no preview of the barcode in this window. Press Ok to confirm the creation of the composite barcode and to view it on the design canvas. To edit the composite barcode, select it as any other item and press the “pencil” button. kortho KGJ X-series H550 AE...
- Page 213 Select the VAR button to enter the variables menu. In the variables menu, there are 5 buttons. Add, Edit, Delete, create Text and create Barcode. Select the Add button to create a variable. kortho H550 AE KGJ X-series Rev.: 007...
- Page 214 First we enter the variable name. This helps to create the variable Text or Barcode later in the process. In this case, the variable name is Line_number. The content of the Text Variable is set to L01. Select OK to add the variable. kortho KGJ X-series H550 AE...
- Page 215 The variable will appear in the variable list on the left. Now select Date to create a Date Variable. In this case we entered production_date as the variable name. The content of the Date Variable is set to Day, Month and Year (2 digits). Select OK to add the variable kortho H550 AE KGJ X-series...
- Page 216 Now select counter to create a Counter Variable. In this case we entered box_counter as the variable name. The content of the Time Variable is set to a regular counter that resets after 99999 boxes. Select OK to add the variable kortho KGJ X-series H550 AE...
- Page 217 All the variables are set and appear in the variable list on the left. Select Ok to go back to the variables main menu. Select the Text button “ABC” to add a text with variable data. kortho H550 AE KGJ X-series...
- Page 218 Select the variables that will be used in the order that they need to appear. In this case, the order of the variable data is set to production_date, current_time, Line_number and box_counter. A preview of the complete string is displayed in the bottom of the screen. kortho I-10 KGJ X-series H550 AE Rev.: 007...
- Page 219 APPENDIX I, USING VARIABLES IN LABELS Select Ok to add the variable text item to the label End of example. kortho I-11 H550 AE KGJ X-series Rev.: 007...
-
Page 221: Appendix J Setting And Using The Security Option
Set the user password (system password required) Enable the security option To set the user password, go to the Settings – Printer page: Select the empty field behind User password. In the next window, enter the system password kortho H550 AE KGJ X-series Rev.: 007... - Page 222 Next, enable the security option. You will be asked to enter the system password to activate the security option. Turn off the controller and switch it back on after 10 seconds. When the controller has booted, one will see the lock screen: kortho KGJ X-series H550 AE...
- Page 223 When the security is disabled, the user password is also cleared. So, when activating the security, one also needs to set the user password again. The system password can be requested from Korthofah bv (or distributor). kortho H550 AE KGJ X-series...
- Page 224 APPENDIX J, SETTING AND USING THE SECURITY OPTION kortho KGJ X-series H550 AE Rev.: 007...
-
Page 225: Appendix K Restore Factory Settings Using Dipswitch
Once the system is running, do not forget to switch the system off and slide dipswitch 4 back to the OFF position again! kortho H550 AE KGJ X-series... - Page 226 APPENDIX K, RESTORE FACTORY SETTINGS USING DIPSWITCH kortho KGJ X-series H550 AE Rev.: 007...
-
Page 227: Appendix L The Automation Feature
One needs to be aware that after PRINT_COMPLETE has been received by the automation application, time is required to rebuild the e.g. new label, send it to the printer and for the printer to generate a bitmap for printing it on the product. kortho H550 AE KGJ X-series... - Page 228 APPENDIX L, THE AUTOMATION FEATURE kortho KGJ X-series H550 AE Rev.: 007...
-
Page 229: Appendix M Selecting And Updating A Label Over Tcp/Ip
PRN, PNL, labels exported from Nicelabel using the windows driver for the X-series • QDL, a legacy format that was used in the past with PC software QicDraw, which is obsolete. • QDM, a multi label format containing labels that will be printed sequentially. kortho H550 AE KGJ X-series Rev.: 007... - Page 230 <CR>, the end of the command (0x1D, CTRL + M) Example: <ESC>03<CR> This will select the label named 03.X18 or 03.X54 or 03.X72 for printing. The controller will respond with “Y<CR>”. If the label does not exist, it will respond with “N<CR>” kortho KGJ X-series H550 AE Rev.: 007...
- Page 231 ▪ U.p.d.a.t.e. .t.e.k.s.t. .i.n. .v.a.r., the actual contents that will be place in FIELD 00 and printed ▪ &%, the dummy CRC characters. (can also be other characters) The controller will respond with: ^..0000019UPDATE_TEXT_FIELD=0## kortho H550 AE KGJ X-series Rev.: 007...
- Page 232 Use the option to show the field numbers to verify that the field numbers of the items that require updating are the same as used in external software that uses these commands. kortho KGJ X-series H550 AE...
-
Page 233: Appendix N Remapping Inputs & Outputs
(default general error can switch 24V / 2A, the other outputs can switch 24V / 300mA). These are the default settings: Outputs: X03-16A-7B Busy X03-14A-5B Ink Out X03-15A-6B Ink Low X03-18A-9B General Error Inputs X03-19A-20B Inhibit X03-13A-4B Trigger kortho H550 AE KGJ X-series Rev.: 007... - Page 234 APPENDIX N, REMAPPING INPUTS & OUTPUTS kortho KGJ X-series H550 AE Rev.: 007...
-
Page 235: Appendix Oec Declaration Of Conformity
EN 60950-1: 2006 + A1: 2010 + A11: 2009 + A12: 2011 + AC: 2011 + A2:2013 following the provisions of the EMC Directive 2014/108/EU Low Voltage Directive 2014/35/EU M.P.J.J. de Groot, Directeur November 30 2015, Katwijk ZH, Nederland kortho H550 AE KGJ X-series Rev.: 007... - Page 236 bv korthofah P.O. box: 3040 2222 AG, Katwijk The Netherlands...
Need help?
Do you have a question about the GraphicJet X Series and is the answer not in the manual?
Questions and answers