Table of Contents
Advertisement
Quick Links
Advertisement
Table of Contents

Related Manuals for Caliber RCD 235BTi


Summary of Contents for Caliber RCD 235BTi
- Page 1 RCD 23 5B T i manual • GB •...
-
Page 2: Table Of Contents
RCD 235BTi manual TABLE OF CONTENTS Dear customer! Thank you for purchasing our product. For safety, it is strongly recommended that this manual is read carefully before connecting, operating and/or adjusting the product. Please keep this manual for reference in the future. -
Page 3: Safety Instructions
RCD 235BTi manual SAFETY INSTRUCTION Caution: To reduce the risk of electric shock, do not remove any covers. No user-serviceable parts inside, refer any servicing to qualified service personnel. IMPORTANT SAFETY INSTRUCTIONS • Read and keep these instructions available for future reference. -
Page 4: Accessories
RCD 235BTi • Manual ACCESSORIES Package will include in the following accessories for installation and operation of the unit (1) Washer, Spring 1 each Washer, M5 Nut (2) Mounting Strap (3) Bolt (4) Screw 4*6 (5) Mounting Sleeve (6) Release Key... -
Page 5: Installing The Unit Into The Iso Dashboard Slot
RCD 235BTi • Manual INSTALLING THE UNIT INTO THE ISO DASHBOARD SLOT Notes: • Choose a mounting location where the unit will not interfere with the normal driving function of the driver. • Before finally installing the unit, connect the wiring temporarily and make sure it is connected properly and the unit and system are working properly. -
Page 6: Installing The Unit
RCD 235BTi • Manual INSTALLING THE UNIT Package will include in the following accessories for installation and operation of the unit Take out screw before installation. • Detach the mounting sleeve (D) and frame (B) from the unit housing. Use the assembly keys (C) to do so. -
Page 7: Removing The Unit
RCD 235BTi • Manual REMOVING THE UNIT To remove the unit, proceed as follows: • Remove the frame. • Insert the right and left hand assembly keys into the respective slots on the sides of the unit. (The locking tabs are now released.) -
Page 8: Wiring Diagram
RCD 235BTi • Manual Wiring Diagram WIRING DIAGRAM CAUTION: 12V DC NEGATIVE GROUND Caution: 12V DC NEGATIVE GROUND Do not connect any speaker wires to the metal body or chassis of the vehicle. Do not connect any speaker wirestot he metal body of chassis of the vehicle. -
Page 9: Control Panel
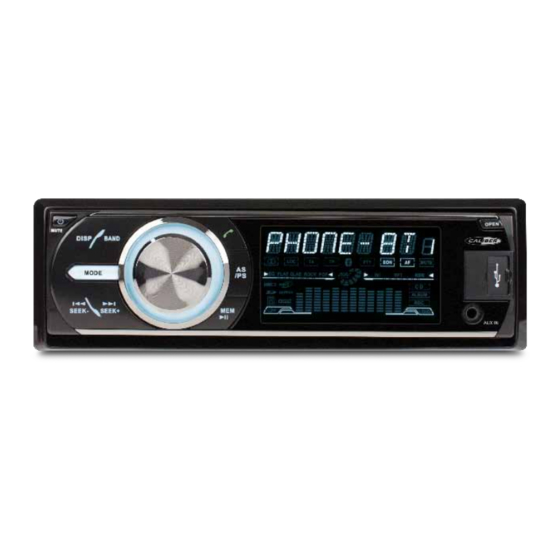
RCD 235BTi • Manual CONTROL PANEL Control panel 1. Power/mute button 8. USB button 2. Disp button / seek- buttons 3. Band button / seek + buttons 4. Vol button 11. Mode button 5. Accept button 12 MEM/PAUSE button 6. AS/PS button 13 LCD 7. -
Page 10: Lcd Layout
RCD 235BTi • Manual LCD Layout LCD Layout 1. Stereo reception indicator 2. EQ type indicator 3. Indicating the played file is MP3 4. Lights up if a USB data storage connected 5. Lights up if a SD/MMC card inserted 6. - Page 11 RCD 235BTi • Manual CONTROL PANEL DETACHING THE CONTROL PANEL Turn the Power off. Press OPEN button to release the panel. Push the panel to the left in 45 degrees and then pull it out towards you. ATTACHING THE CONTROL PANEL Insert the left side of the control panel into the main unit.
- Page 12 RCD 235BTi • Manual SETTINGS OTHER FEATURES Press SEL button and hold on the panel, and then shortly press this button repeatedly to select a setting. Rotate Vol- ume Knob on the panel to adjust each setting, press SEL button to confirm the each setting.
- Page 13 RCD 235BTi • Manual STEREO Rotate the volume knob to select ALARM ON or OFF. Select this mode to switch off the automatic retune. The radio will then emit a double beep sound (ALARM). If a newly tuned station does not broadcast any traffic information for 5 seconds, a beep can be heard.
-
Page 14: Digital Tuner Operations
RCD 235BTi • Manual DIGITAL TUNER OPERATIONS Note: RDS (Radio Data System) service availability varies with areas. Please note that RDS service is not available in Aust & NZ, so the following services are not available. RDS OVERVIEW PI: Program Identification Code – for identifying code. -
Page 15: Disc - Usb/Ipod - Sd Card Operation
RCD 235BTi • Manual DISC - USB/iPOD - SD CARD OPERATION LOADING/EJECTING A DISC Turn the power on. And insert the disc to disc slot with the printed side facing up. Press EJECT button to eject the disc. INSERTING THE SD/MMC CARD/USB DEVICE Insert the SD/MMC card or USB/iPod device into SD/MMC slot or USB socket. -
Page 16: Ipod/Iphone Operation
RCD 235BTi • Manual iPOD/iPHONE OPERATION Original iPod Cable Use only original Apple USB to Dock Connector cables to connect an iPod or iPhone to the USB socket on the unit. The unit turns to iPod/iPhone mode automatically when an iPod is connected. -
Page 17: Radio Operation
RCD 235BTi • Manual HOW TO CONNECT A DEVICE AGAIN AFTER BEING DISCONNECTED To re connect to the unit press the menu button on the phone, and from the Paired Devices list select select “CAR- BT” and press connect. (This operation may vary depending on the phone’s operation. Check your phone manual for instructions on reconnecting with paired devices.) -
Page 18: Memory/Cd Operation
RCD 235BTi • Manual 3. MEMORY /CD OPERATION Note: To enable Memory /CD function, please first insert USB Memory, SD Card or CD. 1. Source display (CD disc Selected) 2. Volume adjustment sidebar. 3. Touch the center of the screen to pause/play the track. -
Page 19: Aux-In Operation
RCD 235BTi • Manual 5. AUX-IN OPERATION Touch AUX IN icon to select AUX IN mode. 6. SET FEATURE (CLOCK) Touch Clock icon to check the current phone clock. 7. SET FEATURE (DISPLAY) Touch Display icon to save screen, touch phone screen again to open screen. -
Page 20: Apple Device Operation
RCD 235BTi • Manual APPLE DEVICE OPERATION (IPHONE, IPOD TOUCH, IPAD) The unit supports operations using the iOS APP “RADIOVIEW1012”. The RADIOVIEW 1012 APP can be downloaded for free from the iTunes APP Store. HOW TO INSTALL THE RADIOVIEW1012 APP •... -
Page 21: Set Feature (Tuner)
RCD 235BTi • Manual 2. SET FEATURE (TUNER) Press icon to set EQ, PLAY, RDS and tuner. RDS and TUNE are only available in Radio mode. Note: RDS (Radio Data System) service availability varies with areas. Please understand if RDS service is not available in your area, the following service is not available, either. - Page 22 RCD 235BTi • Manual 2. SET FEATURE (TUNER) Press icon to set EQ, PLAY, RDS and tuner. RDS and TUNE are only available in Radio mode. Note: RDS (Radio Data System) service availability varies with areas. Please understand if RDS service is not available in your area, the following service is not available, either.
-
Page 23: Memory/Cd Operation
RCD 235BTi • Manual 3. MEMORY /CD OPERATION Note: To enable Memory /CD function, please first insert USB Memory, SD Card or CD. 1. Source display (CD disc Selected) 2. Volume adjustment sidebar. 3. Touch the center of the screen to pause/play the track. -
Page 24: Aux-In Operation
RCD 235BTi • Manual 5. AUX IN OPERATION Tap AUX IN icon to select AUX IN mode. 6. SET FEATURE (CLOCK) Tap Clock icon to check the current phone clock. 7. SET FEATURE (INFO) Tap INFO icon to scan APP version information. -
Page 25: Handling Discs
RCD 235BTi • Manual REDIAL The unit stores the all the incoming call numbers automatically. To access the call list, proceed as follows: Short press BT key to go into BT menu and rotate the VOL knob to show the sequence in below: CALL LIST --> L-DAI. -
Page 26: Specifications And Features
RCD 235BTi • Manual SPECIFICATIONS AND FEATURES USB SECTION GENERAL USB version: 2.0/1.1 compatible device Power supply:DC 14.4V DC (11-16V DC allowable) USB Class:Mass storage/Flash device Grounding System:Negative ground (Earth) File system:FAT 16/32 Current Consumption:<10 Amperes (Typical) Playback Decoding: MP3/WMA/ID3 Tag compatible... - Page 27 RCD 235BTi • Manual Troubleshooting Guide Symptom Cause Remedy Replace with a fuse of the same Power does rating amperage. If the fuse Fuse is blown not turn on. blows again, consult your local (No sound is retailer. produced.) Incorrect wiring Consult your local retailer.
- Page 28 WW W.C aliBE R. nl Parallelweg 2a • 4261 Ga Wijk en aalburg • The netherlands • Tel: +31 416-699 000 • Fax: +31 416-699 001...
Need help?
Do you have a question about the RCD 235BTi and is the answer not in the manual?
Questions and answers