Table of Contents
Advertisement
Quick Links
M
RPX Series Repeater Quick Reference
Guide – RPU2160
This Quick Start User Guide Leaflet is meant
to give you a quick overview of the repeater
parts and functionality. It doesn't intend to
Important
replace the full version of the User and
Installation Guide. You must read the
complete instructions in order to get a proper
installation and performance.
FCC Licensing
This device operates in frequencies that are regulated by
the FCC. Therefore you must obtain a license before
operating the repeater. Please refer to complete
information in the User Guide's FCC section.
Safety Information
Before using this product, read the RF energy
!
awareness information contained in the Safety
and RF exposure booklet P/N 68007024074
C a u t i o n
enclosed with your repeater package.
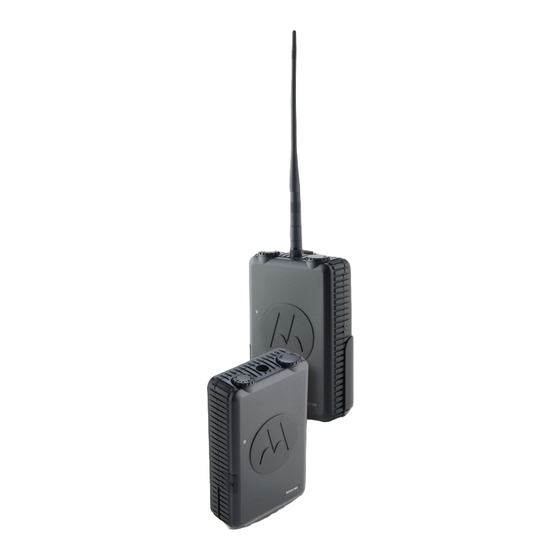
Repeater Overview
Antenna
Connector
Channel
Status LED
Knob
ON/OFF
Indicator
Knob
Battery Frame
Programming
Connector
Model Label
Power LED
DC/AC
Indicator
Connector
Dipole UHF Antenna
AC/DC Power Supply
Wall Mount
Quick Assembly of the Repeater
Remove the screws on each corner on the back of the
repeater and pull out the lid of the alkaline battery frame.
Insert 12 alkaline batteries in each of the compartments
in the alkaline battery frame making sure you follow the
polarity marks inside.
Put back the alkaline battery frame making sure the
screws are tightened well.
Attaching the Dipole Antenna
(P/N HKAE4000)
Align the threaded end of the antenna with the repeater's
antenna connector and turn the antenna bushing
clockwise to fasten it.
Removing/Installing Wall Mount Holster
(P/N 15012009001)
The repeater comes with a wall mount attached on the
back. Remove it by pushing down the hook on the
bottom of the wall mount holster and pulling out from the
repeater. Make sure you install the wall mount on a
stable and flat surface (see details in User Guide). Once
the wall mount is securely installed, slide down the
repeater in the wall mount until it fits securely:
Connecting Power Supply
(P/N PMPN4002)
Plug the AC/DC power supply into an AC power source
of 110/220 V or a 12 V DC power and route it to the
Repeater Jack labeled "AC/DC IN". Make sure the power
supply cable doesn't tangle around the repeater or the
antenna:
Power Supply
Cable
2 ft
Turning On the Repeater
Turn the ON/OFF knob clockwise to turn ON the
repeater. The repeater front LED will blink a red light.
Power Side LED – Repeater with Alkaline Battery Frame
Batteries
AC/DC
LED Status
Detection
Status
Red
No Batteries
AC/DC
(Fast)
Detected
Connected
Steady
Batteries
AC/DC
Detected
Connected
Red
See FRONT
AC/DC
OFF
LED
Connected
CX: Connected to AC/DC
DX: Disconnected from AC/DC
Repeater
Front LED
Status LED (Front LED
)
Transmitting/
Receiving
Receiving Only (*)
Idle
Power Up
Transmit Low
Power
Low Battery
Shutdown
Low Battery
Fatal Error at
Power Up
Unprogrammed
Channel
Non-Repeater
Channel Mode
Note:
(*) This is an abnormal status, as the repeater is only
receiving. Double check your settings to ensure the repeater
is working properly.
Comments
When the battery frame is
empty or the batteries are
dead and AC/DC power is
connected.
Batteries are good and in
place and AC/DC is
connected.
When AC/DC is
disconnected. In this case,
check the FRONT LED for
battery status.
Solid Red
Solid Green
Red (Slow) Blinking
Solid Red 2 – 3
seconds
Solid Orange
Orange (Fast) Blinking
Orange Blinking
1 Green Blink, 1
Orange Blink, 1 Green
Blink, then repeat
Double Red (Slow)
Blinking
1 Red Blink, 1 Green
Blink, then repeat
Advertisement
Table of Contents

Subscribe to Our Youtube Channel
Related Manuals for Motorola RPX Series


Summary of Contents for Motorola RPX Series
-
Page 1: Safety Information
(P/N HKAE4000) Power Side LED – Repeater with Alkaline Battery Frame Batteries AC/DC LED Status Comments Detection Status RPX Series Repeater Quick Reference When the battery frame is Guide – RPU2160 No Batteries AC/DC empty or the batteries are (Fast) Detected... - Page 2 Number of repeater and radio in the channel that is being 1 to 16 Channels 90º programmed. The Motorola RDX and RPX Series radios Ground Reverse Burst 180 to 240 use companding at 12.5 KHz to enhance audio quality. •...
Need help?
Do you have a question about the RPX Series and is the answer not in the manual?
Questions and answers