Table of Contents
Advertisement
Advertisement
Table of Contents

Related Manuals for oticon FittingLINK WP-2


Summary of Contents for oticon FittingLINK WP-2
- Page 1 INSTRUCTIONS FOR USE...
- Page 2 Introduction to this booklet Intended use Thank you for choosing our product as your means to fast, reliable fitting. To support FittingLINK is an accessory to fitting software used when programming wireless hearing your efforts, we have put great care and attention into making sure that FittingLINK instruments.
-
Page 3: Table Of Contents
Contents Instrument view Package content Basic functions - first-time use Turning FittingLINK ON/OFF How to charge FittingLINK Charging FittingLINK with the charger and charging cradle Charging FittingLINK with the charging cradle and USB cable Charging FittingLINK without the charging cradle Battery low indicator Connect to a PC Connect to a PC via the Bluetooth adapter... -
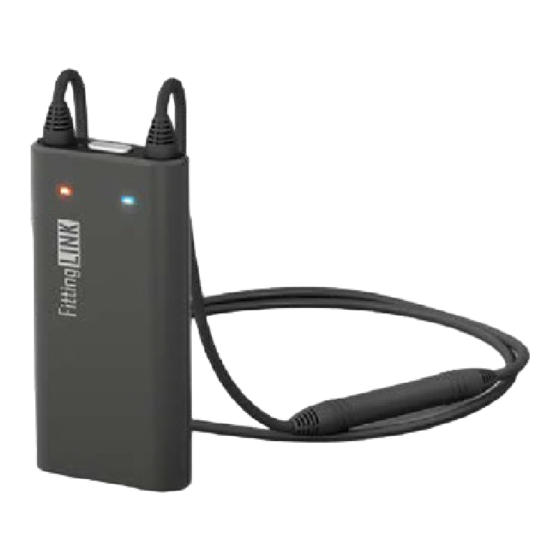
Page 4: Instrument View
Instrument view How to use FittingLINK on children How to use FittingLINK for coupler-based verification using Neck loop ON/OFF hearing instrument analysers Overview of the LED indicators Cleaning and maintenance Warnings Front LED Front LED Technical information FittingLINK indicator - red indicator - blue Technical information Bluetooth adapter Technical information... -
Page 5: Package Content
Package content FittingLINK – what is in the box? The FittingLINK box consists of the following elements: Bluetooth adapter Clip Box 1 Box 2 Box 3 InstructIons for use Charger* USB cable 3 m Charging cradle This guide (Instructions for Use) * Charger will vary from country to country. -
Page 6: Basic Functions - First-Time Use
Basic functions - first-time use Turning FittingLINK ON/OFF Insert the USB cable in the bottom of the charging cradle and the charger is ready for use. Power on Press the ON/OFF button on top of FittingLINK for approx. 2 seconds until you see a green steady light from the top LED and a short red and blue flash from the front LED indicators. -
Page 7: How To Charge Fittinglink
How to charge FittingLINK FittingLINK charging indicator Charging FittingLINK uses an internal rechargeable battery. Top LED Description indicator FittingLINK can be charged either by using the provided charger and charging cradle or by using the USB cable provided. Device on and fully charged When charging FittingLINK for the first time, it should be left to charge for at least two hours even if the top LED indicator on the device shows that the battery is fully charged. - Page 8 Charging FittingLINK with the charger and Charging FittingLINK with the charging cradle and charging cradle USB cable Simply place FittingLINK in the charging cradle when you want to charge FittingLINK with When charging FittingLINK with the provided charging cradle and the USB cable, place the provided charger and charging cradle.
-
Page 9: Charging Fittinglink Without The Charging Cradle
Charging FittingLINK without the charging cradle Please note that if you charge via a USB hub, some hubs do not deliver enough power to actually charge FittingLINK. In this case we recommend use of the provided charger instead. If you prefer not to use the charging cradle when charging FittingLINK, you have the option to insert the USB cable directly into FittingtLINK instead of the charging cradle. -
Page 10: Battery Low Indicator
Battery low indicator The battery should not be drained completely. Keeping the battery fully charged will prolong the capacity of the battery. The battery cannot be replaced by the user. FittingLINK will indicate low battery (approx. 20 minutes programming capacity left) with a steady red light, and very low battery (approx. -
Page 11: Connect To A Pc Via The Bluetooth Adapter
Connect to a PC Connect to a PC via the Bluetooth adapter You can connect FittingLINK to your PC either by using the provided Bluetooth adapter or Make sure that FittingLINK is turned OFF. the USB cable. To obtain wireless connection between FittingLINK and The Bluetooth adapter enables you to connect FittingLINK wirelessly to your computer. -
Page 12: How To Re-Establish Pairing Between Fittinglink And The Bluetooth Adapter
How to re-establish pairing between FittingLINK 2. Press the ON/OFF button on FittingLINK for five seconds and the top LED will light and the Bluetooth adapter ON/OFF up with a flashing blue light. The pairing will begin automatically. FittingLINK must FittingLINK has been paired by the manufacturer with the adapter provided in the be close to the Bluetooth adapter (approx. -
Page 13: Connect To A Pc Via The Usb Cable
Connect to a PC via the USB cable Pairing Top LED Description To connect FittingLINK to your PC with the USB cable, insert the USB cable in the indicator USB port in the bottom of FittingLINK and then insert the other end of the cable in a USB port on your PC. -
Page 14: Fittinglink And Your Fitting Software
FittingLINK and your fitting software How to use FittingLINK When opening your fitting software the first time after FittingLINK has been installed on FittingLINK has been designed to offer the PC, it will be detected as a programming device. you the best possible daily use during programming sessions with and without Depending on which fitting software you are using, FittingLINK is either automatically your clients. - Page 15 Make sure that the neck loop is not curled or touching any electrical wires or equipment At the end of the session and before disconnecting or removing FittingLINK make sure and that the hearing instruments are not touching the neck loop. that you have saved your programming to the hearing instruments.
- Page 16 Programming with a client When opening the neck loop, pull the connectors When you want to program hearing instruments while your client is wearing them, please apart. Do not pull the neck loop antenna. make sure that FittingLINK is sufficiently charged. When you program hearing instruments, the For easy placement, the neck loop can be opened, as shown on the drawing below, neck loop must always be closed as shown in the...
- Page 17 If you experience decreased performance, we recommend that you turn off possible sources of interference. At the end of the session and before disconnecting or removing FittingLINK make sure that you have saved your programming to the hearing instruments. Please consult the fitting software for further guidance.
- Page 18 How to use FittingLINK on children For children who are old enough to provide verbal feedback regarding their hearing instrument, it will be possible to use FittingLINK for programming, real-ear verification or fine-tuning. It is also possible to use FittingLINK with babies or small children. However, the programming process with infants and small children differs from adults since they are not able to provide verbal feedback on their hearing instruments’...
- Page 19 How to use FittingLINK for coupler-based verification using hearing instrument analysers Place FittingLINK in the test chamber. Connect the hearing instrument to the 2cc coupler and place the hearing instrument 5-10 cm away from the outside of the neck loop, as shown here.
- Page 20 Overview of the LED indicators How to read FittingLINK LED indicators. How to read the Bluetooth adapter LED indicator. The top LED indicator is the battery status indicator. Bluetooth adapter Battery status Description Top LED Description indicator indicator Bluetooth adapter active FittingLINK on and battery fully charged Bluetooth adapter searching for in-range FittingLINK Battery charging...
- Page 21 The front LED indicators are programming status indicators. Programming status Front LED Description indicator Connected to right hearing instrument Front LED Communicating with right hearing instrument indicator - red Front LED indicator - blue Connected to left hearing instrument Communicating with left hearing instrument Not connected to the hearing instruments Steady Flash...
- Page 22 Cleaning and maintenance Warnings FittingLINK is a sealed device that requires minimum maintenance. To ensure personal safety and correct use you should familiarise yourself fully with the To ensure high levels of hygiene always disinfect FittingLINK before a programming following general warnings and the entire contents of this booklet before using your session begins.
- Page 23 Warnings Warnings Heat and chemicals FittingLINK must never be exposed to extreme heat e.g. left inside a parked car in the Active Implants sun. FittingLINK must not be dried in microwave ovens or other ovens. The chemicals in FittingLINK has been thoroughly tested and characterised for human health according to cosmetics, hairspray, perfume, aftershave lotion, suntan lotion and insect repellent can international standards for human exposure (Specific Absorption Ratio - SAR), induced damage FittingLINK.
- Page 24 Warnings Warnings Please note that other active FittingLINK devices and wireless hearing instrument Rechargeable battery accessories in proximity may create interference and should be turned off. Do not attempt to open FittingLINK, as it may damage the battery. Use of the neck loop Never attempt to replace the battery.
- Page 25 Technical information FittingLINK USA and Canada This device is certified under: FittingLINK contains a radio transceiver using short-range magnetic induction technology, working at 3.84 MHz and a Bluetooth radio operating at 2.4 GHz. FCC ID: 2ACAHWLP021 IC: 11936A-WLP021 The magnetic field strength of the transmitter is very weak and always below 15 nW [typically below -15 dBμA/m at 10 meter distance].
- Page 26 Technical information Bluetooth adapter Notice: The Bluetooth adapter contains a radio transceiver using Bluetooth Low Energy and Changes or modifications not expressly approved by the party responsible for compliance Bluetooth at 2.4 GHz. The radio transmitter is weak and always below 10mW equal to could void the user’s authority to operate the equipment.
- Page 27 Technical data and conditions of use If this equipment does cause harmful interference to radio or television reception, which can be determined by turning the equipment off and on, the user is encouraged to try to correct the interference by one or more of the following measures: FittingLINK model WP-2 Bluetooth adapter model...
- Page 28 International warranty The manufacturer declares that FittingLINK (WP-2 and BTD 800 USB) is in compliance with the essential requirements and other relevant provisions of Directive 2014/53/EU. Your FittingLINK is covered by an international limited warranty issued by the Declarations of Conformity are available at the manufacturer. manufacturer for a period of 12 months from the date of delivery.
- Page 29 Description of symbols used in this booklet Description of additional symbols used on labels Warnings Keep dry Text marked with a marking symbol must be read before using the product. Indicates a medical device that needs to be protected from moisture. Manufacturer Caution symbol The product is produced by the manufacturer whose name and address are stated next to the...
- Page 30 0000173877000001...
Need help?
Do you have a question about the FittingLINK WP-2 and is the answer not in the manual?
Questions and answers