Table of Contents
Advertisement
Advertisement
Table of Contents

Related Manuals for Bresser 7002531


Summary of Contents for Bresser 7002531
- Page 1 Weather Station · Wind Gauge Instruction manual...
- Page 2 (codi QR) per accedir a les versions disponibles. Deseja um manual detalhado deste produto numa determinada língua? Visite a nossa Website através da seguinte ligação (QR Code) das versões disponíveis. www.bresser.de/P7002531 GARANTIE · WARRANTY · GARANTÍA · GARANZIA www.bresser.de/warranty_terms...
-
Page 3: Table Of Contents
Contents 1 Imprint ................................ 4 2 Validity information ............................ 4 3 About this Instruction Manual........................ 4 4 Parts overview and delivery content - base station .................. 5 5 Parts overview and delivery content - windmeter .................. 6 6 Scope of delivery............................ 6 7 Screen display .............................. 7 8 Before starting operation.......................... 8 9 Setting up power supply.......................... 8 10 Attaching rubber pads ........................... 9... -
Page 4: Imprint
Please be aware that any requests or submissions sent directly to the manufacturer cannot be processed. Errors excepted. Subject to technical modifications. © 2019 Bresser GmbH All rights reserved. Reproduction of this document, including extracts, in any form (photocopied, printed etc.) or the use and distribution of this document by electronic means (image file, website etc.) is not permitted without... -
Page 5: Parts Overview And Delivery Content - Base Station
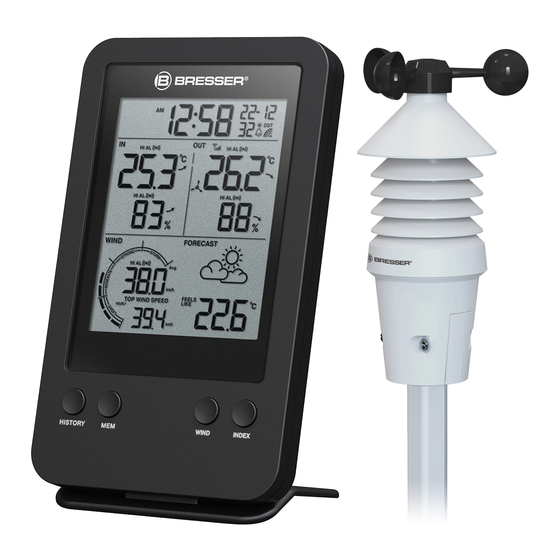
4 Parts overview and delivery content - base station Illustration 1: All parts of the base station 1 SNOOZE/LIGHT button (snooze function 2 Display and backlight) 3 HISTORY button (show hourly records 4 MEM button (show recorded data) for temperature, humidity and wind speed) 5 INDEX button (display change between 6 WIND button (wind speed unit setting or dis-... -
Page 6: Parts Overview And Delivery Content - Windmeter
Recommended batteries (not included):2 pcs. of Mignon batteries (1.5V AA type) 5 Parts overview and delivery content - windmeter Illustration 2: All parts of the windmeter 1 Wind cups 2 Upper housing part 3 Bottom housing part 4 Thick fully threaded screw 5 LED Status indicator (flashes during data 6 Radiation protection slats transmission) -
Page 7: Screen Display
Recommended batteries (not included) Station: 2 pcs. Mignon batteries (1.5V, AA type) Sensor: 3 pcs. Mignon batteries (1.5V, AA type) 7 Screen display Illustration 3: Screen display 1 AM/PM information in 12-hour time mode 2 Current time (hours:minutes:seconds) 3 Date (month-day or reverse) 4 Frost warning enabled 5 Automatic daylight saving time enabled 6 Transmission symbol for radio-controlled clock... -
Page 8: Before Starting Operation
15 Information on 'feels like' temperature, wind 16 Type of wind speed (Avg=average, Gust=cur- chill, dew point and heat index rent gust) 17 Wind speed 18 Top wind speed (hourly, daily, monthly, yearly) 19 Wind speed alarm enabled 20 Wind speed classification (light, moderate, strong, storm) 21 Indoor humidity 22 Indoor humidity alarm enabled... -
Page 9: Attaching Rubber Pads
10 Attaching rubber pads Attach the supplied self-adhesive rubber pads to the clamps as shown to ensure a firmer fitting of the mounting rod. 11 Windmeter installation and mounting Depending on the desired location, the remote sensor can be installed in different ways. NOTICE! During the assembly make sure that the upper part of the wind vane is minimum 1.5 metres off the ground. -
Page 10: Automatic Time Setting
9. Place the mounting base with its bottom site first on the tube and press the tube clamp (counter- part) against the tube from the opposite site. 10. Slide 4 screws through the bore holes of the mounting base and through the bore holes of the tube clamp on the other site. -
Page 11: Snooze Function
16 Snooze function 1. When the alarm sounds, press SNOOZE button to activate the snooze function. The alarm will sound again in 5 minutes. 2. Press ALARM button when the alarm sounds to interrupt the alarm until the alarm time will be reached again. -
Page 12: Weather Trend
Note: 7. The unit will automatically exit setting mode in 5 seconds if no button is pressed. 8. When ALERT alarm is on, the area and type of alarm that triggered the alarm will be flashing and the alarm will sound for 2 minutes. 9. -
Page 13: Wind Chill Factor
calm < 1 km/h | < 1 mph < 1 knots | < 0.3 m/s light air 1.1-5.5 km/h | 1-3 mph 1-3 knots | 0.3-1.5 m/s light breeze 5.6-11 km/h | 4-7 mph 1-3 knots | 0.3-1.5 m/s gentle breeze 12-19 km/h | 8-12 mph 7-10 knots | 3.5-5.4 m/s moderate breeze... -
Page 14: Dew Point
4. *for the currently selected channel 29 EC Declaration of Conformity Hereby, Bresser GmbH declares that the equipment type with item number 7002531 : is in compli- ance with Directive: 2014/30/EU. The full text of the EU declaration of conformity is available at the following internet address: www.bresser.de/download/7002531/CE/7002531_CE.pdf... -
Page 15: Disposal
30 Disposal Dispose of the packaging materials properly, according to their type, such as paper or card- board. Contact your local waste-disposal service or environmental authority for information on the proper disposal. Do not dispose of electronic devices in the household garbage! As per Directive 2012/19/EC of the European Parliament on waste electrical and electronic equipment and its adaptation into German law, used electronic devices must be collected separately and recycled in an environmentally friendly manner. - Page 16 (de preferencia por e-mail: service@bresseruk.com Telephone*: +44 1342 837 098 e-mail). BRESSER UK Ltd e-mail: servicio.iberia@bresser-iberia.es Unit 1 starborough Farm, Teléfono*: +34 91 67972 69 Starborough Road, Nr Marsh Green,...
Need help?
Do you have a question about the 7002531 and is the answer not in the manual?
Questions and answers