
Related Manuals for auna multimedia 10022731


Summary of Contents for auna multimedia 10022731
- Page 1 Bluetooth-Lautsprecher UKW / MW / AUX 10022730 10022731 http://www.auna-multimedia.com...
- Page 2 Sehr geehrter Kunde, wir gratulieren Ihnen zum Erwerb Ihres Gerätes. Lesen Sie die folgenden Hinweise sorgfältig durch und befolgen Sie diese, um möglichen Schäden vorzubeugen. Für Schäden, die durch Missachtung der Hinweise und unsachgemäßen Gebrauch entstehen, übernehmen wir keine Haftung. Sicherheitshinweise Zur Reduzierung der Gefahr von Brand, elektrischem Schlag und Beschädigung: •...
- Page 3 Netzadapter • Der Netzadapter kann mit Wechselstrom von 220 - 240 V betrieben werden. • Verwenden Sie aber einen geeigneten Steckeradapter, wenn der Stecker nicht in die Netzsteckdose passt. Bestimmungsgemäßer Gebrauch Dieses Gerät dient dem Abspielen von Musik. Es ist ausschließlich für diesen Zweck bestimmt und darf nur zu diesem Zweck verwendet werden.
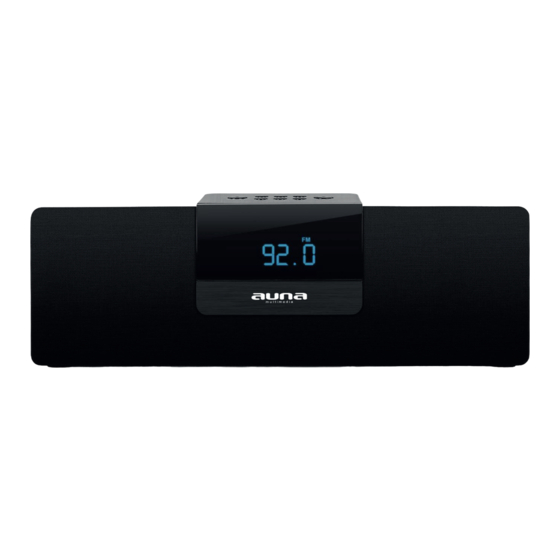
- Page 4 Bedienelemente 1 Modus-Auswahl (Bluetooth, Radio, Line-Eingang) 2 Radiospeicherwahl abwärts (kurz drücken), Radiosendersuche abwärts (gedrückt halten) 3 Aktuellen Radiosender speichern 4 Radiospeicherwahl aufwärts (kurz drücken), Radiosendersuche aufwärts (gedrückt halten) 5 Bluetooth-Verbindung herstellen 6 Abspielen / Pausieren / Lautstärke reduzieren 7 Radiosenderwahl 8 Lautstärke erhöhen 9 Betriebsschalter 10 Netzteil-Eingang...
-
Page 5: Hinweise Zur Entsorgung
2. Drücken Sie den „FM-“ oder „FM+“, um das Frequenzand in 0.1MHZ-Schritten zu durchschreiten. 3. Halten Sie einen dieser beiden Knöpfe gedrückt, um den nächstgelegenen verfügbaren Sender anzusteuern. 4. Das Gerät kann 10 Sender speichern, die Sie durch Drücken von „Preset“ ansteuern können. 5. Drücken Sie zunächst „MEM“, um einen aktuelle Sendefrequenz zu speichern. Wählen Sie anschließend mit „FM-“... -
Page 6: Safety Instructions
Dear Customer, Congratulations on purchasing this equipment. Please read this manual carefully and take care of the following hints to avoid damages. Any failure caused by ignoring the mentioned items and cautions mentioned in the instruction manual are not covered by our warranty and any liability. Safety Instructions To ensure the safety of you and others, please read the Safety Instructions before using this device. -
Page 7: Part Names And Functions
Part Names and Functions 1 Select source (Bluetooth / FM radio / Audio-In) 2 FM- (short press) / Previous available station press and hold) 3 Store current radio station 4 FM+ (short press) / Next available station (press and hold) 5 Bluetooth connection 6 Decrease volume 7 Play / Pause / Select stored radio channels 8 Increase volume 9 Power switch... -
Page 8: Fm Radio Mode
2. Enable Bluetooth on your PC. 3. Select “Devices and Printers” from the Control Panel and click “Add a Device”. 4. Select “Princeton” from the available devices to install drivers. 5. If the Princeton is not automatically set as your output device, select “Sound” from the control panel t hen h ighlight t he P rinceton a nd s elect “... -
Page 9: Troubleshooting
Troubleshooting The problems listed below do not necessarily signify a fault with the device. Please check this list before requesting a repair. Hints on Disposal According to the European waste regulation 2002/96/EG this symbol on the product or on its packaging indicates that this product may not be treated as household was- te. -
Page 10: Consignes De Sécurité
Chère cliente, cher client, Toutes nos félicitations pour l’acquisition de ce nouvel appareil. Veuillez lire attentivement et respec- ter les instructions de branchement et d’utilisation afin d’éviter d’éventuels dommages techniques. Nous ne saurions être tenus pour responsables des dommages dus au non-respect des consignes et à la mauvaise utilisation de l’appareil. Consignes de sécurité... - Page 11 Adaptateur secteur • L’adaptateur secteur fonctionne avec un courant alternatif de 220 – 240 V. • Utiliser adaptateur de fiche adéquat si la fiche ne rentre pas dans la prise secteur. Utilisation conforme Cet appareil sert à lire de la musique. Il n’est destiné qu’à cet usage et ne doit être utilisé que pour cela.
-
Page 12: Éléments De Commande
Éléments de commande 1 Choix du mode (Bluetooth, radio, entrée Line) 4 Choix d’une station de radio enregistrée vers l’avant (appuyer brièvement), rechercher les stations de radio vers l’arrière (maintenir enfoncé) enregistrer les 3 stations de radio actuelles 5 Choix d’une station de radio enregistrée vers l’avant (appuyer brièvement), rechercher les stations de radio vers l’avant (maintenir enfoncé) 6 Établir une connexion Bluetooth 7 Lecture / pause / réduire le volume 8 Choix de la station de radio 9 Augmenter le volume 10 Interrupteur... -
Page 13: Déclaration De Conformité
5.4. Mode radio 1. Appuyer sur le bouton de sélection du mode jusqu’à ce que le symbole FM et la fré quence actuelle s’affi chent sur l’écran. 2. Appuyer sur « FM » ou « FM+ » pour parcourir les fréquences par étapes de 0.1MHZ. 3. Maintenir l’un de ces deux boutons enfoncé pour aller directement à la prochaine station disponible.
Need help?
Do you have a question about the 10022731 and is the answer not in the manual?
Questions and answers