Table of Contents
Advertisement
Available languages
Available languages
Quick Links
with Maintenance Bypass Switch
Models: PDUB15, PDUB20, PDUB30, PDUBHV10, PDUBHV20
PROTECT YOUR INVESTMENT!
Register your product for quicker service and ultimate peace of mind.
You could also win an ISOBAR6ULTRA surge protector-a $100 value!
Copyright © 2019 Tripp Lite. All trademarks are the sole property of their respective owners.
Owner's Manual
Hot-Swap PDU
www.tripplite.com/warranty
1111 W. 35th Street, Chicago, IL 60609 USA • www.tripplite.com/support
1
2
2
4
6
7
7
8
15
22
Advertisement
Chapters
Table of Contents

Related Manuals for Tripp Lite PDUB15


Summary of Contents for Tripp Lite PDUB15
-
Page 1: Table Of Contents
Owner’s Manual Hot-Swap PDU with Maintenance Bypass Switch Models: PDUB15, PDUB20, PDUB30, PDUBHV10, PDUBHV20 Important Safety Warnings Mounting Features Connection & Operation Troubleshooting Service, Warranty & Product Registration Español Français Русский PROTECT YOUR INVESTMENT! Register your product for quicker service and ultimate peace of mind. -
Page 2: Important Safety Warnings
• The PDU must be connected to a wall outlet that is protected by an overcurrent device with the rating shown in the table below: Model Overcurrent Rating of Protection Device Model Overcurrent Rating of Protection Device PDUB15 PDUBHV10 20A ( ) or 16A (CE) PDUB20... - Page 3 Mounting (continued) Step 2. Install 4POSTRAILKIT into the rack using only the top mounting hole at each side of the rear of the 4POSTRAILKIT mounting shelves. (The screws at the front of the shelves will not change from the standard procedure shown in your UPS or 4POSTRAILKIT manual.) Step 2 Step 3.
-
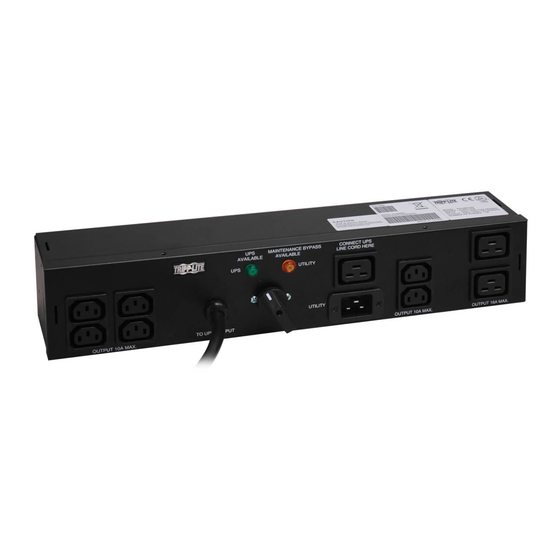
Page 4: Features
Utility Source Input: Connects to the utility power source. Models PDUB15, PDUB20 and PDUB30 each have a fixed input cord and plug. Model PDUBHV10 has a C14 inlet and model PDUBHV20 has a C20 inlet. Models PDUBHV10 and PDUBHV20 both include an extension jumper and can also be used with a user-supplied power cord. - Page 5 Input Plug/ Connection Input Plug/ Model System Rating Cord Length Outlet Cord Length Outlets for Equipment PDUB15 100-127V, Up to 1500VA 5-15P / 10 ft. 5-15R 5-15P / 6 ft. 8 (5-15R) PDUB20 100-127V, 2200-2600VA 5-20P / 10 ft. 5-20R 5-20P / 6 ft.
-
Page 6: Connection & Operation
Connection & Operation Input/Output Power Connections Step 1. Shut down the equipment plugged into the UPS system and unplug the equipment cables from the UPS system. Step 2. Shut down the UPS system and unplug it from the utility source. Step 3. -
Page 7: Troubleshooting
Troubleshooting Use the following chart to make minor adjustments or attempt to solve problems. Do not attempt to open the PDU, as there are no user- serviceable parts inside. If problems persist after troubleshooting, please visit www.tripplite.com/support. Problem Possible Cause Possible Solution Yellow light does not illuminate. -
Page 8: Español
Manual del propietario PDU con cambio en operación e interruptor de rodeo de mantenimiento Modelos: PDUB15, PDUB20, PDUB30, PDUBHV10, PDUBHV20 Advertencias de seguridad importantes Montaje Características Conexión y operación Solución de problemas Servicio y garantía English Français Русский 1111 W. 35th Street, Chicago, IL 60609 USA • www.tripplite.com/support... -
Page 9: Advertencias De Seguridad Importantes
• La PDU se debe conectar a un toma de pared protegido por un dispositivo contra sobrecorriente conforme los valores nominales que se muestran en la siguiente tabla: Valor nominal de sobrecorriente del Valor nominal de sobrecorriente del Modelo dispositivo de protección Modelo dispositivo de protección PDUB15 PDUBHV10 20 A 20A (cTUVus) ó 16A (CE) PDUB20 PDUBHV20 20 A 20A (cTUVus) ó 16A (CE) - Page 10 Montaje (continuación) Paso 2. Instale el 4POSTRAILKIT en el rack usando solo el orificio de montaje superior que se encuentra a cada lado en la parte posterior de los estantes de montaje 4POSTRAILKIT. (La ubicación de los tornillos en la parte frontal de los estantes no será distinta a la del procedimiento estándar que se describe en el manual del UPS o 4POSTRAILKIT.) Paso 2 Paso 3.
-
Page 11: Características
Entrada de fuente red pública: se conecta a la fuente de energía de la red pública. Los modelos PDUB15, PDUB20 y PDUB30 tienen un cable y enchufe de entrada fijos. El modelo PDUBHV10 tiene una entrada C14 y el modelo PDUBHV20 tiene una entrada C20. Los modelos PDUBHV10 y PDUBHV20 incluyen un jumper de extensión y también puede usarse con un cable de alimentación suministrado por el usuario. - Page 12 Modelo compatible de la fuente red pública la fuente UPS Tomacorrientes por equipo PDUB15 100-127V, hasta 1500VA 5-15P / 10 pies (3 m) 5-15R 5-15P / 6 pies (1,8 m) 8 (5-15R) PDUB20...
-
Page 13: Conexión Y Operación
Conexión y operación Conexiones eléctricas de entrada/salida Paso 1. Apague los equipos conectados en el sistema UPS y desenchufe los cables conectados en el UPS. Paso 2. Apague el sistema UPS y desenchúfelo de la fuente de red pública. Paso 3. Fije el interruptor de rodeo de mantenimiento de la PDU en la posición “Utility”... -
Page 14: Solución De Problemas
Solución de problemas Use el siguiente cuadro para realizar ajustes menores o intentar la solución de problemas. No intente abrir la PDU, no tiene partes internas que el usuario pueda reparar. Si los problemas continúan después de la solución de problemas, visite www.tripplite.com/support. Problema Causa posible Solución posible... -
Page 15: Français
Guide de l’utilisateur PDU remplaçable à chaud avec un sectionneur de dérivation pour maintenance Modèles : PDUB15, PDUB20, PDUB30, PDUBHV10, PDUBHV20 Consignes de sécurité importantes Montage Caractéristiques Connexion et fonctionnement Dépannage Service et garantie English Español Русский 1111 W. 35th Street, Chicago, IL 60609 USA • www.tripplite.com/support... -
Page 16: Consignes De Sécurité Importantes
• Le PDU doit être connecté à une prise murale qui est protégée par un dispositif de protection contre les surintensités avec la puissance nominale indiquée dans le tableau ci-dessous : Modèle Dispositif de protection contre les surintensités Modèle Dispositif de protection contre les surintensités PDUB15 PDUBHV10 20 A 20 A (cTUVus) ou 16 A (CE) PDUB20 20 A... - Page 17 Montage (suite) Étape 2. Installer le 4POSTRAILKIT sur le bâti en utilisant uniquement le trou de montage supérieur de chaque côté de l’arrière des étagères de montage 4POSTRAILKIT. (Les vis sur le devant des étagères ne seront pas différentes de la procédure standard indiquée dans le manuel de votre UPS ou 4POSTRAILKIT.) Étape 2 Étape 3.
-
Page 18: Caractéristiques
Entrée de source de secteur : se connecte à la source d’alimentation secteur. Les modèles PDUB15, PDUB20 et PDUB30 possèdent chacun un cor- don et une fiche d’entrée fixe. Le modèle PDUBHV10 possède une entrée C14 et le modèle PDUBHV20 possède une entrée C20. Les modèles PDUB- HV10 et PDUBHV20 comprennent une bretelle d’extension et peuvent être utilisés avec un cordon d’alimentation fourni par l’utilisateur. - Page 19 / Modèle UPS compatible secteur / Longueur du cordon nexion de l'UPS Longueur du cordon Sorties pour l'équipement PDUB15 100-127 V, jusqu’à 1 500 VA 5-15P / 10 pi 5-15R 5-15P / 6 pi 8 (5-15R) PDUB20...
-
Page 20: Connexion Et Fonctionnement
Connexion et fonctionnement Connexions d’alimentation d’entrée / de sortie Étape 1. Mettre hors tension l’équipement branché dans le système UPS, puis débrancher les câbles du système UPS. Étape 2. Mettre hors tension le système UPS, puis le débrancher de la source de secteur. Étape 3. -
Page 21: Dépannage
Dépannage Utiliser le tableau suivant pour effectuer des réglages mineurs ou tenter de résoudre des problèmes. Ne pas essayer d’ouvrir le PDU, puisqu’il n’y a aucun élément à l’intérieur qui puisse être réparé par l’utilisateur. Si les problèmes persistent après le dépannage, veuillez visiter www.tripplite.com/support. Problème Cause possible Solution possible... -
Page 22: Русский
Руководство пользователя Блок PDU с переключателем обходной цепи для «горячей» замены Модели: PDUB15, PDUB20, PDUB30, PDUBHV10, PDUBHV20 Важные меры предосторожности Монтаж Свойства Подключение и эксплуатация Поиск и устранение неисправностей Обслуживание и гарантия English Español Français 1111 W. 35th Street, Chicago, IL 60609 USA • www.tripplite.com/support... -
Page 23: Важные Меры Предосторожности
• Блок PDU должен подключаться к розетке, которая запитана через автомат защиты сети, имеющий номинал, показанный в таблице ниже: Модель Номинал автомата защиты сети Модель Номинал автомата защиты сети PDUB15 PDUBHV10 20 A 20 А (cTUVus) или 16 А (CE) PDUB20... - Page 24 Монтаж (продолжение) Шаг 2. Установить комплект 4POSTRAILKIT в стойку, используя только верхнее монтажное отверстие с каждой стороны задней части монтажных полок комплекта 4POSTRAILKIT. (Крепление винтами передней части полок не отличается от стандартной процедуры, описанной в руководстве по ИБП или 4POSTRAILKIT.) Шаг...
-
Page 25: Свойства
светиться, когда сетевое электропитание подсоединено и в нем присутствует напряжение. Вход от сети: Подключение к источнику сетевого электропитания. Модели PDUB15, PDUB20 и PDUB30 каждая имеют закрепленный сетевой шнур с вилкой. Модель PDUBHV10 имеет входной разъем C14, а модель PDUBHV20 — разъем C20. Модели PDUBHV10 и... - Page 26 подключения чения к ИБП / Розетки для Модель системы ИБП источника/длина шнура ИБП длина шнура оборудования PDUB15 100-127 В, до 1500 ВА 5-15P/ 3 м 5-15R 5-15P/ 1,8 м 8 (5-15R) PDUB20 100-127 В, 2200-2600 ВА 5-20P/ 3 м 5-20R 5-20P/ 1,8 м...
-
Page 27: Подключение И Эксплуатация
Подключение и эксплуатация Подключение силовых входов и выходов Шаг 1. Выключить оборудование, подсоединенное к системе ИБП, и отсоединить его кабели от системы ИБП. Шаг 2. Выключить систему ИБП и отсоединить ее от сети. Шаг 3. Установить переключатель обходной цепи на блоке PDU в положение “Utility” (сеть) и... -
Page 28: Поиск И Устранение Неисправностей
Поиск и устранение неисправностей Следующая таблица используется для внесения небольших исправлений или попыток решения проблем. Нельзя пытаться открыть блок PDU, поскольку в нем не содержатся части, требующие обслуживания пользователем. Если проблема сохраняется после попыток ее решения, посетите веб-сайт www.tripplite.com/support. Проблема Возможная...
Need help?
Do you have a question about the PDUB15 and is the answer not in the manual?
Questions and answers