
Related Manuals for Interquartz 98583


Summary of Contents for Interquartz 98583
- Page 1 All manuals and user guides at all-guides.com LCD FEATURE PHONE Model 98583 OPERATING INSTRUCTIONS...
-
Page 2: Table Of Contents
All manuals and user guides at all-guides.com This Interquartz telephone has been manufactured to very high standards and is very easy to use. Please read this manual carefully to find out how to use the features. Contents 1. Important Notes .................. -
Page 3: Important Notes
This apparatus is intended for use on 2 wire analogue PSTN and PABX circuits within the United Kingdom. Declaration of Conformity Interquartz (UK) Limited declares under its sole responsibility that this product Model: 98583 Is in conformity with the following relevant harmonised standards Health &... -
Page 4: Ren Number
All manuals and user guides at all-guides.com REN number The REN number of this telephone is 1. If you wish to connect any other equipment to the line, simply add the REN numbers of each piece together and ensure that the total does not exceed 4. If too many phones are connected to the line, the circuit may be overloaded and your telephone may not ring. -
Page 5: Installation
All manuals and user guides at all-guides.com 2. Installation This telephone is designed to plug straight into a modular style socket. If you do not have one of these sockets, they can be obtained from your Network Supplier. A card is included for this purpose. Simply complete it and send it to your Network Supplier. -
Page 6: Connection
All manuals and user guides at all-guides.com Connection Insert the line cord into the socket. Set the tone/pulse switch ( located in the base of the telephone, see Figure 2 ) to the appropriate position. If you are unsure as to whether your exchange is pulse or tone, call your Network Supplier and they will advise you. -
Page 7: Telephone Features
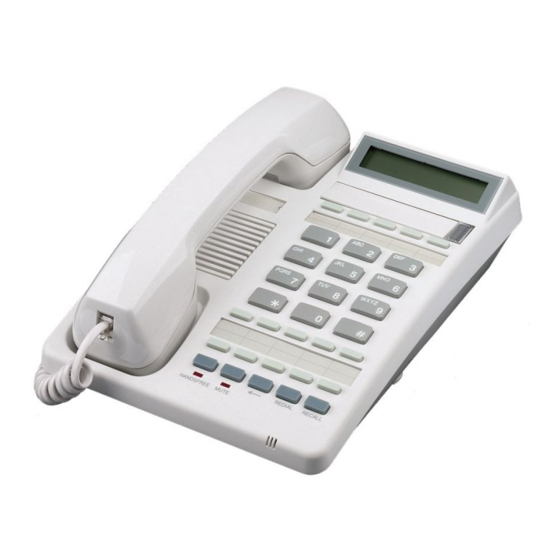
All manuals and user guides at all-guides.com 3. Telephone Features START / STOP, TONE, CLOCK / TIMER, 16-DIGIT LIQUID CRYSTAL ON-OFF HOOK, PAUSE, STORE BUTTON DISPLAY WITH INDICATOR (Beneath Hinged Cover) FLAGS RINGER INDICATOR LIGHT ONE TOUCH AND LED MESSAGE WAIT TWO TOUCH MEMORIES HANDSET RESET BUTTON... - Page 8 All manuals and user guides at all-guides.com Mute button Press to activate the mute circuit, cutting off the speech transmission to the handset ( or handsfree microphone ). Press again to resume normal conversation. The red LED, below the mute button, glows when the call is muted and a MUTE prompt is also displayed on the LCD.
- Page 9 All manuals and user guides at all-guides.com Start / Stop Push to start the timer, push again to stop it. Note, the timer will automatically start when the telephone handset is lifted (or the handsfree button is pressed) and will stop when the handset is replaced. The elapsed time will show on the LCD for a period of 8 seconds and then the display will revert to clock.
-
Page 10: Figure 2 Bottom View
All manuals and user guides at all-guides.com Pause button Introduces a pause of 3.6 seconds during dialling. A maximum of 3 pauses may be inserted, otherwise the telephone may cease to function properly. This feature is storable in memory. Store button Used for storing numbers in the direct access memories. - Page 11 All manuals and user guides at all-guides.com Ringer pitch control Located on the base of the unit ( see Figure 2 ). Rotating this knob alters the pitch of the ringing signal. Ideal where there is more than one phone in a room.
-
Page 12: Operating Instructions
All manuals and user guides at all-guides.com 4. Operating Instructions Manual dialling Lift the handset, listen for the dial tone and then dial the required number using the keypad. The number called will appear on the LCD. On hook dialling In this mode, telephone calls can be made without lifting the handset and the progress of calls can be monitored. -
Page 13: Speakerphone Dialling
All manuals and user guides at all-guides.com Speakerphone dialling The speakerphone can be used for manual dialling in much the same way as the off-hook dialling method : - Press the speakerphone button and the dial tone will be heard in the speaker. -
Page 14: Speed Dialling
All manuals and user guides at all-guides.com When using the memory facilities, this telephone has two audible beeps to advise you of a correct entry - "high tone" or an incorrect entry - "low tone". If you make an incorrect entry, check your error and re-input the information. When entering numbers into these direct access memories you should ensure that you have programmed them correctly, by checking the LCD display. - Page 15 All manuals and user guides at all-guides.com The memories are capable of storing the numbers 0-9, #, *, pause, tone, timed break recall, off-hook, handsfree. If a number in memory begins with an off-hook or a speakerphone code, the associated button becomes a speed dialling button. Pressing the button will turn on the monitor in either handsfree or speakerphone mode.
-
Page 16: Cascade Dialling
All manuals and user guides at all-guides.com Cascade dialling It is possible to dial a number that is contained in more than one memory location or for which you want to dial part of the number manually. e.g. for a very long number split between memory locations 1 and 2 - obtain a dial tone - press memory button 1 - press memory button 2... -
Page 17: Redialling
All manuals and user guides at all-guides.com It is possible to store mixed dialling format numbers in the memory. Simply follow the above procedure, pressing the tone key at the appropriate place. Redialling The telephone number stored in the temporary re-dial buffer will NOT include the off-hook or the Speakerphone codes if these were input manually before a call was made. -
Page 18: Pabx And System Usage
All manuals and user guides at all-guides.com 5. PABX and System Usage This telephone can be used behind a PABX or on a network system that utilises the recall function. There are many such systems and whilst it is likely that no problems will be encountered, it cannot be guaranteed that the telephone will operate correctly under all circumstances and any cases of difficulty should be referred to your supplier. -
Page 19: Automatic Pause Insertion
All manuals and user guides at all-guides.com Automatic pause insertion If your PABX requires a pause after dialling the outside line access code, this can be inserted automatically by programming the telephone. e.g. If the access code is "9", the telephone can be programmed in the following way - press store - press "9"... - Page 20 All manuals and user guides at all-guides.com If for some reason the message light, a bright red LED, comes on with NO message signals received, remove the telephone from the line and adjust the switch marked S1/S2 from the S1 position to the S2 position. When re- connected, the telephone should now function correctly.
-
Page 21: Maintenance And Problem Solving
All manuals and user guides at all-guides.com 6. Maintenance and Problem Solving Your telephone is a precision electronic instrument. Avoid rough handling and extreme temperatures. Use a mild detergent and a damp cloth when cleaning. Never use a stronger cleaner. If your telephone does not appear to be working correctly, please check the following : No dial tone... -
Page 22: Warranty And Service
2001. A warranty is designed to cover either manufacturing faults or component defects. It is not designed to cover fair wear and tear. The Interquartz warranty is no exception. We look to you, our customer, to be reasonable and sensible over the warranty. - Page 23 This warranty is in addition to any statutory rights This telephone is approved to EEC directive 1999/5/EC Distributed in the United Kingdom by Interquartz (UK) Limited Manufactured by International Quartz Limited A Subsidiary of Chiaphua Industries Ltd. ©Copyright INTERNATIONAL QUARTZ LTD. 2000...
Need help?
Do you have a question about the 98583 and is the answer not in the manual?
Questions and answers